How To Make Deer Antlers
Creating your own deer antlers is a satisfying project that combines structural engineering with artistic flair.
I have spent over a decade crafting realistic props for theater productions and high-end costume design.
This guide relies on my personal experience with various materials to ensure your finished product is both durable and visually stunning.
Quick Overview
This project involves building a lightweight internal skeleton and layering it with sculpting materials to mimic the organic growth of bone.
- Time needed: 6 to 8 hours of active work, plus 24 to 48 hours for drying.
- Difficulty: Intermediate
- What you’ll need: Aluminum wire, aluminum foil, air-dry clay or foam clay, acrylic paints, and sandpaper.
Step 1: Gather Reference Images
Before you touch any materials, you must understand the anatomy of the specific deer species you want to replicate.
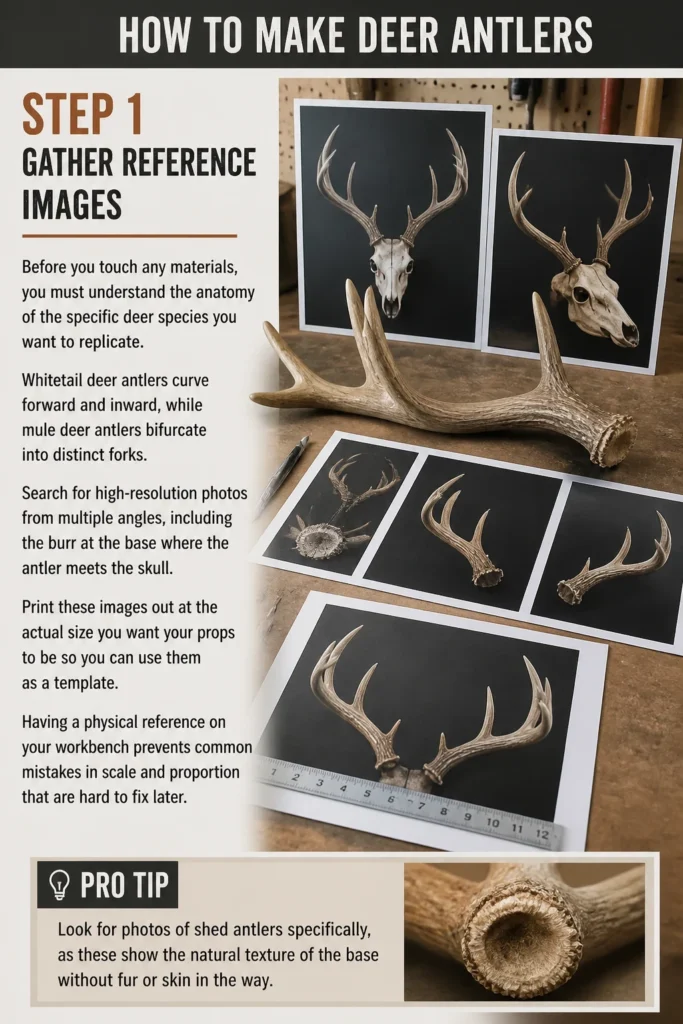
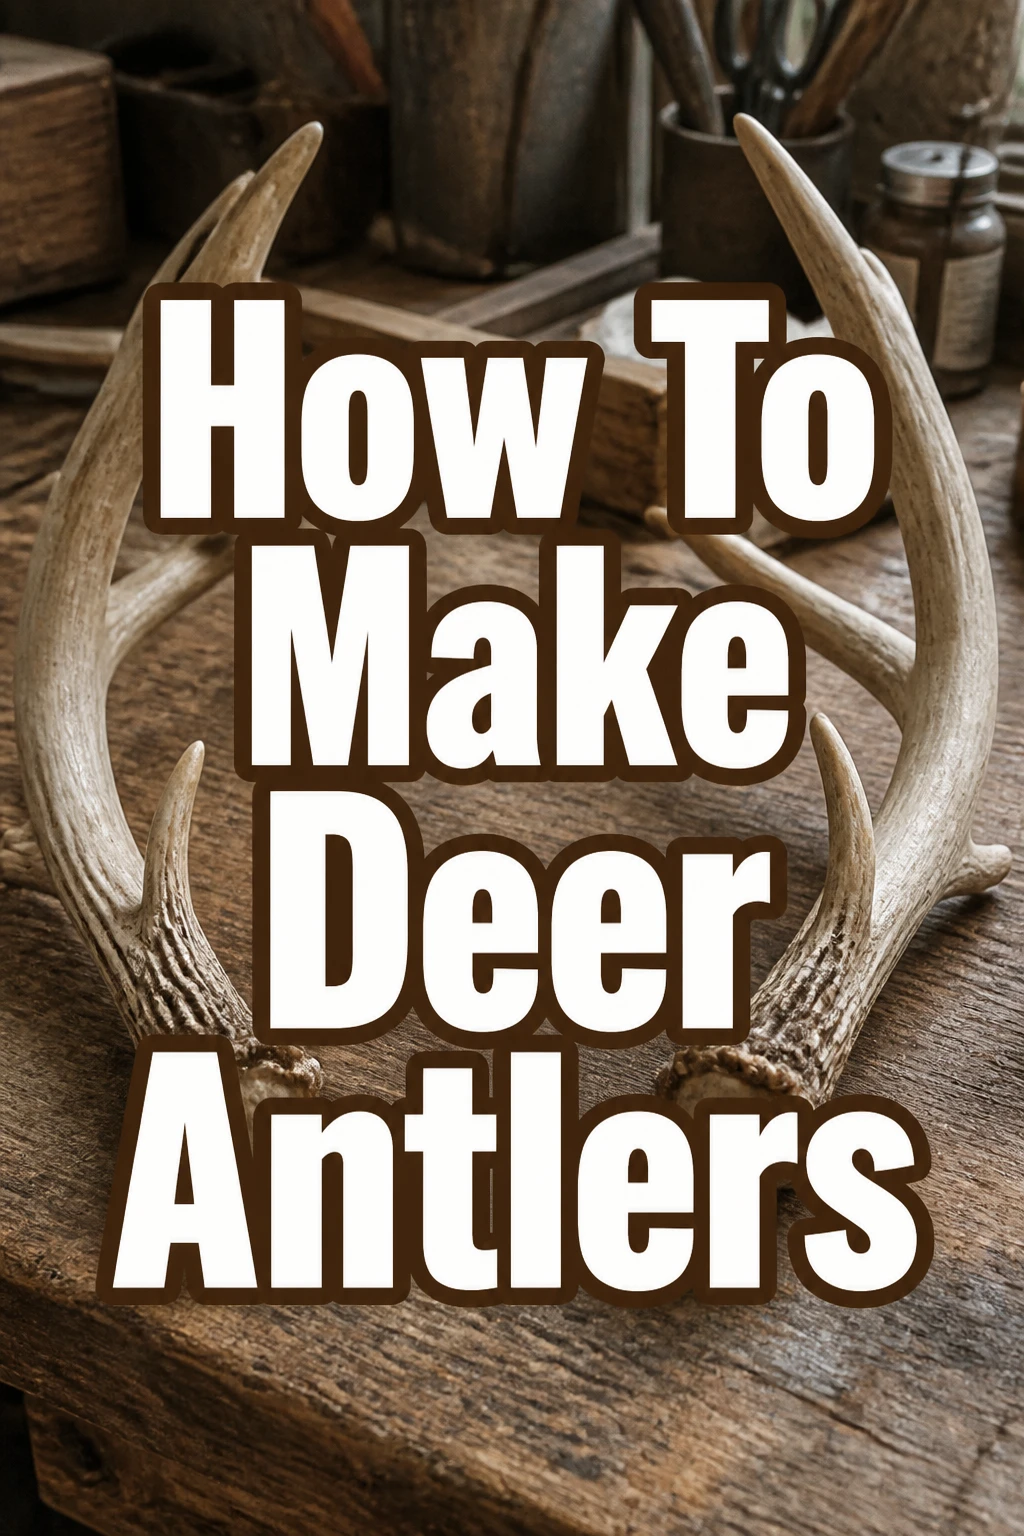
Whitetail deer antlers curve forward and inward, while mule deer antlers bifurcate into distinct forks.
Search for high-resolution photos from multiple angles, including the “burr” at the base where the antler meets the skull.
Print these images out at the actual size you want your props to be so you can use them as a template.
Having a physical reference on your workbench prevents common mistakes in scale and proportion that are hard to fix later.
Pro Tip: Look for photos of “shed” antlers specifically, as these show the natural texture of the base without fur or skin in the way.
Step 2: Construct the Wire Armature
The armature is the skeleton of your antlers and provides the necessary structural integrity to hold the weight of the clay.
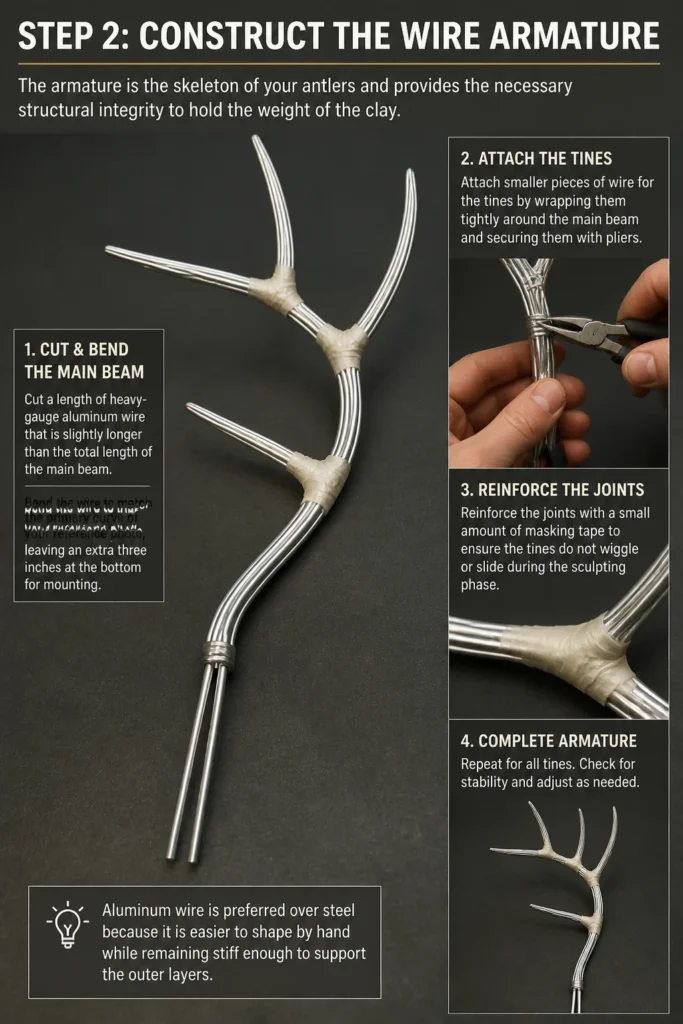
Cut a length of heavy-gauge aluminum wire that is slightly longer than the total length of the main beam.
Bend the wire to match the primary curve of your reference photo, leaving an extra three inches at the bottom for mounting.
Attach smaller pieces of wire for the tines by wrapping them tightly around the main beam and securing them with pliers.
Reinforce the joints with a small amount of masking tape to ensure the tines do not wiggle or slide during the sculpting phase.
Aluminum wire is preferred over steel because it is easier to shape by hand while remaining stiff enough to support the outer layers.
Step 3: Build Volume with Aluminum Foil
Adding clay directly to a thin wire results in a heavy, brittle prop that takes forever to dry.
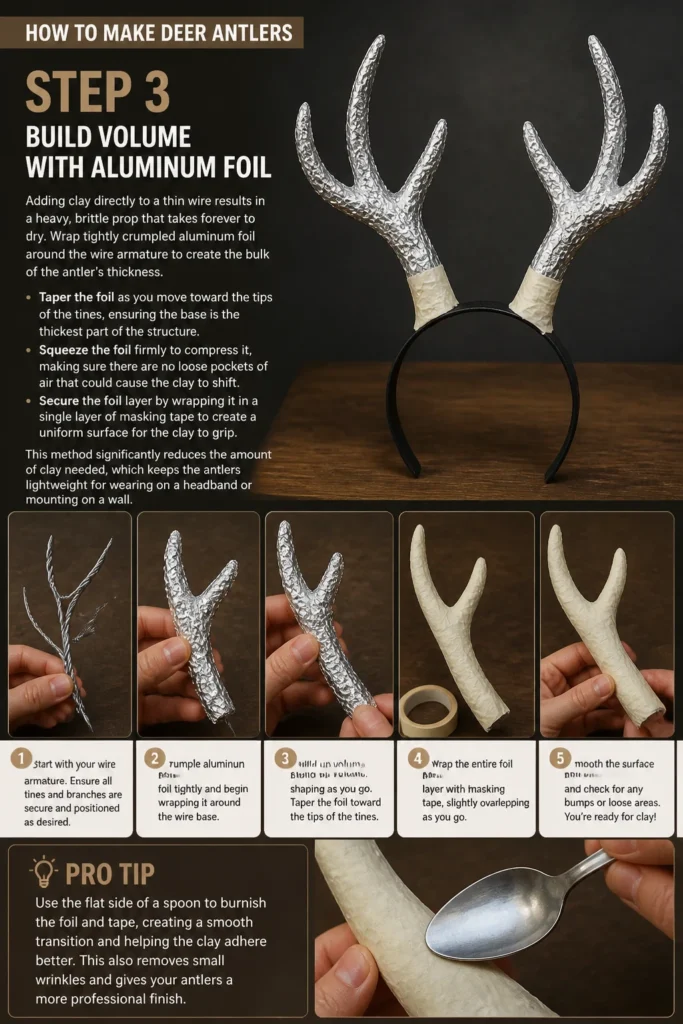
Wrap tightly crumpled aluminum foil around the wire armature to create the bulk of the antler’s thickness.
Taper the foil as you move toward the tips of the tines, ensuring the base is the thickest part of the structure.
Squeeze the foil firmly to compress it, making sure there are no loose pockets of air that could cause the clay to shift.
Secure the foil layer by wrapping it in a single layer of masking tape to create a uniform surface for the clay to grip.
This method significantly reduces the amount of clay needed, which keeps the antlers lightweight for wearing on a headband or mounting on a wall.
Pro Tip: Use the flat side of a spoon to burnish the foil and tape, creating a smooth transition between the tines and the main beam.
Step 4: Apply the Sculpting Material
Now you will transform the metallic skeleton into an organic shape using your chosen clay.
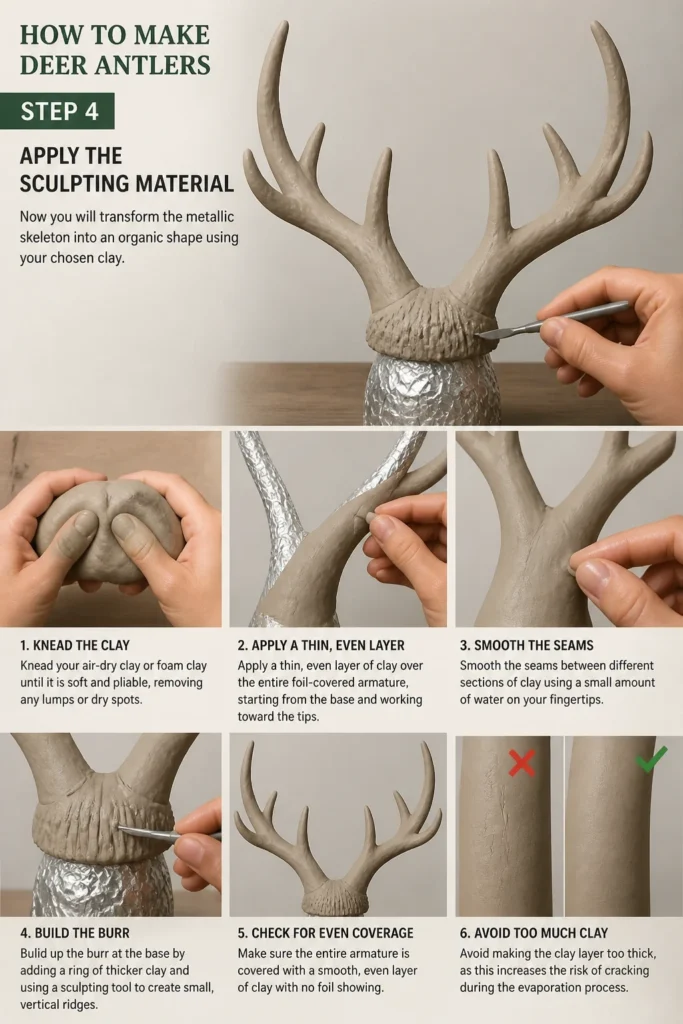
Knead your air-dry clay or foam clay until it is soft and pliable, removing any lumps or dry spots.
Apply a thin, even layer of clay over the entire foil-covered armature, starting from the base and working toward the tips.
Smooth the seams between different sections of clay using a small amount of water on your fingertips.
Build up the “burr” at the base by adding a ring of thicker clay and using a sculpting tool to create small, vertical ridges.
Avoid making the clay layer too thick, as this increases the risk of cracking during the evaporation process.
Step 5: Carve Realistic Textures
Real antlers are not perfectly smooth; they feature long grooves and a porous, pitted texture near the base.
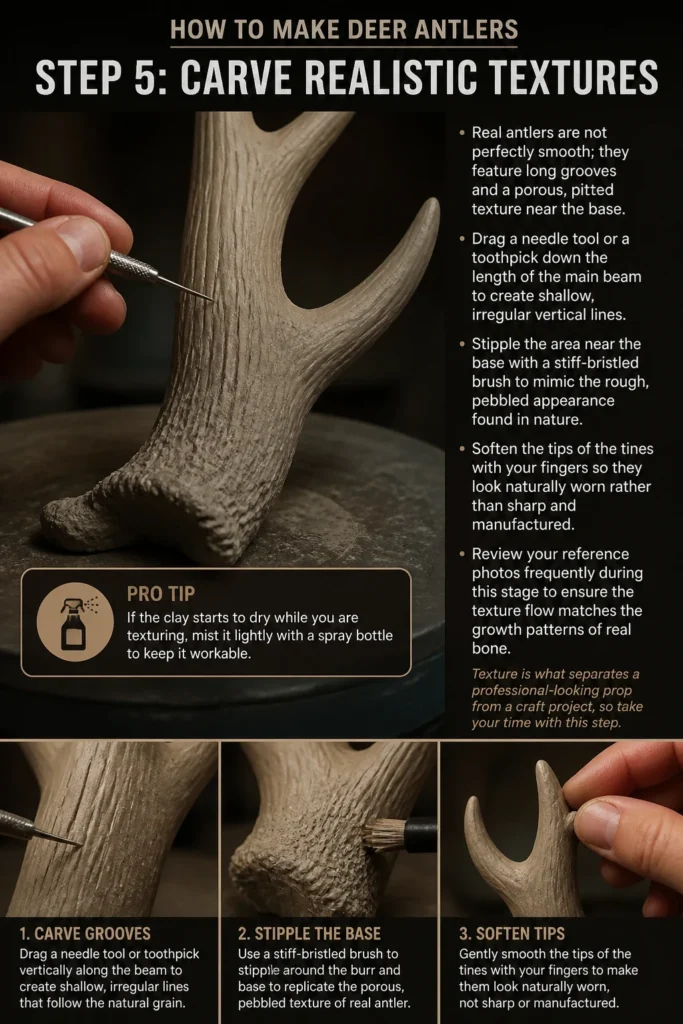
Drag a needle tool or a toothpick down the length of the main beam to create shallow, irregular vertical lines.
Stipple the area near the base with a stiff-bristled brush to mimic the rough, pebbled appearance found in nature.
Soften the tips of the tines with your fingers so they look naturally worn rather than sharp and manufactured.
Review your reference photos frequently during this stage to ensure the texture flow matches the growth patterns of real bone.
Texture is what separates a professional-looking prop from a craft project, so take your time with this step.
Pro Tip: If the clay starts to dry while you are texturing, mist it lightly with a spray bottle to keep it workable.
Step 6: Allow for Proper Drying
Patience is the most difficult part of the process but is essential for a durable finished product.
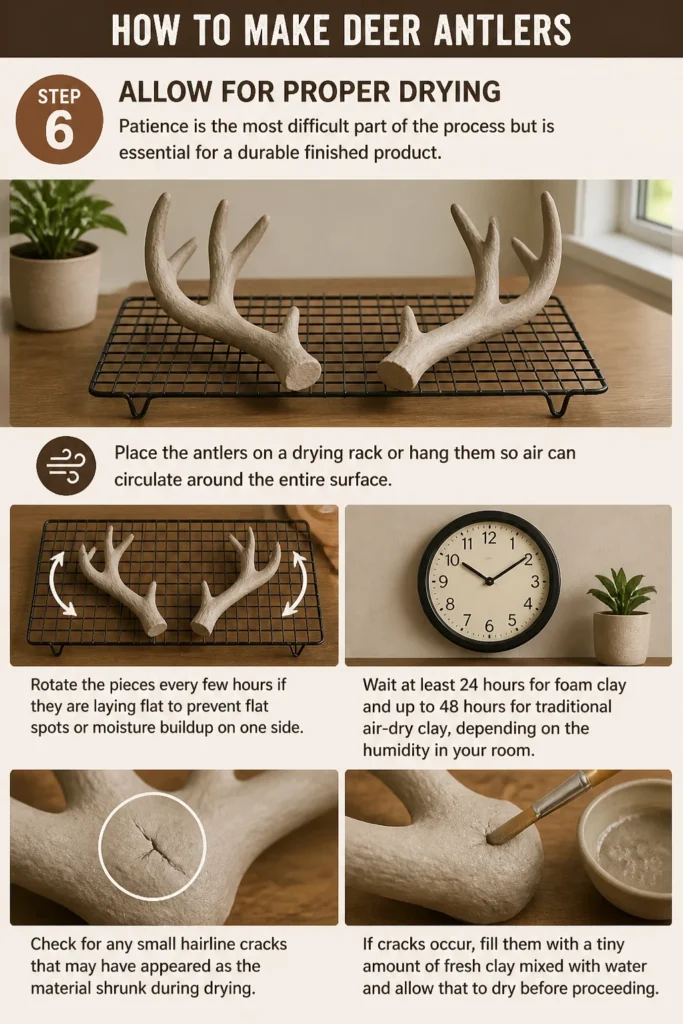
Place the antlers on a drying rack or hang them so air can circulate around the entire surface.
Rotate the pieces every few hours if they are laying flat to prevent flat spots or moisture buildup on one side.
Wait at least 24 hours for foam clay and up to 48 hours for traditional air-dry clay, depending on the humidity in your room.
Check for any small hairline cracks that may have appeared as the material shrunk during drying.
If cracks occur, fill them with a tiny amount of fresh clay mixed with water and allow that to dry before proceeding.
Step 7: Sanding and Refining
Once the antlers are completely dry and hard, you can refine the shape and remove any unwanted bumps.
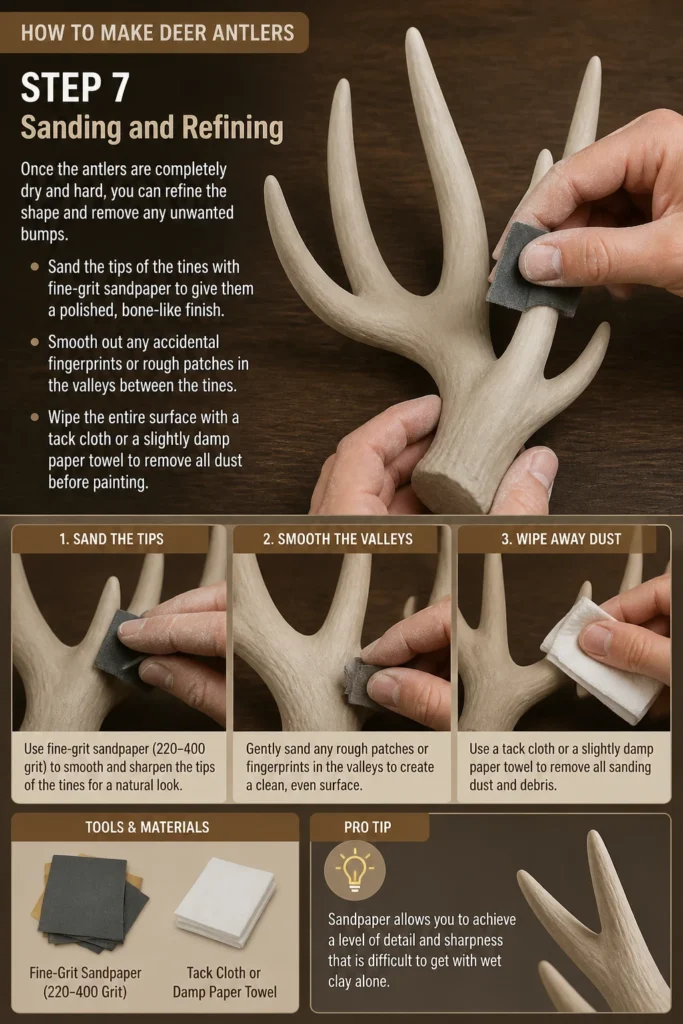
Sand the tips of the tines with fine-grit sandpaper to give them a polished, bone-like finish.
Smooth out any accidental fingerprints or rough patches in the “valleys” between the tines.
Wipe the entire surface with a tack cloth or a slightly damp paper towel to remove all dust before painting.
Sandpaper allows you to achieve a level of detail and sharpness that is difficult to get with wet clay alone.
Step 8: Apply the Base Coat
Painting antlers requires a layering technique to capture the depth of natural bone coloration.
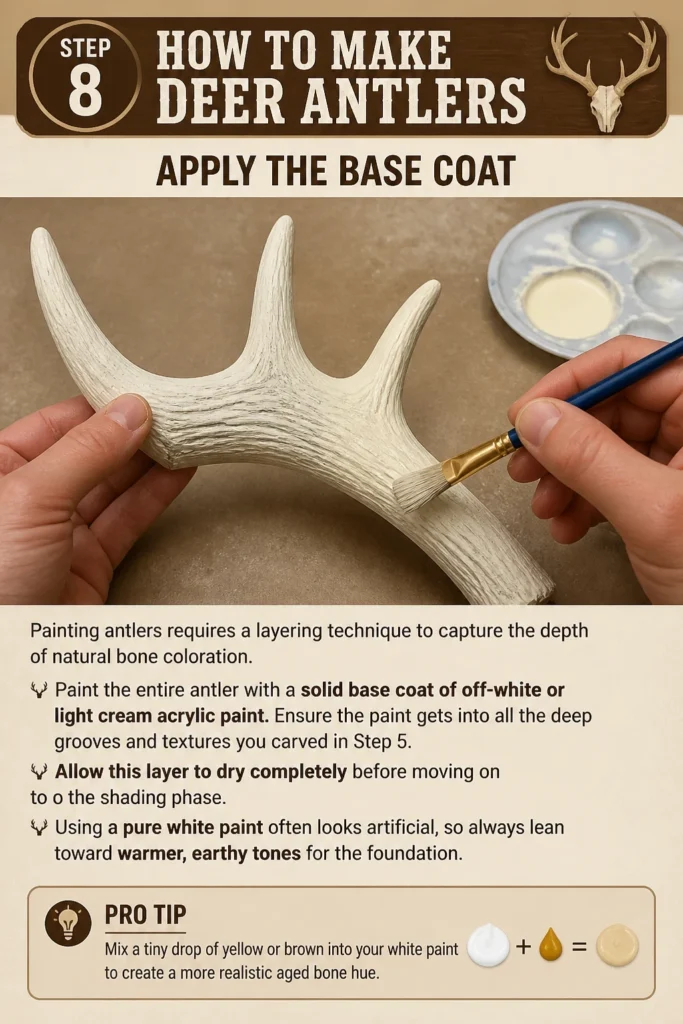
Paint the entire antler with a solid base coat of off-white or light cream acrylic paint.
Ensure the paint gets into all the deep grooves and textures you carved in Step 5.
Allow this layer to dry completely before moving on to the shading phase.
Using a pure white paint often looks artificial, so always lean toward warmer, earthy tones for the foundation.
Pro Tip: Mix a tiny drop of yellow or brown into your white paint to create a more realistic “aged bone” hue.
Step 9: Layering Color with Washes
Real antlers are darker at the base and lighter at the tips because of the way they rub against trees.
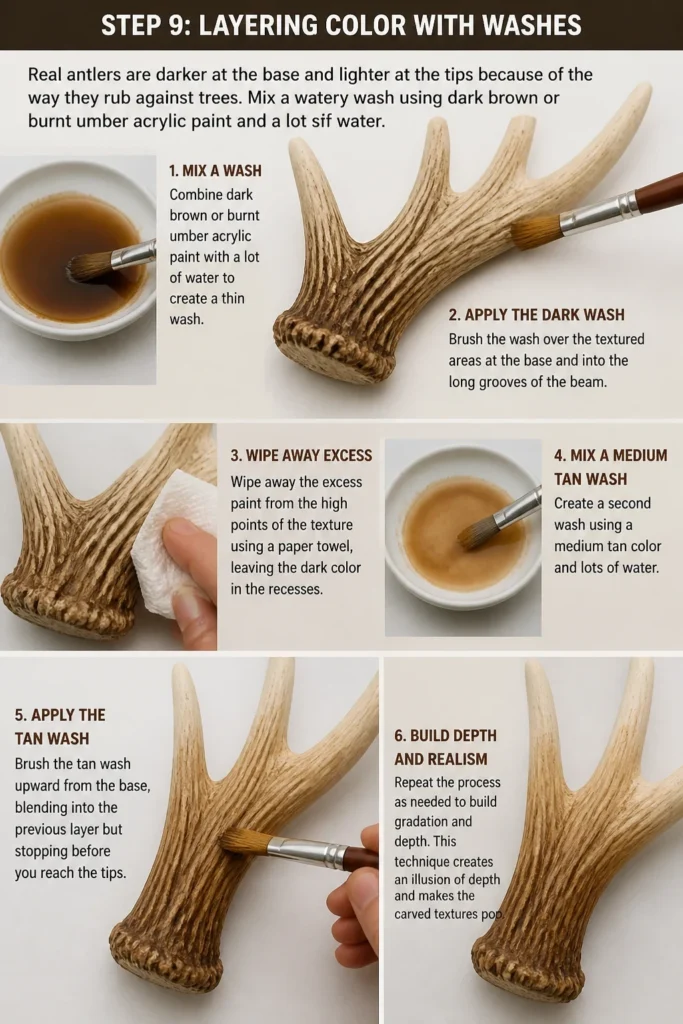
Mix a watery “wash” using dark brown or burnt umber acrylic paint and a lot of water.
Brush this wash over the textured areas at the base and into the long grooves of the beam.
Wipe away the excess paint from the high points of the texture using a paper towel, leaving the dark color in the recesses.
Repeat this process with a medium tan color, blending it upward but stopping before you reach the tips.
This technique creates an illusion of depth and makes the carved textures pop.
Step 10: Final Highlights and Sealing
The final step brings the project together by emphasizing the points and protecting your hard work.
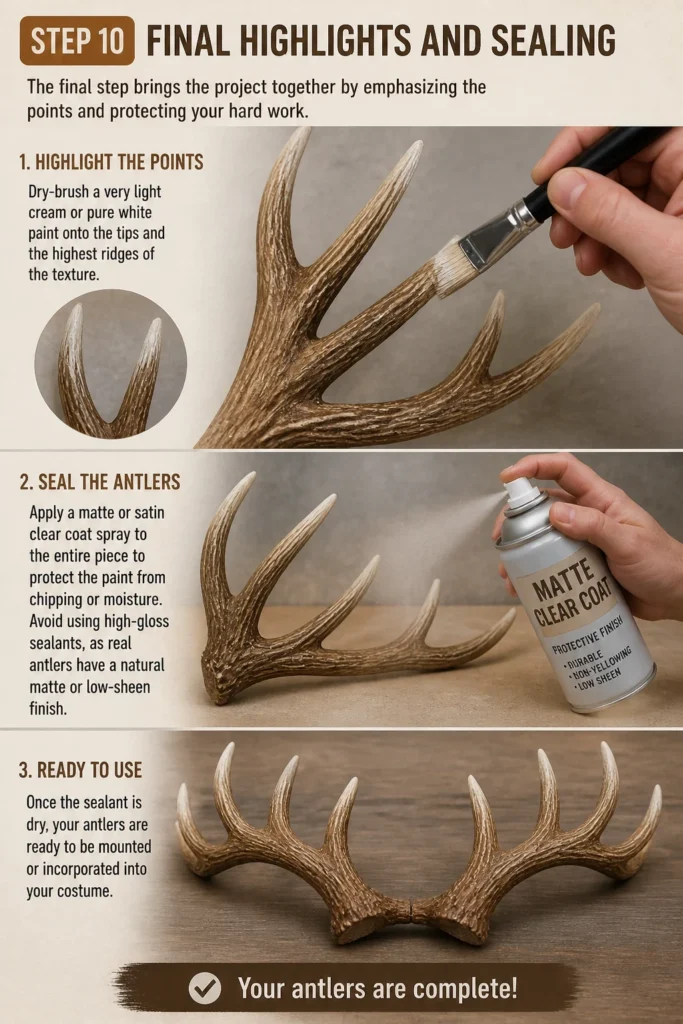
Dry-brush a very light cream or pure white paint onto the tips and the highest ridges of the texture.
Apply a matte or satin clear coat spray to the entire piece to protect the paint from chipping or moisture.
Avoid using high-gloss sealants, as real antlers have a natural matte or low-sheen finish.
Once the sealant is dry, your antlers are ready to be mounted or incorporated into your costume.
Common Mistakes to Avoid
Using Heavy Materials
Many beginners use solid clay or wood, which results in antlers that are far too heavy to wear comfortably. This puts immense strain on the neck or requires a bulky, unsightly harness to keep them upright.
Always use a hollow or foil-filled core to keep the weight at a minimum while maintaining the desired thickness. Lightweight foam clay is the best option for wearable pieces.
Perfect Symmetry
In nature, antlers are almost never perfectly symmetrical. Trying to make the left and right sides identical often makes the final product look like a plastic toy rather than a biological growth.
Allow for slight variations in the angle of the tines and the flow of the texture to give the piece a more organic and believable appearance. Embrace the small imperfections that occur during the sculpting process.
Skipping the Sanding Phase
Leaving the clay exactly as it dried often results in visible fingerprints or “lumpy” transitions that ruin the realism. Sanding is the bridge between a rough sculpt and a professional prop.
Taking ten minutes to smooth the tips and refine the edges makes a massive difference in how the light hits the finished piece. Never underestimate the power of a fine-grit sanding sponge.
Troubleshooting
The Clay is Cracking
Cracking usually happens when the outer layer of clay dries much faster than the inner layer or when the clay is applied too thickly. This is common in dry climates or if you use a heater to speed up the process.
To fix this, mix a small amount of clay with water to create a paste known as “slurry.” Press this paste into the cracks, smooth it out, and let it dry naturally at room temperature.
The Antlers Feel Wobbly
If the tines or the main beam feel loose, it means the internal wire armature was not secured tightly enough at the joints. This can lead to the clay cracking or the entire piece snapping under its own weight.
Before the clay dries, you can sometimes reinforce the base with a bit of hot glue or two-part epoxy. If the clay is already dry, you may need to drill a small hole, insert a support wire, and patch the area with fresh clay.
The Paint Looks Flat and Fake
A flat appearance is usually the result of using only one or two colors without enough contrast. Real bone has a complex variety of tones ranging from deep mahogany to pale ivory.
Add another layer of very diluted dark wash to the deepest crevices. Then, use the dry-brushing technique with a lighter color than your base coat to catch the light on the edges.
Key Takeaways
- Reference is vital: Use real photos to guide your shape and texture for a professional result.
- Lightweight is better: Use an aluminum foil core to save on material and reduce the overall weight.
- Texture adds realism: Spend time carving grooves and stippling the base to mimic natural bone growth.
- Layer your paint: Use washes and dry-brushing instead of solid colors to create depth and dimension.
- Be patient: Allow full drying times to prevent structural failure and cracking.
- Seal your work: A matte finish protects the paint and provides a realistic, non-plastic sheen.
Frequently Asked Questions
What is the best type of clay for making antlers?
For wearable antlers, foam clay is the superior choice because it is incredibly lightweight and slightly flexible when dry. If you are making a wall-mounted decor piece, a high-quality air-dry clay provides a more rigid, stone-like feel that is easier to sand to a high polish.
How do I attach the antlers to a headband?
The best method is to leave a few inches of the internal wire armature extending from the base of the antler. You can then drill small holes in a sturdy plastic headband, poke the wires through, and wrap them securely around the band before covering the joint with more clay or felt.
Can I use real deer antlers for my project?
While you can use real sheds, they are often very heavy and difficult to drill into without specialized tools. Making your own allows you to customize the size, weight, and shape to perfectly fit your specific needs while remaining animal-friendly.
How do I make the antlers look “old”?
To achieve an aged or “weathered” look, use more grey and light brown washes rather than dark mahogany. You can also add a few tiny “chew marks” with a hobby knife near the tips to simulate the way squirrels or rabbits gnaw on shed antlers in the wild.
Our Top Recommended Finds
- 12-Gauge Aluminum Craft Wire: This provides the perfect balance of flexibility and strength for your internal armature.
- Professional Foam Clay: This air-dries to a velvet-like finish and is light enough for all-day wear on a headpiece.
- Acrylic Paint Wash Set: A set of pre-thinned brown and black washes will help you achieve realistic depth without having to mix your own.
Bringing Your Vision To Life
Now that you have the technical knowledge to build a set of realistic antlers, it is time to start your build. Focus on the organic flow of the tines and do not be afraid to experiment with different textures during the sculpting phase.
Once you master this technique, you can apply it to other projects like ram horns, fantasy creature spikes, or even realistic tree branches. Grab your wire and clay today and start shaping your next masterpiece.