How To Make Earrings
Creating your own earrings is a wonderfully rewarding craft.
It lets you express your unique style and wear something truly original.
I’ve spent countless hours at my workbench, turning simple wires and beads into wearable art, and I’m excited to share how you can do the same.
Quick Overview
This guide will walk you through crafting beautiful, custom dangle earrings, perfect for beginners.
You will learn the fundamental techniques of jewelry making, creating pieces you’ll be proud to wear or gift.
- Time needed: 1-2 hours for your first pair
- Difficulty: Beginner
- What you’ll need: Jewelry pliers (round-nose, chain-nose, flush cutters), jewelry wire, beads, headpins or eyepins, and ear wires.
Step-by-Step Instructions
Step 1: Gather Your Materials
Before you begin, lay out all your chosen components on a clean, well-lit surface.
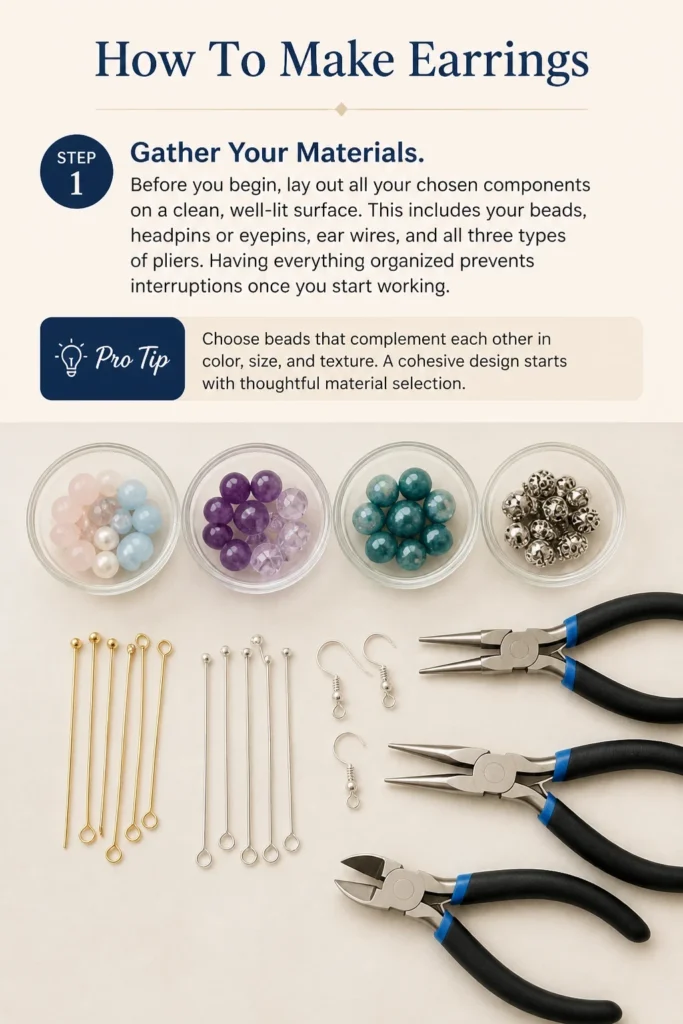
This includes your beads, headpins or eyepins, ear wires, and all three types of pliers.
Having everything organized prevents interruptions once you start working.
Pro Tip: Choose beads that complement each other in color, size, and texture. A cohesive design starts with thoughtful material selection.
Step 2: Plan Your Design
Visualize how your finished earring will look. If you’re using multiple beads, arrange them on your workspace in the order you want them to appear on the headpin.
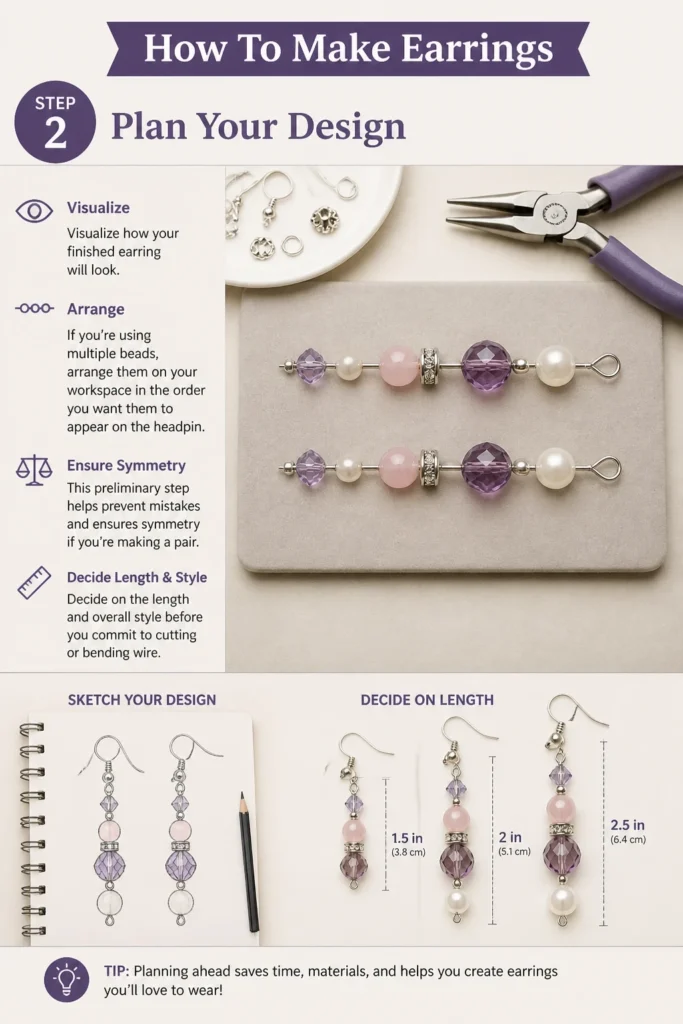
This preliminary step helps prevent mistakes and ensures symmetry if you’re making a pair.
Decide on the length and overall style before you commit to cutting or bending wire.
Step 3: Prepare Your Headpins or Eyepins
Slide your chosen beads onto a headpin or eyepin. If you’re using a headpin, the flat or decorative end will secure the bottom bead.
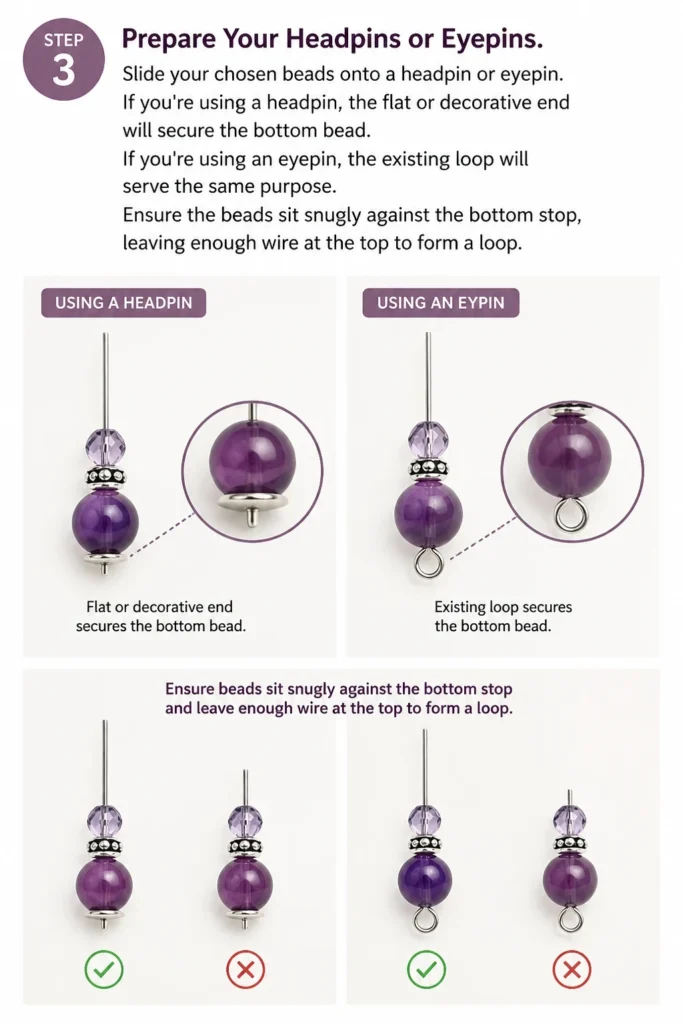
If you’re using an eyepin, the existing loop will serve the same purpose.
Ensure the beads sit snugly against the bottom stop, leaving enough wire at the top to form a loop.
Step 4: Trim Excess Wire
With your beads securely on the pin, use your flush cutters to trim the wire, leaving about 3/8 to 1/2 inch (approximately 1 cm) of wire above the last bead.
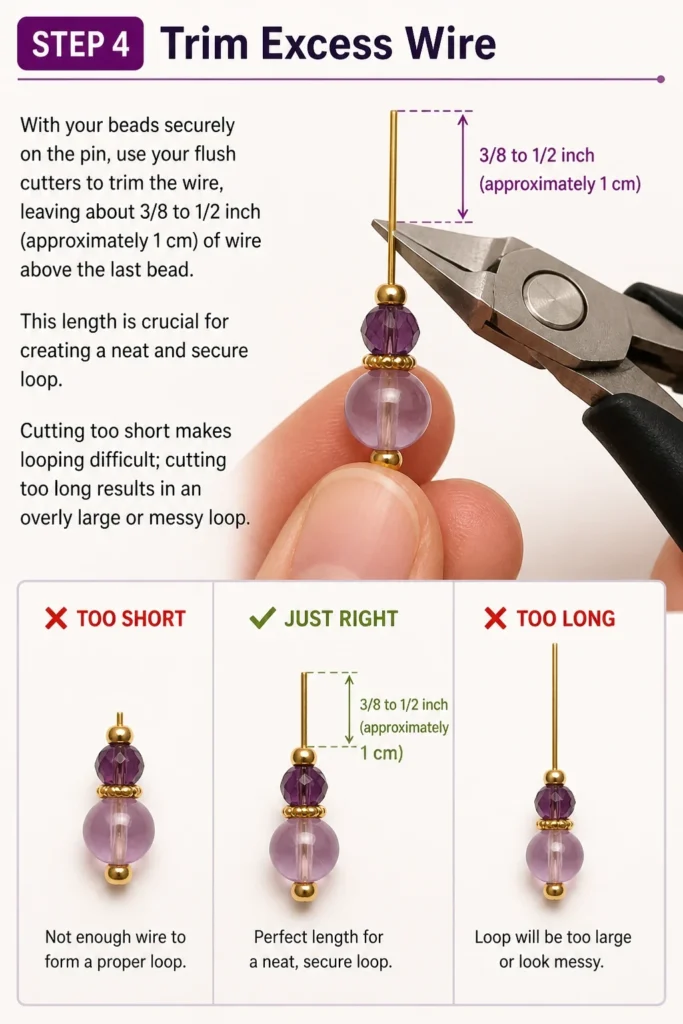
This length is crucial for creating a neat and secure loop.
Cutting too short makes looping difficult; cutting too long results in an overly large or messy loop.
Step 5: Create the First Loop
Grasp the very tip of the remaining wire with your round-nose pliers.
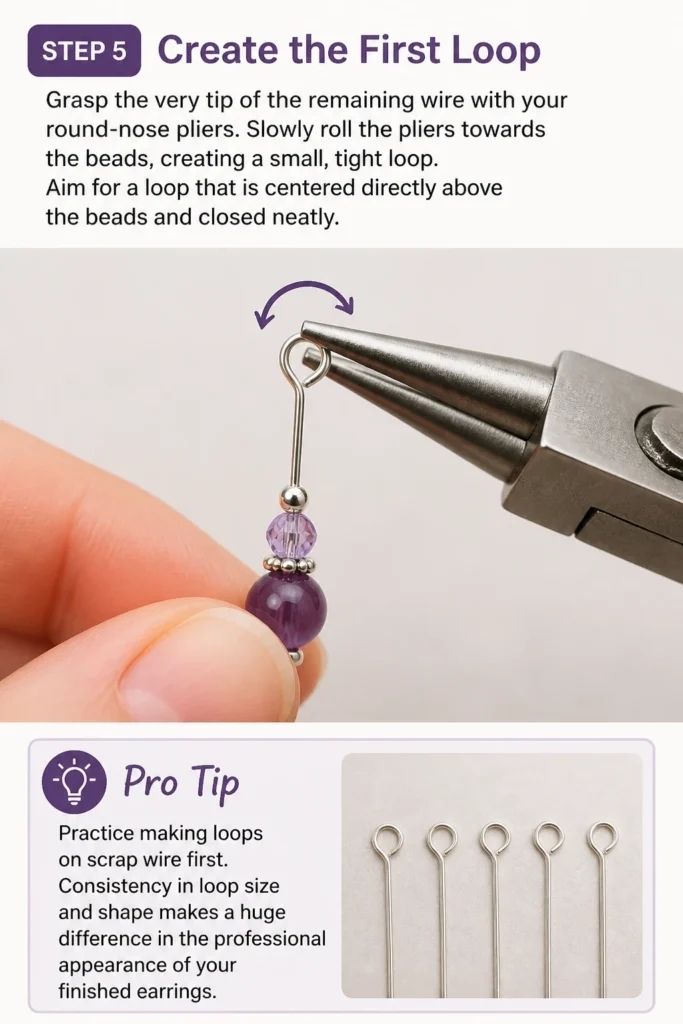
Slowly roll the pliers towards the beads, creating a small, tight loop.
Aim for a loop that is centered directly above the beads and closed neatly.
Pro Tip: Practice making loops on scrap wire first. Consistency in loop size and shape makes a huge difference in the professional appearance of your finished earrings.
Step 6: Open the Ear Wire Loop
Take one of your ear wires. Using your chain-nose pliers, gently twist open the small loop at the bottom of the ear wire.
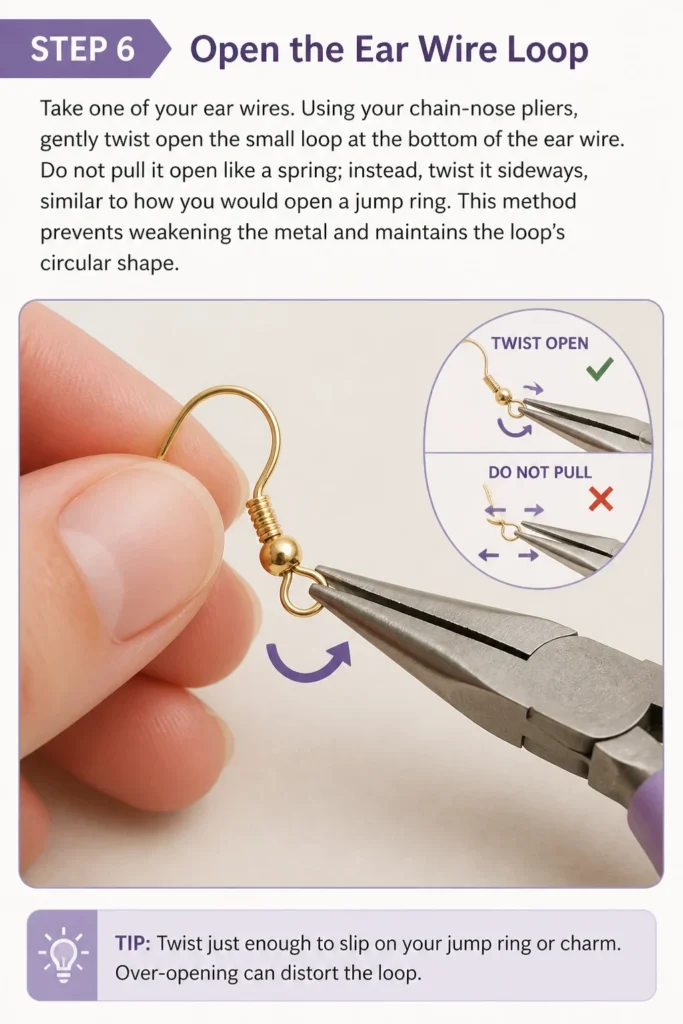
Do not pull it open like a spring; instead, twist it sideways, similar to how you would open a jump ring.
This method prevents weakening the metal and maintains the loop’s circular shape.
Step 7: Attach Your Beaded Dangle
Carefully slide the loop you created on your beaded headpin onto the opened loop of the ear wire.
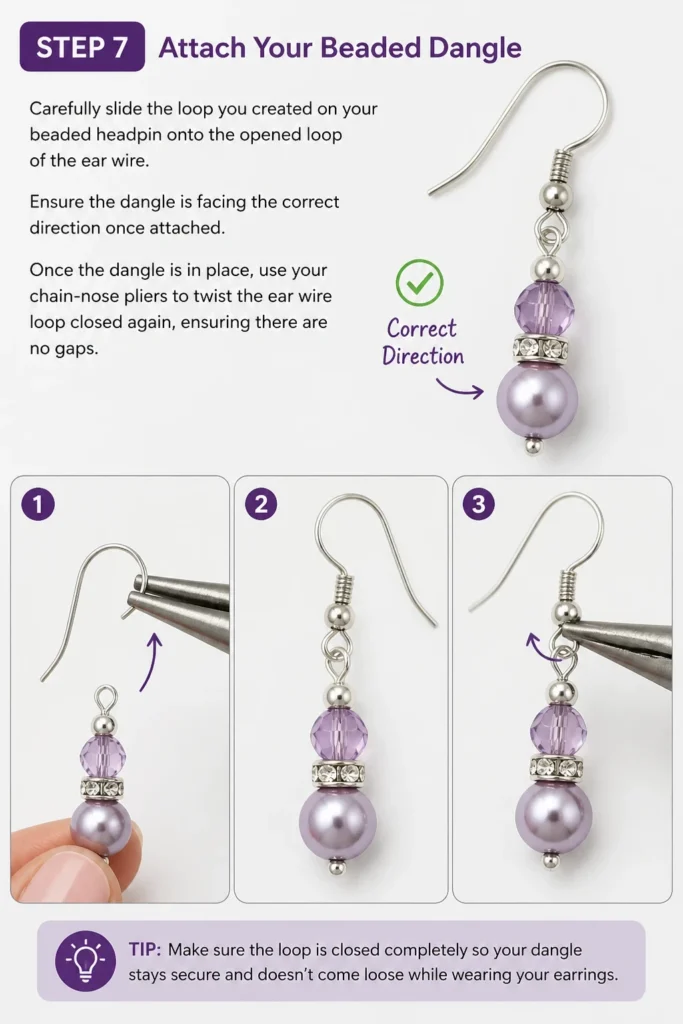
Ensure the dangle is facing the correct direction once attached.
Once the dangle is in place, use your chain-nose pliers to twist the ear wire loop closed again, ensuring there are no gaps.
Step 8: Finish the Second Earring and Inspect
Repeat Steps 3 through 7 for your second earring, striving for symmetry in bead placement, wire trimming, and loop formation.
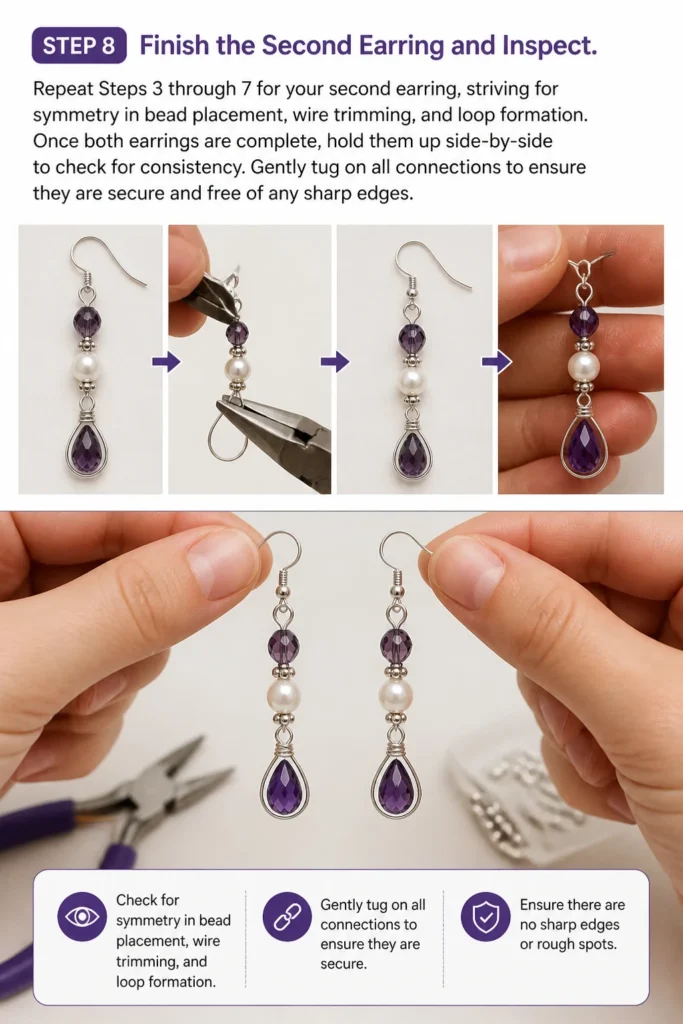
Once both earrings are complete, hold them up side-by-side to check for consistency.
Gently tug on all connections to ensure they are secure and free of any sharp edges.
Common Mistakes to Avoid
Inconsistent Loop Sizes
One of the most common issues for beginners is creating loops of varying sizes. This can make your earrings look mismatched or unprofessional.
To correct this, always grip the wire at the same point on your round-nose pliers for each loop. Practice will build muscle memory, leading to more uniform results.
Weak or Gaping Loops
If your loops are not fully closed, beads or dangles can easily fall off. A weakly formed loop is also prone to bending or breaking.
Always ensure your loops are twisted completely shut with no visible gaps. Gently test the security of each connection before considering the earring finished.
Damaging Wire with Pliers
Applying too much pressure or using the wrong part of the pliers can leave unsightly marks or kinks on your wire. This detracts from the overall aesthetic.
Use smooth, even pressure and ensure your pliers are clean. Avoid gripping the wire any tighter than necessary to manipulate it.
Asymmetrical Designs
When making a pair of earrings, it is easy for one to turn out slightly different from the other. This can be frustrating after all your effort.
Always work on both earrings simultaneously, or at least have both sets of beads laid out. Compare them frequently throughout the process to maintain symmetry in length, bead order, and loop placement.
Troubleshooting
Beads Don’t Fit on Headpin
Sometimes, the hole in a bead is too small for the headpin or eyepin you’ve chosen. This can halt your progress.
Check bead hole sizes before you start. If a bead is too small, try a thinner gauge headpin or select a different bead. Do not force beads onto pins, as this can break the bead or bend the pin.
Wire Snaps While Looping
If your wire breaks when you are forming a loop, it might be due to a few reasons. The wire could be too thin, or you might be overworking the metal.
Use a slightly thicker gauge wire if breakage is frequent. Also, avoid excessive bending and unbending of the wire, as this work-hardens and weakens it.
Earring Dangle Faces the Wrong Way
It’s common for a newly attached dangle to face sideways or backward once the ear wire is closed. This affects how the earring hangs.
Before closing the ear wire loop, ensure the front of your beaded dangle is aligned to face forward. Adjust its orientation while the loop is still open, then carefully close it.
Key Takeaways
- Organize your workspace: Have all tools and components ready before you begin.
- Plan your design: Visualize the finished product to ensure consistency and symmetry.
- Master your loops: Consistent, secure loops are fundamental to professional-looking jewelry.
- Use proper technique: Twist loops open and closed, avoid pulling, and use gentle pressure with pliers.
- Inspect thoroughly: Check for security, symmetry, and smooth finishes on both earrings.
- Practice makes perfect: Don’t be discouraged by initial imperfections; every attempt builds skill.
Frequently Asked Questions
What type of wire is best for beginners?
For beginners, 20 or 22 gauge artistic wire or sterling silver wire is a great starting point. It’s malleable enough to bend easily but sturdy enough to hold its shape.
Avoid very thin wires, as they can be challenging to work with and prone to bending out of shape.
Can I make earrings without headpins or eyepins?
Yes, you can. You can create your own headpins by forming a small coil or decorative swirl at one end of a piece of wire to stop the beads.
Alternatively, you can use jump rings to connect multiple components, creating a chain-like dangle.
How do I make sure my earrings are symmetrical?
The best way to ensure symmetry is to measure and compare constantly. Cut wires to the exact same length, count the same number of beads, and even visually compare your loops as you form them.
Working on both earrings in parallel stages can also help maintain consistency.
How do I clean my jewelry tools?
Keep your jewelry pliers clean by wiping them with a soft, dry cloth after each use. If they become stiff, a tiny drop of specialized jewelry tool oil at the pivot point can help.
Store them in a dry place to prevent rust, preferably in a tool roll or box.
Our Top Recommended Finds
- Jewelry Pliers Set: A beginner-friendly set typically includes round-nose, chain-nose, and flush cutters, essential for all basic earring projects.
- Assorted Headpins and Eyepins: Having a variety of lengths and finishes (e.g., silver, gold-plated) allows for diverse designs without needing to cut wire constantly.
- Mixed Bead Kit: A starter kit with various sizes, colors, and materials (glass, acrylic, stone) provides endless creative possibilities for your first few pairs.
Your Next Step in Creative Expression
You now have the knowledge and steps to create your very first pair of handmade earrings.
This journey into jewelry making is just beginning, opening doors to endless design possibilities and personal expression.
Don’t wait; gather your supplies and start crafting something beautiful today.