How To Make Bows
I spent three years working in a high-end boutique where every single gift had to look like a work of art.
During those years, I tied thousands of bows, ranging from tiny velvet accents to massive velvet door displays.
This guide shares the exact techniques I used to create professional, sturdy, and beautiful bows every single time.
Quick Overview
You will learn how to create a classic multi-loop bow that works for gifts, wreaths, or home decor.
- Time needed: 15 to 20 minutes
- Difficulty: Beginner
- What you’ll need: Ribbon, sharp fabric scissors, floral wire, and a ruler.
Step-by-Step Instructions
Step 1: Select Your Ribbon Material
The success of your bow depends heavily on the type of ribbon you choose for the project.
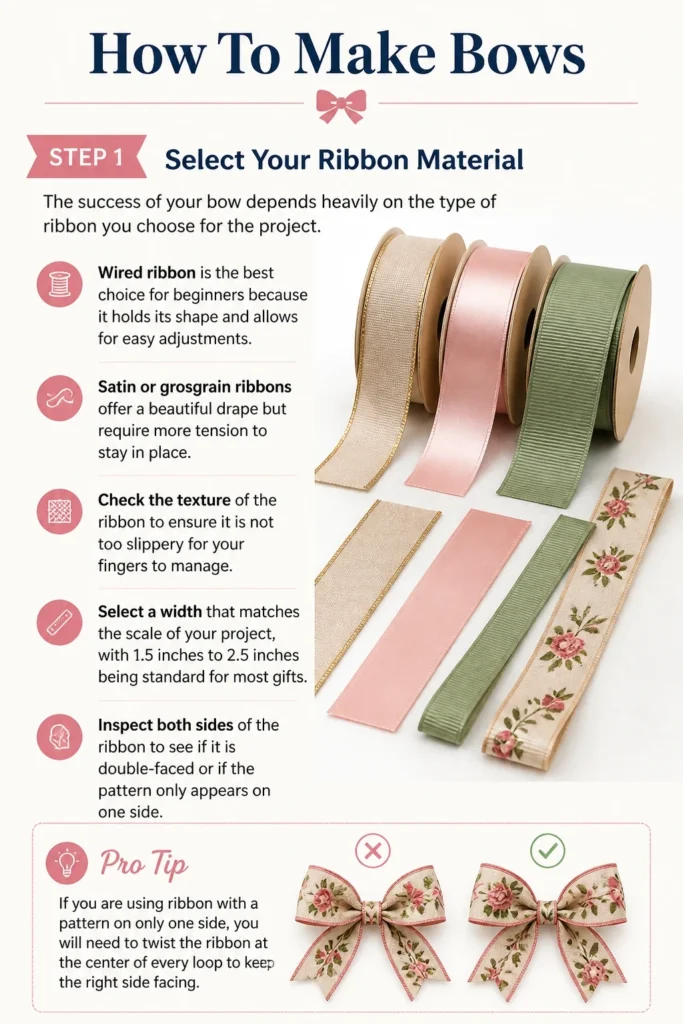
Wired ribbon is the best choice for beginners because it holds its shape and allows for easy adjustments.
If you prefer a softer look, satin or grosgrain ribbons offer a beautiful drape but require more tension to stay in place.
- Check the texture of the ribbon to ensure it is not too slippery for your fingers to manage.
- Select a width that matches the scale of your project, with 1.5 inches to 2.5 inches being standard for most gifts.
- Inspect both sides of the ribbon to see if it is double-faced or if the pattern only appears on one side.
Pro Tip: If you are using ribbon with a pattern on only one side, you will need to twist the ribbon at the center of every loop to keep the “right” side facing out.
Step 2: Measure and Cut the Ribbon
Avoid cutting the ribbon from the spool until you have finished the main body of the bow.
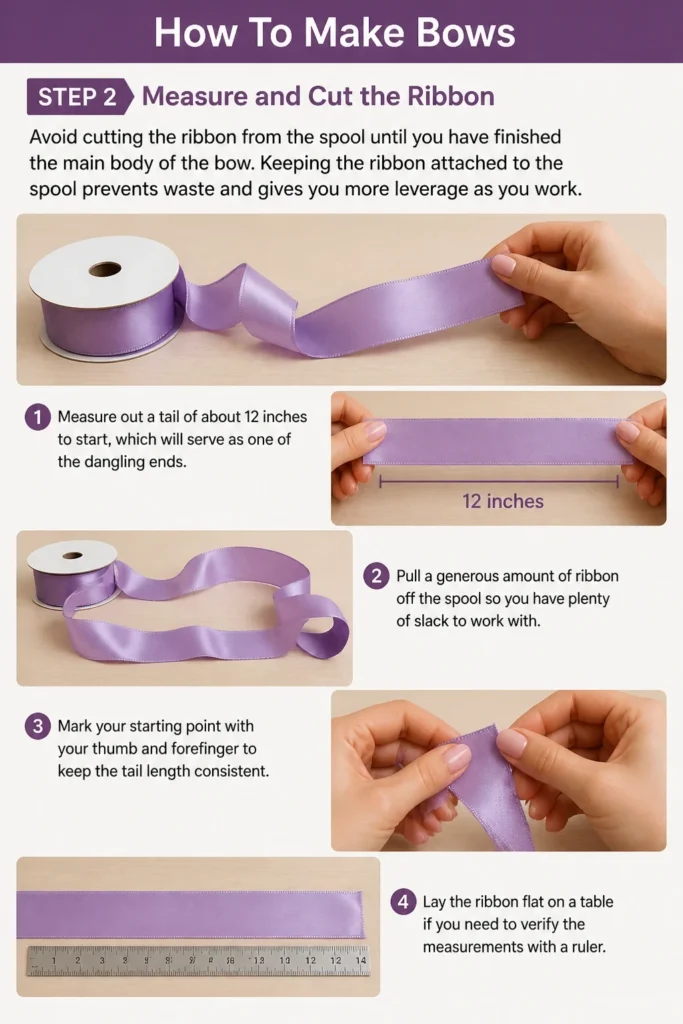
Keeping the ribbon attached to the spool prevents waste and gives you more leverage as you work.
Measure out a tail of about 12 inches to start, which will serve as one of the dangling ends.
- Pull a generous amount of ribbon off the spool so you have plenty of slack to work with.
- Mark your starting point with your thumb and forefinger to keep the tail length consistent.
- Lay the ribbon flat on a table if you need to verify the measurements with a ruler.
Step 3: Create the Center Loop
The center loop is the smallest part of the bow and hides the wire you will use later.
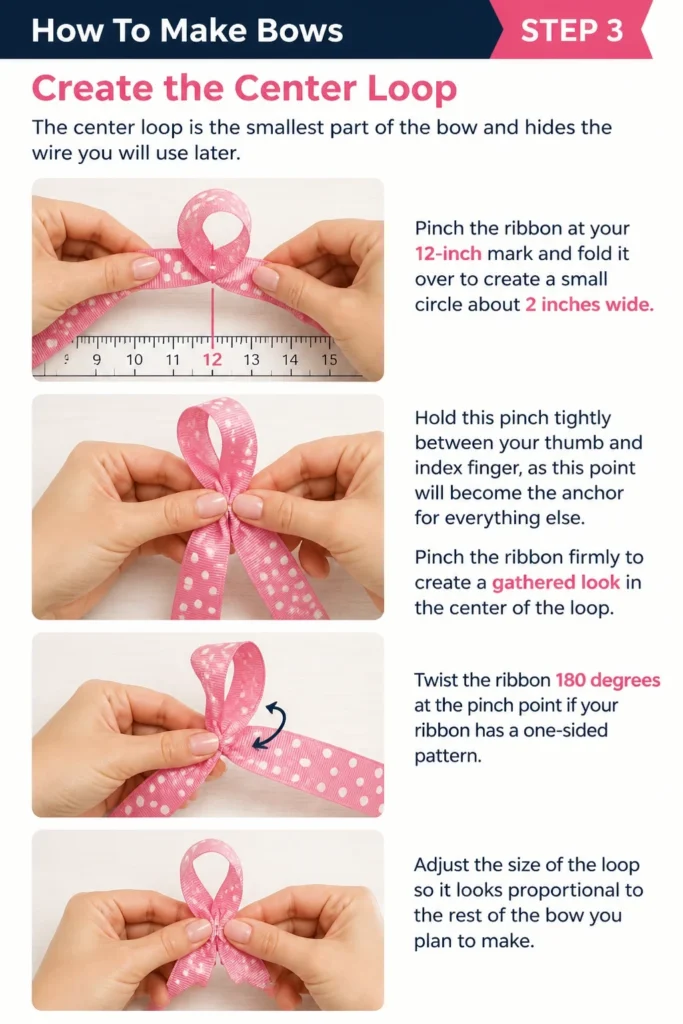
Pinch the ribbon at your 12-inch mark and fold it over to create a small circle about 2 inches wide.
Hold this pinch tightly between your thumb and index finger, as this point will become the anchor for everything else.
- Pinch the ribbon firmly to create a gathered look in the center of the loop.
- Twist the ribbon 180 degrees at the pinch point if your ribbon has a one-sided pattern.
- Adjust the size of the loop so it looks proportional to the rest of the bow you plan to make.
Step 4: Form the First Set of Side Loops
Now you will begin building the volume of the bow by adding larger loops on either side of the center.
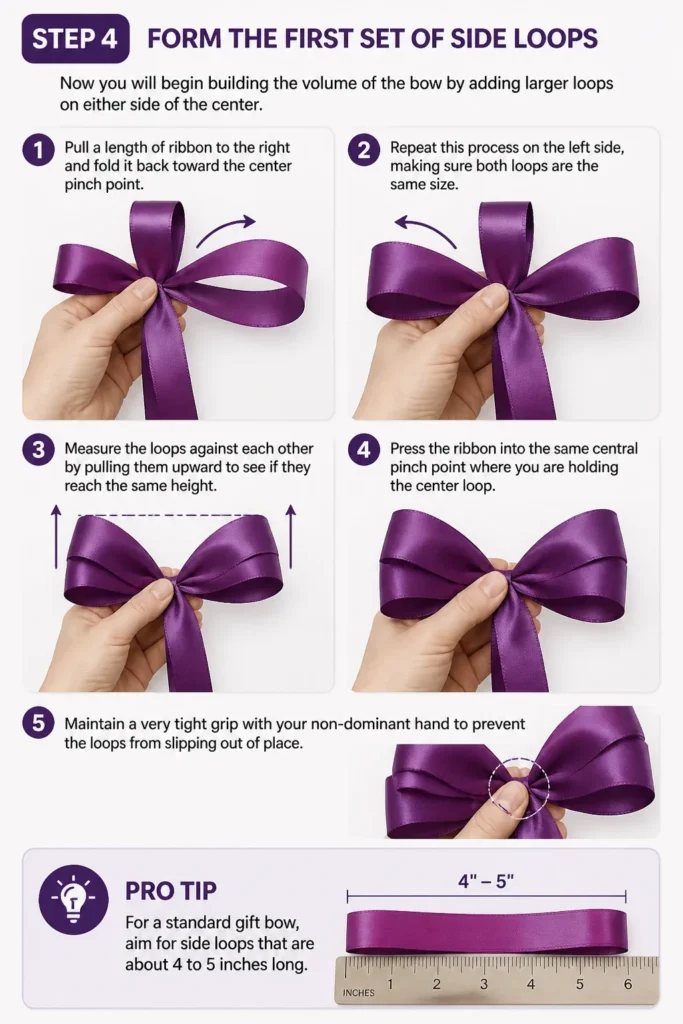
Pull a length of ribbon to the right and fold it back toward the center pinch point.
Repeat this process on the left side, making sure both loops are the same size.
- Measure the loops against each other by pulling them upward to see if they reach the same height.
- Press the ribbon into the same central pinch point where you are holding the center loop.
- Maintain a very tight grip with your non-dominant hand to prevent the loops from slipping out of place.
Pro Tip: For a standard gift bow, aim for side loops that are about 4 to 5 inches long.
Step 5: Layer Additional Loops for Fullness
A professional bow usually has at least three loops on each side for a total of six side loops.
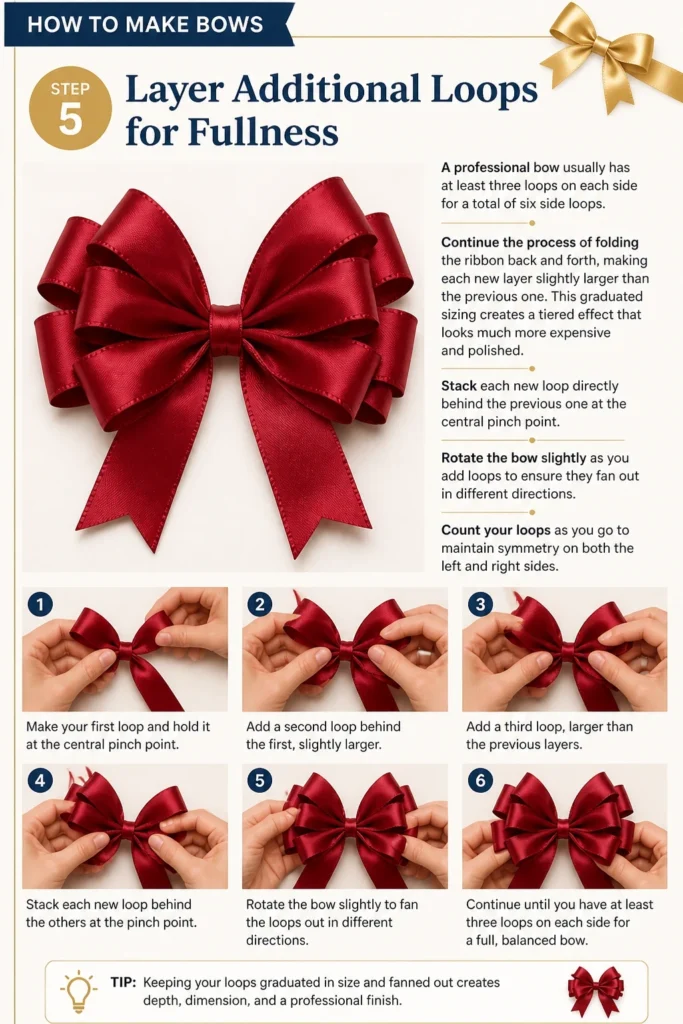
Continue the process of folding the ribbon back and forth, making each new layer slightly larger than the previous one.
This graduated sizing creates a tiered effect that looks much more expensive and polished.
- Stack each new loop directly behind the previous one at the central pinch point.
- Rotate the bow slightly as you add loops to ensure they fan out in different directions.
- Count your loops as you go to maintain symmetry on both the left and right sides.
Step 6: Secure the Center with Wire
Once you are happy with the number of loops, you need to lock them in place permanently.
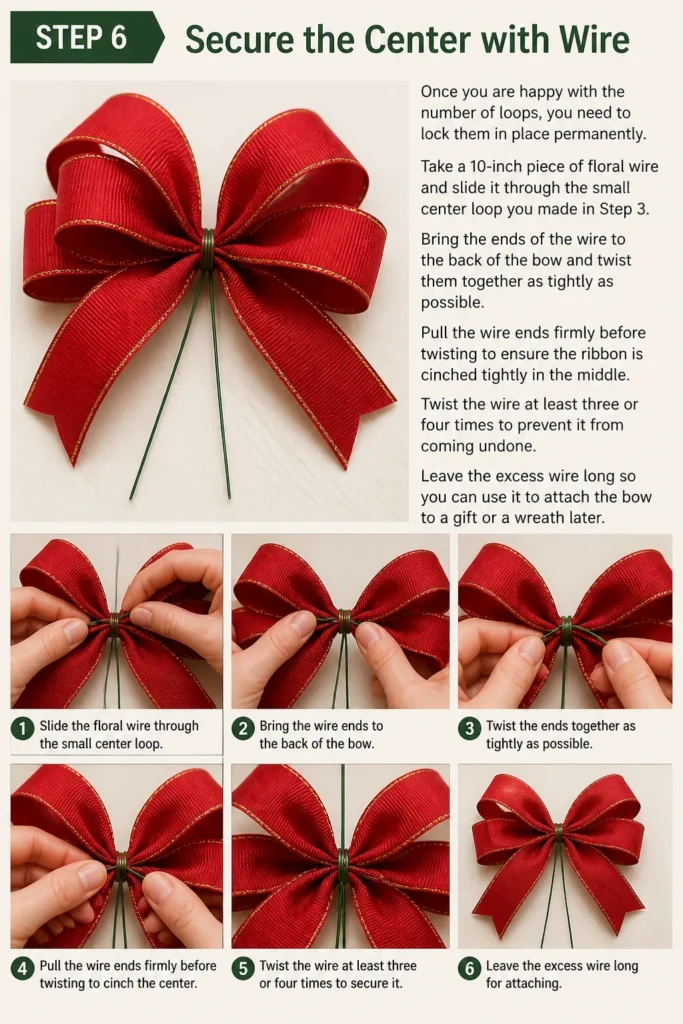
Take a 10-inch piece of floral wire and slide it through the small center loop you made in Step 3.
Bring the ends of the wire to the back of the bow and twist them together as tightly as possible.
- Pull the wire ends firmly before twisting to ensure the ribbon is cinched tightly in the middle.
- Twist the wire at least three or four times to prevent it from coming undone.
- Leave the excess wire long so you can use it to attach the bow to a gift or a wreath later.
Step 7: Add the Final Tail and Cut
Now that the bow is secured, you can add the second tail to match the one you started with.
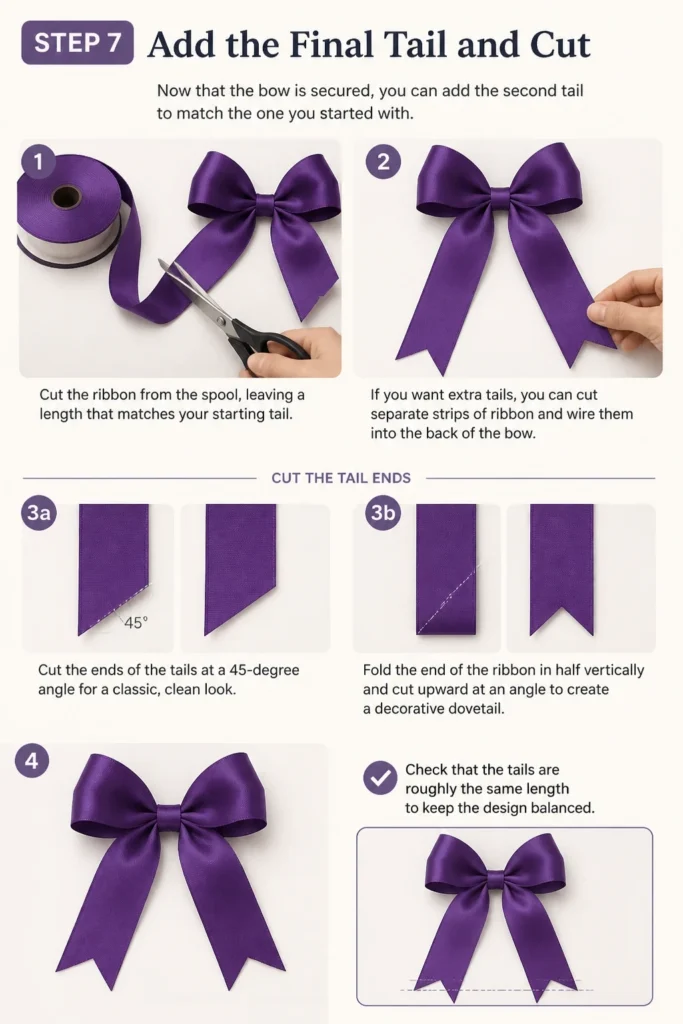
Cut the ribbon from the spool, leaving a length that matches your starting tail.
If you want extra tails, you can cut separate strips of ribbon and wire them into the back of the bow.
- Cut the ends of the tails at a 45-degree angle for a classic, clean look.
- Fold the end of the ribbon in half vertically and cut upward at an angle to create a decorative dovetail.
- Check that the tails are roughly the same length to keep the design balanced.
Step 8: Fluff and Shape the Loops
Your bow will likely look flat and messy immediately after you finish the wiring process.
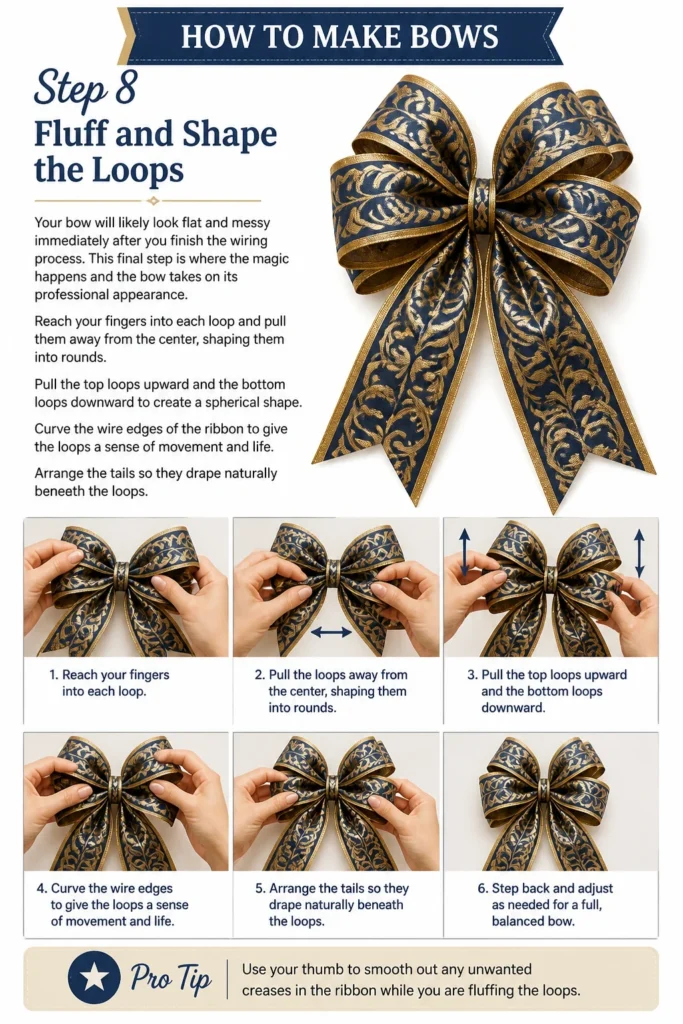
This final step is where the magic happens and the bow takes on its professional appearance.
Reach your fingers into each loop and pull them away from the center, shaping them into rounds.
- Pull the top loops upward and the bottom loops downward to create a spherical shape.
- Curve the wire edges of the ribbon to give the loops a sense of movement and life.
- Arrange the tails so they drape naturally beneath the loops.
Pro Tip: Use your thumb to smooth out any unwanted creases in the ribbon while you are fluffing the loops.
Common Mistakes to Avoid
Using Dull Scissors
Cutting ribbon with household scissors that have been used on paper will almost always result in frayed edges.
Ribbon requires a very sharp, clean edge to look professional and prevent the threads from unraveling.
Invest in a pair of dedicated fabric shears and never use them for anything other than textiles or ribbon.
Loosening Your Grip
The most common reason bows look lopsided or fall apart is a weak grip at the central pinch point.
If you let the ribbon slide even a fraction of an inch while adding loops, the symmetry of the bow will be ruined.
Keep a firm, constant pressure on the center until the wire is completely tightened and secured.
Ignoring the Ribbon Grain
Some ribbons have a distinct grain or direction that affects how they fold and catch the light.
If you force a stiff ribbon to bend against its natural grain, it will create sharp, ugly peaks instead of soft loops.
Test a small piece of the ribbon first to see how it naturally wants to curve before you start the full bow.
Cutting Tails Too Short
Many people cut the tails of their bows too early in the process and end up with stubs that look out of proportion.
It is always better to have tails that are too long, as you can easily trim them down at the very end.
Long, flowing tails add a sense of elegance and luxury that short tails simply cannot provide.
Troubleshooting
The Bow Keeps Flattening Out
If your loops refuse to stay round, you are likely using a ribbon that is too soft or heavy for its own weight.
You can fix this by lightly misting the back of the ribbon with hairspray or fabric stiffener before you shape it.
Alternatively, try adding a few more loops to the bow to provide more internal support for the structure.
The Wire is Visible in the Front
When the wire shows through the center, it usually means your center loop was too large or not cinched enough.
You can hide the wire by wrapping a small, separate scrap of ribbon around the center and gluing it in the back.
Make sure the wire is tucked deep into the folds of the ribbon before you do your final twist.
The Loops are Uneven Sizes
Uneven loops happen when you rely on visual estimation rather than physical measurement.
If the bow is already wired, you can sometimes gently tug on the shorter loop to steal a bit of length from the longer one.
If the difference is significant, it is usually best to unwrap the wire and start over to ensure a quality result.
Key Takeaways
- Wired ribbon is the most forgiving material for beginners and offers the best structural integrity.
- The central pinch point must be held with significant tension until the wire is fully secured.
- Always use dedicated fabric shears to ensure clean, crisp edges on your ribbon tails.
- Twisting the ribbon at the center of each loop is essential for one-sided patterns.
- Fluffing and shaping the loops at the end is what transforms a flat ribbon into a professional bow.
- Leave the ribbon on the spool as long as possible to avoid unnecessary waste and measurement errors.
Frequently Asked Questions
What is the best ribbon for outdoor wreaths?
For outdoor use, look for ribbon labeled as “weather-resistant” or “poly-canvas.”
Standard satin or velvet will quickly fade and limp when exposed to moisture or direct sunlight.
Solution-dyed acrylic ribbons are also excellent because they resist mold and maintain their color for several seasons.
How do I stop ribbon from fraying?
The most effective way to stop fraying is to use a small amount of clear nail polish or specialized fray-check liquid on the edges.
If you are using synthetic ribbon like polyester, you can very carefully singe the edge with a lighter to melt the fibers together.
Always test this on a scrap piece first to ensure the ribbon doesn’t discolor or burn too quickly.
Can I reuse ribbon from old gifts?
You can certainly reuse ribbon if it hasn’t been creased or crushed beyond repair.
To refresh old ribbon, run it through a flat iron on a very low heat setting to remove wrinkles.
Avoid using high heat, as many decorative ribbons are made of plastic-based fibers that will melt instantly.
How much ribbon do I need for one bow?
A standard medium-sized bow with six loops usually requires about 3 to 4 yards of ribbon.
If you want extra-long tails or a very full “pom-pom” style bow, you should plan for 5 to 7 yards.
Always buy a little more than you think you need to account for mistakes or trimming.
Our Top Recommended Finds
- Professional Fabric Shears: High-carbon steel scissors will give you the cleanest possible cut on any ribbon type.
- 26-Gauge Floral Wire: This specific thickness is strong enough to hold heavy ribbon but flexible enough to twist easily by hand.
- Double-Faced Satin Ribbon: This ribbon has a shiny finish on both sides, which eliminates the need for complex twisting at the center.
Mastering the Art of the Perfect Loop
Now that you have the foundational skills for making a professional bow, you can experiment with different textures and layers.
Try mixing two different types of ribbon together, such as a wide burlap and a thin lace, for a rustic look.
You might also consider adding small ornaments or sprigs of greenery into the wire center for seasonal decorations.
The more you practice the “pinch and twist” method, the faster and more consistent your bows will become.
Take a look at your current gift wrapping supplies and see which ribbons would benefit from a multi-loop upgrade today.