How To Rip Jeans DIY
I have spent years experimenting with different ways to make brand-new denim look like it has been through a decade of adventure.
My first attempt at ripping jeans ended in disaster when I accidentally cut through both sides of the leg, making them completely unwearable.
This guide comes from a place of trial and error to ensure you get that high-end boutique look without the designer price tag.
Quick Overview
This process transforms a standard pair of jeans into a custom piece of clothing that fits your personal style perfectly.
- Time needed: 45 to 90 minutes
- Difficulty: Beginner
- What you’ll need: Denim jeans, tailor’s chalk, fabric scissors or a box cutter, tweezers, sandpaper, and a piece of cardboard.
Step 1: Select the Right Pair of Jeans
Choose a pair of jeans that are made of 100 percent cotton for the most authentic distressed results.
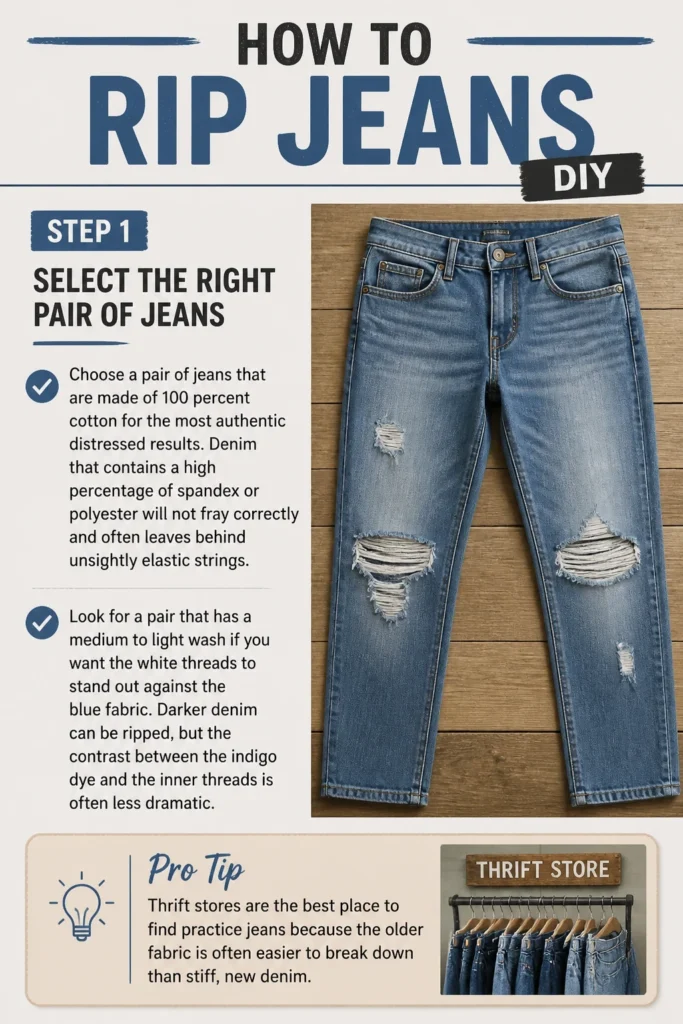
Denim that contains a high percentage of spandex or polyester will not fray correctly and often leaves behind unsightly elastic strings.
Look for a pair that has a medium to light wash if you want the white threads to stand out against the blue fabric.
Darker denim can be ripped, but the contrast between the indigo dye and the inner threads is often less dramatic.
Pro Tip: Thrift stores are the best place to find practice jeans because the older fabric is often easier to break down than stiff, new denim.
Step 2: Mark Your Intended Rips
Put the jeans on and stand in front of a full-length mirror to see exactly where the fabric hits your legs.
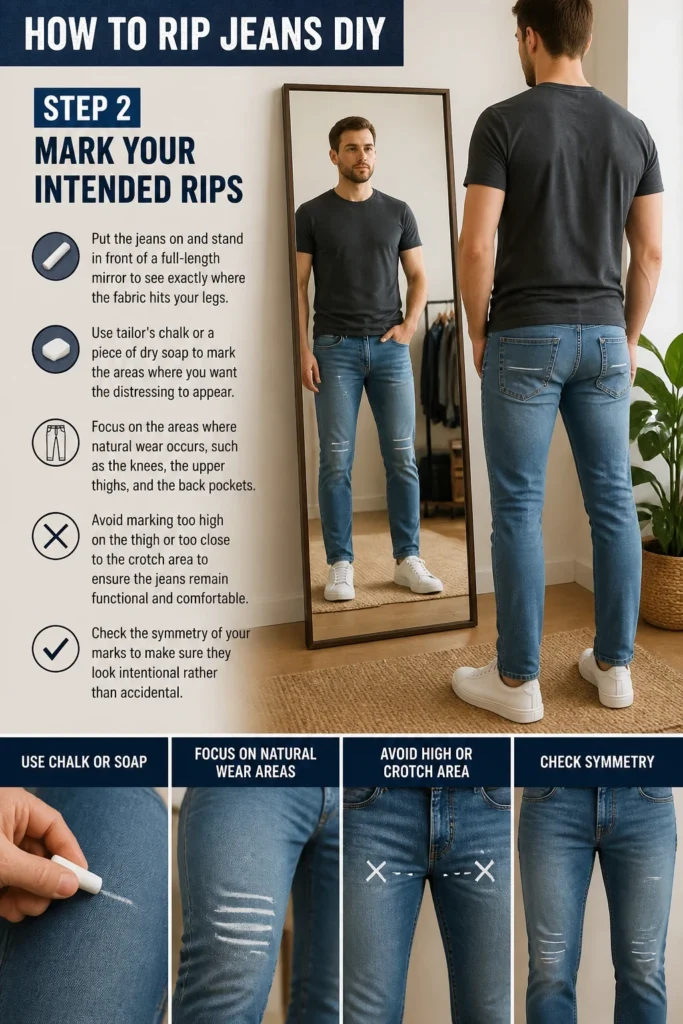
Use tailor’s chalk or a piece of dry soap to mark the areas where you want the distressing to appear.
Focus on the areas where natural wear occurs, such as the knees, the upper thighs, and the back pockets.
Avoid marking too high on the thigh or too close to the crotch area to ensure the jeans remain functional and comfortable.
Check the symmetry of your marks to make sure they look intentional rather than accidental.
Step 3: Insert a Protective Barrier
Slide a thick piece of cardboard or a small wooden block inside the pant leg directly under the area you plan to cut.
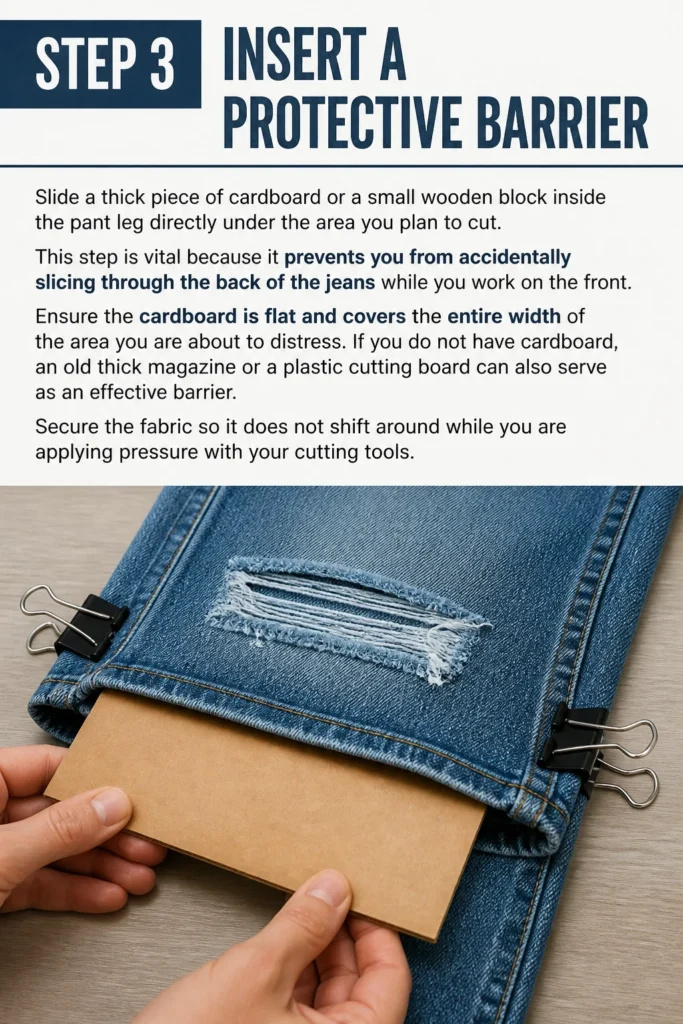
This step is vital because it prevents you from accidentally slicing through the back of the jeans while you work on the front.
Ensure the cardboard is flat and covers the entire width of the area you are about to distress.
If you do not have cardboard, an old thick magazine or a plastic cutting board can also serve as an effective barrier.
Secure the fabric so it does not shift around while you are applying pressure with your cutting tools.
Step 4: Create Precise Horizontal Slits
Take your box cutter or fabric scissors and make a series of horizontal cuts across the area you marked earlier.
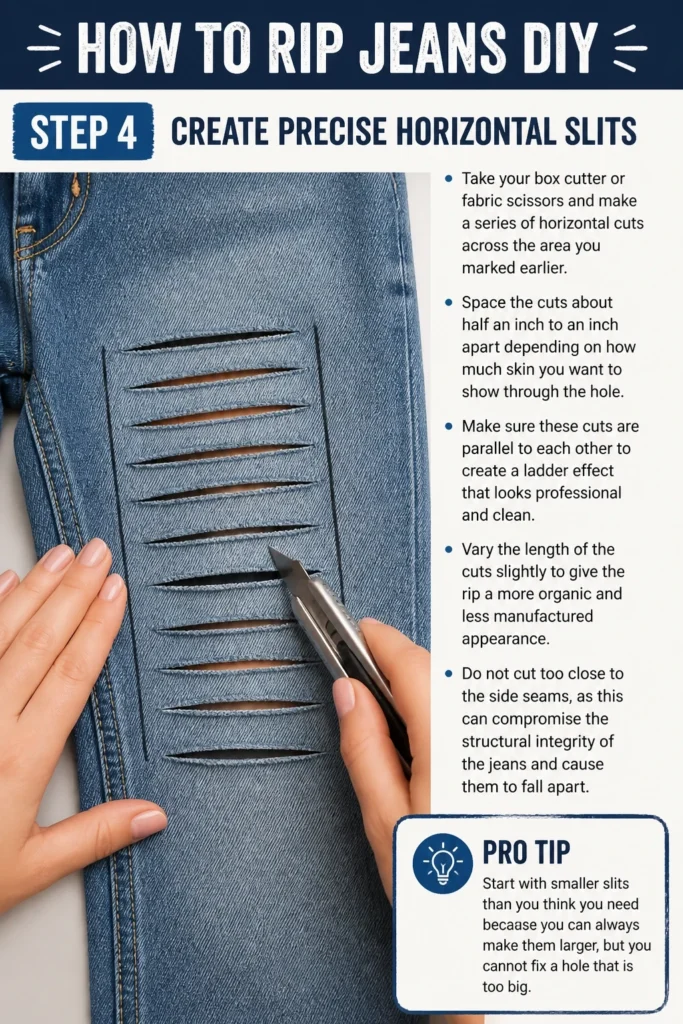
Space the cuts about half an inch to an inch apart depending on how much skin you want to show through the hole.
Make sure these cuts are parallel to each other to create a ladder effect that looks professional and clean.
Vary the length of the cuts slightly to give the rip a more organic and less manufactured appearance.
Do not cut too close to the side seams, as this can compromise the structural integrity of the jeans and cause them to fall apart.
Pro Tip: Start with smaller slits than you think you need because you can always make them larger, but you cannot fix a hole that is too big.
Step 5: Fray the Edges with Sandpaper
Rub a piece of heavy-duty sandpaper over the edges of the cuts you just made to loosen the fibers.
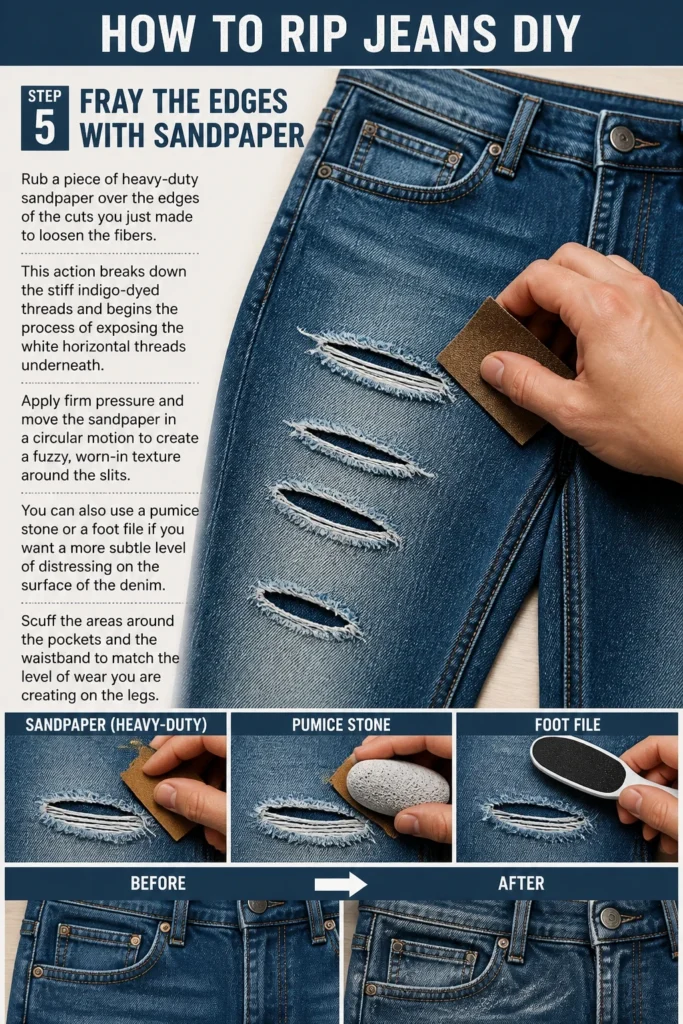
This action breaks down the stiff indigo-dyed threads and begins the process of exposing the white horizontal threads underneath.
Apply firm pressure and move the sandpaper in a circular motion to create a fuzzy, worn-in texture around the slits.
You can also use a pumice stone or a foot file if you want a more subtle level of distressing on the surface of the denim.
Scuff the areas around the pockets and the waistband to match the level of wear you are creating on the legs.
Step 6: Remove the Vertical Indigo Threads
Identify the blue threads that run vertically and the white threads that run horizontally within the fabric weave.
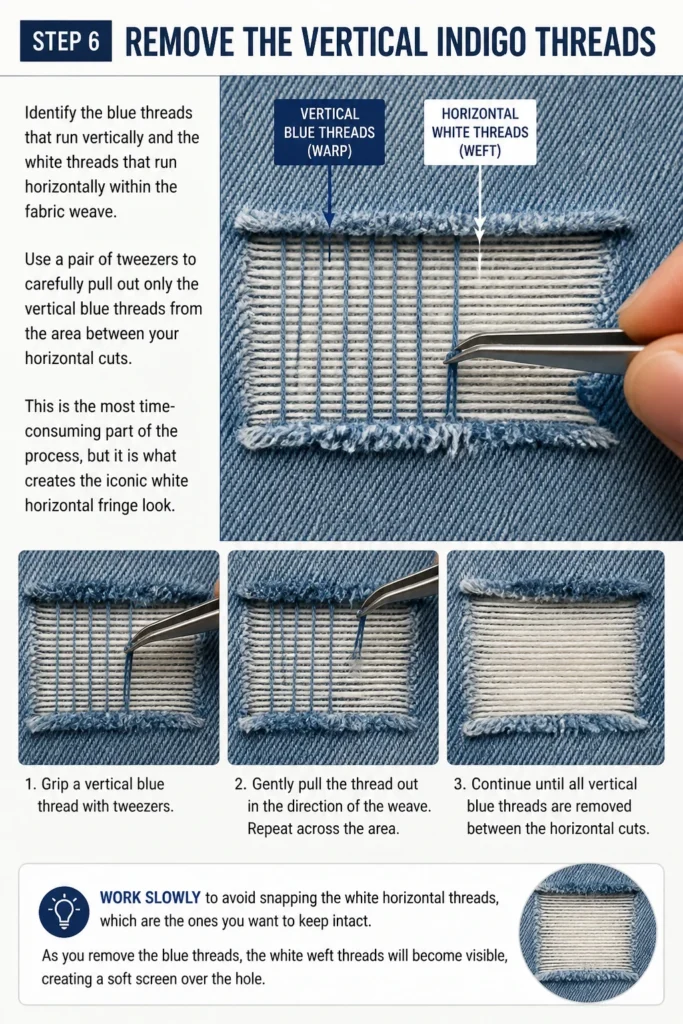
Use a pair of tweezers to carefully pull out only the vertical blue threads from the area between your horizontal cuts.
This is the most time-consuming part of the process, but it is what creates the iconic white horizontal fringe look.
Work slowly to avoid snapping the white horizontal threads, which are the ones you want to keep intact.
As you remove the blue threads, the white “weft” threads will become visible, creating a soft screen over the hole.
Step 7: Scrape the Fabric for Extra Texture
Hold the blade of your scissors or a box cutter perpendicular to the fabric and scrape it across the surface of the denim.
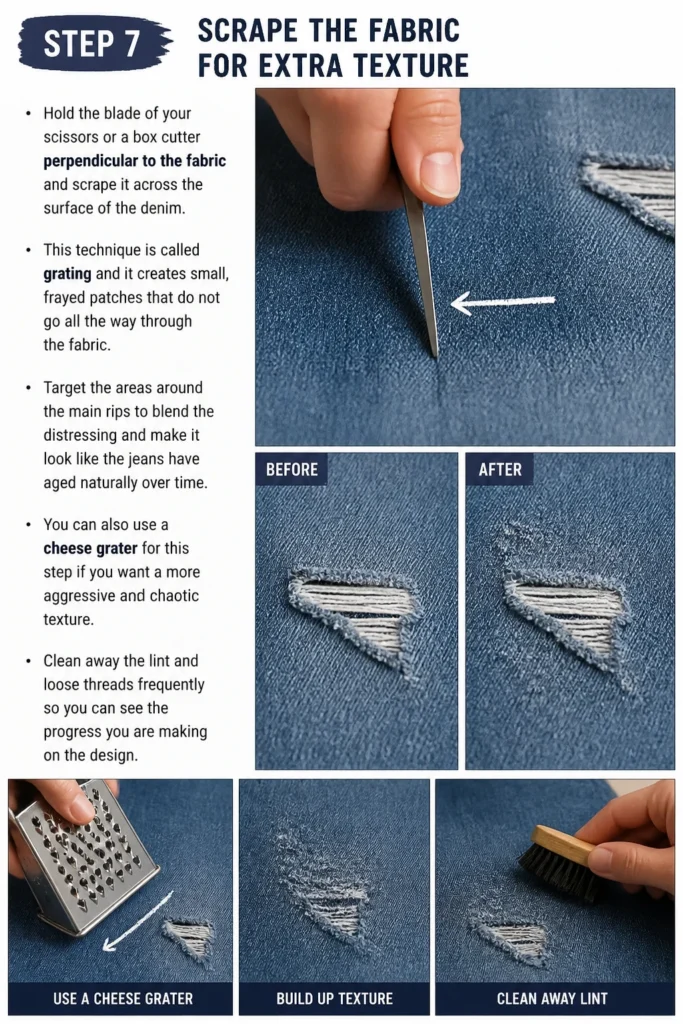
This technique is called “grating” and it creates small, frayed patches that do not go all the way through the fabric.
Target the areas around the main rips to blend the distressing and make it look like the jeans have aged naturally over time.
You can also use a cheese grater for this step if you want a more aggressive and chaotic texture.
Clean away the lint and loose threads frequently so you can see the progress you are making on the design.
Step 8: Wash and Dry to Set the Look
Place your newly ripped jeans in the washing machine on a cold cycle to help the frayed edges bloom.
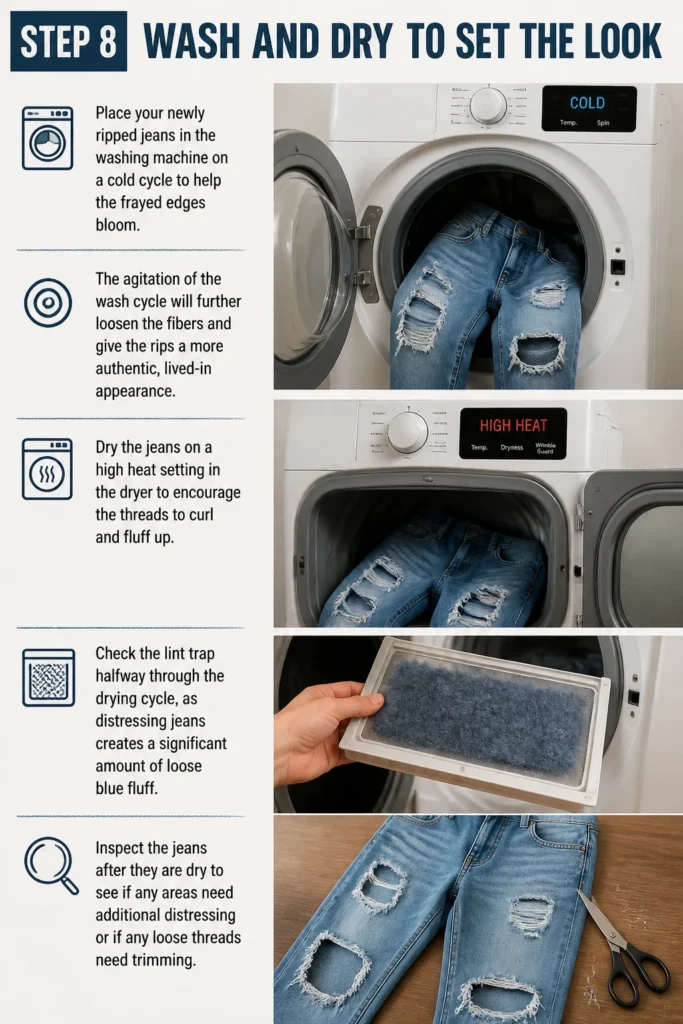
The agitation of the wash cycle will further loosen the fibers and give the rips a more authentic, lived-in appearance.
Dry the jeans on a high heat setting in the dryer to encourage the threads to curl and fluff up.
Check the lint trap halfway through the drying cycle, as distressing jeans creates a significant amount of loose blue fluff.
Inspect the jeans after they are dry to see if any areas need additional distressing or if any loose threads need trimming.
Common Mistakes to Avoid
Cutting While Wearing the Jeans
It is very tempting to make a quick cut while you have the jeans on to see exactly where the hole will land. This is incredibly dangerous and often leads to skin nicks or deep cuts because denim requires significant pressure to slice. Always take the jeans off and use a protective barrier before you start using sharp tools.
Using High Stretch Denim
Jeans that feel like leggings are usually made with a lot of elastic fibers that do not behave like traditional cotton. When you rip these jeans, the elastic tends to snap and curl into little white nubs that look messy rather than stylish. Stick to rigid denim or jeans with a very low percentage of stretch for the best DIY results.
Creating Perfectly Symmetrical Holes
Nature rarely creates perfect symmetry, and neither does natural wear and tear on clothing. If you put identical holes on both knees at the exact same height, the jeans will look like a costume rather than a fashion choice. Stagger your rips and vary their sizes to achieve a more realistic and aesthetically pleasing look.
Troubleshooting
The White Threads Are Breaking
If the white horizontal threads are snapping while you are tweezing, you might be applying too much force or using a blade that is too dull. Try using a finer pair of tweezers and work on one blue thread at a time instead of grabbing chunks of fabric. If the threads are already broken, you can use a needle and white thread to manually bridge the gap and rebuild the fringe look.
The Hole Is Expanding Too Fast
Sometimes a small rip can turn into a massive hole after just one wash because the integrity of the fabric was compromised. To stop a rip from growing, you can apply a small amount of clear fabric glue or clear nail polish to the ends of the cut. For a more permanent solution, sew a small reinforcement stitch at the corners of the rip to prevent the fabric from splitting further.
Key Takeaways
- Always use a piece of cardboard inside the leg to protect the back of the jeans from your cutting tools.
- Prioritize 100 percent cotton denim to ensure the white horizontal threads stay intact and look professional.
- Use tweezers to remove vertical blue threads while leaving the horizontal white threads for a classic distressed look.
- Wash and dry the jeans immediately after ripping to help the edges fray naturally and soften the fabric.
- Start with small cuts and gradually increase the size to avoid making the jeans unwearable.
Frequently Asked Questions
Can I rip black jeans using this same method?
Yes, you can rip black jeans using the same technique, but the results will look slightly different. Most black denim uses black threads for both the warp and the weft, so you will not get the high-contrast white fringe. The result will be a monochromatic, textured look that is more subtle but still very stylish.
How do I make the frayed edges look more natural?
The secret to natural fraying is a combination of sandpaper and the washing machine. Sanding the edges before you wash them breaks down the factory finish of the thread. When the jeans hit the water and the dryer heat, those broken fibers expand and tangle, which mimics years of actual wear.
What if I don’t have a box cutter or fabric scissors?
You can use a standard pair of kitchen scissors or even a sharp pocket knife, but you must be extra careful with your control. Some people use a disposable razor to shave the surface of the denim, which creates a thinning effect before the hole actually opens. Regardless of the tool, the key is to work in small increments rather than making large, aggressive movements.
Our Top Recommended Finds
- Heavy Duty Tweezers: Look for a pair with a slanted tip and a strong grip to make the thread removal process much faster.
- 80-Grit Sandpaper: This specific coarseness is perfect for breaking down tough denim fibers without destroying the fabric too quickly.
- Tailor’s Chalk: This allows you to mark your jeans clearly and wipes away easily with a damp cloth once you are finished.
Take Your Denim to the Next Level
Now that you have mastered the basics of ripping and distressing, you can start experimenting with more advanced techniques like acid washing or fabric painting. Customizing your own clothes is a great way to express your creativity and ensure that no one else has the exact same outfit as you.
Take a look at your closet today and find a pair of old jeans that could use a new lease on life. With a little bit of patience and the right tools, you can turn a forgotten pair of pants into your new favorite piece of clothing.