How To Make A Mold
Creating your first silicone mold transforms a simple hobby into a production line for your creative ideas.
I spent years refining these techniques in my own workshop to ensure every detail of the original object is captured perfectly.
This guide provides the exact workflow I use to produce professional-grade molds for resin, wax, and plaster casting.
Quick Overview
You will learn how to create a high-quality silicone mold that can be used hundreds of times for various casting materials.
- Time needed: 24 to 48 hours (including curing time)
- Difficulty: Intermediate
- What you’ll need: RTV silicone, mixing containers, mold housing, release agent, and an original model.
Step-by-Step Instructions
Step 1: Select and Prepare Your Original Model
The quality of your final cast depends entirely on the original object you choose to replicate.
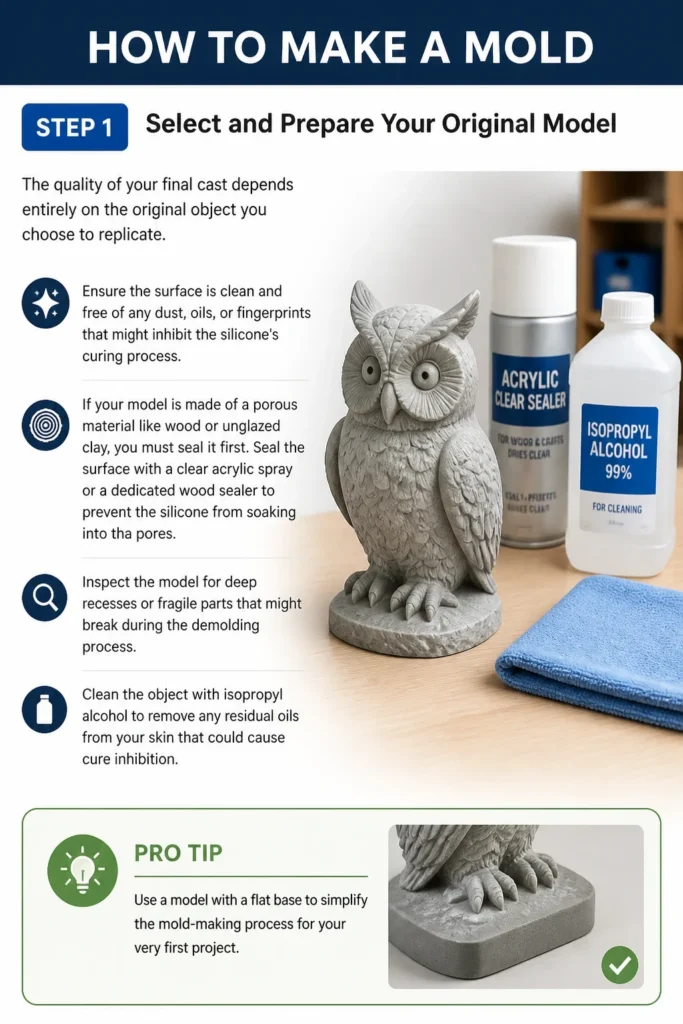
Ensure the surface is clean and free of any dust, oils, or fingerprints that might inhibit the silicone’s curing process.
If your model is made of a porous material like wood or unglazed clay, you must seal it first.
- Inspect the model for deep recesses or fragile parts that might break during the demolding process.
- Seal the surface with a clear acrylic spray or a dedicated wood sealer to prevent the silicone from soaking into the pores.
- Clean the object with isopropyl alcohol to remove any residual oils from your skin that could cause cure inhibition.
Pro Tip: Use a model with a flat base to simplify the mold-making process for your very first project.
Step 2: Construct the Mold Housing
A mold housing, often called a mold box, contains the liquid silicone while it cures around your object.
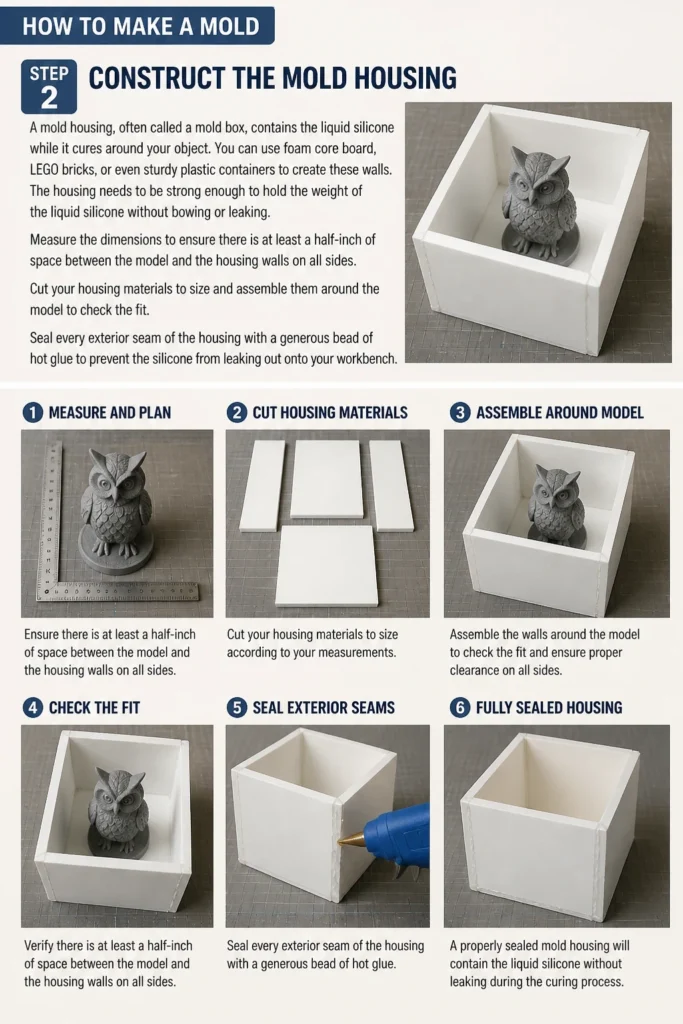
You can use foam core board, LEGO bricks, or even sturdy plastic containers to create these walls.
The housing needs to be strong enough to hold the weight of the liquid silicone without bowing or leaking.
- Measure the dimensions to ensure there is at least a half-inch of space between the model and the housing walls on all sides.
- Cut your housing materials to size and assemble them around the model to check the fit.
- Seal every exterior seam of the housing with a generous bead of hot glue to prevent the silicone from leaking out onto your workbench.
Step 3: Secure the Model to the Base
Your object must stay firmly in place while the heavy liquid silicone is poured over it.
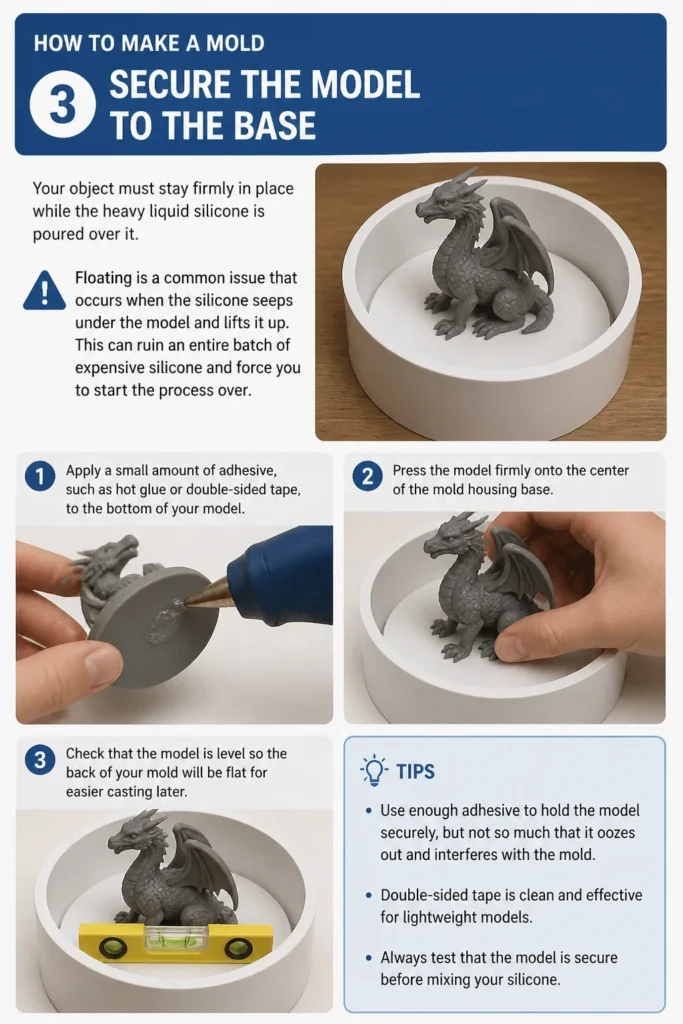
Floating is a common issue that occurs when the silicone seeps under the model and lifts it up.
This can ruin an entire batch of expensive silicone and force you to start the process over.
- Apply a small amount of adhesive, such as hot glue or double-sided tape, to the bottom of your model.
- Press the model firmly onto the center of the mold housing base.
- Check that the model is level so the back of your mold will be flat for easier casting later.
Step 4: Apply the Release Agent
Release agents prevent the silicone from bonding permanently to your model or the housing walls.
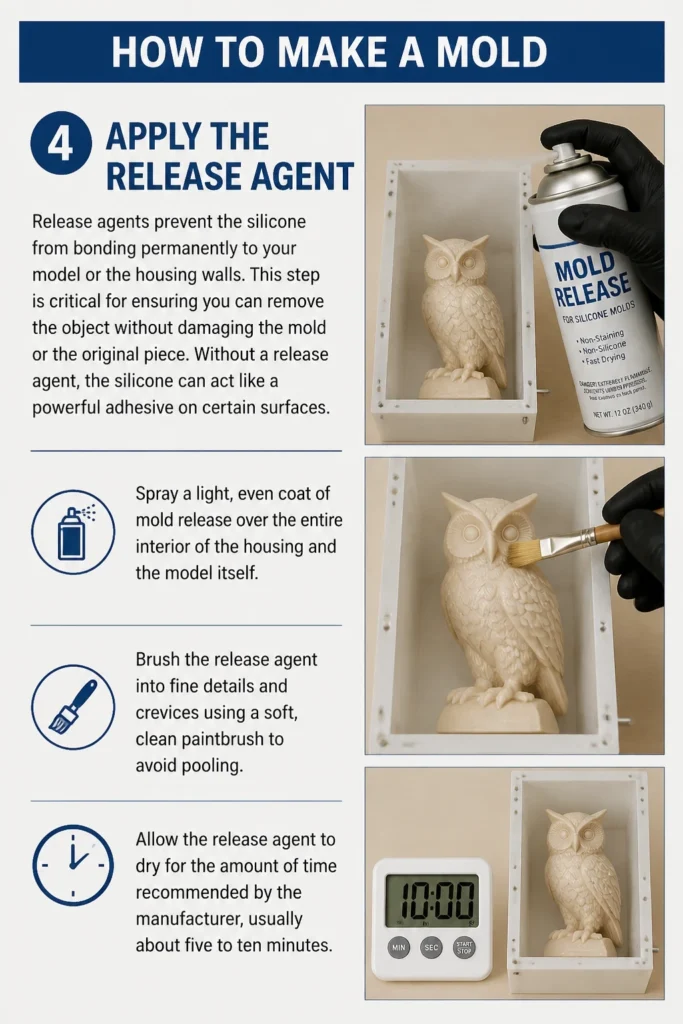
This step is critical for ensuring you can remove the object without damaging the mold or the original piece.
Without a release agent, the silicone can act like a powerful adhesive on certain surfaces.
- Spray a light, even coat of mold release over the entire interior of the housing and the model itself.
- Brush the release agent into fine details and crevices using a soft, clean paintbrush to avoid pooling.
- Allow the release agent to dry for the amount of time recommended by the manufacturer, usually about five to ten minutes.
Step 5: Calculate and Measure the Silicone
Most RTV (Room Temperature Vulcanizing) silicones come in two parts that must be mixed at a specific ratio.
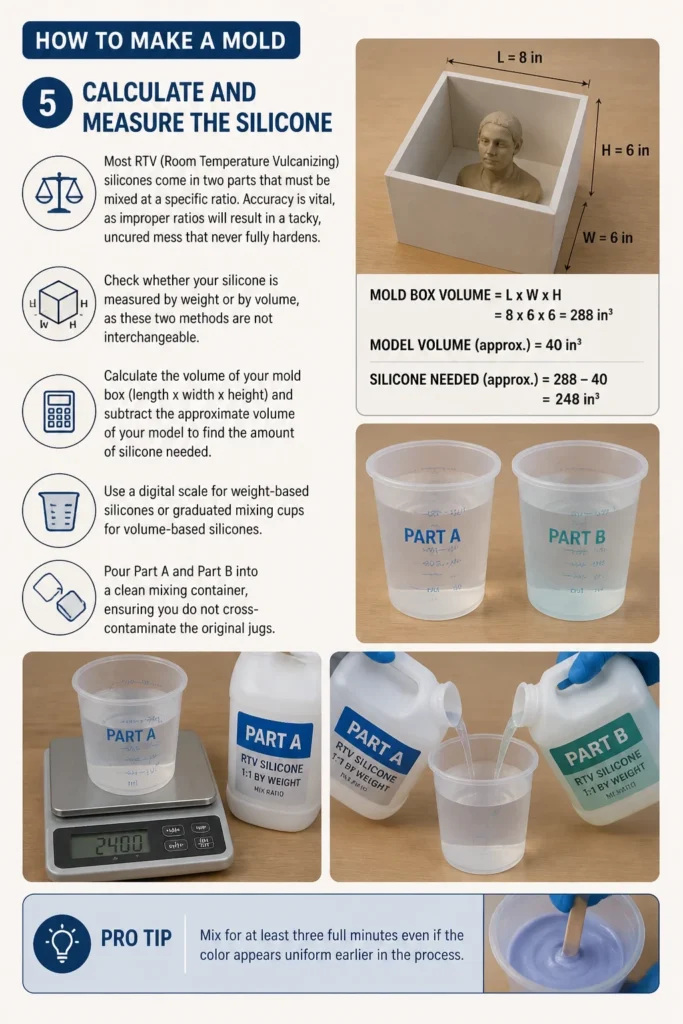
Accuracy is vital, as improper ratios will result in a tacky, uncured mess that never fully hardens.
Check whether your silicone is measured by weight or by volume, as these two methods are not interchangeable.
- Calculate the volume of your mold box (length x width x height) and subtract the approximate volume of your model to find the amount of silicone needed.
- Use a digital scale for weight-based silicones or graduated mixing cups for volume-based silicones.
- Pour Part A and Part B into a clean mixing container, ensuring you do not cross-contaminate the original jugs.
Pro Tip: Mix for at least three full minutes even if the color appears uniform earlier in the process.
Step 6: Mix the Silicone Components
Thorough mixing ensures that the catalyst is evenly distributed throughout the base material.
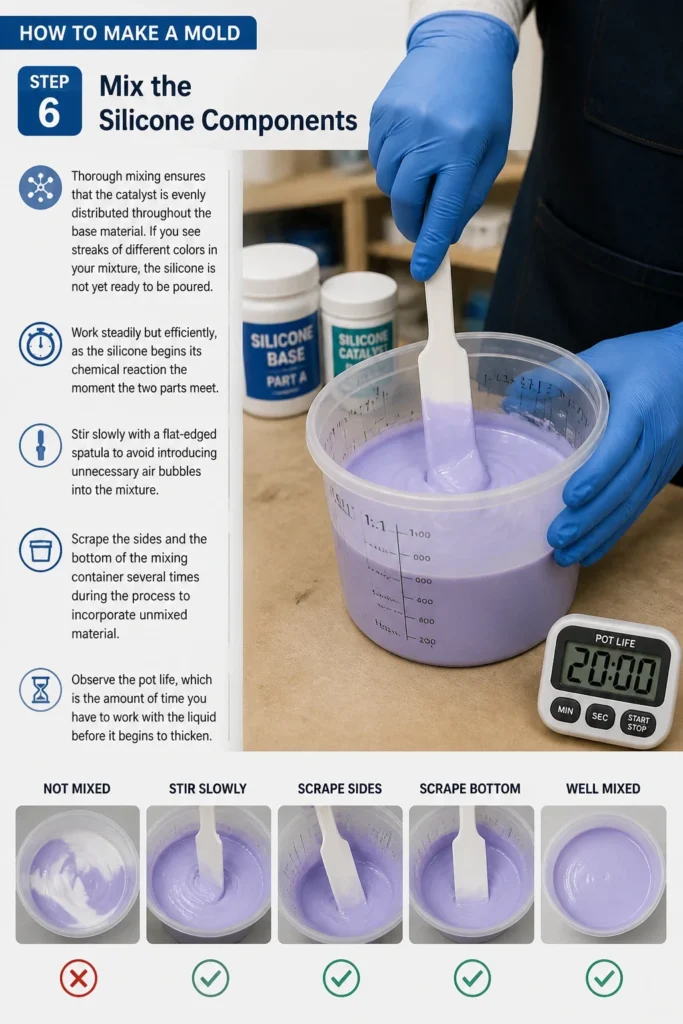
If you see streaks of different colors in your mixture, the silicone is not yet ready to be poured.
Work steadily but efficiently, as the silicone begins its chemical reaction the moment the two parts meet.
- Stir slowly with a flat-edged spatula to avoid introducing unnecessary air bubbles into the mixture.
- Scrape the sides and the bottom of the mixing container several times during the process to incorporate unmixed material.
- Observe the pot life, which is the amount of time you have to work with the liquid before it begins to thicken.
Step 7: Degas the Mixture
Air bubbles trapped against the surface of your model will create imperfections in your final casts.
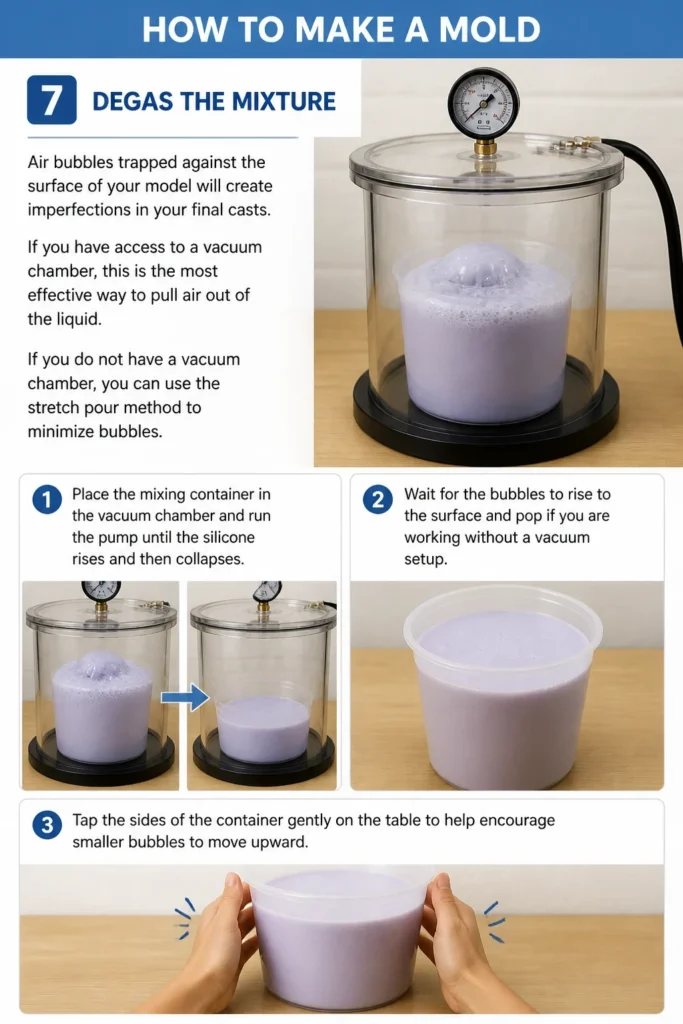
If you have access to a vacuum chamber, this is the most effective way to pull air out of the liquid.
If you do not have a vacuum chamber, you can use the “stretch pour” method to minimize bubbles.
- Place the mixing container in the vacuum chamber and run the pump until the silicone rises and then collapses.
- Wait for the bubbles to rise to the surface and pop if you are working without a vacuum setup.
- Tap the sides of the container gently on the table to help encourage smaller bubbles to move upward.
Step 8: Perform the Pour
The way you pour the silicone determines how well it captures the fine details of your model.
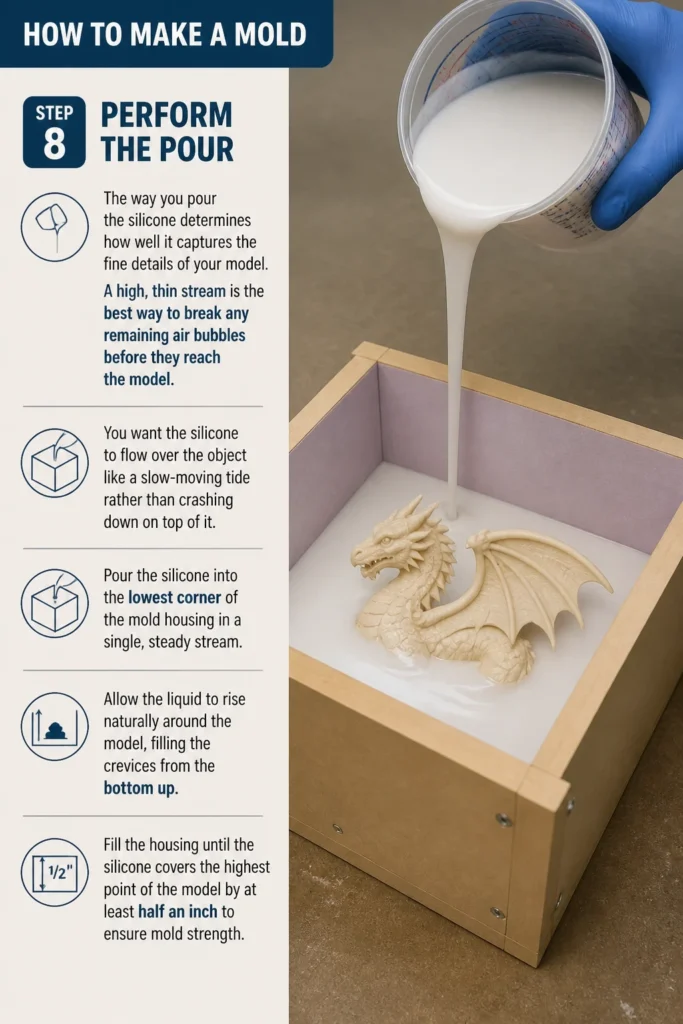
A high, thin stream is the best way to break any remaining air bubbles before they reach the model.
You want the silicone to flow over the object like a slow-moving tide rather than crashing down on top of it.
- Pour the silicone into the lowest corner of the mold housing in a single, steady stream.
- Allow the liquid to rise naturally around the model, filling the crevices from the bottom up.
- Fill the housing until the silicone covers the highest point of the model by at least half an inch to ensure mold strength.
Step 9: Allow for Proper Curing
Patience is the most important tool in this step of the process.
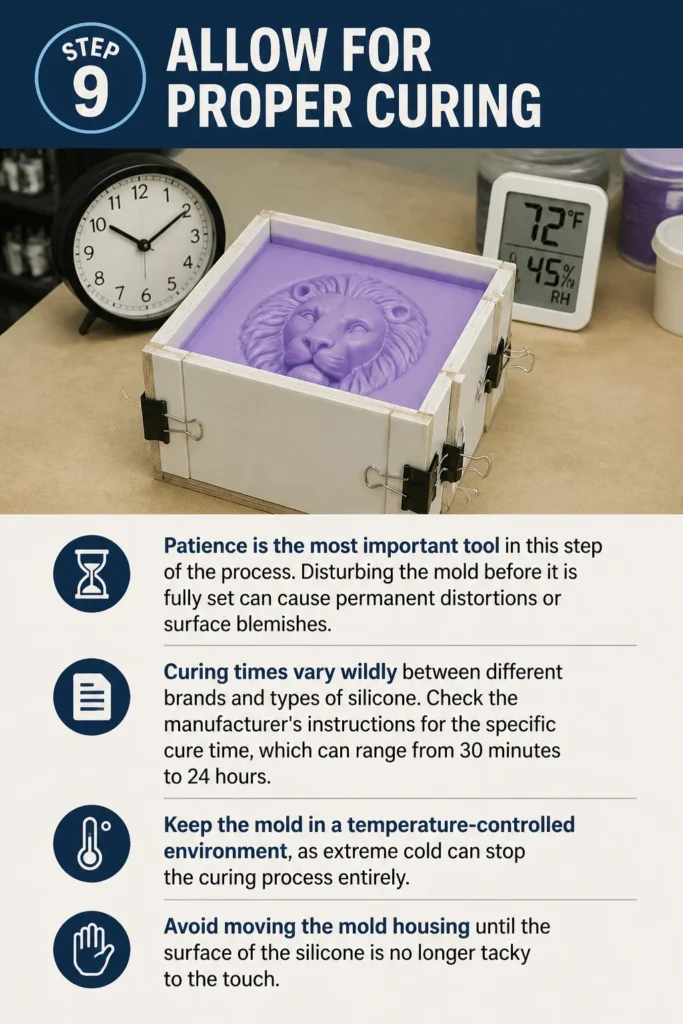
Disturbing the mold before it is fully set can cause permanent distortions or surface blemishes.
Curing times vary wildly between different brands and types of silicone.
- Check the manufacturer’s instructions for the specific cure time, which can range from 30 minutes to 24 hours.
- Keep the mold in a temperature-controlled environment, as extreme cold can stop the curing process entirely.
- Avoid moving the mold housing until the surface of the silicone is no longer tacky to the touch.
Step 10: Demold the Original Object
Once the silicone is firm and resilient, it is time to remove the housing and the original model.
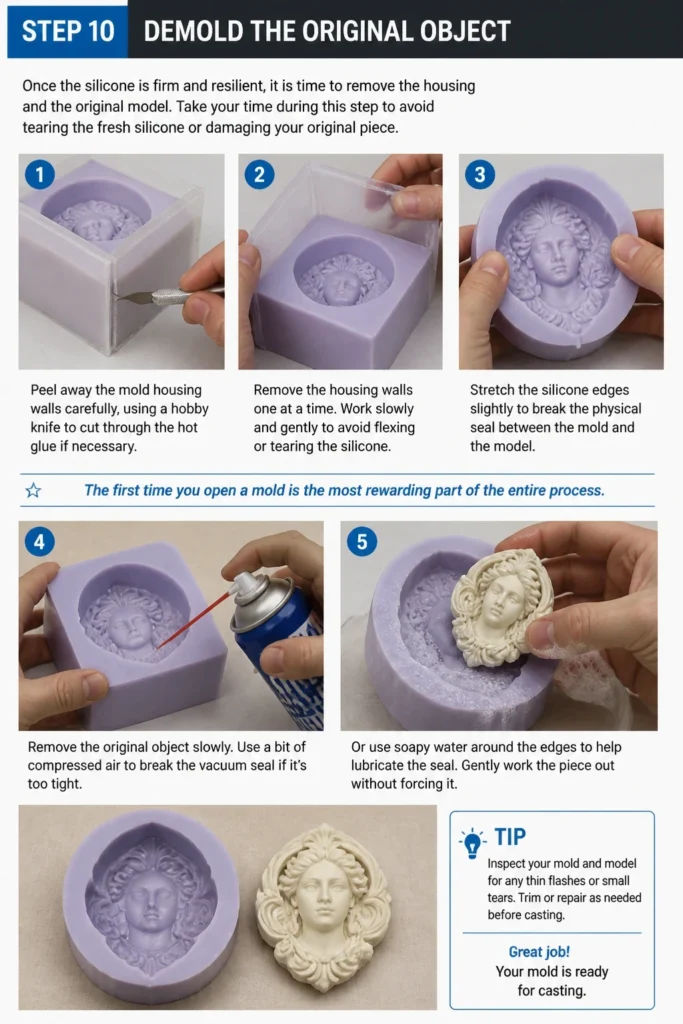
Take your time during this step to avoid tearing the fresh silicone or damaging your original piece.
The first time you open a mold is the most rewarding part of the entire process.
- Peel away the mold housing walls carefully, using a hobby knife to cut through the hot glue if necessary.
- Stretch the silicone edges slightly to break the physical seal between the mold and the model.
- Remove the original object slowly, using a bit of compressed air or soapy water if the vacuum seal is too tight.
Common Mistakes to Avoid
Inaccurate Mixing Ratios
Failing to measure your silicone components precisely is the most frequent cause of mold failure.
Even a small deviation can prevent the chemical reaction needed for the silicone to harden properly.
Always use a digital scale or graduated mixing cups to ensure the ratio matches the manufacturer’s specifications exactly.
Ignoring Sulfur Inhibition
Certain materials, particularly clays containing sulfur, will prevent platinum-cure silicone from ever hardening.
The silicone will remain liquid or gooey wherever it touches the sulfur-bearing material, ruining the mold.
Always check your clay labels or perform a small test cure on a scrap piece before committing to a full mold.
Rushing the Pouring Process
Pouring the silicone too quickly or directly onto the top of the model traps air in deep recesses.
These air pockets become “warts” or holes in your final casted parts, requiring extensive post-processing.
Pouring in a thin stream from a significant height helps break bubbles before they ever reach the model surface.
Troubleshooting
Silicone is Tacky After the Recommended Curing Time
This usually indicates either a mixing error or temperature issues in your workspace during the cure.
If the environment is too cold, the curing process will slow down significantly or stop altogether.
Try moving the mold to a warmer area or wait an additional 24 hours before deciding the mold is a total loss.
Bubbles on the Surface of the Finished Mold
Surface bubbles mean air was trapped against the original model during the pouring stage.
For your next attempt, try painting a thin layer of silicone onto the model with a brush before pouring the rest.
This “detail coat” ensures that the silicone gets into every tiny crack without trapping air pockets against the detail.
The Mold Tore During Demolding
This often happens if the silicone you chose has a low tear strength or if the model had sharp undercuts.
You can sometimes repair small tears using a tiny amount of fresh silicone as an adhesive.
For future projects with complex shapes, look for silicone labeled as “high tear strength” to handle the stress of demolding.
Key Takeaways
- Select non-porous models or seal them thoroughly with acrylic spray before starting.
- Build a leak-proof housing with enough clearance to provide a sturdy wall for the mold.
- Measure silicone by weight or volume exactly as the manufacturer specifies for that specific product.
- Pour silicone in a thin stream into the lowest point of the mold box to minimize air entrapment.
- Wait the full recommended cure time in a warm environment to prevent mold distortion or tackiness.
- Use a quality release agent to ensure the model and housing separate easily from the cured silicone.
Frequently Asked Questions
How many times can I use a single silicone mold?
The lifespan of a mold depends on the material you are casting into it and the complexity of the shape.
Resins are chemically aggressive and may wear out a silicone mold after 20 to 50 pours as the mold loses its flexibility.
Wax and plaster are much gentler, allowing a single high-quality mold to last for hundreds of uses without significant degradation.
Can I make a mold of an object with deep undercuts?
Yes, silicone is flexible enough to pull away from moderate undercuts without tearing the material.
For extreme undercuts, you may need to create a multi-part mold or a “cut-block” mold where you manually slice the silicone.
Choosing a silicone with a high elongation percentage will help the mold stretch over complex shapes without snapping.
What is the difference between tin-cure and platinum-cure silicone?
Tin-cure silicone is generally more affordable and is more resistant to inhibition from materials like sulfur clay.
Platinum-cure silicone has better long-term dimensional stability and lower shrinkage but is much more sensitive to chemical contamination.
Most professionals prefer platinum-cure for high-precision industrial parts and molds that need to remain accurate for years.
Our Top Recommended Finds
- Digital Gram Scale: This is essential for measuring silicone parts accurately to the tenth of a gram for a perfect cure.
- Vacuum Chamber and Pump: A game-changer for removing all air bubbles from your silicone, resulting in professional, glass-smooth molds.
- High-Strength Mold Release: A quality aerosol release agent ensures your models pop out easily without damaging the delicate silicone surface.
Begin Your Custom Casting Project
Mastering the art of mold making opens a world of creative possibilities for artists, engineers, and hobbyists alike.
Start with a small, simple object to build your confidence and get a feel for how the silicone behaves during the mix.
Once you have your first successful mold, you can explore the vast array of casting resins and pigments to bring your ideas to life.
Gather your materials and start building your first mold housing today to see what you can replicate.