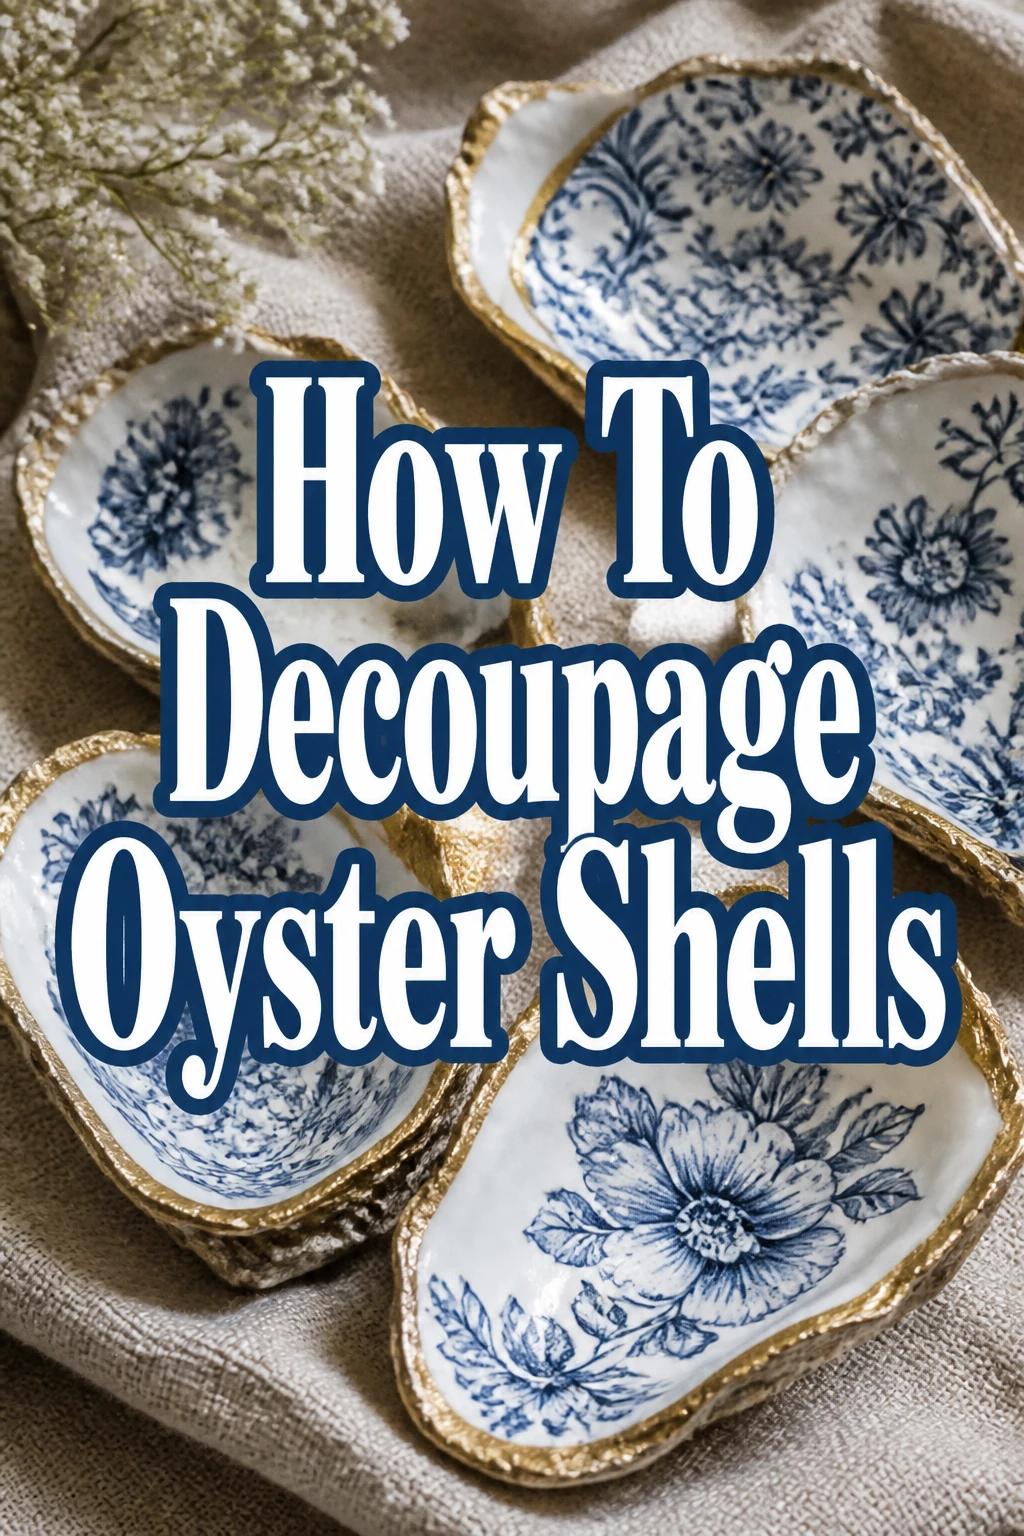
How To Decoupage Oyster Shells
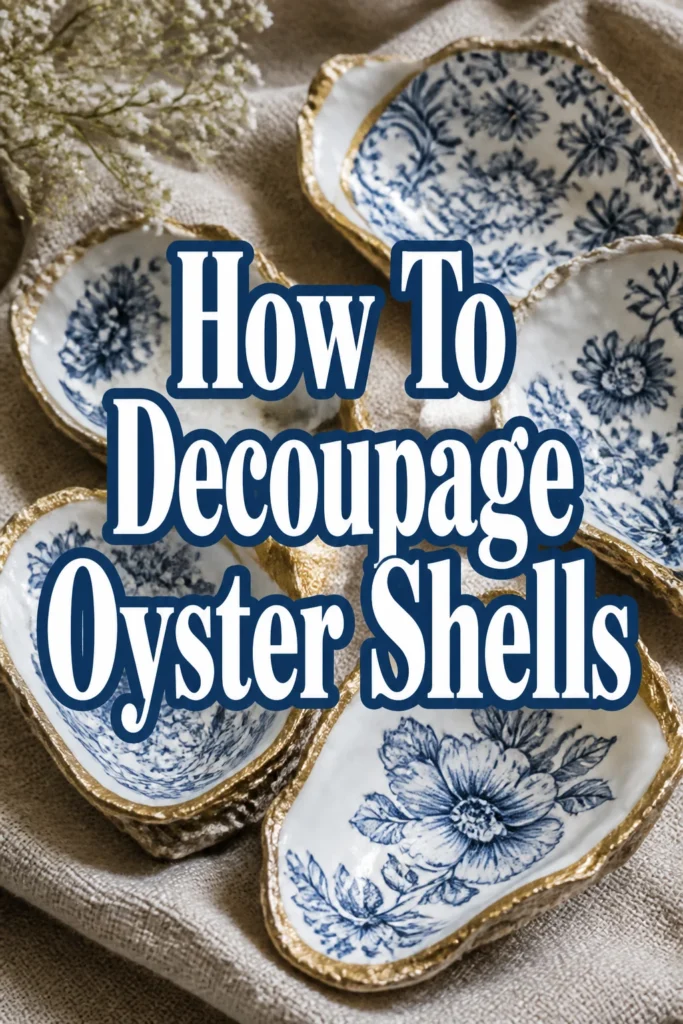
Decoupage transforms a simple oyster shell into a piece of functional art that captures the essence of the coast. After years of collecting shells along the Atlantic shoreline, I have refined the process of making these gilded treasures into high-end home decor.
This guide shares my tried-and-true methods for achieving a professional, boutique-quality finish every time. You will learn how to prepare the natural surface and apply delicate patterns with precision.
Quick Overview
This project is an excellent way to repurpose natural materials into beautiful gifts or jewelry dishes. It requires patience and a steady hand but offers a high reward for minimal financial investment.
- Time needed: 3 to 4 hours (including drying time)
- Difficulty: Beginner
- What you’ll need: Oyster shells, decorative napkins, Mod Podge, white acrylic paint, gold liquid leaf, and soft-bristled brushes.
Step 1: Source and Clean Your Shells
Identify the best shells for your project by looking for deep, cupped shapes that can hold jewelry or salt. If you are foraging them yourself, look for shells that are thick and free of large cracks or deep pits.
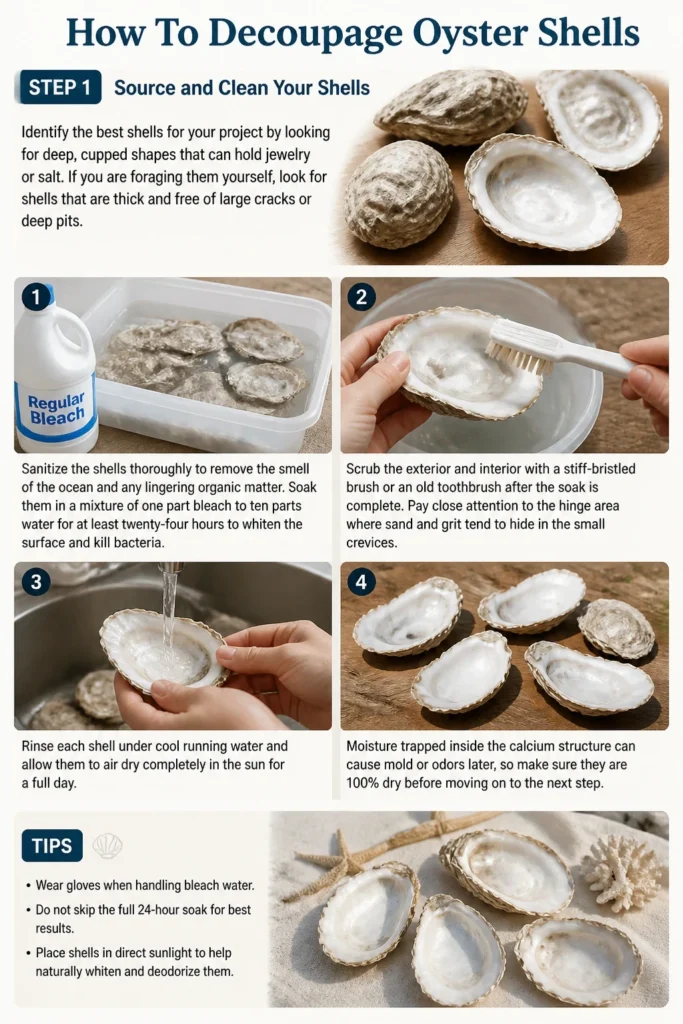
Sanitize the shells thoroughly to remove the smell of the ocean and any lingering organic matter. Soak them in a mixture of one part bleach to ten parts water for at least twenty-four hours to whiten the surface and kill bacteria.
Scrub the exterior and interior with a stiff-bristled brush or an old toothbrush after the soak is complete. Pay close attention to the hinge area where sand and grit tend to hide in the small crevices.
Rinse each shell under cool running water and allow them to air dry completely in the sun for a full day. Moisture trapped inside the calcium structure can prevent your glue from adhering correctly later in the process.
Pro Tip: If you get shells from a restaurant, boil them for ten minutes first to break down any residual oils or butter from the cooking process.
Step 2: Prepare the Surface with Sandpaper
Examine the back of the shell for any sharp edges or barnacles that might scratch a tabletop. Use a medium-grit sandpaper, around 150 grit, to smooth down the rough exterior until it feels comfortable to the touch.
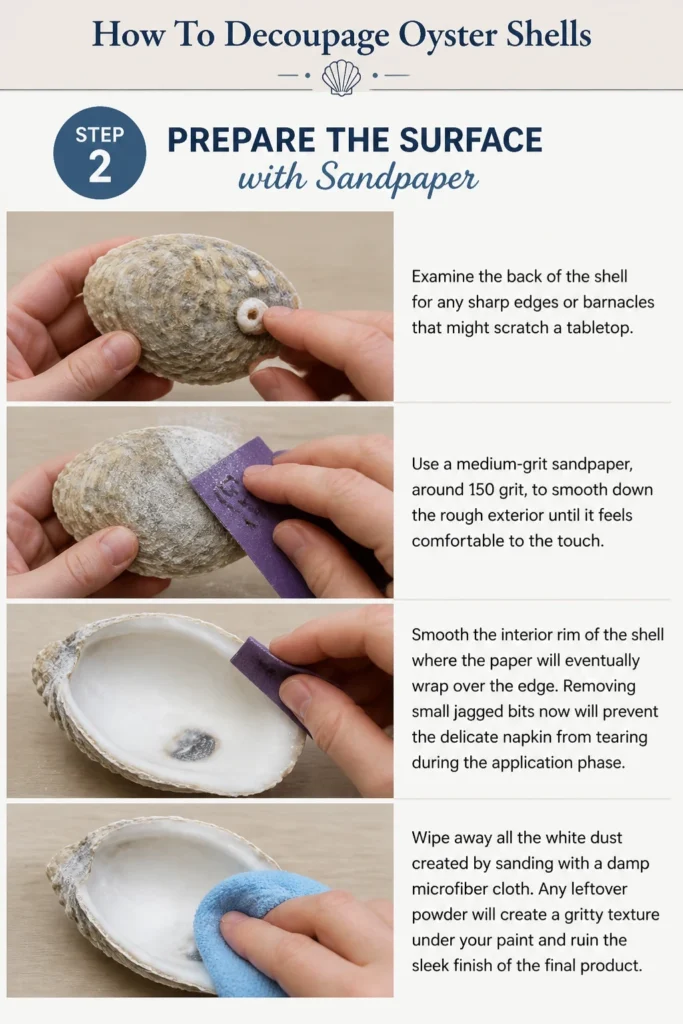
Smooth the interior rim of the shell where the paper will eventually wrap over the edge. Removing small jagged bits now will prevent the delicate napkin from tearing during the application phase.
Wipe away all the white dust created by sanding with a damp microfiber cloth. Any leftover powder will create a gritty texture under your paint and ruin the sleek finish of the final product.
Step 3: Apply a White Base Coat
Paint the entire interior of the oyster shell with a thin layer of white acrylic paint. This step is vital because oyster shells often have dark purple or grey spots that will show through thin decoupage paper.
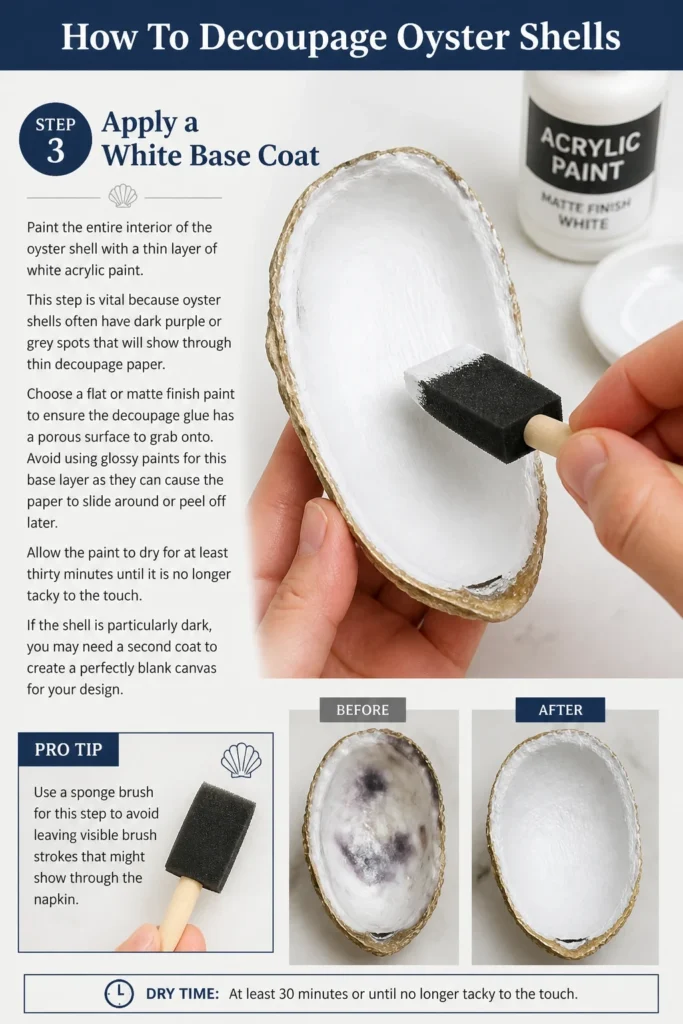
Choose a flat or matte finish paint to ensure the decoupage glue has a porous surface to grab onto. Avoid using glossy paints for this base layer as they can cause the paper to slide around or peel off later.
Allow the paint to dry for at least thirty minutes until it is no longer tacky to the touch. If the shell is particularly dark, you may need a second coat to create a perfectly blank canvas for your design.
Pro Tip: Use a sponge brush for this step to avoid leaving visible brush strokes that might show through the napkin.
Step 4: Select and Separate the Napkins
Choose high-quality paper napkins with small, repeating patterns like florals, chinoiserie, or coastal motifs. Large patterns often get lost on the small, curved surface of an oyster shell, so scale is an important consideration.
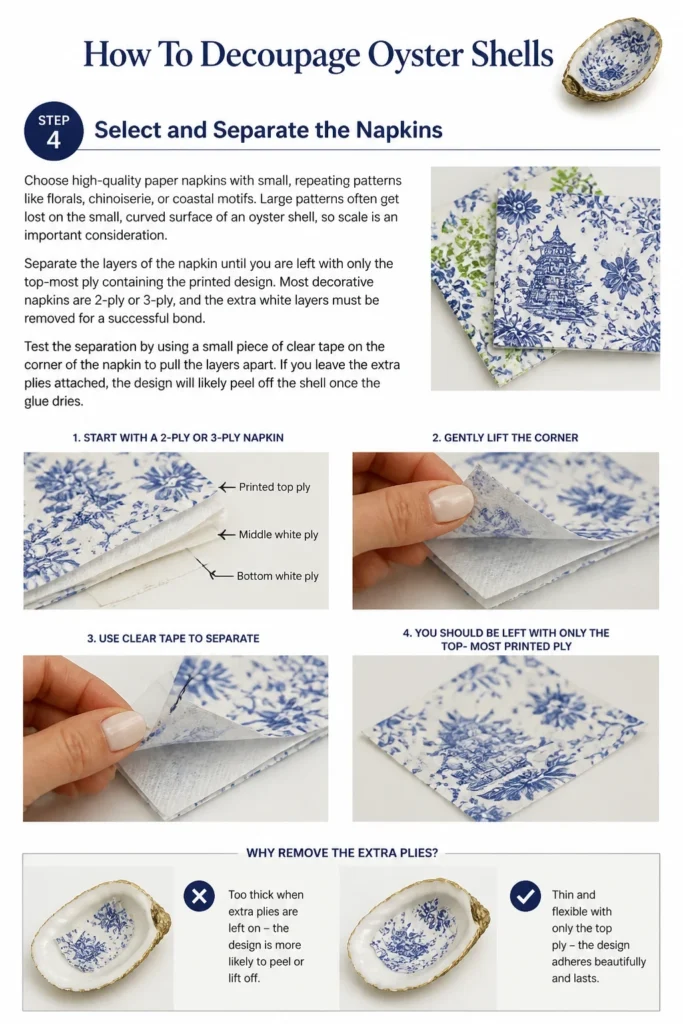
Separate the layers of the napkin until you are left with only the top-most ply containing the printed design. Most decorative napkins are 2-ply or 3-ply, and the extra white layers must be removed for a successful bond.
Test the separation by using a small piece of clear tape on the corner of the napkin to pull the layers apart. If you leave the extra plies attached, the design will likely peel off the shell once the glue dries.
Step 5: Cut and Dry Fit the Design
Roughly cut a piece of the napkin that is slightly larger than the shell you are working on. You want plenty of excess paper hanging over the edges to ensure full coverage of the interior curves.
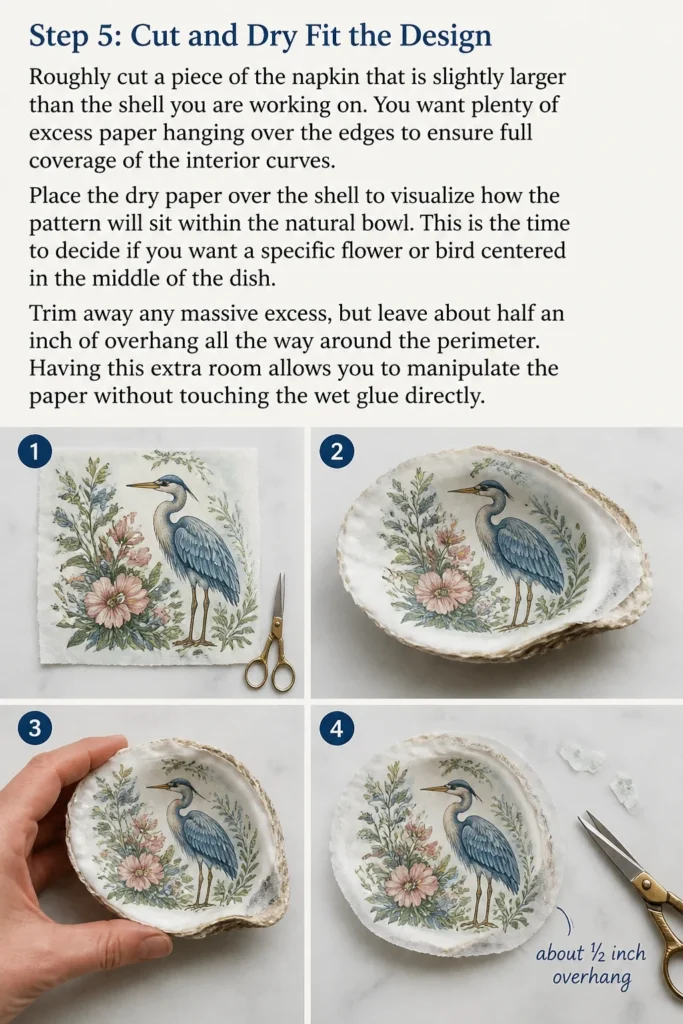
Place the dry paper over the shell to visualize how the pattern will sit within the natural bowl. This is the time to decide if you want a specific flower or bird centered in the middle of the dish.
Trim away any massive excess, but leave about half an inch of overhang all the way around the perimeter. Having this extra room allows you to manipulate the paper without touching the wet glue directly.
Step 6: Apply the Decoupage Medium
Brush a thin, even layer of Mod Podge or decoupage glue over the painted interior of the shell. Start from the center and work your way out to the edges to ensure every millimeter is covered.
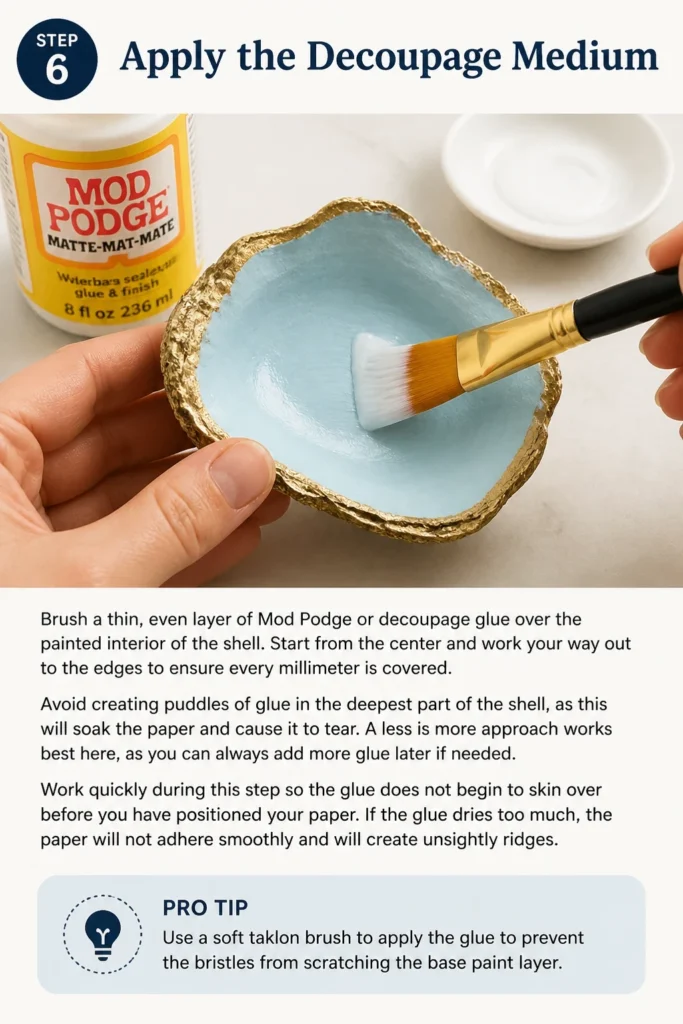
Avoid creating puddles of glue in the deepest part of the shell, as this will soak the paper and cause it to tear. A “less is more” approach works best here, as you can always add more glue later if needed.
Work quickly during this step so the glue does not begin to skin over before you have positioned your paper. If the glue dries too much, the paper will not adhere smoothly and will create unsightly ridges.
Pro Tip: Use a soft taklon brush to apply the glue to prevent the bristles from scratching the base paint layer.
Step 7: Position and Smooth the Paper
Lay the napkin ply gently onto the wet glue, starting from the center of the shell and moving outward. Use your fingers or a soft, dry brush to press the paper into the deep curves and crevices.
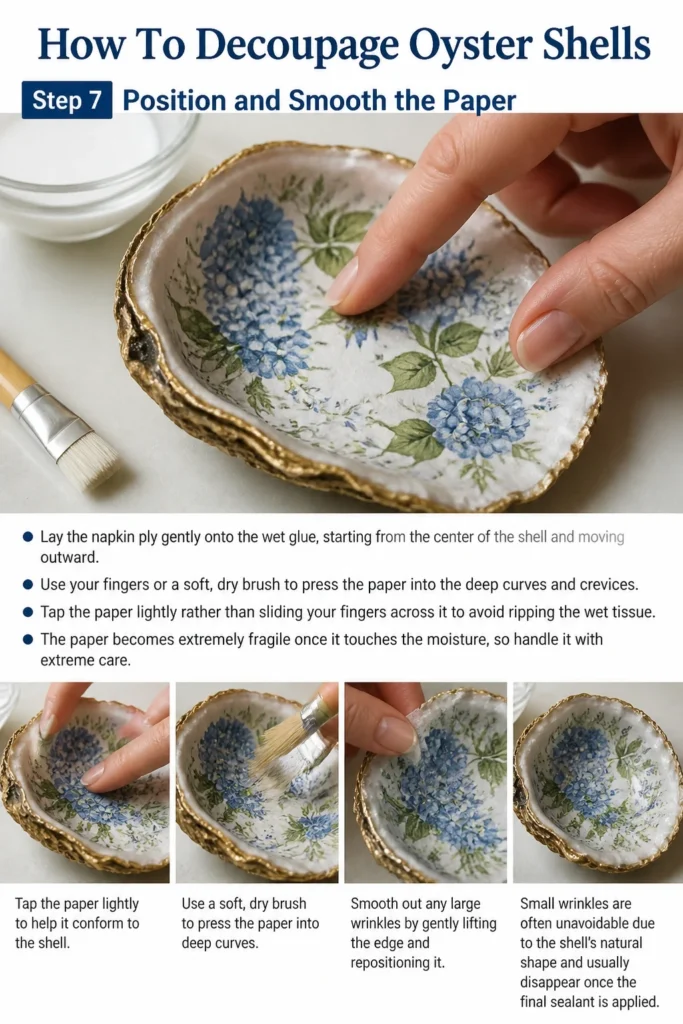
Tap the paper lightly rather than sliding your fingers across it to avoid ripping the wet tissue. The paper becomes extremely fragile once it touches the moisture, so handle it with extreme care.
Smooth out any large wrinkles by gently lifting the edge of the paper and repositioning it. Small wrinkles are often unavoidable due to the shell’s natural shape and usually disappear once the final sealant is applied.
Step 8: Remove Excess Paper
Wait for the glue to dry for about ten minutes so the paper is securely anchored but not fully hardened. This makes the next step of removing the overhang much cleaner and more precise.
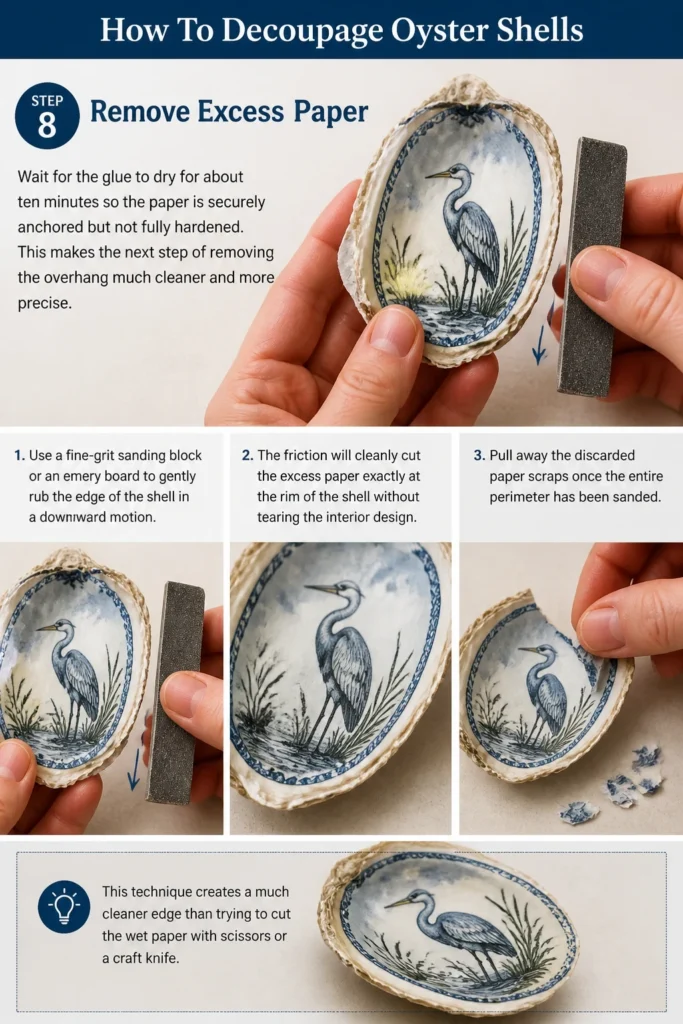
Use a fine-grit sanding block or an emery board to gently rub the edge of the shell in a downward motion. The friction will cleanly “cut” the excess paper exactly at the rim of the shell without tearing the interior design.
Pull away the discarded paper scraps once the entire perimeter has been sanded. This technique creates a much cleaner edge than trying to cut the wet paper with scissors or a craft knife.
Step 9: Seal the Design
Apply a top coat of decoupage medium over the entire interior of the shell once the paper is dry. This coat protects the design from moisture and provides a uniform sheen across the surface.
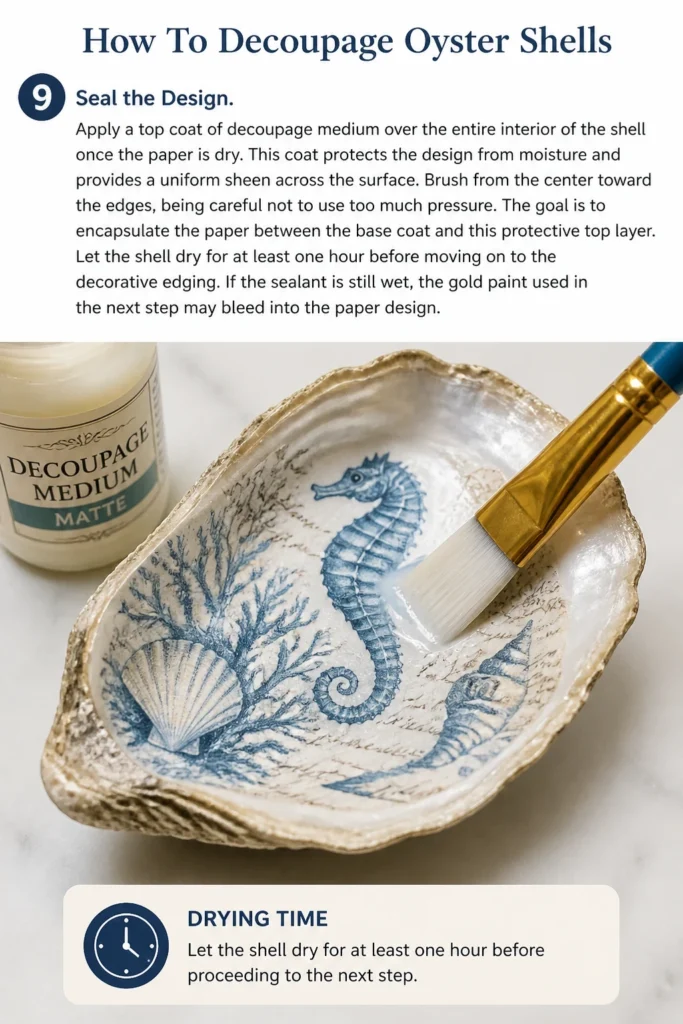
Brush from the center toward the edges, being careful not to use too much pressure. The goal is to encapsulate the paper between the base coat and this protective top layer.
Let the shell dry for at least one hour before moving on to the decorative edging. If the sealant is still wet, the gold paint used in the next step may bleed into the paper design.
Step 10: Gild the Edges
Dip a small, detail brush into liquid gold leaf or high-quality metallic gold acrylic paint. Liquid gold leaf provides a more authentic metallic shine but requires a well-ventilated area due to its strong fumes.
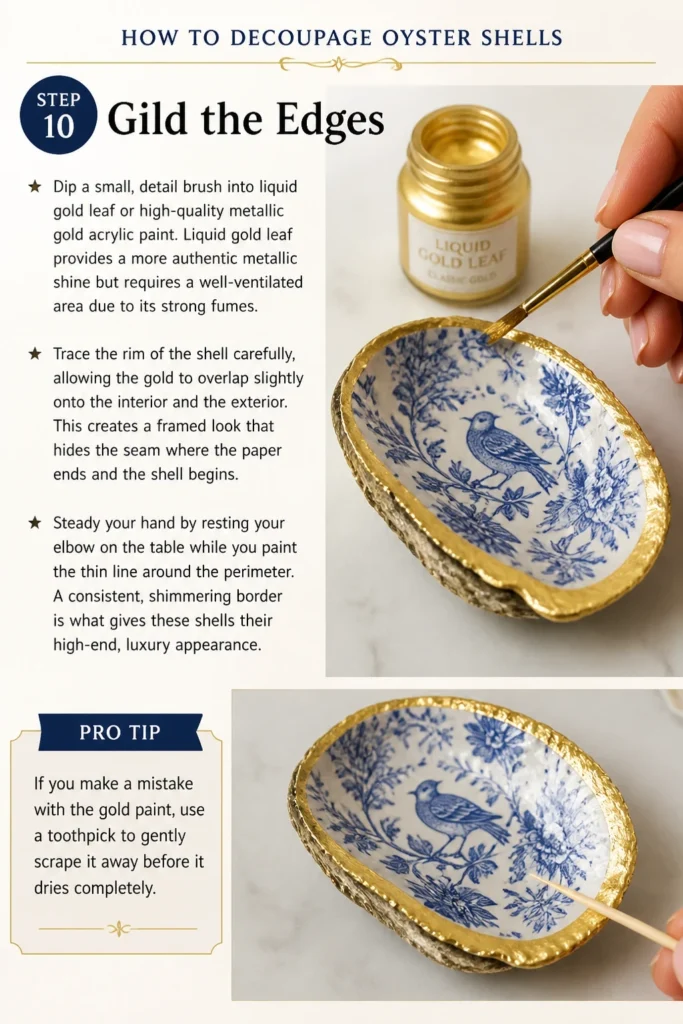
Trace the rim of the shell carefully, allowing the gold to overlap slightly onto the interior and the exterior. This creates a framed look that hides the seam where the paper ends and the shell begins.
Steady your hand by resting your elbow on the table while you paint the thin line around the perimeter. A consistent, shimmering border is what gives these shells their high-end, luxury appearance.
Pro Tip: If you make a mistake with the gold paint, use a toothpick to gently scrape it away before it dries completely.
Step 11: Final Varnish and Cure
Spray or brush a final high-gloss varnish over the entire shell once the gold paint has dried for several hours. A gloss finish mimics the natural wet look of a shell and makes the colors of the napkin pop.
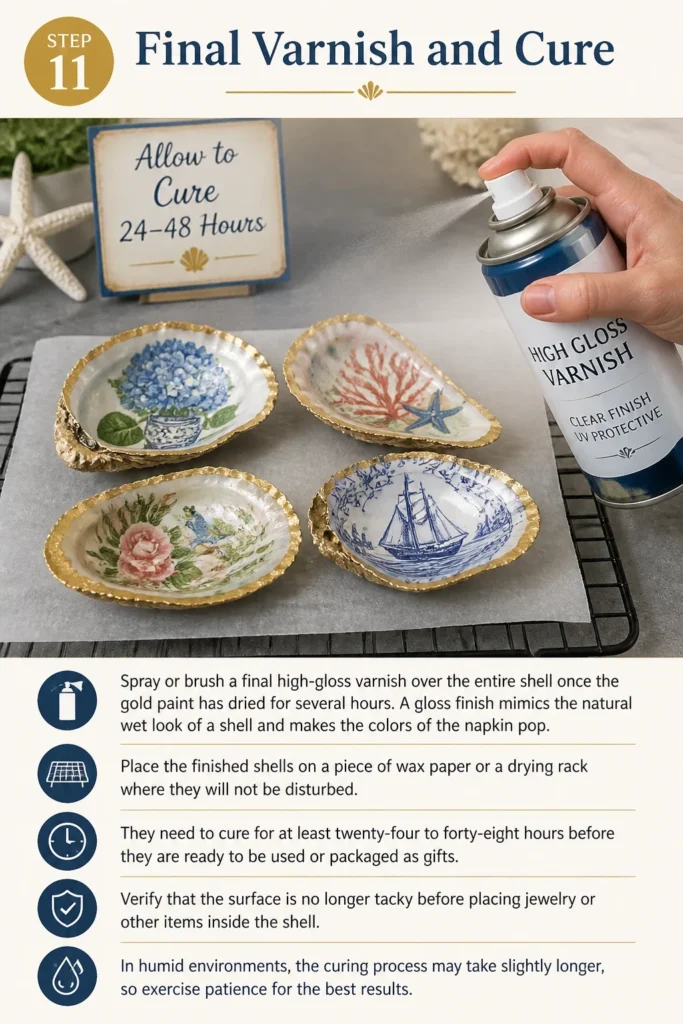
Place the finished shells on a piece of wax paper or a drying rack where they will not be disturbed. They need to cure for at least twenty-four to forty-eight hours before they are ready to be used or packaged as gifts.
Verify that the surface is no longer tacky before placing jewelry or other items inside the shell. In humid environments, the curing process may take slightly longer, so exercise patience for the best results.
Common Mistakes to Avoid
Skipping the White Base Coat
Many beginners assume the white part of the shell is bright enough to act as a background. However, oyster shells are naturally translucent and have dark mineral deposits that will make your napkin design look muddy or dull. The white paint acts as a primer that ensures the colors of your chosen pattern remain vibrant and true to life.
Using Multi-Ply Napkins
Attempting to glue a full napkin onto a shell is the most common cause of peeling and bubbling. The glue only penetrates the bottom layer, leaving the top printed layer effectively floating on a bed of unattached paper. You must peel the napkin down to the single, thinnest layer possible to ensure the adhesive can bond the design directly to the shell surface.
Overworking the Wet Paper
Once the thin napkin touches the wet Mod Podge, it becomes as delicate as a wet tissue. If you continue to brush or rub the surface to remove every tiny wrinkle, you will inevitably create a hole in the design. It is better to accept a few minor natural folds than to ruin the entire piece by over-handling the fragile material while it is saturated.
Troubleshooting
The Paper is Bubbling or Lifting
Bubbles usually occur when air is trapped under the paper or when the glue was applied too thickly in one spot. To fix this, you can use a very fine sewing needle to prick the bubble and release the air, then gently press it down with a damp finger. If the edges are lifting, use a tiny detail brush to apply a bit more glue underneath and press firmly until it holds.
The Gold Paint is Bleeding into the Pattern
This happens when the top sealant coat hasn’t fully dried or wasn’t applied all the way to the edge. If the gold starts to spread into the paper fibers, stop immediately and let the shell dry for another hour. You can sometimes hide these bleeds by adding a slightly wider gold border or by using a tiny bit of white paint to cover the stray gold before re-applying the pattern.
The Finish is Cloudy or Milky
A cloudy finish is often the result of applying a second coat of sealant before the first one has completely dried. This traps moisture between the layers, which can take days or even weeks to clear up. To avoid this, always work in thin layers and ensure the environment is not overly humid, as moisture in the air can interfere with the clarity of the decoupage medium.
Key Takeaways
- Always sanitize and dry your shells thoroughly before starting to ensure proper adhesion.
- The white acrylic base coat is essential for making the paper colors appear bright and clear.
- Use only the top printed layer of the napkin to prevent the design from peeling off later.
- Sanding the edges downward is the most effective way to get a clean, professional trim.
- Liquid gold leaf provides the most realistic metallic finish for a high-end look.
- Allow for a full 48-hour cure time to ensure the shell is durable and non-tacky.
Frequently Asked Questions
Can I use fabric instead of napkins for this project?
Yes, you can use very thin cotton fabric, but it is much more difficult to wrap around the deep curves of an oyster shell. Fabric does not stretch or conform as easily as tissue-thin napkins, so you may end up with much larger folds and wrinkles. If you choose fabric, use a heavier-duty decoupage medium designed specifically for textiles to ensure a strong bond.
Are these decoupaged shells food safe?
Generally, shells decorated with Mod Podge and acrylic paint are not considered food safe. While they are perfect for holding dry items like salt or jewelry, you should not serve wet foods or items intended for consumption directly off the decorated surface. If you want to use them for food, you must find a specific epoxy resin or sealer that is explicitly labeled as FDA-compliant and food-safe.
How do I clean the shells once they are finished?
Decoupaged shells should never be submerged in water or placed in a dishwasher. To clean them, simply wipe the surface with a dry or slightly damp microfiber cloth to remove dust. Because the paper and glue are sensitive to moisture, keeping them in a dry environment will ensure the decorative finish lasts for many years without yellowing or peeling.
Our Top Recommended Finds
- Matte Mod Podge: This is the industry standard for decoupage and provides a reliable, easy-to-use adhesive and sealant.
- Liquid Gold Leaf: This solvent-based paint offers a much richer, more reflective metallic finish than standard gold acrylics.
- Detail Paint Brush Set: A set of soft, synthetic brushes in various sizes is necessary for both the delicate paper application and the precise gold edging.
Expanding Your Coastal Craft Collection
Once you have mastered the art of the oyster shell, you can apply these same techniques to other treasures found on the beach. Scallop shells, large clam shells, and even smooth sea stones can be transformed using the same decoupage and gilding methods. Consider experimenting with different types of paper, such as vintage maps, sheet music, or tissue paper, to create a diverse collection of decorative items.
These shells make stunning place card holders for weddings, unique ornaments for holiday trees, or elegant favors for coastal-themed events. Gather your materials today and start exploring the endless creative possibilities that these natural canvases provide. Your home will soon be filled with the sophisticated charm of handmade coastal art.