How To Make Chain Bracelets
There’s a unique satisfaction in wearing something you’ve crafted with your own hands.
I remember the joy of finishing my very first chain bracelet, a simple yet elegant piece that felt incredibly special.
This guide draws from years of personal experience, ensuring you’ll learn the practical steps to create your own beautiful chain bracelets.
Quick Overview
This guide will walk you through creating a stunning chain bracelet from start to finish. You’ll learn how to select your components, assemble the chain, and add a secure clasp, resulting in a personalized piece of jewelry.
- Time needed: 30 minutes to 1 hour (depending on complexity)
- Difficulty: Beginner
- What you’ll need: Jewelry pliers, chain, jump rings, clasp, wire cutters
Step-by-Step Instructions
Step 1: Gather Your Materials and Tools
Before you begin, lay out all your necessary items on a clean, well-lit workspace. Having everything within reach makes the process smoother and more enjoyable.
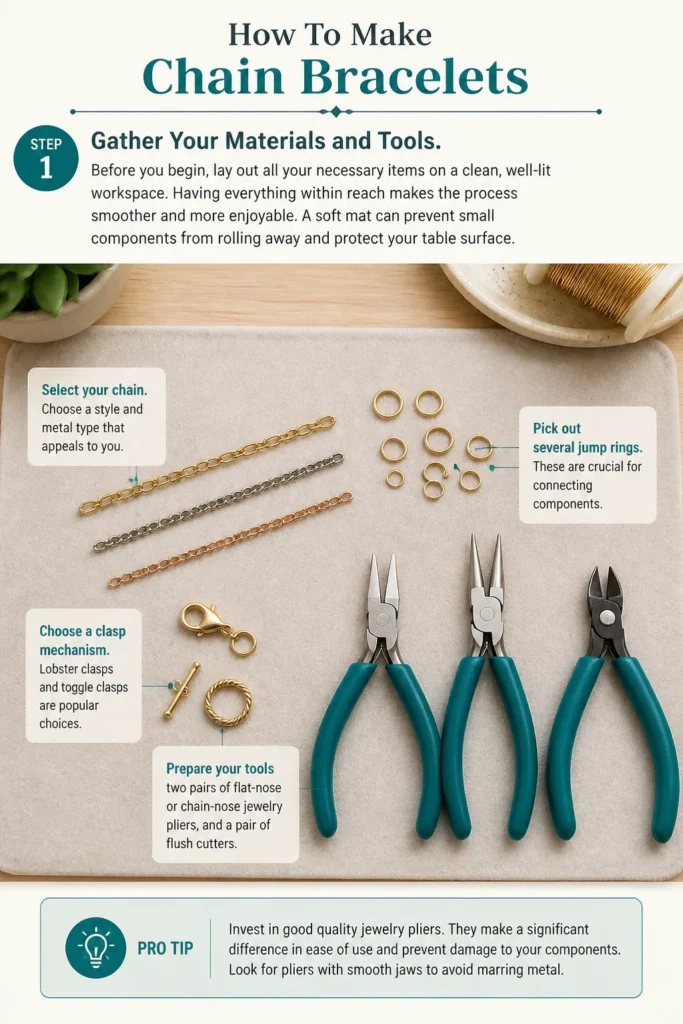
A soft mat can prevent small components from rolling away and protect your table surface.
- Select your chain. Choose a style and metal type that appeals to you.
- Pick out several jump rings. These are crucial for connecting components.
- Choose a clasp mechanism. Lobster clasps and toggle clasps are popular choices.
- Prepare your tools: two pairs of flat-nose or chain-nose jewelry pliers, and a pair of flush cutters.
Pro Tip: Invest in good quality jewelry pliers. They make a significant difference in ease of use and prevent damage to your components. Look for pliers with smooth jaws to avoid marring metal.
Step 2: Measure and Cut Your Chain
The length of your chain is critical for a comfortable fit. It’s always better to cut a little longer than you think you need, as you can always trim more later.
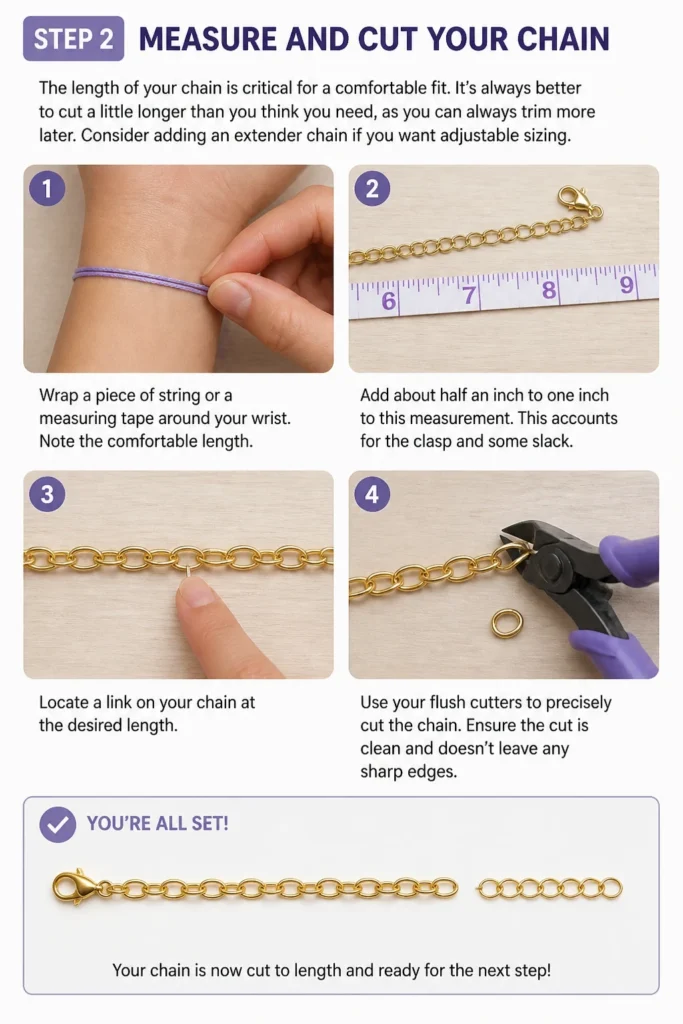
Consider adding an extender chain if you want adjustable sizing.
- Wrap a piece of string or a measuring tape around your wrist. Note the comfortable length.
- Add about half an inch to one inch to this measurement. This accounts for the clasp and some slack.
- Locate a link on your chain at the desired length. Use your flush cutters to precisely cut the chain.
- Ensure the cut is clean and doesn’t leave any sharp edges.
Step 3: Open a Jump Ring Correctly
Opening jump rings correctly is a fundamental skill in jewelry making. Improper technique can weaken the ring or distort its shape.
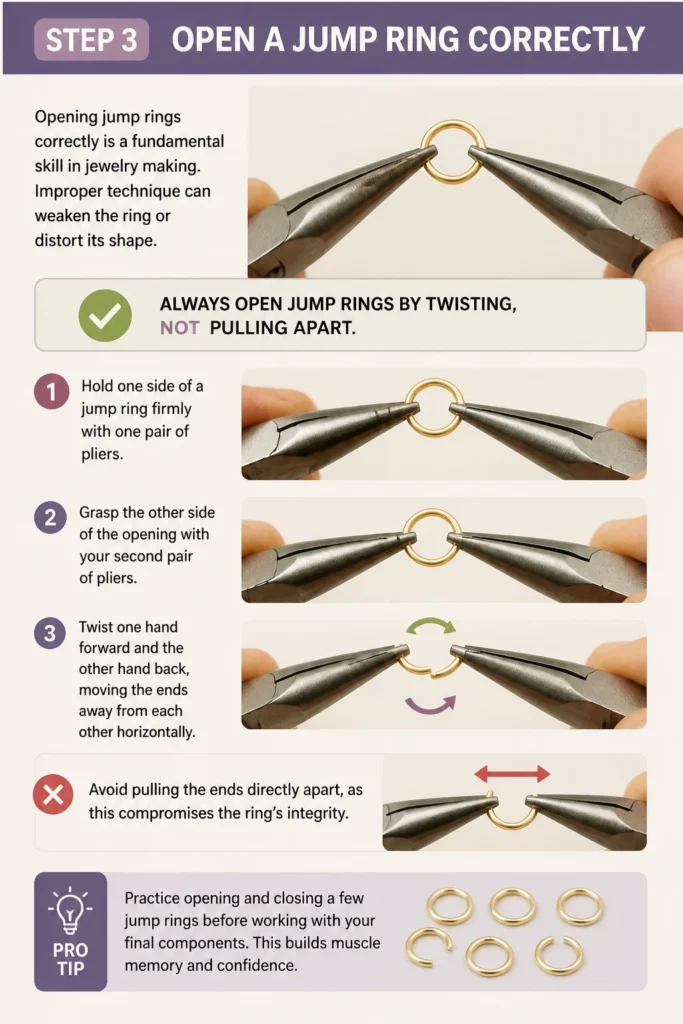
Always open jump rings by twisting, not pulling apart.
- Hold one side of a jump ring firmly with one pair of pliers.
- Grasp the other side of the opening with your second pair of pliers.
- Twist one hand forward and the other hand back, moving the ends away from each other horizontally.
- Avoid pulling the ends directly apart, as this compromises the ring’s integrity.
Pro Tip: Practice opening and closing a few jump rings before working with your final components. This builds muscle memory and confidence.
Step 4: Attach the Clasp to One End of the Chain
The clasp is what secures your bracelet to your wrist. Attaching it properly ensures your bracelet stays put.
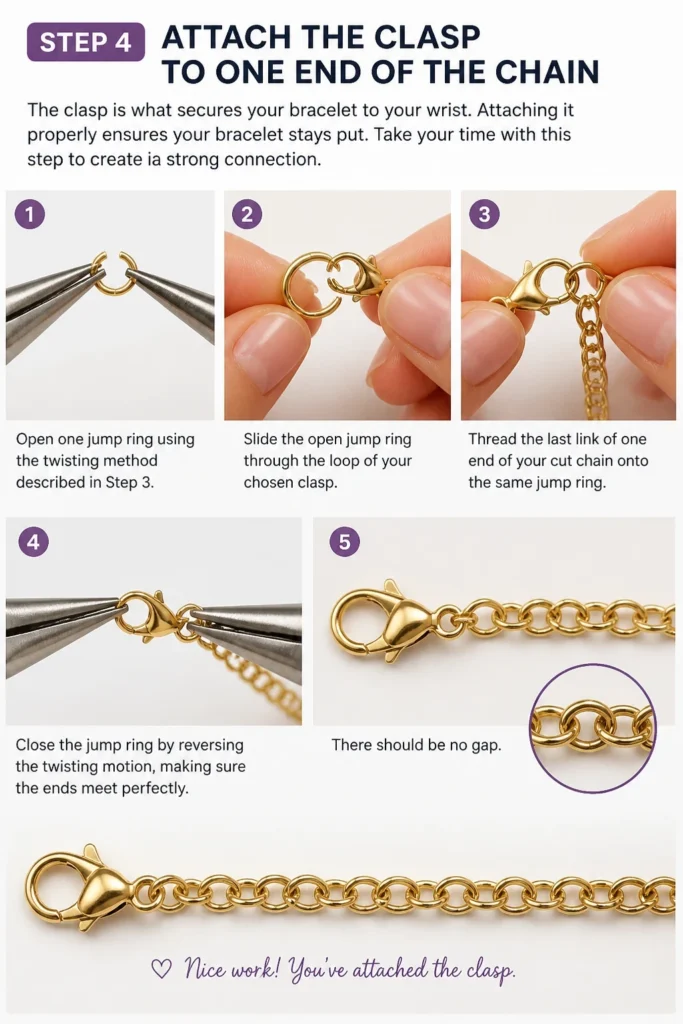
Take your time with this step to create a strong connection.
- Open one jump ring using the twisting method described in Step 3.
- Slide the open jump ring through the loop of your chosen clasp.
- Thread the last link of one end of your cut chain onto the same jump ring.
- Close the jump ring by reversing the twisting motion, making sure the ends meet perfectly. There should be no gap.
Step 5: Attach a Jump Ring to the Other End of the Chain
This jump ring serves as the catch for your clasp. It completes the bracelet’s functionality.
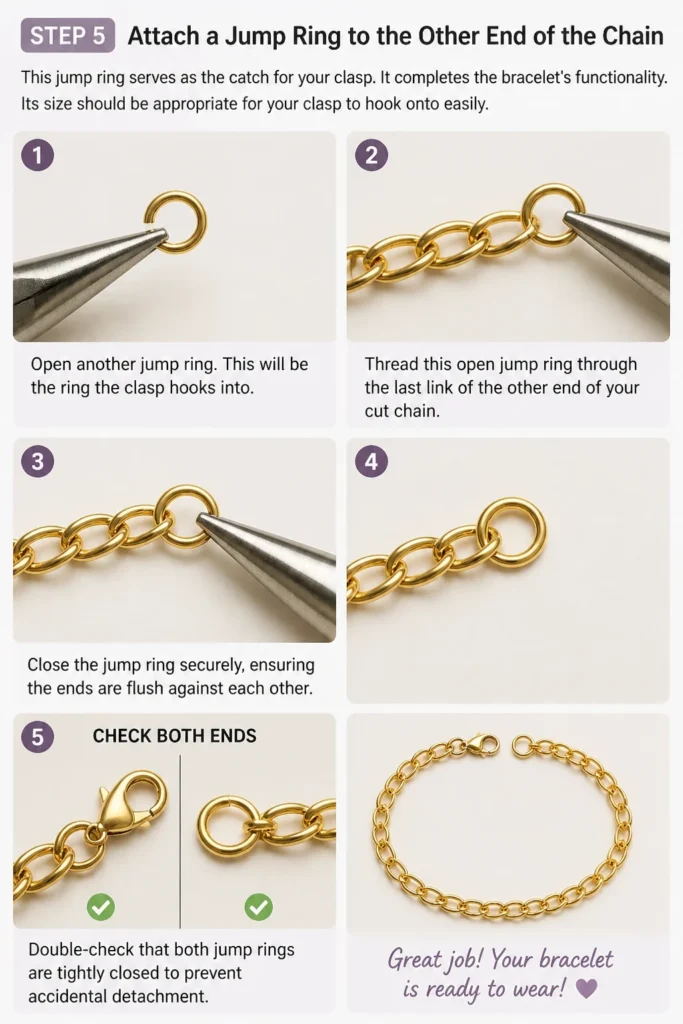
Its size should be appropriate for your clasp to hook onto easily.
- Open another jump ring. This will be the ring the clasp hooks into.
- Thread this open jump ring through the last link of the other end of your cut chain.
- Close the jump ring securely, ensuring the ends are flush against each other.
- Double-check that both jump rings are tightly closed to prevent accidental detachment.
Step 6: Test the Bracelet for Fit and Function
Before considering your bracelet complete, always try it on. This helps ensure it’s comfortable and the clasp works as expected.
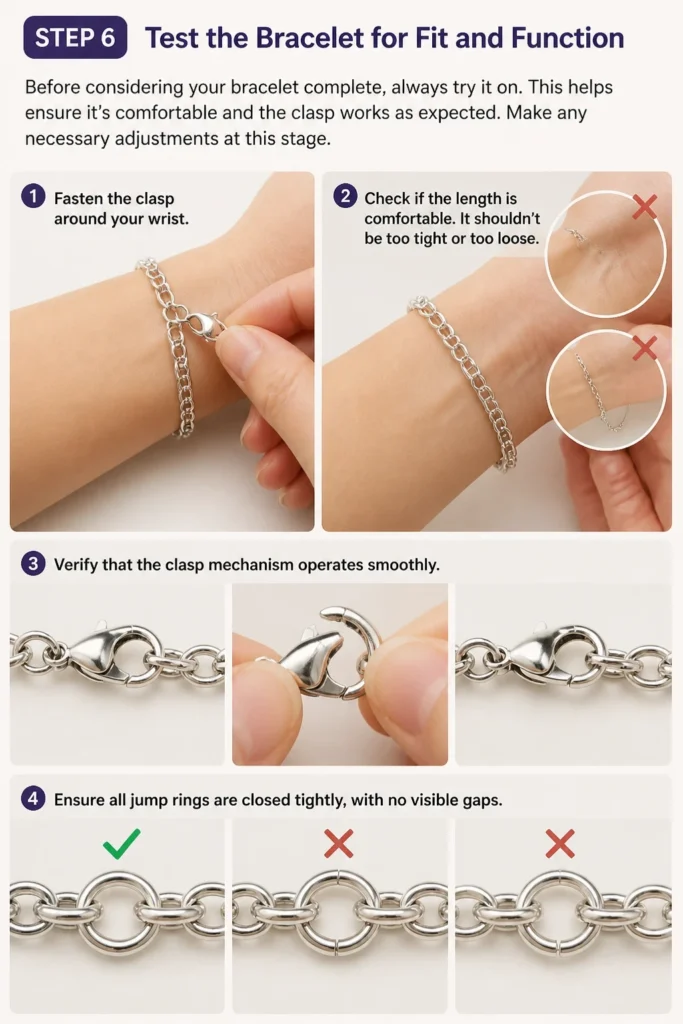
Make any necessary adjustments at this stage.
- Fasten the clasp around your wrist.
- Check if the length is comfortable. It shouldn’t be too tight or too loose.
- Verify that the clasp mechanism operates smoothly.
- Ensure all jump rings are closed tightly, with no visible gaps.
Step 7: Add Charms or Embellishments (Optional)
Personalizing your chain bracelet makes it truly unique. Charms add character and a touch of individuality.
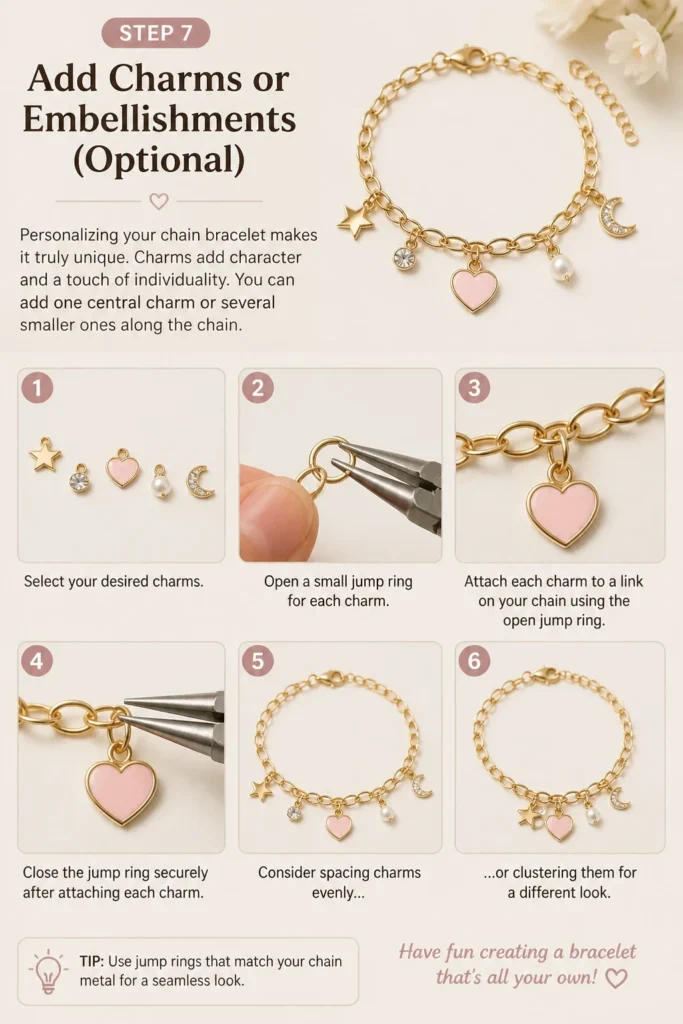
You can add one central charm or several smaller ones along the chain.
- Select your desired charms.
- Open a small jump ring for each charm.
- Attach each charm to a link on your chain using the open jump ring.
- Close the jump ring securely after attaching each charm.
- Consider spacing charms evenly or clustering them for a different look.
Common Mistakes to Avoid
Using the Wrong Pliers
Many beginners use household pliers for jewelry making. These often have serrated jaws that will scratch and damage your delicate metal components, leaving unsightly marks. Always use jewelry-specific pliers with smooth, flat jaws to protect your materials.
Opening Jump Rings Incorrectly
A common error is pulling jump ring ends directly apart instead of twisting them. This distorts the ring’s perfect circular shape, making it difficult to close securely and weakening its structure. Always twist the ends horizontally to maintain the circle and ensure a strong closure.
Cutting the Chain to the Wrong Length
Cutting the chain too short is a permanent mistake that can’t be easily fixed without adding more chain. Always measure carefully, and remember it’s better to cut slightly longer than needed. You can always trim off extra links, but you can’t add them back seamlessly.
Leaving Gaps in Jump Rings
Even a tiny gap in a closed jump ring can lead to your bracelet falling apart. Components, especially charms or the clasp, can slip through these small openings. Always ensure the ends of your jump rings meet perfectly flush, creating a strong, continuous loop.
Troubleshooting
Bracelet Feels Too Tight
If your finished bracelet feels uncomfortably snug, you likely cut the chain too short. The easiest solution is to add an extender chain. You can purchase these pre-made or create one by linking a few extra chain links together with an additional jump ring at the end.
Clasp Keeps Opening Accidentally
An opening clasp often indicates a weak or faulty clasp mechanism, or that the jump ring connecting it to the chain is not fully closed. First, check the jump ring for any gaps and close it tightly. If the clasp itself is the problem, replace it with a new, sturdier one, ensuring it’s appropriate for the bracelet’s weight.
Jump Rings Break or Deform
If your jump rings are breaking or deforming easily, they might be too thin for the stress they’re under, or you might be using too much force. Ensure you’re using jump rings with an appropriate gauge (thickness) for your project. Also, practice the correct twisting motion to open and close them gently, avoiding excessive bending.
Key Takeaways
- Preparation is key: Gather all tools and materials before starting for a smooth crafting process.
- Measure precisely: Always measure your wrist and add a little extra length to your chain for a comfortable fit.
- Master jump ring technique: Open and close jump rings by twisting horizontally to maintain their strength and shape.
- Ensure secure closures: Double-check that all jump rings are completely closed with no gaps to prevent components from detaching.
- Personalize your creation: Don’t hesitate to add charms or other embellishments to make your bracelet uniquely yours.
- Test for comfort: Always try on your bracelet to ensure a good fit and proper clasp function before declaring it finished.
Frequently Asked Questions
What type of chain is best for beginners?
For beginners, a medium-weight cable chain or rolo chain is often recommended. These chains are relatively easy to work with, have sturdy links that are simple to open and close with pliers, and are forgiving if you make a slight mistake. Avoid very delicate or intricate chains until you gain more experience.
Can I mix different metals in one bracelet?
Absolutely! Mixing metals like silver, gold, and rose gold can create a stylish and contemporary look. Just ensure the different metals complement each other and that the overall aesthetic is cohesive. This is a great way to add visual interest and personal flair to your design.
How do I clean my finished chain bracelet?
The best way to clean your chain bracelet depends on the metal. For most sterling silver or gold-filled pieces, a soft cloth and a gentle jewelry cleaner or mild soap and water will suffice. Always dry thoroughly to prevent tarnishing. Avoid harsh chemicals or abrasive materials, which can damage the finish.
What if I don’t have two pairs of pliers?
While two pairs of pliers make opening and closing jump rings much easier and more secure, you can manage with one pair and your fingers for very light-duty tasks. However, for a professional finish and to prevent hand strain, investing in a second pair of flat-nose or chain-nose pliers is highly recommended for any serious jewelry maker.
Our Top Recommended Finds
- Jewelry Pliers Set: A basic set including chain-nose, round-nose, and flush cutters will cover most of your needs for various jewelry projects.
- Assorted Jump Rings Kit: Having a variety of sizes and gauges in different metal finishes ensures you always have the right component on hand.
- Jewelry Making Mat: A soft, non-slip mat provides a safe and organized workspace, preventing small parts from rolling away.
Your Next Creative Adventure Awaits
You now have all the knowledge and practical steps to create your own beautiful chain bracelets. This simple project builds foundational jewelry-making skills that open up a world of creative possibilities.
Don’t stop here. Consider experimenting with different chain styles, adding various charms, or even incorporating beads into your next design.
Pick up your pliers today and start crafting a piece that truly reflects your personal style. The satisfaction of wearing your own handmade jewelry is incredibly rewarding.