How To Make An Umbrella
There is a specific kind of frustration that comes with a cheap umbrella collapsing during a heavy downpour.
I remember standing on a windy street corner three years ago, watching my store-bought umbrella turn inside out like a broken bird.
That moment led me to build my own high-quality version, and I have never had to buy a disposable one since.
Quick Overview
Building your own umbrella allows you to choose superior fabrics and a frame that actually stands up to the wind.
This project transforms a basic utility item into a piece of custom engineering that reflects your personal style.
- Time needed: 4 to 6 hours
- Difficulty: Intermediate
- What you’ll need: Umbrella frame, waterproof fabric (nylon or polyester), heavy-duty thread, sewing machine, seam sealer, and a fabric marking pen.
Step 1: Source a High-Quality Frame
Locate a sturdy frame by either purchasing a dedicated umbrella kit or reclaiming one from a high-end broken umbrella.
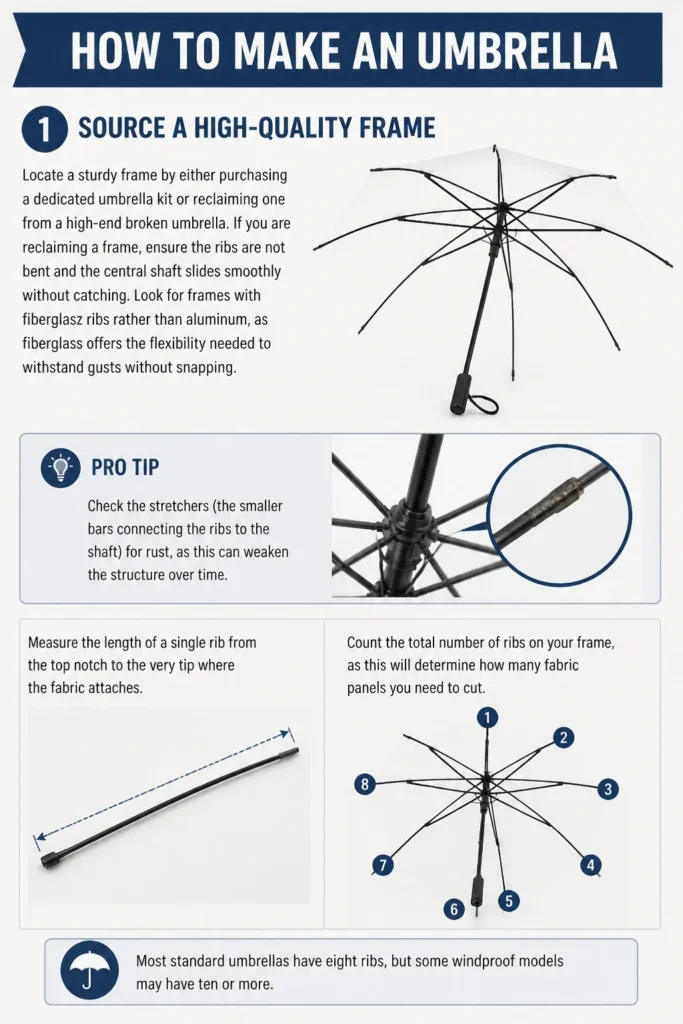
If you are reclaiming a frame, ensure the ribs are not bent and the central shaft slides smoothly without catching.
Look for frames with fiberglass ribs rather than aluminum, as fiberglass offers the flexibility needed to withstand gusts without snapping.
Pro Tip: Check the “stretchers” (the smaller bars connecting the ribs to the shaft) for rust, as this can weaken the structure over time.
Measure the length of a single rib from the top notch to the very tip where the fabric attaches.
Count the total number of ribs on your frame, as this will determine how many fabric panels you need to cut.
Most standard umbrellas have eight ribs, but some windproof models may have ten or even twelve for extra stability.
Step 2: Create the Gore Pattern
Design a template for the fabric panels, which are technically known as “gores.”
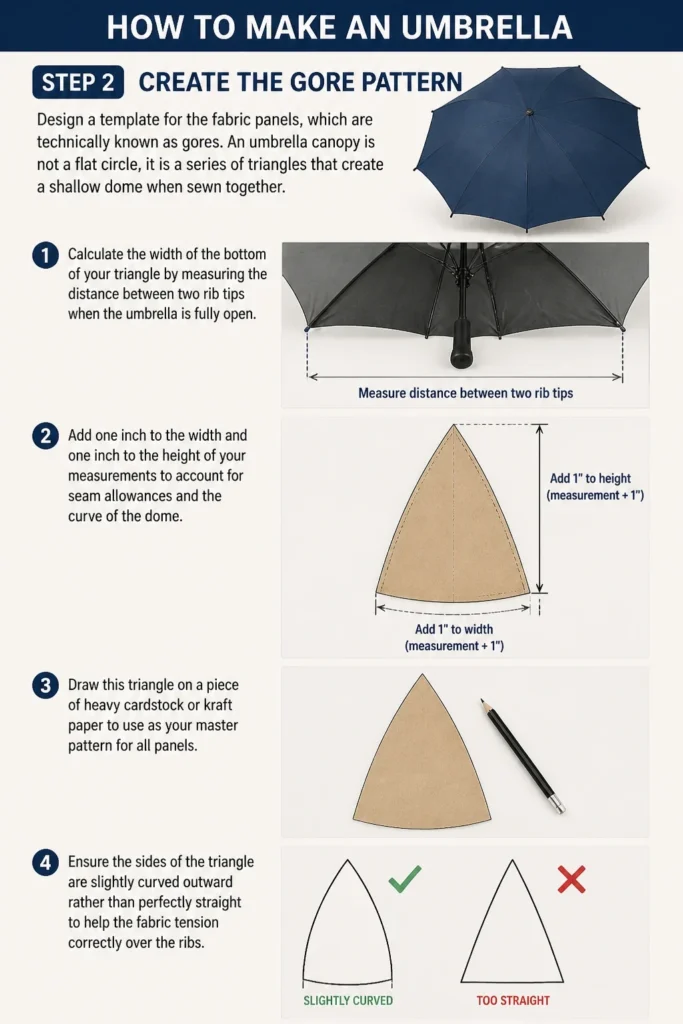
An umbrella canopy is not a flat circle; it is a series of triangles that create a shallow dome when sewn together.
Calculate the width of the bottom of your triangle by measuring the distance between two rib tips when the umbrella is fully open.
Add one inch to the width and one inch to the height of your measurements to account for seam allowances and the curve of the dome.
Draw this triangle on a piece of heavy cardstock or kraft paper to use as your master pattern for all panels.
Ensure the sides of the triangle are slightly curved outward rather than perfectly straight to help the fabric tension correctly over the ribs.
Step 3: Prepare and Cut the Fabric
Select a fabric that is lightweight, tightly woven, and inherently water-resistant, such as ripstop nylon or high-density polyester.
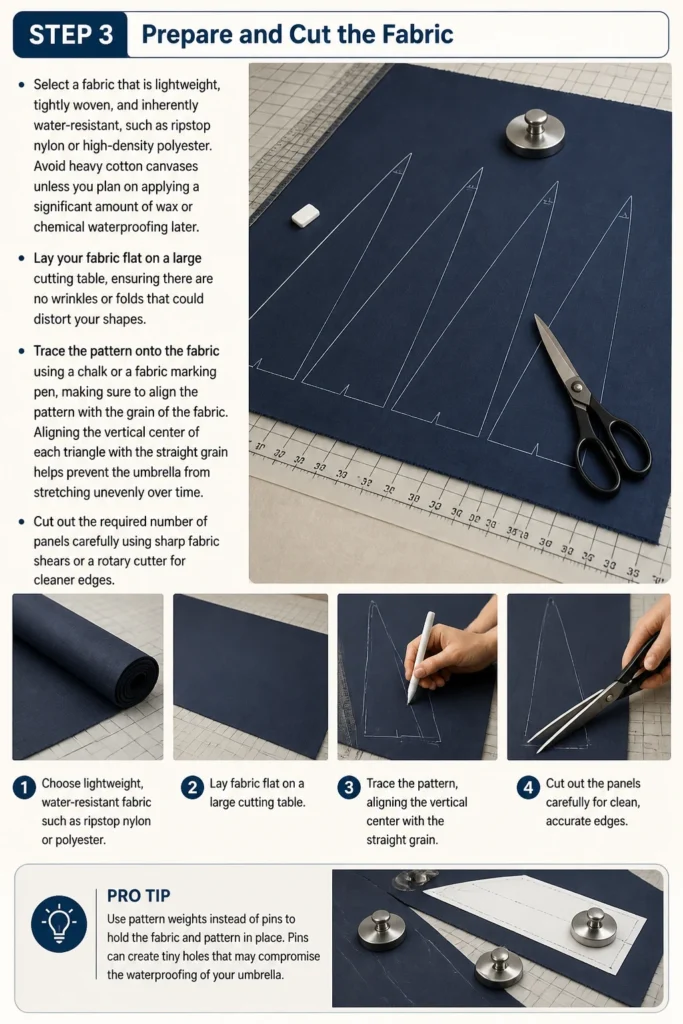
Avoid heavy cotton canvases unless you plan on applying a significant amount of wax or chemical waterproofing later.
Lay your fabric flat on a large cutting table, ensuring there are no wrinkles or folds that could distort your shapes.
Trace the pattern onto the fabric using a chalk or a fabric marking pen, making sure to align the pattern with the grain of the fabric.
Aligning the vertical center of each triangle with the “straight grain” helps prevent the umbrella from stretching unevenly over time.
Cut out the required number of panels carefully using sharp fabric shears or a rotary cutter for cleaner edges.
Pro Tip: Use pattern weights instead of pins to hold your template down, as pins can leave permanent holes in waterproof fabric.
Step 4: Sew the Panels Together
Pin two fabric panels with their “right sides” facing each other along one of the long edges.
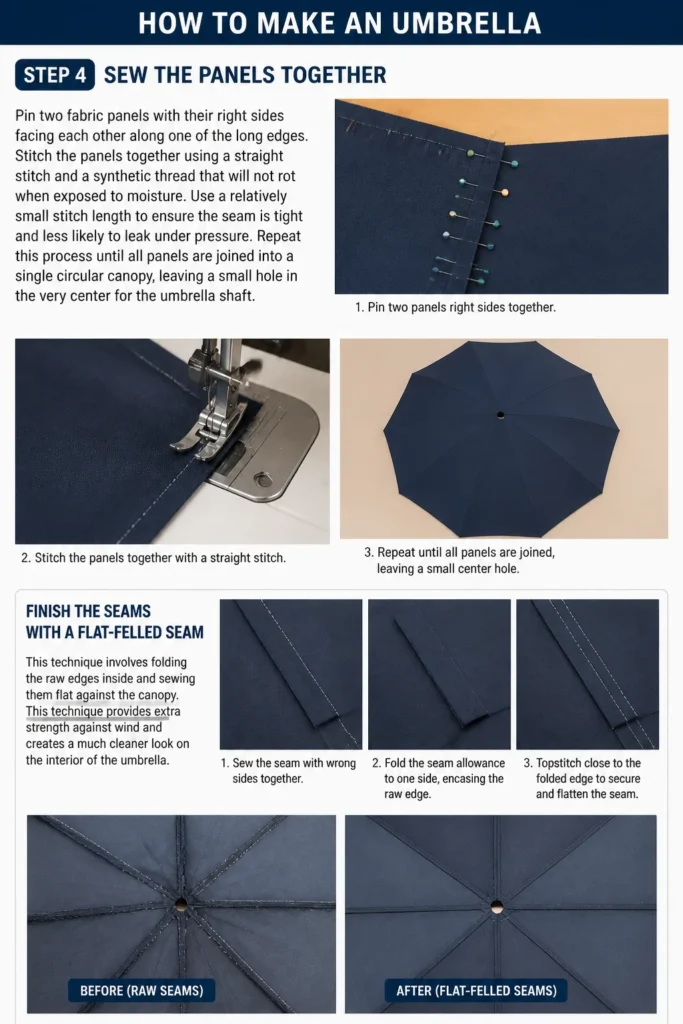
Stitch the panels together using a straight stitch and a synthetic thread that will not rot when exposed to moisture.
Use a relatively small stitch length to ensure the seam is tight and less likely to leak under pressure.
Repeat this process until all panels are joined into a single circular canopy, leaving a small hole in the very center for the umbrella shaft.
Finish the seams using a flat-felled seam technique, which involves folding the raw edges inside and sewing them flat against the canopy.
This technique provides extra strength against wind and creates a much cleaner look on the interior of the umbrella.
Step 5: Reinforce the Center and Hem
Cut a small circle of fabric, about three inches in diameter, to serve as a reinforcement patch for the top of the umbrella.
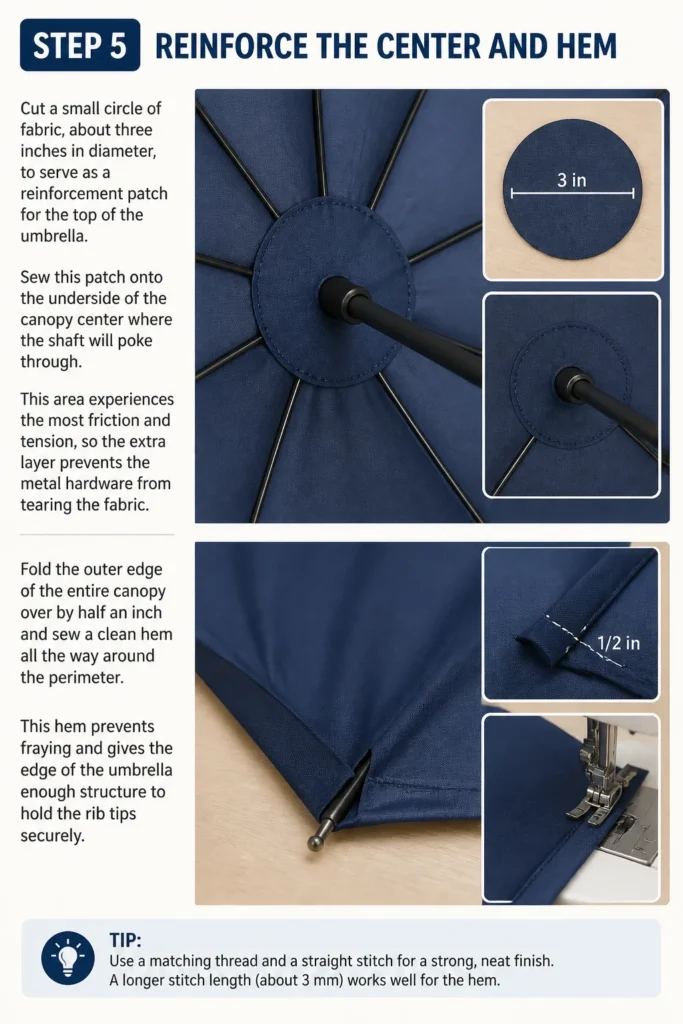
Sew this patch onto the underside of the canopy center where the shaft will poke through.
This area experiences the most friction and tension, so the extra layer prevents the metal hardware from tearing the fabric.
Fold the outer edge of the entire canopy over by half an inch and sew a clean hem all the way around the perimeter.
This hem prevents fraying and gives the edge of the umbrella enough structure to hold the rib tips securely.
Step 6: Attach the Canopy to the Frame
Slide the center hole of your fabric canopy over the top of the umbrella shaft.
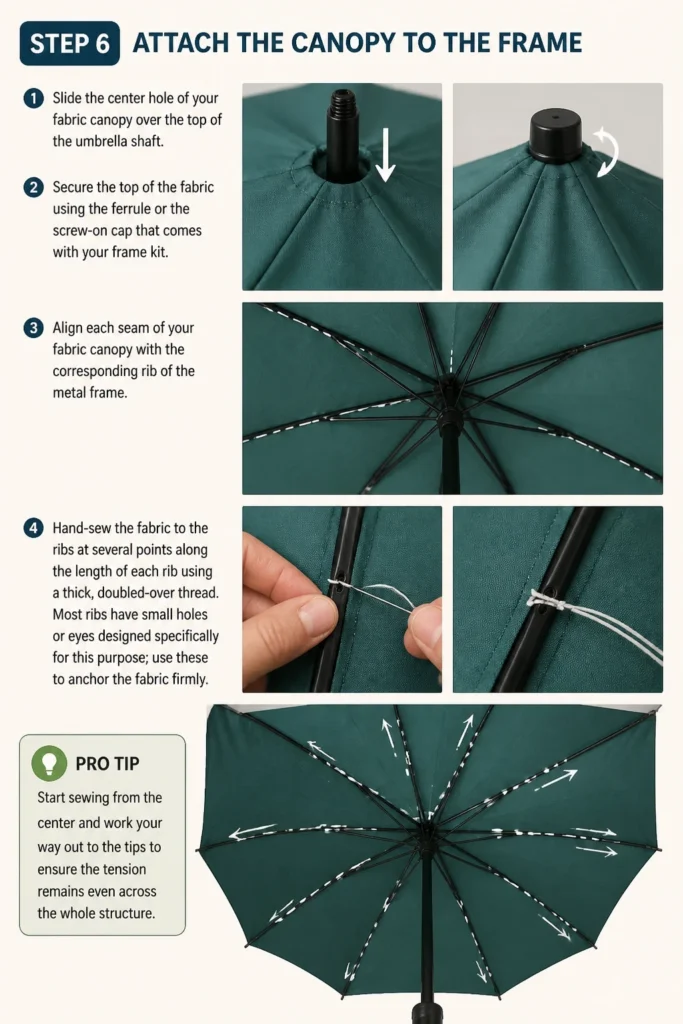
Secure the top of the fabric using the “ferrule” or the screw-on cap that comes with your frame kit.
Align each seam of your fabric canopy with the corresponding rib of the metal frame.
Hand-sew the fabric to the ribs at several points along the length of each rib using a thick, doubled-over thread.
Most ribs have small holes or “eyes” designed specifically for this purpose; use these to anchor the fabric firmly.
Pro Tip: Start sewing from the center and work your way out to the tips to ensure the tension remains even across the whole structure.
Step 7: Secure the Rib Tips
Insert the ends of the ribs into the specialized “tips” that are sewn onto the outer hem of your canopy.
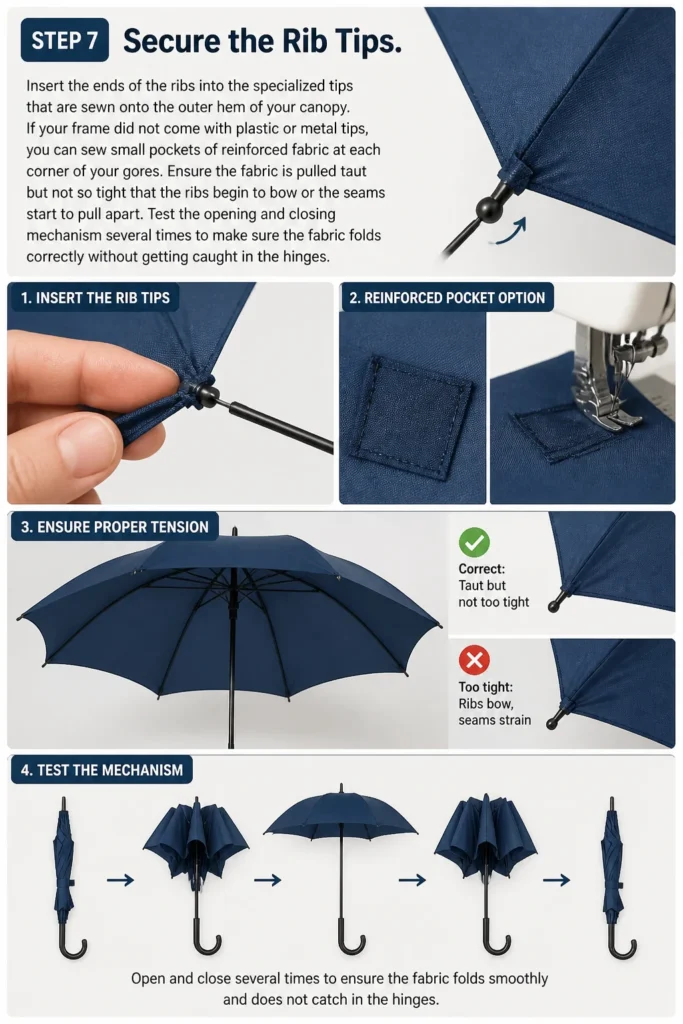
If your frame did not come with plastic or metal tips, you can sew small pockets of reinforced fabric at each corner of your gores.
Ensure the fabric is pulled taut but not so tight that the ribs begin to bow or the seams start to pull apart.
Test the opening and closing mechanism several times to make sure the fabric folds correctly without getting caught in the hinges.
Step 8: Apply Seam Sealer
Open the umbrella fully and place it in a well-ventilated area or outdoors.
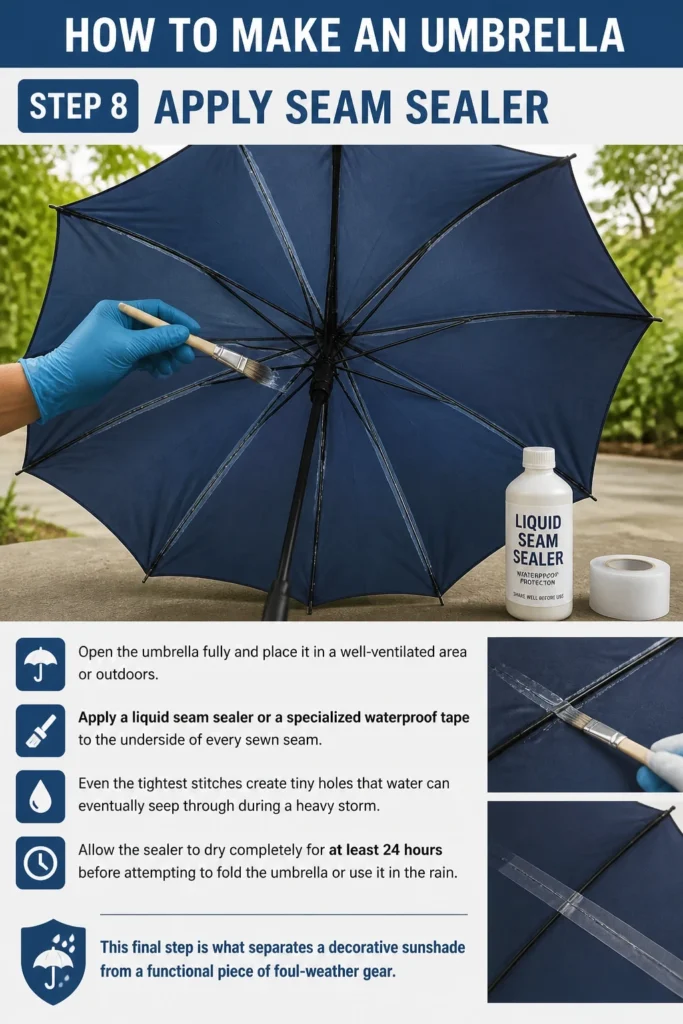
Apply a liquid seam sealer or a specialized waterproof tape to the underside of every sewn seam.
Even the tightest stitches create tiny holes that water can eventually seep through during a heavy storm.
Allow the sealer to dry completely for at least 24 hours before attempting to fold the umbrella or use it in the rain.
This final step is what separates a decorative sunshade from a functional piece of foul-weather gear.
Common Mistakes to Avoid
Using the Wrong Thread Type
Many beginners reach for standard cotton thread because it is readily available in many colors. Cotton absorbs water and will eventually swell, weaken, and rot after a few seasons of use. Always use 100% polyester or nylon thread, as these synthetic fibers are designed to repel moisture and resist UV degradation.
Ignoring the Fabric Grain
If you cut your panels haphazardly without considering the grain of the fabric, the umbrella will eventually warp. Fabric stretches differently along the “bias” or diagonal than it does along the vertical threads. If your panels are not cut uniformly, the canopy will look lumpy and sag in some areas while remaining tight in others.
Over-Tightening the Canopy
It is tempting to pull the fabric as tight as possible to achieve a drum-like finish. However, fabric expands and contracts with temperature changes and moisture levels. If there is no “give” in your tension, the rib tips may punch through the fabric or the central shaft may snap when you try to lock the umbrella open.
Troubleshooting
The Canopy Leaks Along the Seams
If you notice water dripping through the stitching, your seam sealer was likely applied too thinly or missed a spot. Wait for the umbrella to dry completely, then apply a second, more generous layer of sealer to the interior seams. Focus specifically on the areas where multiple panels meet at the top of the umbrella.
The Umbrella Won’t Stay Open
This usually happens if the fabric canopy is slightly too small for the frame, preventing the runner from reaching the locking notch. Check to see if any fabric is caught in the top spring or if the ribs are being pulled too far inward. You may need to slightly loosen the hand-stitched points where the fabric meets the ribs to allow for more movement.
Fabric Bunching Near the Tips
Bunching occurs when the distance between the rib attachment points is shorter than the fabric panel width. You can fix this by adjusting the position of your hand-sewn anchors. Slide the fabric further toward the tip of the rib and re-secure it to distribute the slack more evenly across the panel.
Key Takeaways
- Select a fiberglass frame for the best balance of flexibility and strength in high winds.
- Use a dedicated waterproof synthetic fabric like ripstop nylon to ensure long-term durability.
- Always use a flat-felled seam to increase the structural integrity of the canopy joins.
- Hand-sew the fabric to the ribs at multiple points to prevent the canopy from shifting.
- Never skip the seam sealing process, as needle holes are the primary cause of leaks.
- Test the tension of the canopy by opening and closing the frame several times before finishing.
Frequently Asked Questions
Can I use an old shower curtain for the canopy?
While shower curtains are waterproof, they are often made of vinyl which can be difficult to sew and may crack in cold weather. If you choose to use one, ensure it is a fabric-style curtain rather than a heavy plastic sheet. Fabric curtains are much more pliable and will fold correctly when the umbrella is closed.
How do I clean my handmade umbrella?
Avoid putting the umbrella in a washing machine, as the agitation can damage the frame and strip the waterproofing. Instead, open the umbrella and sponge it down with lukewarm water and a very mild soap. Rinse it thoroughly with a hose and leave it open in a shaded area until it is completely dry.
What is the best way to store a custom umbrella?
Never store your umbrella while it is still wet, as this encourages mold growth and can cause the metal frame to rust. Leave it in a partially open position until the fabric is bone dry. Once dry, fold the panels neatly along their natural creases and store it in a cool, dry place away from direct sunlight.
Can I add a UV coating to my umbrella?
Yes, you can purchase spray-on UV protectants that are designed for outdoor gear and tents. This is highly recommended if you plan on using your umbrella as a sunshade during the summer months. The coating will help prevent the fabric colors from fading and stop the fibers from becoming brittle over time.
Our Top Recommended Finds
- Universal Umbrella Frame Kit: A high-quality fiberglass frame provides the perfect skeleton for your custom project.
- Silicone Seam Sealer: This liquid sealant creates a permanent, flexible, and waterproof barrier over your stitching.
- Heavy-Duty Polyester Thread: Choosing a UV-resistant thread ensures your seams won’t fail after a few months of sun exposure.
Elevate Your Rainy Day Style
Building your own umbrella is a rewarding project that combines mechanical assembly with precision sewing.
Once you have mastered the basic construction, you can experiment with different panel colors or even add reflective tape for safety.
Take your new skills and try making a matching waterproof carrying sleeve to keep your umbrella protected when not in use.
Start gathering your materials today and prepare yourself for the next storm with a tool you built to last.