How To Make Potli Bags
I remember the quiet satisfaction of finishing my very first potli bag, a small creation filled with character.
It felt like holding a piece of tradition, made by my own hands.
This guide shares the practical steps I’ve refined over time, helping you craft your own beautiful pouches with confidence.
Quick Overview
You are about to embark on a delightful crafting journey.
By the end of this guide, you will have created a charming, functional potli bag, perfect for gifts or personal use.
This project introduces fundamental sewing techniques while allowing for immense creative expression.
- Time needed: 2-4 hours (depending on embellishment complexity)
- Difficulty: Beginner to Intermediate
- What you’ll need: Fabric, lining material, drawstring cord, basic sewing kit, embellishments
Step-by-Step Instructions
Step 1: Gather Your Materials and Tools
Before you begin, ensure all your supplies are ready and organized.
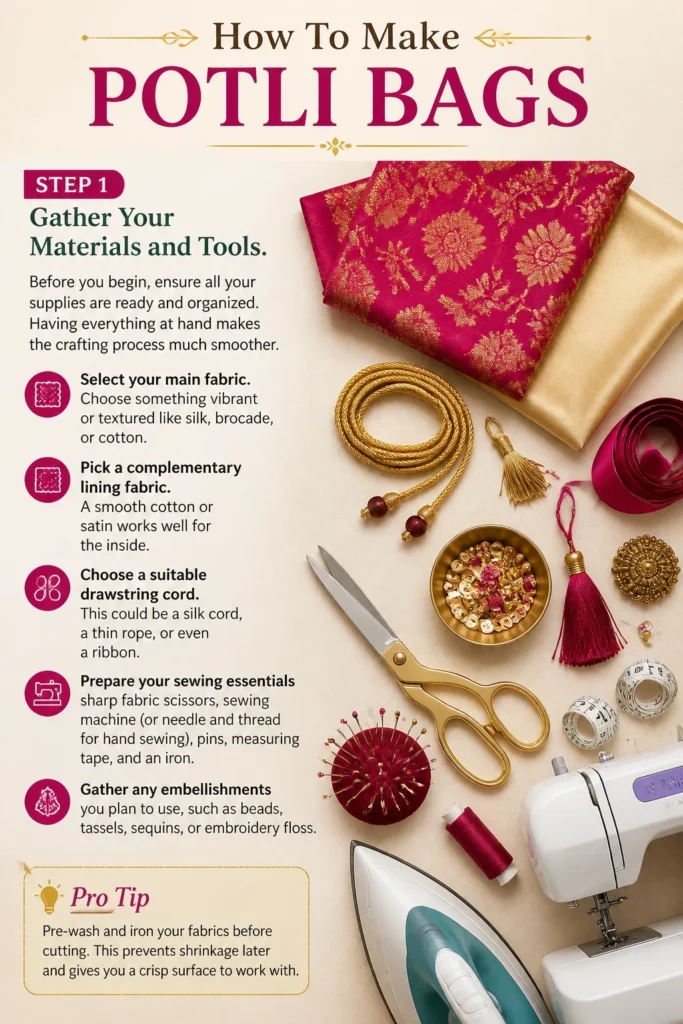
Having everything at hand makes the crafting process much smoother.
- Select your main fabric. Choose something vibrant or textured like silk, brocade, or cotton.
- Pick a complementary lining fabric. A smooth cotton or satin works well for the inside.
- Choose a suitable drawstring cord. This could be a silk cord, a thin rope, or even a ribbon.
- Prepare your sewing essentials: sharp fabric scissors, sewing machine (or needle and thread for hand sewing), pins, measuring tape, and an iron.
- Gather any embellishments you plan to use, such as beads, tassels, sequins, or embroidery floss.
Pro Tip: Pre-wash and iron your fabrics before cutting. This prevents shrinkage later and gives you a crisp surface to work with.
Step 2: Measure and Cut Your Fabric
Accurate cutting is the foundation of a well-made potli bag.
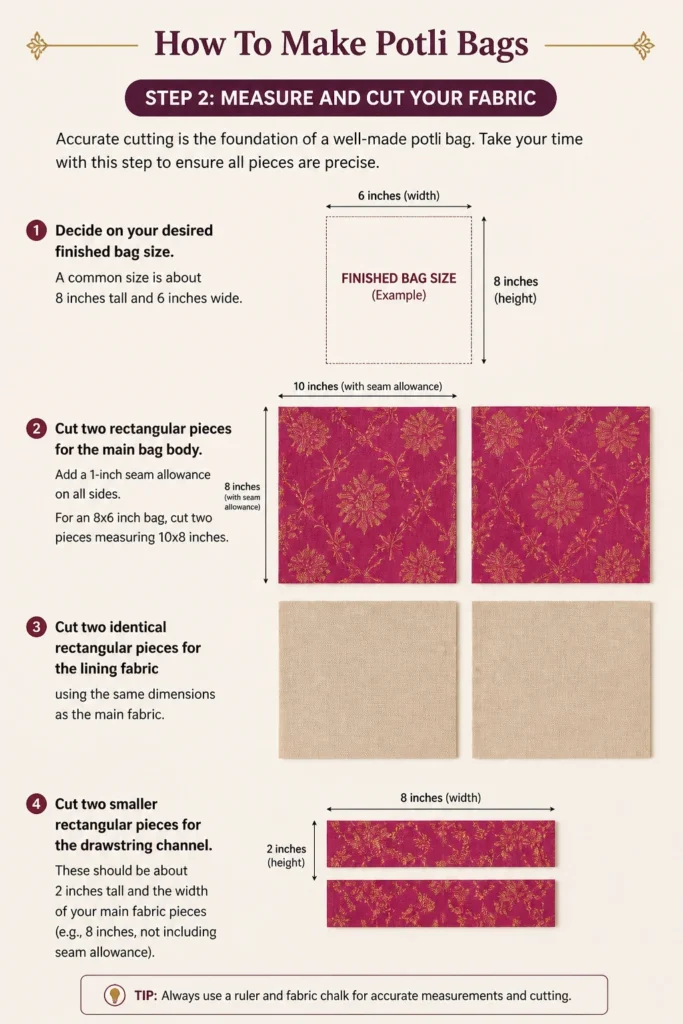
Take your time with this step to ensure all pieces are precise.
- Decide on your desired finished bag size. A common size is about 8 inches tall and 6 inches wide.
- Cut two rectangular pieces for the main bag body. Add a 1-inch seam allowance on all sides. For an 8×6 inch bag, cut two pieces measuring 10×8 inches.
- Cut two identical rectangular pieces for the lining fabric, using the same dimensions as the main fabric.
- Cut two smaller rectangular pieces for the drawstring channel. These should be about 2 inches tall and the width of your main fabric pieces (e.g., 8 inches, not including seam allowance).
Step 3: Prepare the Drawstring Channels
Creating neat drawstring channels is crucial for a professional finish.
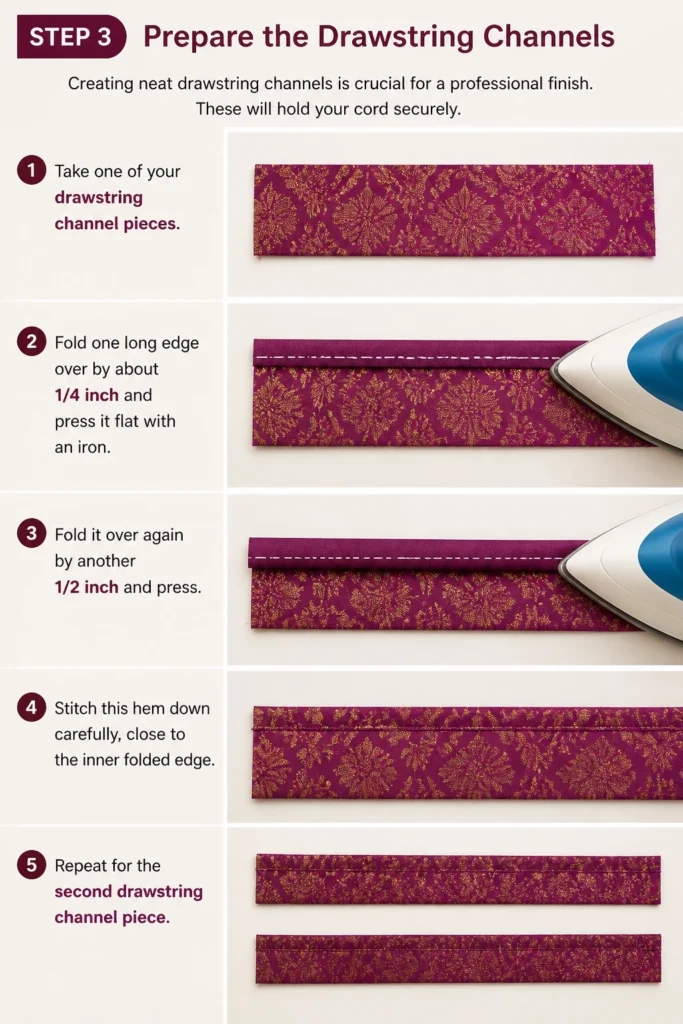
These will hold your cord securely.
- Take one of your drawstring channel pieces.
- Fold one long edge over by about 1/4 inch and press it flat with an iron.
- Fold it over again by another 1/2 inch and press.
- Stitch this hem down carefully, close to the inner folded edge. Repeat for the second drawstring channel piece.
Step 4: Stitch the Main Bag Body
Now, we begin assembling the outer shell of your potli bag.
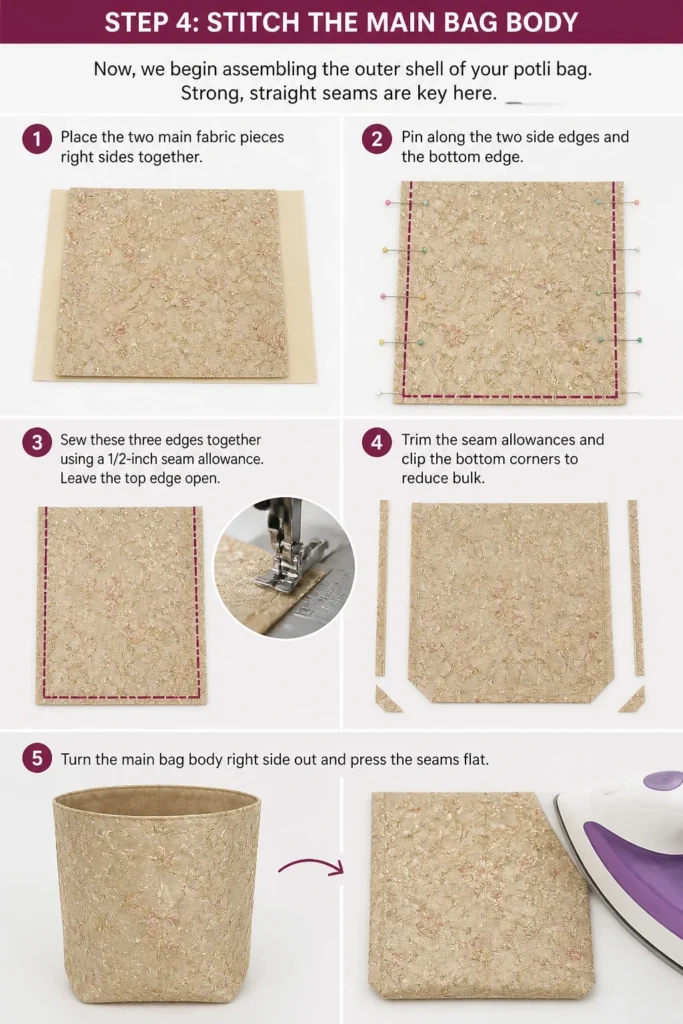
Strong, straight seams are key here.
- Place the two main fabric pieces right sides together.
- Pin along the two side edges and the bottom edge.
- Sew these three edges together using a 1/2-inch seam allowance. Leave the top edge open.
- Trim the seam allowances and clip the bottom corners to reduce bulk.
- Turn the main bag body right side out and press the seams flat.
Step 5: Assemble the Lining
The lining provides a clean interior and adds durability to your bag.
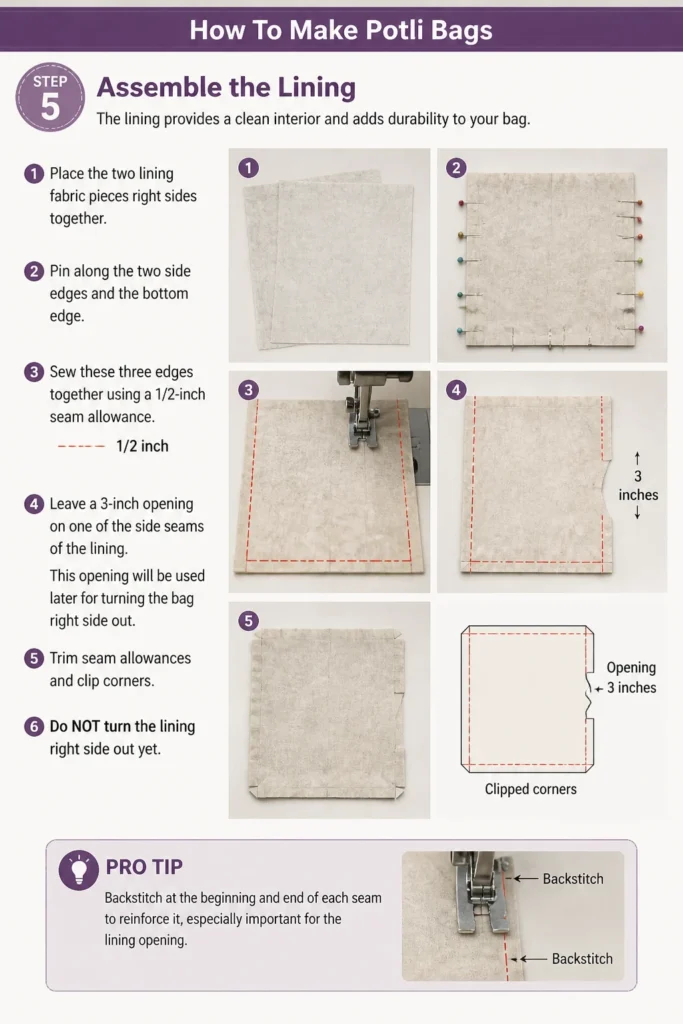
The process is very similar to assembling the main body.
- Place the two lining fabric pieces right sides together.
- Pin along the two side edges and the bottom edge.
- Sew these three edges together using a 1/2-inch seam allowance.
- Leave a 3-inch opening on one of the side seams of the lining. This opening will be used later for turning the bag right side out.
- Trim seam allowances and clip corners. Do NOT turn the lining right side out yet.
Pro Tip: Backstitch at the beginning and end of each seam to reinforce it, especially important for the lining opening.
Step 6: Attach Drawstring Channels to Main Body
This step integrates the channels where your drawstring will pass.
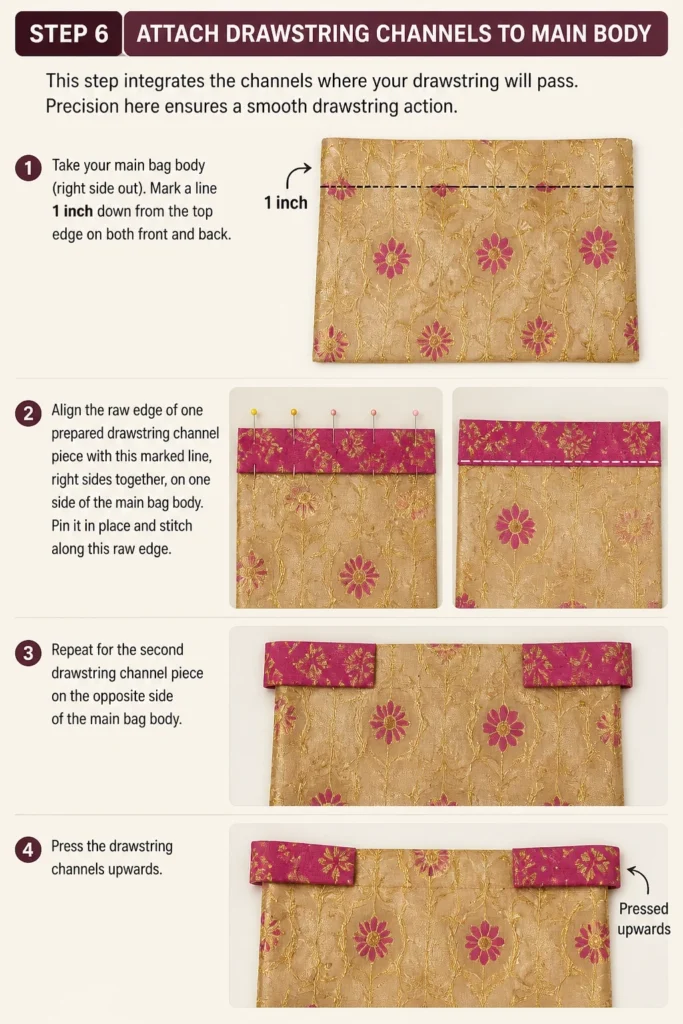
Precision here ensures a smooth drawstring action.
- Take your main bag body (right side out).
- Mark a line 1 inch down from the top edge on both front and back.
- Align the raw edge of one prepared drawstring channel piece with this marked line, right sides together, on one side of the main bag body.
- Pin it in place and stitch along this raw edge.
- Repeat for the second drawstring channel piece on the opposite side of the main bag body.
- Press the drawstring channels upwards.
Step 7: Join Main Bag and Lining
Now, we bring the outer bag and its lining together.
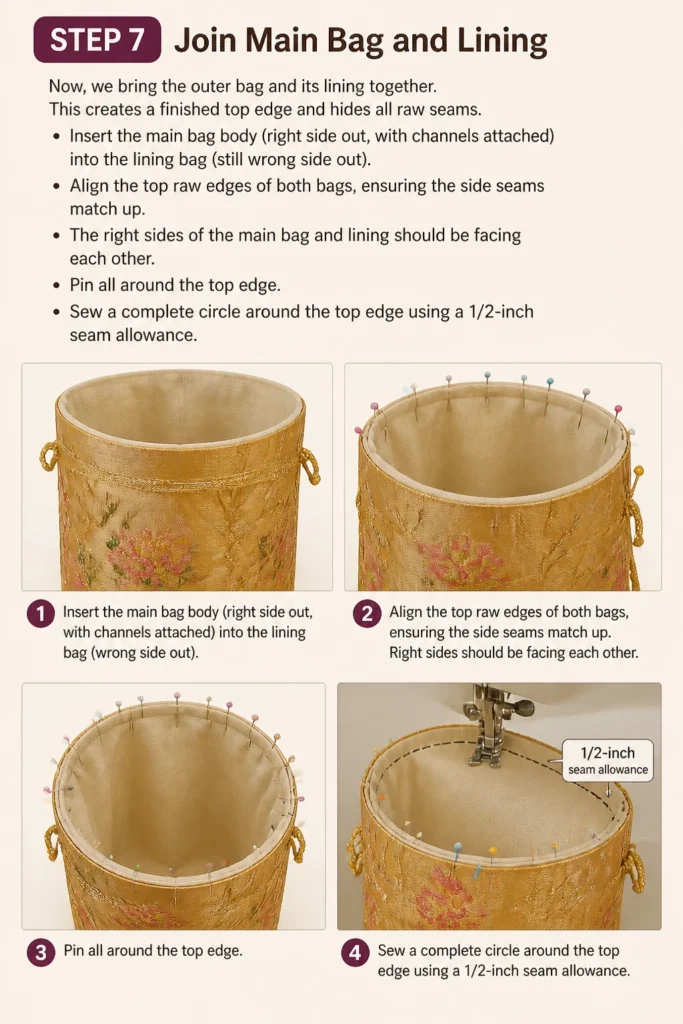
This creates a finished top edge and hides all raw seams.
- Insert the main bag body (right side out, with channels attached) into the lining bag (still wrong side out).
- Align the top raw edges of both bags, ensuring the side seams match up. The right sides of the main bag and lining should be facing each other.
- Pin all around the top edge.
- Sew a complete circle around the top edge using a 1/2-inch seam allowance.
Step 8: Finish the Bag and Insert Drawstring
This is where your potli bag truly takes shape.
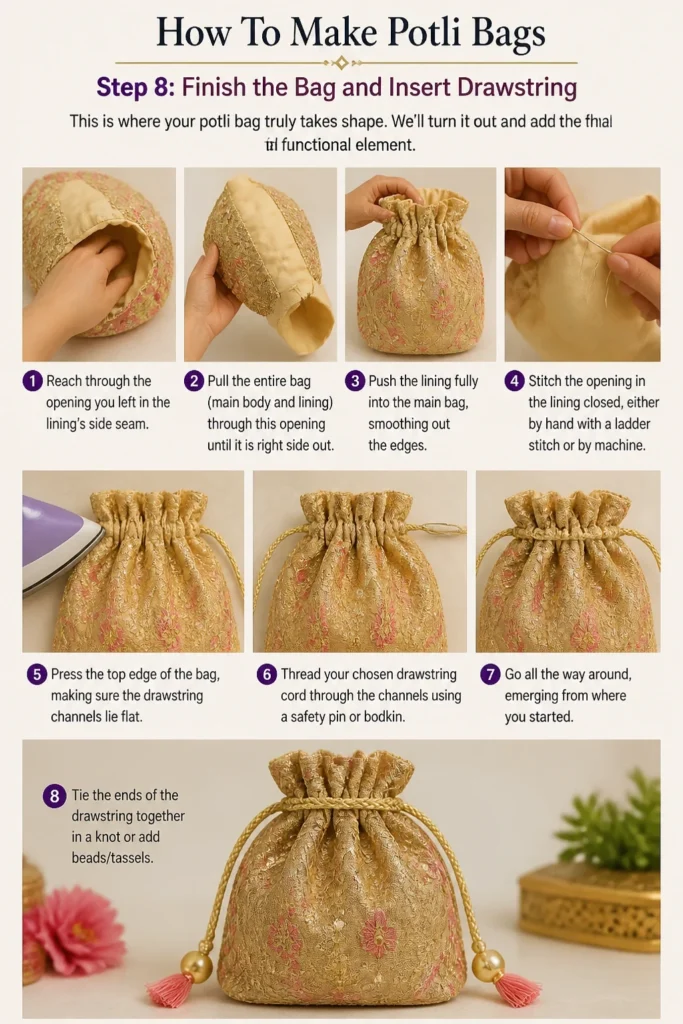
We’ll turn it out and add the final functional element.
- Reach through the opening you left in the lining’s side seam.
- Pull the entire bag (main body and lining) through this opening until it is right side out.
- Push the lining fully into the main bag, smoothing out the edges.
- Stitch the opening in the lining closed, either by hand with a ladder stitch or by machine.
- Press the top edge of the bag, making sure the drawstring channels lie flat.
- Thread your chosen drawstring cord through the channels using a safety pin or bodkin. Go all the way around, emerging from where you started.
- Tie the ends of the drawstring together in a knot or add beads/tassels.
Step 9: Embellish Your Potli Bag
Personalization makes your potli bag unique and special.
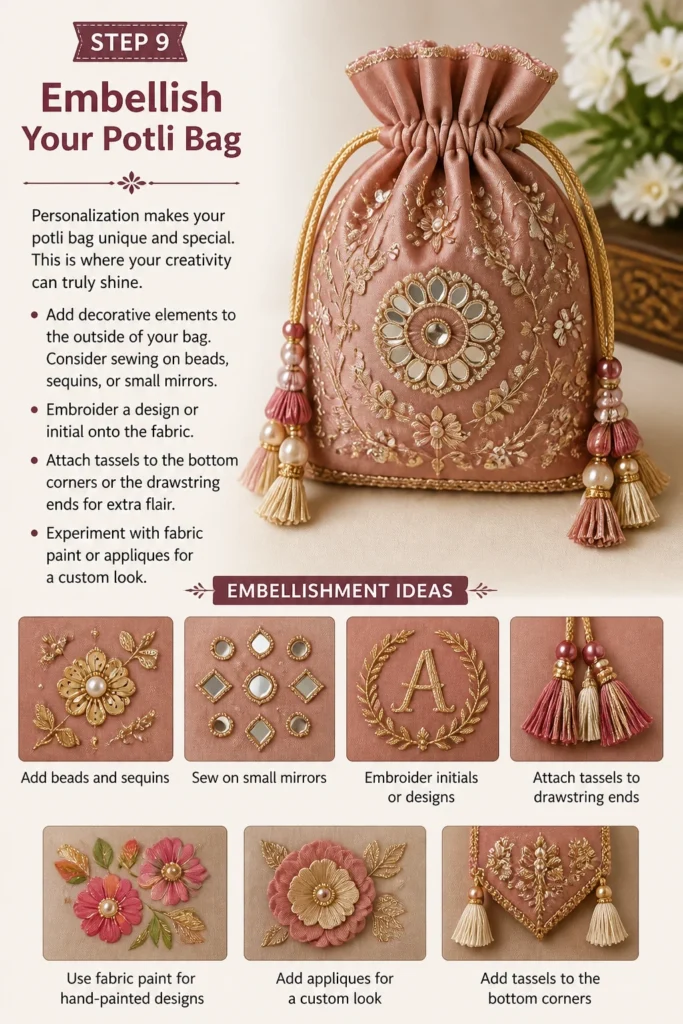
This is where your creativity can truly shine.
- Add decorative elements to the outside of your bag.
- Consider sewing on beads, sequins, or small mirrors.
- Embroider a design or initial onto the fabric.
- Attach tassels to the bottom corners or the drawstring ends for extra flair.
- Experiment with fabric paint or appliques for a custom look.
Common Mistakes to Avoid
Uneven Seam Allowances
Inconsistent seam allowances can lead to a lopsided or poorly shaped bag.
Always use a ruler or the markings on your sewing machine to maintain a uniform seam width, ensuring your bag stands straight and looks professional.
Forgetting the Lining Opening
Leaving out the turning hole in the lining is a common oversight that can halt your progress.
Without this gap, you won’t be able to turn the bag right side out after sewing the main body and lining together, forcing you to unpick stitches.
Incorrect Drawstring Channel Size
If your drawstring channels are too narrow, the cord will be difficult to thread or won’t move freely.
If they are too wide, the drawstring won’t gather the bag effectively, so always measure your cord and ensure the channel provides enough clearance.
Weak or Unfinished Seams
Skipping backstitching at the beginning and end of seams can cause them to unravel over time, especially with frequent use.
Reinforce all critical seams and consider finishing raw edges with a zigzag stitch or serger to prevent fraying and ensure durability.
Troubleshooting
Bag Doesn’t Stand Up Straight
This often happens if your fabric pieces were cut unevenly or if your seams weren’t straight.
Carefully re-measure your fabric pieces for future projects and use a walking foot on your sewing machine if fabric slippage is an issue.
Drawstring Snags or Is Hard to Pull
A snagging drawstring can be frustrating and usually indicates the channel is too tight or the cord is too thick.
Try using a slightly thinner cord or ensure your channel seams are pressed completely flat, with no stray threads catching the drawstring.
Fabric Fraying After Cutting
Some fabrics, especially silks or loosely woven materials, tend to fray excessively.
To prevent this, you can apply a small amount of fabric sealant to the raw edges immediately after cutting, or finish all raw edges with a zigzag stitch before assembling the bag.
Key Takeaways
- Accurate measuring and cutting are fundamental for a well-structured potli bag.
- Always include a turning opening in your lining to easily reverse the bag.
- Properly sized drawstring channels ensure smooth and functional closure.
- Reinforce all seams with backstitching for a durable and long-lasting creation.
- Embellishments offer a wonderful opportunity to personalize your unique potli bag.
- Patience and attention to detail will lead to a beautiful, handmade result.
Frequently Asked Questions
Can I make a potli bag without a sewing machine?
Absolutely, potli bags can be beautifully hand-stitched. It will take more time, but using a strong backstitch for seams and a neat slip stitch for finishing will yield excellent results.
What type of fabric is best for potli bags?
Rich fabrics like silk, brocade, velvet, or satin are traditional choices, giving a luxurious feel. Cotton or linen are also great for a more casual, everyday potli bag, offering durability and ease of sewing.
How do I make a round bottom potli bag?
Instead of cutting rectangular pieces for the main body and lining, you would cut a large circle for the base and then a long rectangle for the side of the bag. The rectangle is gathered and sewn to the circular base, creating a rounded shape before adding the drawstring channel.
Can I use multiple drawstrings?
Yes, many potli bags feature two separate drawstrings, each entering from an opposite side of the bag and exiting on the same side. This creates a more secure closure and a traditional look when pulled tight.
Our Top Recommended Finds
- Sharp Fabric Scissors: Precision cutting makes all the difference for clean edges and accurate shapes.
- Fabric Pins: Essential for holding fabric layers together securely before stitching, preventing shifting.
- Bodkin or Safety Pin: These tools make threading drawstrings through narrow channels quick and effortless.
Your Next Creative Adventure Awaits
You’ve now mastered the art of crafting a beautiful potli bag, a project that blends tradition with personal style.
Each stitch you made tells a story of creativity and skill.
Consider experimenting with different fabric combinations or exploring advanced embellishment techniques to elevate your next creation.
Why not start planning your next potli bag today, perhaps as a thoughtful, handmade gift?