How To Lace Shoes
Lacing shoes might seem like a simple task, something you’ve done countless times without much thought.
But have you ever considered if there’s a better, more comfortable, or even more stylish way?
Having laced hundreds of pairs myself, from casual sneakers to formal Oxfords, I’ve learned that a proper lacing technique truly enhances fit and feel.
Quick Overview
This guide will walk you through the fundamental criss-cross lacing method, ensuring your shoes fit perfectly and look neat.
You’ll learn how to achieve a balanced, comfortable lace-up that prevents common issues like pinching or looseness.
- Time needed: 5-10 minutes
- Difficulty: Beginner
- What you’ll need: A pair of shoes, a pair of shoelaces
Step-by-Step Instructions
Step 1: Prepare Your Shoes and Laces
Begin by removing any old laces from your shoes. This gives you a clean slate and helps you see the eyelets clearly.
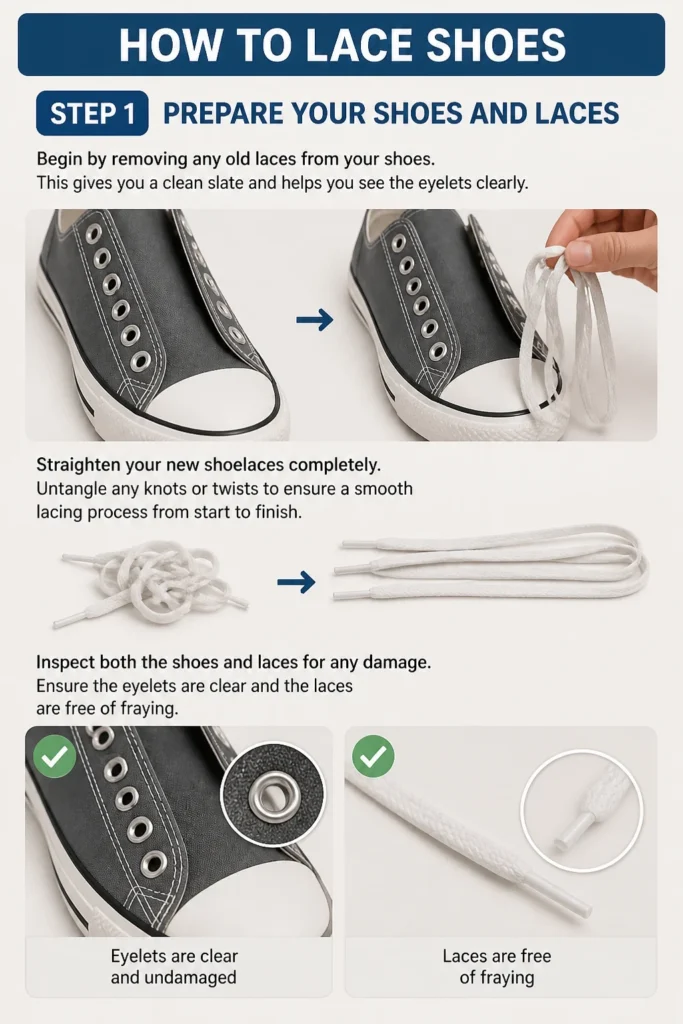
Straighten your new shoelaces completely. Untangle any knots or twists to ensure a smooth lacing process from start to finish.
Inspect both the shoes and laces for any damage. Ensure the eyelets are clear and the laces are free of fraying.
Step 2: Find the Starting Point
Locate the two bottom-most eyelets on your shoe. These are the holes closest to your toes.
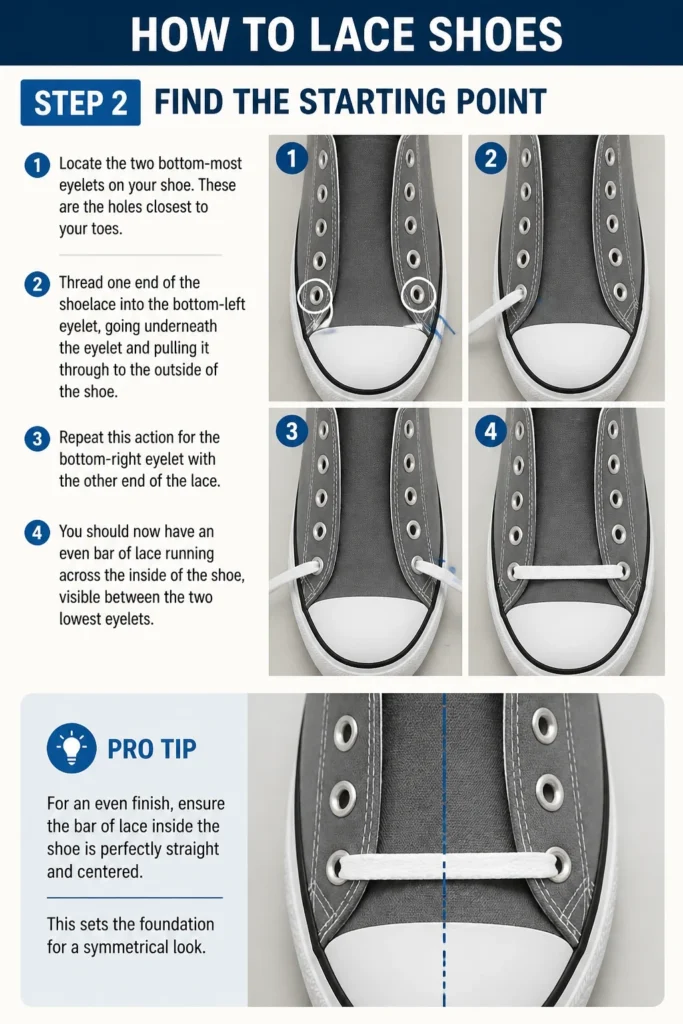
Thread one end of the shoelace into the bottom-left eyelet, going underneath the eyelet and pulling it through to the outside of the shoe.
Repeat this action for the bottom-right eyelet with the other end of the lace. You should now have an even bar of lace running across the inside of the shoe, visible between the two lowest eyelets.
Pro Tip: For an even finish, ensure the bar of lace inside the shoe is perfectly straight and centered. This sets the foundation for a symmetrical look.
Step 3: Equalize the Lace Lengths
Pull both ends of the shoelace up and out through their respective bottom eyelets.
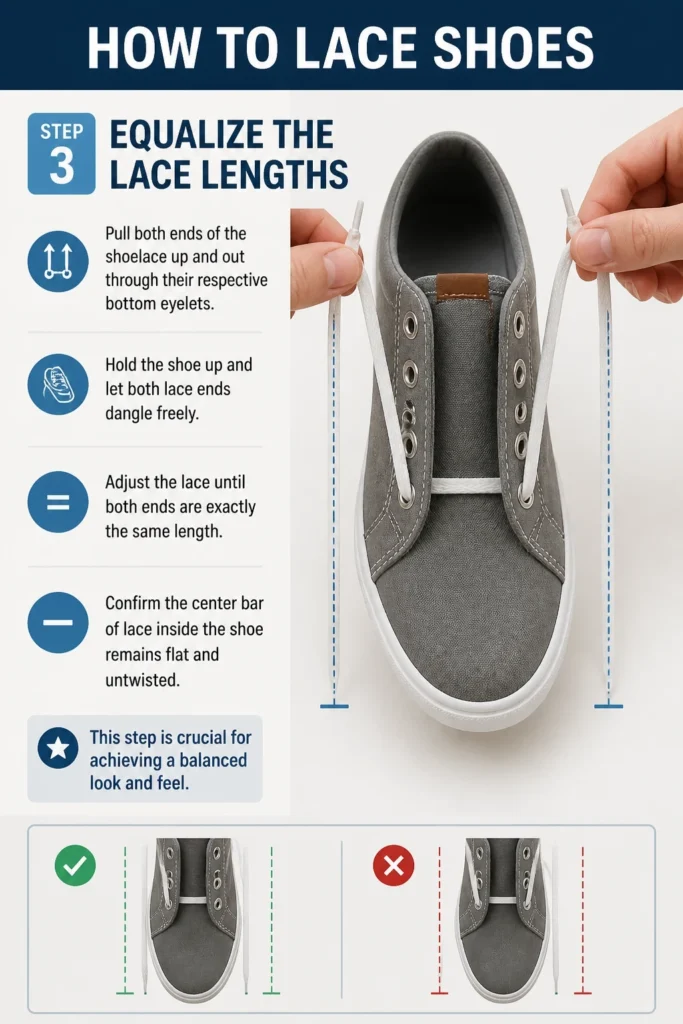
Hold the shoe up and let both lace ends dangle freely. Adjust the lace until both ends are exactly the same length.
Confirm the center bar of lace inside the shoe remains flat and untwisted. This step is crucial for achieving a balanced look and feel.
Step 4: Create the First Criss-Cross (Bottom Layer)
Take the lace end emerging from the bottom-left eyelet. Cross it diagonally over the tongue of the shoe.
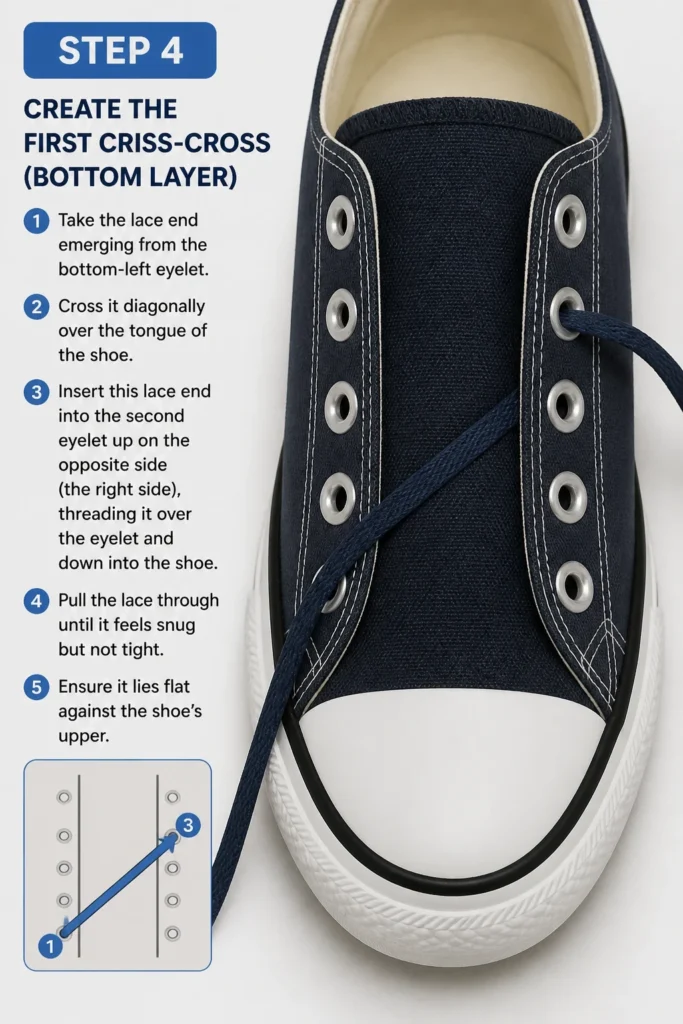
Insert this lace end into the second eyelet up on the opposite side (the right side), threading it over the eyelet and down into the shoe.
Pull the lace through until it feels snug but not tight. Ensure it lies flat against the shoe’s upper.
Step 5: Create the Second Criss-Cross (Bottom Layer)
Now take the lace end emerging from the bottom-right eyelet. Cross it diagonally over the tongue in the opposite direction.
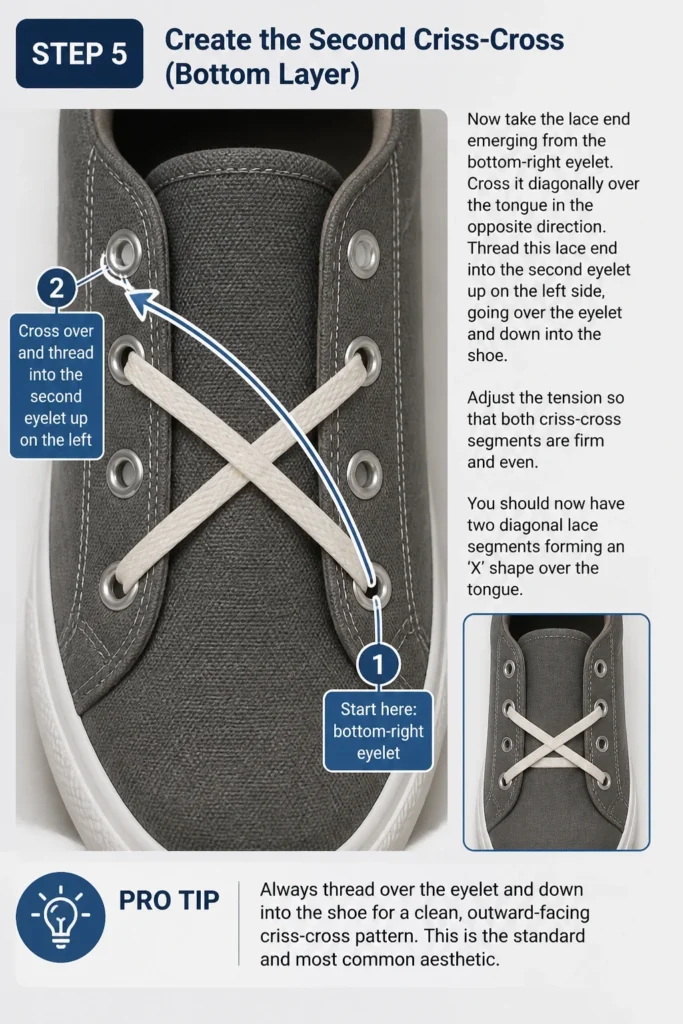
Thread this lace end into the second eyelet up on the left side, going over the eyelet and down into the shoe.
Adjust the tension so that both criss-cross segments are firm and even. You should now have two diagonal lace segments forming an ‘X’ shape over the tongue.
Pro Tip: Always thread over the eyelet and down into the shoe for a clean, outward-facing criss-cross pattern. This is the standard and most common aesthetic.
Step 6: Continue the Criss-Cross Pattern
Continue this criss-cross pattern, alternating sides with each new set of eyelets.
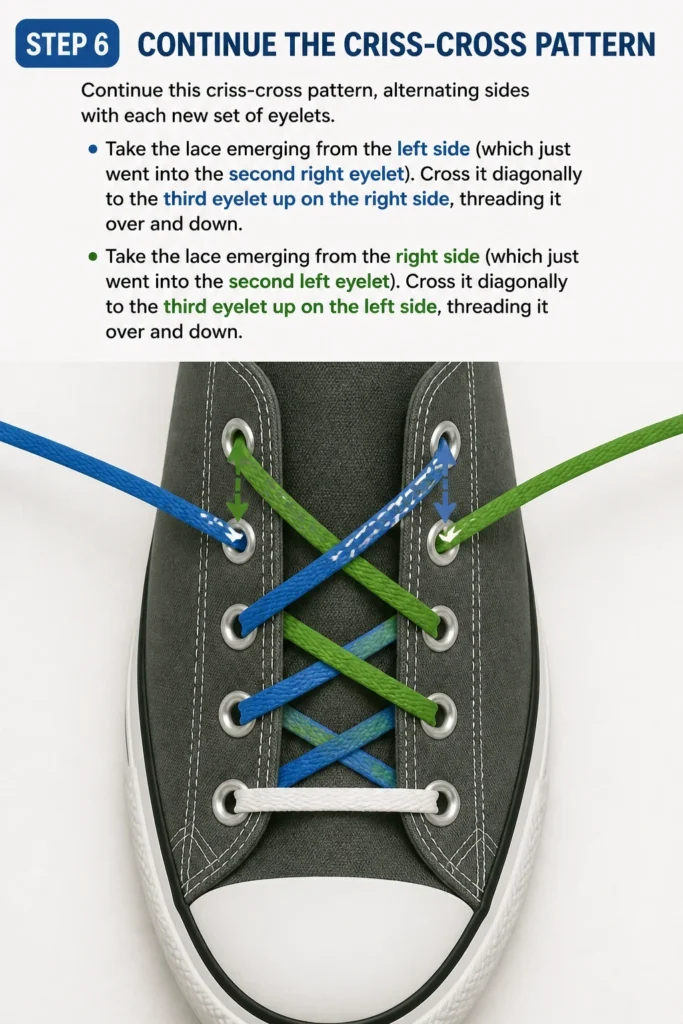
Take the lace emerging from the left side (which just went into the second right eyelet). Cross it diagonally to the third eyelet up on the right side, threading it over and down.
Take the lace emerging from the right side (which just went into the second left eyelet). Cross it diagonally to the third eyelet up on the left side, threading it over and down.
Step 7: Maintain Even Tension
As you progress up the shoe, consistently check and adjust the tension of each lace segment.
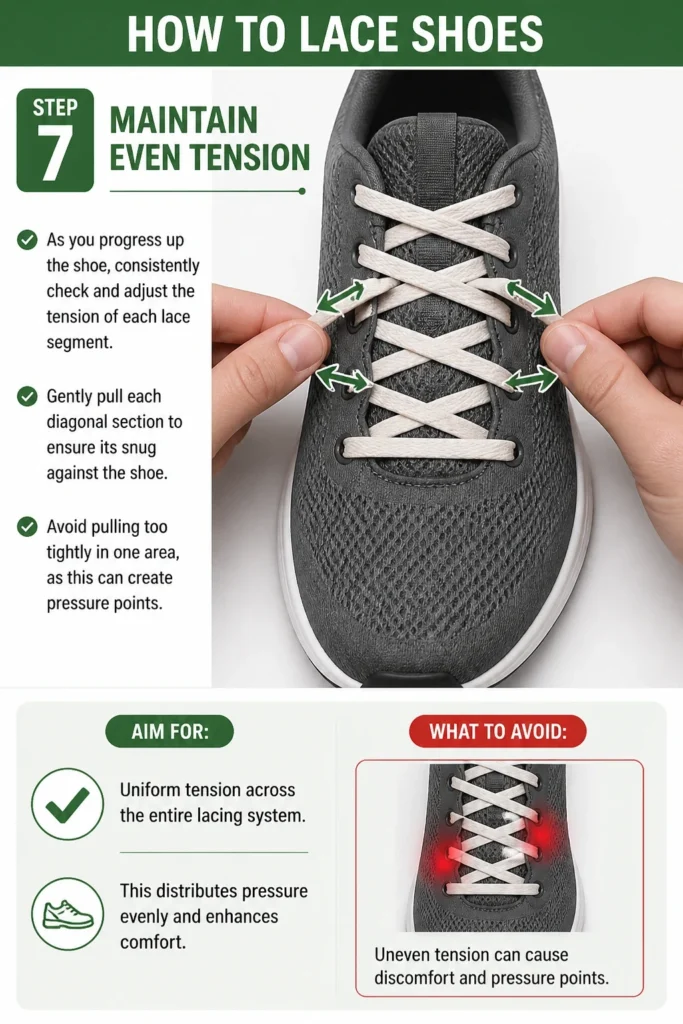
Gently pull each diagonal section to ensure it’s snug against the shoe. Avoid pulling too tightly in one area, as this can create pressure points.
Aim for uniform tension across the entire lacing system. This distributes pressure evenly and enhances comfort.
Step 8: Reach the Top Eyelets
Continue the criss-cross pattern until you reach the top-most eyelets on your shoe.
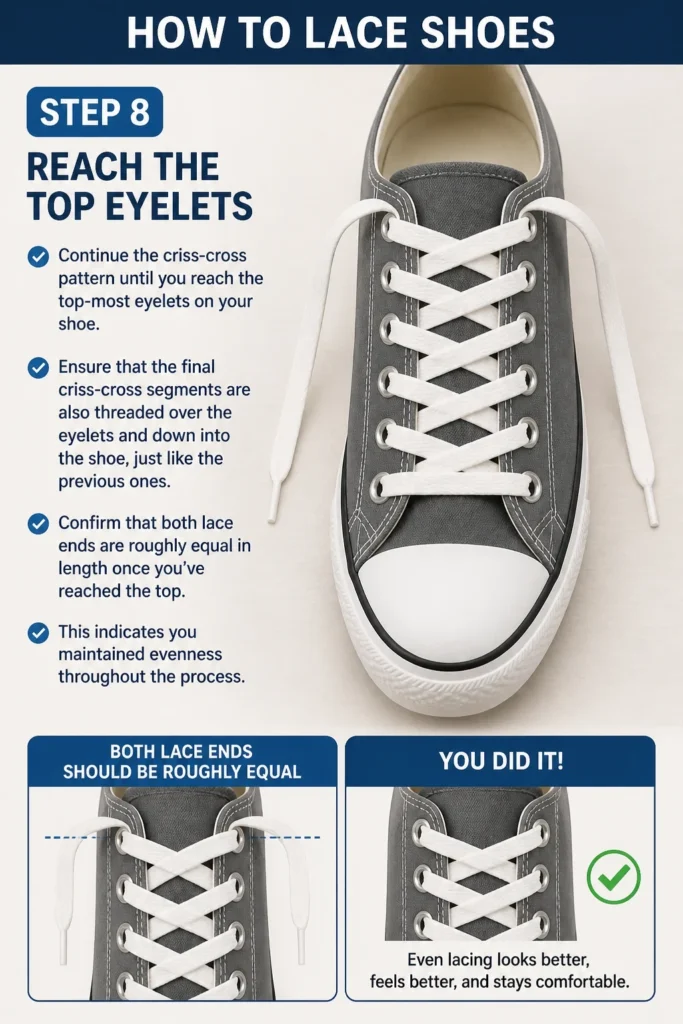
Ensure that the final criss-cross segments are also threaded over the eyelets and down into the shoe, just like the previous ones.
Confirm that both lace ends are roughly equal in length once you’ve reached the top. This indicates you maintained evenness throughout the process.
Step 9: Final Adjustments and Tying
Perform a final check of the entire lacing system. Ensure all criss-crosses are neat, untwisted, and evenly spaced.
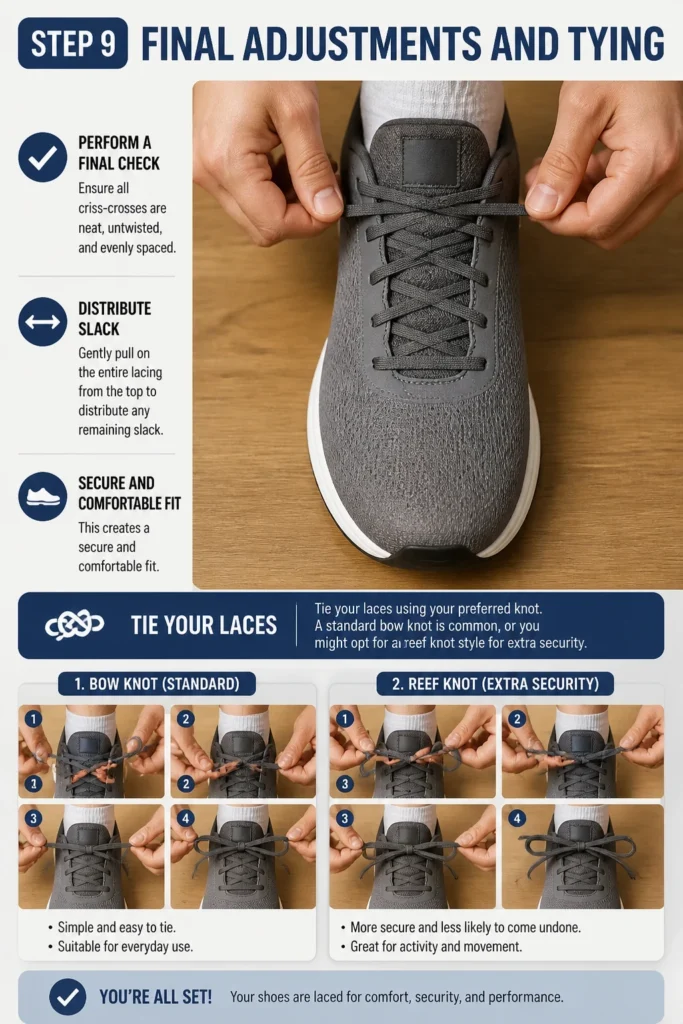
Gently pull on the entire lacing from the top to distribute any remaining slack. This creates a secure and comfortable fit.
Tie your laces using your preferred knot. A standard bow knot is common, or you might opt for a “reef knot” style for extra security.
Common Mistakes to Avoid
Uneven Lace Lengths
Starting with one lace end significantly longer than the other is a common pitfall. This results in an awkward bow at the end, with one loop being much larger or one end too short to tie properly.
Always ensure you equalize the lace lengths in the very first step. Pull both ends through the bottom eyelets and adjust until they hang evenly before you begin criss-crossing.
Twisted Laces
Allowing your laces to twist as you thread them through the eyelets creates a messy and unprofessional appearance. Twisted laces can also dig into your foot, causing discomfort over time.
Take your time with each segment. Flatten the lace as you guide it through each eyelet and across the shoe’s tongue. A smooth, untwisted lace lies flat and looks much cleaner.
Skipping Eyelets
Sometimes, in a rush, people might accidentally skip an eyelet or thread a lace into the wrong one. This disrupts the pattern, creates uneven tension, and can make the shoe feel less secure.
Always count your eyelets and follow the sequence carefully. Ensure each lace segment goes into the next available eyelet on the opposite side, maintaining a consistent pattern.
Lacing Too Tight or Too Loose
Lacing too tightly can cause painful pressure points, restrict circulation, and make your feet uncomfortable. Conversely, lacing too loosely means your foot can slide around, leading to blisters and poor support.
Aim for a snug but comfortable fit. You should be able to slide a finger under the laces without much difficulty, but your foot should not feel loose inside the shoe. Adjust the tension gradually as you lace up.
Troubleshooting
Laces Come Undone Easily
If your shoelaces constantly untie themselves, the knot you’re using might not be secure enough, or your laces might be too slippery.
Try tying a “reef knot” or “surgeon’s knot” instead of a standard bow. You can also double-knot for extra security. For very slippery laces, consider replacing them with cotton or waxed varieties that offer more friction.
Shoes Feel Too Tight or Cause Pressure Points
Discomfort often stems from unevenly distributed tension or a lacing style that doesn’t suit your foot shape.
Relace your shoes, paying close attention to evening out the tension across all segments. If you have a high instep, consider “straight lacing” or “bar lacing” where laces run horizontally, reducing vertical pressure on the top of your foot.
Difficulty Getting Shoes On and Off
If your shoes are a struggle to put on or take off, your laces might be too tight or you’re not loosening them sufficiently.
After untying, pull the top two or three criss-cross sections outward to create more slack. This opens the shoe collar wider, making it easier to slip your foot in or out. Always loosen before trying to remove your foot.
Key Takeaways
- Always start by equalizing lace lengths for a balanced finish.
- Maintain even tension throughout the lacing process for optimal comfort and fit.
- Thread laces over eyelets and down into the shoe for the classic criss-cross look.
- Avoid twisted laces to ensure a neat appearance and prevent discomfort.
- Choose a lacing method that suits your foot shape and activity for best results.
- Regularly check your lacing for neatness and adjust as needed.
Frequently Asked Questions
What is the best lacing method for running shoes?
For running shoes, the criss-cross method is generally effective for most. However, many runners benefit from “heel lock lacing” (using the extra eyelets at the top) to prevent heel slippage. Some also use “straight lacing” to reduce pressure on the top of the foot during swelling.
How often should I replace my shoelaces?
The lifespan of shoelaces varies depending on use and material. If your laces are frayed, stretched, discolored, or constantly coming undone, it’s time for a replacement. Replacing them every 6-12 months for frequently worn shoes is a good general guideline.
Can I wash my shoelaces?
Yes, most shoelaces can be washed. Remove them from your shoes and place them in a mesh laundry bag to prevent tangling. Wash them with your regular laundry in cold water, or hand wash them with mild soap. Air dry them completely to prevent shrinkage or damage.
Are there different types of shoelaces?
Absolutely. Shoelaces come in various materials (cotton, polyester, leather), shapes (flat, round, oval), and textures (waxed, elastic). Flat laces are common for sneakers, while round laces often appear on dress shoes. Waxed laces offer more grip and stay tied longer.
Stepping Out with Confidence and Comfort
Mastering the art of lacing your shoes is more than just a functional skill; it’s about enhancing your comfort, supporting your feet, and even elevating your style.
A well-laced shoe can make a significant difference in how your footwear feels throughout the day, whether you’re walking, working, or playing.
Now that you have these practical steps, take a moment to relace your favorite pair. Experience the immediate improvement in fit and appearance.
Don’t stop here; explore different lacing patterns like straight lacing or ladder lacing to see how they can further customize your footwear experience. Step out with confidence and enjoy the perfect fit.