How To Make Moccasins Pattern
Creating your own moccasin pattern is a deeply rewarding craft.
It allows for a custom fit and a truly unique pair of footwear.
Having drafted patterns for numerous pairs myself, I can guide you through each essential stage.
Quick Overview
This guide will walk you through creating a custom pattern for soft-soled moccasins.
You will finish with a ready-to-cut pattern that perfectly matches your foot measurements.
- Time needed: 2-4 hours
- Difficulty: Beginner
- What you’ll need: Large sheets of paper (kraft paper or butcher paper), pencil, eraser, ruler, measuring tape, scissors, masking tape, your own feet.
Step-by-Step Instructions
Step 1: Gather Your Materials and Prepare Your Workspace
Clear a large, flat surface where you can work comfortably.
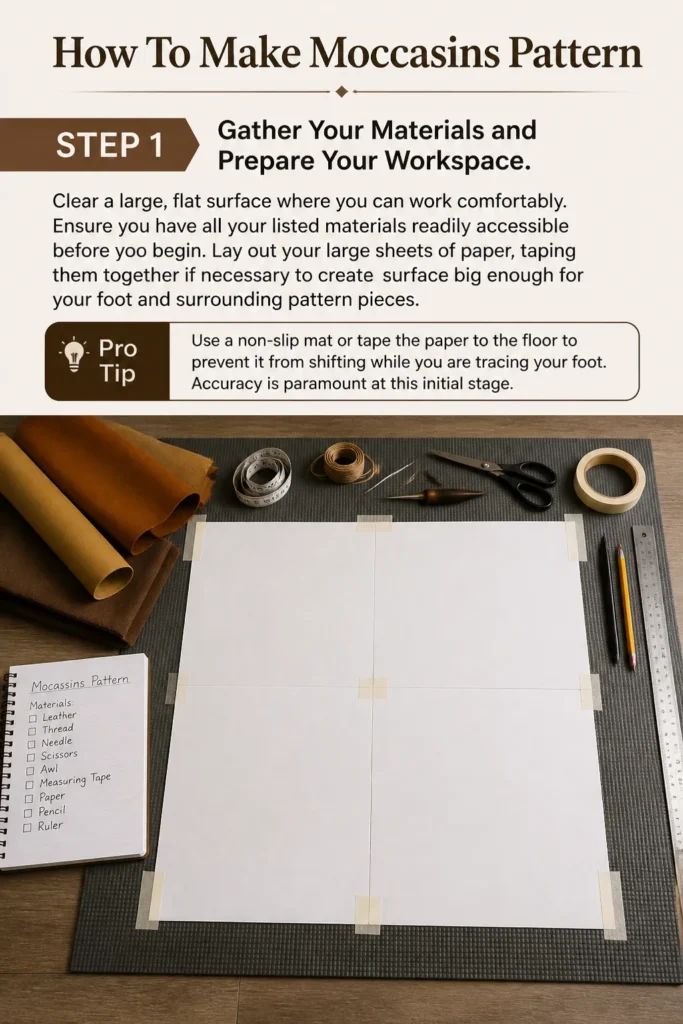
Ensure you have all your listed materials readily accessible before you begin.
Lay out your large sheets of paper, taping them together if necessary to create a surface big enough for your foot and surrounding pattern pieces.
Pro Tip: Use a non-slip mat or tape the paper to the floor to prevent it from shifting while you are tracing your foot. Accuracy is paramount at this initial stage.
Step 2: Trace Your Foot for the Sole Pattern
Sit comfortably on a chair with your foot flat on the paper.
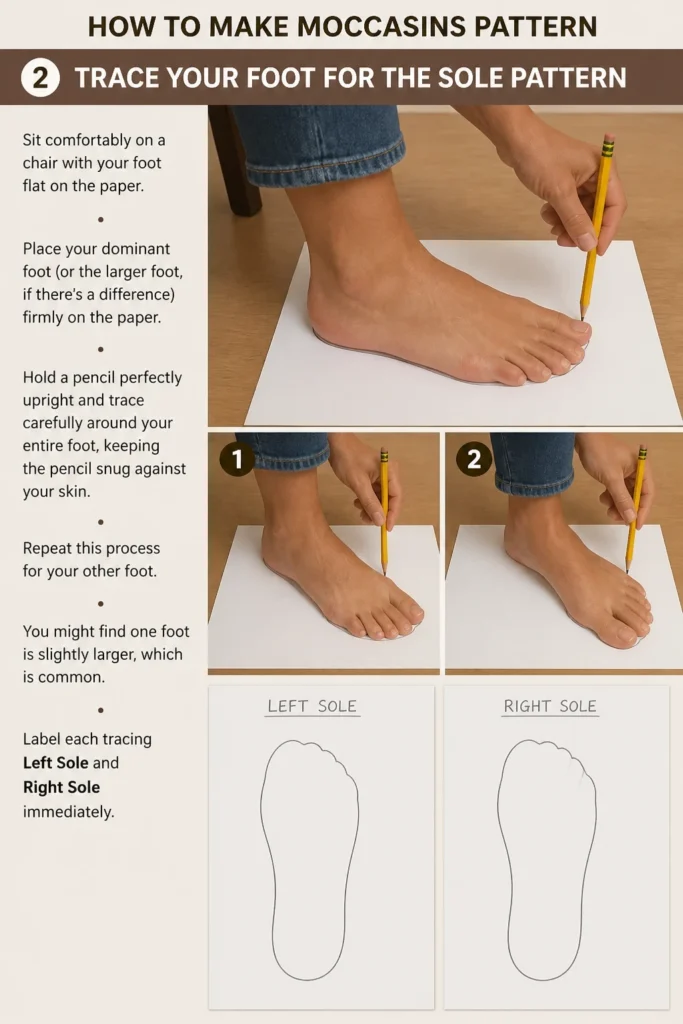
Place your dominant foot (or the larger foot, if there’s a difference) firmly on the paper.
Hold a pencil perfectly upright and trace carefully around your entire foot, keeping the pencil snug against your skin.
Repeat this process for your other foot. You might find one foot is slightly larger, which is common.
Label each tracing “Left Sole” and “Right Sole” immediately.
Step 3: Refine the Sole Tracing and Add Seam Allowance
Examine your traced foot outlines for any jagged lines or inconsistencies.
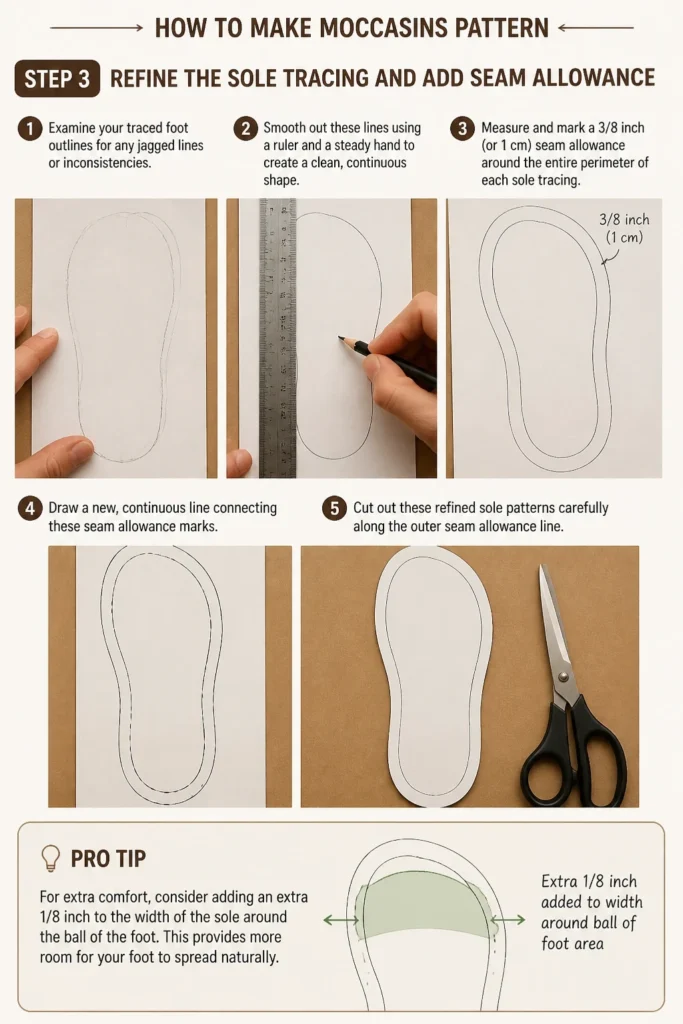
Smooth out these lines using a ruler and a steady hand to create a clean, continuous shape.
Measure and mark a 3/8 inch (or 1 cm) seam allowance around the entire perimeter of each sole tracing.
Draw a new, continuous line connecting these seam allowance marks.
Cut out these refined sole patterns carefully along the outer seam allowance line.
Pro Tip: For extra comfort, consider adding an extra 1/8 inch to the width of the sole around the ball of the foot. This provides more room for your foot to spread naturally.
Step 4: Create the Vamp Pattern (Top of the Moccasin)
Place one of your cut sole patterns on a fresh piece of paper.
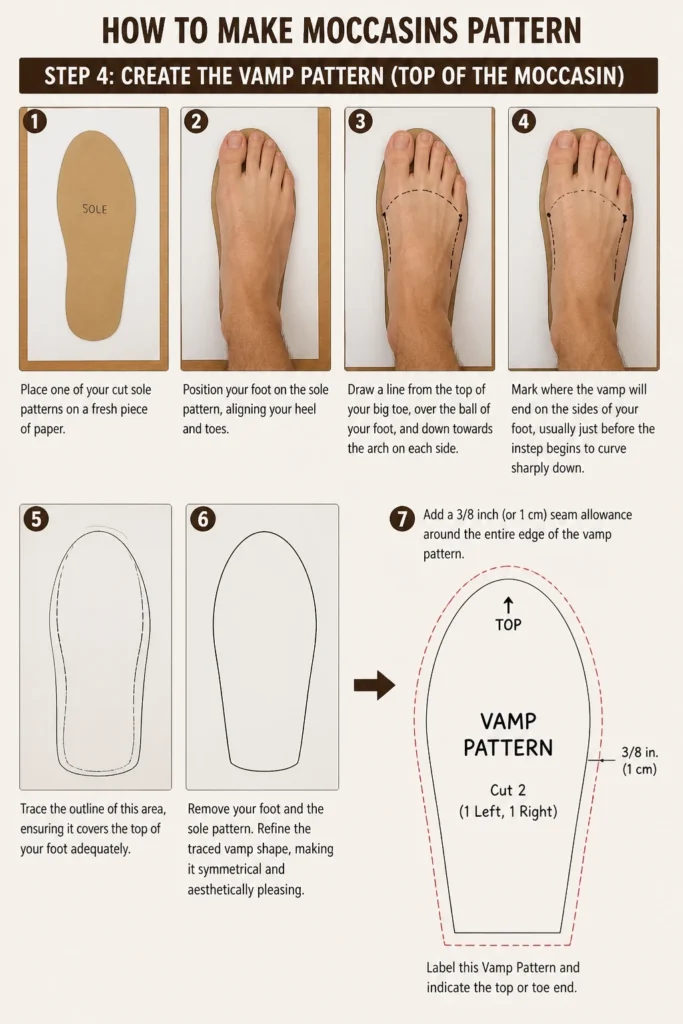
Position your foot on the sole pattern, aligning your heel and toes.
Draw a line from the top of your big toe, over the ball of your foot, and down towards the arch on each side.
Mark where the vamp will end on the sides of your foot, usually just before the instep begins to curve sharply down.
Trace the outline of this area, ensuring it covers the top of your foot adequately.
Remove your foot and the sole pattern.
Refine the traced vamp shape, making it symmetrical and aesthetically pleasing.
Add a 3/8 inch (or 1 cm) seam allowance around the entire edge of the vamp pattern.
Label this “Vamp Pattern” and indicate the “top” or “toe” end.
Step 5: Design the Heel Counter/Collar Pattern
Take your sole pattern again and place it on new paper.
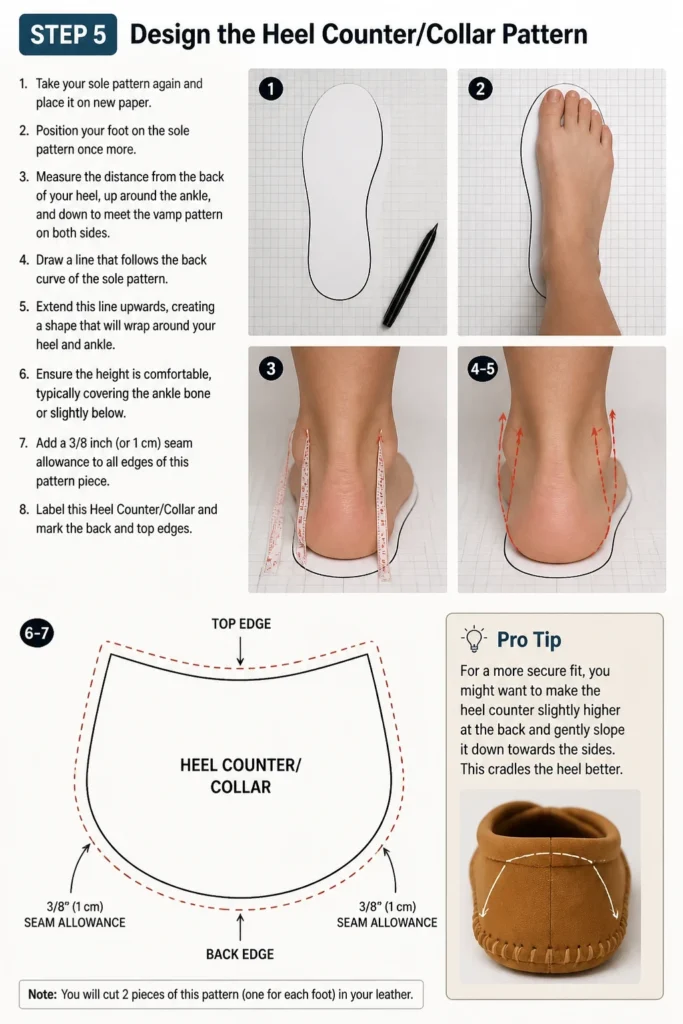
Position your foot on the sole pattern once more.
Measure the distance from the back of your heel, up around the ankle, and down to meet the vamp pattern on both sides.
Draw a line that follows the back curve of the sole pattern.
Extend this line upwards, creating a shape that will wrap around your heel and ankle.
Ensure the height is comfortable, typically covering the ankle bone or slightly below.
Add a 3/8 inch (or 1 cm) seam allowance to all edges of this pattern piece.
Label this “Heel Counter/Collar” and mark the “back” and “top” edges.
Pro Tip: For a more secure fit, you might want to make the heel counter slightly higher at the back and gently slope it down towards the sides. This cradles the heel better.
Step 6: Create the Tongue or Gusset Pattern (Optional but Recommended)
Consider if you want a separate tongue for added comfort and fit, especially if your vamp is more open.
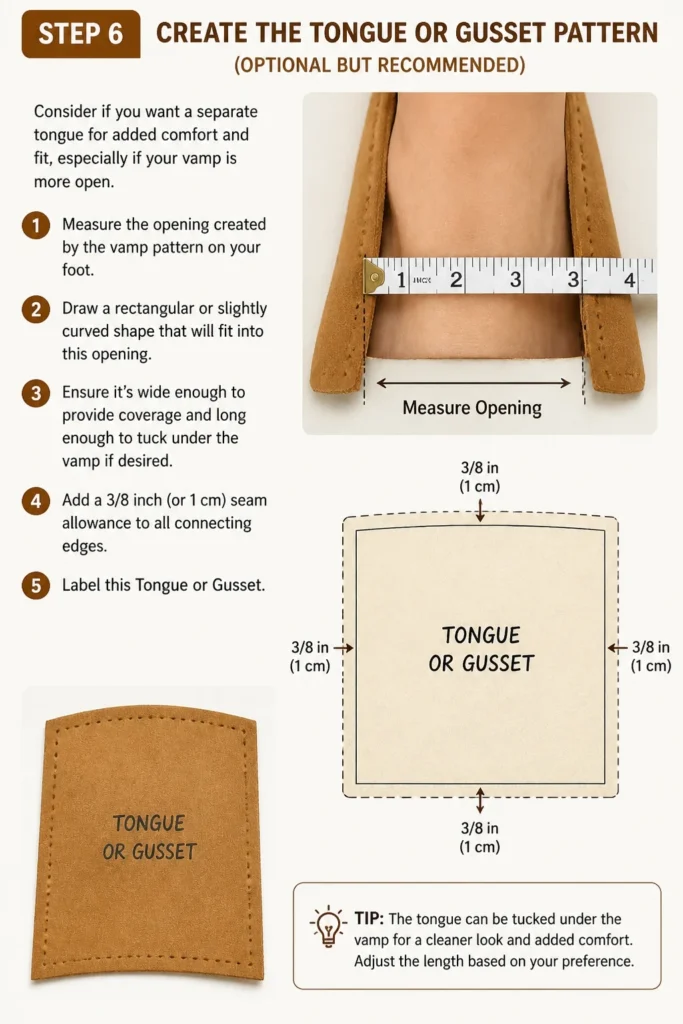
Measure the opening created by the vamp pattern on your foot.
Draw a rectangular or slightly curved shape that will fit into this opening.
Ensure it’s wide enough to provide coverage and long enough to tuck under the vamp if desired.
Add a 3/8 inch (or 1 cm) seam allowance to all connecting edges.
Label this “Tongue” or “Gusset.”
Step 7: Check Pattern Alignment and Fit
Lay out all your pattern pieces on a flat surface: the sole, vamp, and heel counter.
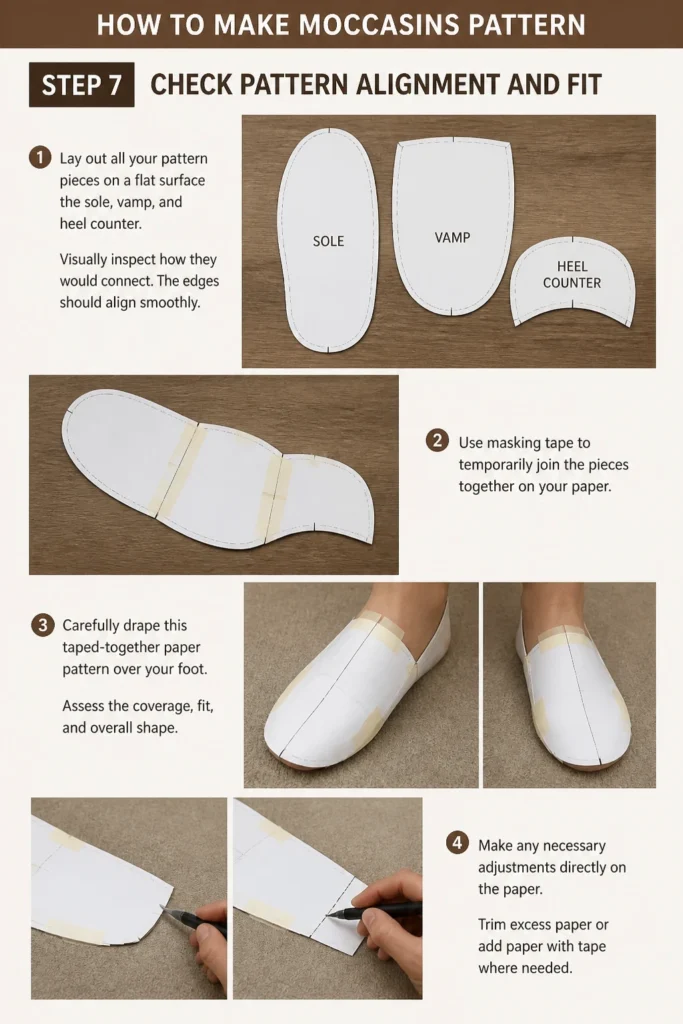
Visually inspect how they would connect. The edges should align smoothly.
Use masking tape to temporarily join the pieces together on your paper.
Carefully drape this taped-together paper pattern over your foot.
Assess the coverage, fit, and overall shape. Make any necessary adjustments directly on the paper.
Trim excess paper or add paper with tape where needed.
Step 8: Finalize and Transfer Your Pattern
Once you are satisfied with the fit and appearance of your paper mock-up, carefully separate the taped pieces.
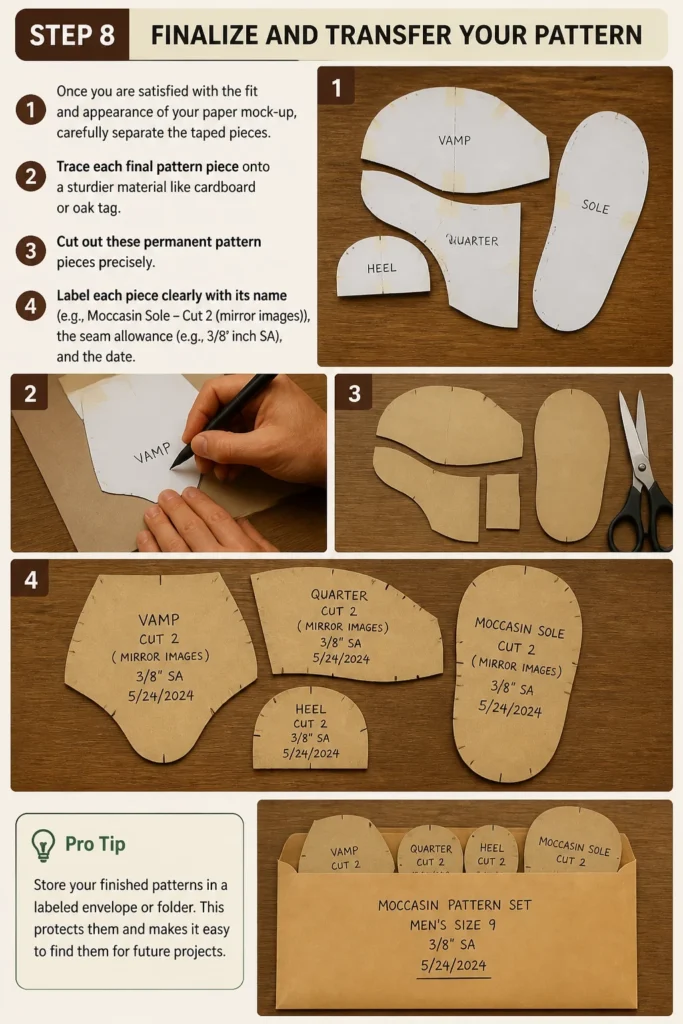
Trace each final pattern piece onto a sturdier material like cardboard or oak tag.
Cut out these permanent pattern pieces precisely.
Label each piece clearly with its name (e.g., “Moccasin Sole – Cut 2 (mirror images)”), the seam allowance (e.g., “3/8 inch SA”), and the date.
Pro Tip: Store your finished patterns in a labeled envelope or folder. This protects them and makes it easy to find them for future projects.
Common Mistakes to Avoid
Forgetting Seam Allowance
Many beginners trace their foot and cut directly, forgetting to add seam allowance. This results in moccasins that are too small and unwearable. Always remember to add a consistent seam allowance to all edges that will be sewn.
Inaccurate Tracing
Tracing your foot while holding the pencil at an angle will distort the sole shape, making your pattern incorrect. Always hold the pencil perfectly vertical, perpendicular to the paper, to get an accurate representation of your foot’s outline.
Ignoring Foot Differences
Most people have one foot slightly larger than the other. If you only trace one foot and mirror the pattern, your moccasins might not fit comfortably. Always trace both feet and use the larger tracing as your primary template, adjusting the other as needed.
Rushing the Paper Mock-Up
Skipping the step of taping your paper pattern together and trying it on your foot can lead to significant issues later. This mock-up is crucial for identifying fit problems before you cut into expensive leather or fabric, saving time and materials.
Troubleshooting
Moccasin Feels Too Tight
If your paper pattern feels too snug when you try it on, it’s likely due to an insufficient seam allowance or a tracing that was too tight. Re-examine your sole and vamp patterns, adding an extra 1/8 to 1/4 inch to all outer edges, especially around the ball of the foot and toes. Retrace and re-test.
Pattern Pieces Don’t Align
When you try to tape your paper pieces together, if they don’t meet smoothly, the curves might be off. Revisit the points where the vamp meets the sole and where the heel counter meets the sole. Ensure your seam allowance lines are consistent and that the curves are gradual and even. Use your foot as a guide to redraw the intersecting lines.
Moccasin Slips Off Heel
If your heel counter pattern feels too shallow or doesn’t cup your heel properly, it will lead to slippage. Increase the height of the heel counter pattern, particularly at the back. You can also make the curve at the base of the heel counter more pronounced to hug the heel better. Test the revised pattern on your foot.
Key Takeaways
- Always begin by tracing both of your feet accurately for the sole pattern.
- Add a consistent seam allowance (e.g., 3/8 inch or 1 cm) to all pattern edges that will be sewn.
- Create separate pattern pieces for the sole, vamp, and heel counter.
- Conduct a paper mock-up and try it on your foot to verify the fit before cutting fabric.
- Refine and smooth all lines on your pattern for a professional finish.
- Label all your pattern pieces clearly for future use and easy identification.
Frequently Asked Questions
Can I use an existing shoe as a guide for my pattern?
While you can certainly look at an existing shoe for inspiration regarding style and shape, directly tracing an existing shoe is not recommended for a custom fit. Shoes have internal structures and different construction methods that won’t translate directly to a flat moccasin pattern. Always start with your foot tracing for the best results.
What if my foot is unusually wide or narrow?
That’s precisely why making your own pattern is so beneficial. When tracing your foot, you naturally capture its unique width. For wider feet, consider adding an extra 1/8 to 1/4 inch to the sole’s width around the ball of the foot and toes during the refinement stage for added comfort. For narrow feet, stick closely to your tracing and use the standard seam allowance.
How do I make a pattern for a lined moccasin?
For a lined moccasin, you will typically use the exact same pattern pieces for both the outer material and the lining. However, some experienced crafters might slightly reduce the lining pattern’s seam allowance (e.g., by 1/16 inch) to ensure the lining fits snugly inside without bulk. Always test with a scrap first.
Should I make my pattern symmetrical?
While the overall design of your moccasin should appear symmetrical, remember that your feet are not perfectly identical. Trace both feet and make minor adjustments to achieve visual symmetry on your pattern pieces while still accommodating the subtle differences in your left and right foot for a comfortable fit.
Our Top Recommended Finds
- Large Kraft Paper Roll: Ideal for tracing and creating large pattern pieces without interruption. It’s durable and easy to mark.
- Flexible Measuring Tape: Essential for taking accurate foot measurements and for measuring curved pattern lines precisely.
- Pattern Drafting Ruler Set: Includes various curves and straight edges, which are invaluable for smoothing out lines and creating professional-looking pattern shapes.
Embarking on Your Moccasin Journey
You now possess the knowledge to craft a custom moccasin pattern.
This foundational skill opens up a world of personalized footwear possibilities.
Take the next step today and begin tracing your path to handmade comfort and style.