
How To Make DIY Windmill
I remember the first time I built a small windmill for my garden.
The joy of seeing it spin with the breeze was truly rewarding, a testament to simple mechanics and a bit of effort.
This guide shares all the practical lessons I learned, ensuring your project is a success and you too can enjoy your very own DIY windmill.

Quick Overview
This project guides you through creating a functional and decorative windmill, perfect for your garden or yard. It’s a rewarding build that combines crafting with basic engineering principles.
- Time needed: 3-5 hours (depending on complexity and experience)
- Difficulty: Intermediate
- What you’ll need: Wood planks, PVC pipe, dowel, screws, bearings, basic hand tools
Step-by-Step Instructions
Step 1: Gather Your Materials and Tools
Before beginning, lay out all your necessary materials and tools. This ensures you have everything at hand and can work efficiently without interruptions.
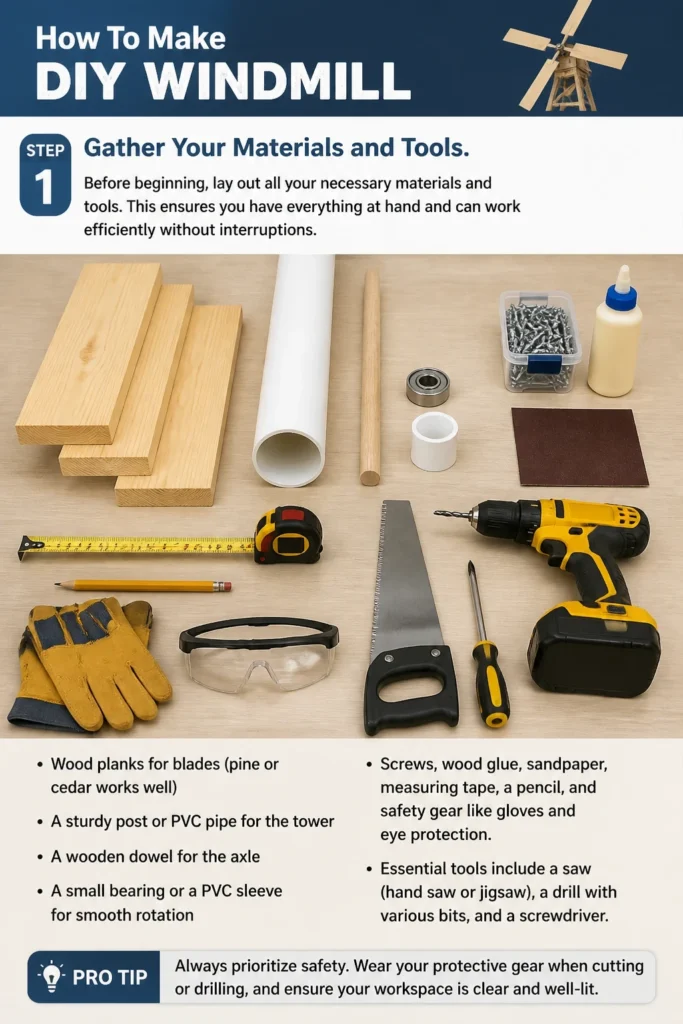
You will need wood planks for blades (pine or cedar works well), a sturdy post or PVC pipe for the tower, a wooden dowel for the axle, and a small bearing or a PVC sleeve for smooth rotation.
Gather screws, wood glue, sandpaper, a measuring tape, a pencil, and safety gear like gloves and eye protection. Essential tools include a saw (hand saw or jigsaw), a drill with various bits, and a screwdriver.
Pro Tip: Always prioritize safety. Wear your protective gear when cutting or drilling, and ensure your workspace is clear and well-lit.
Step 2: Design and Mark Your Blades
The performance of your windmill largely depends on the design of its blades. Aim for four or six equally sized blades for optimal balance and spin.
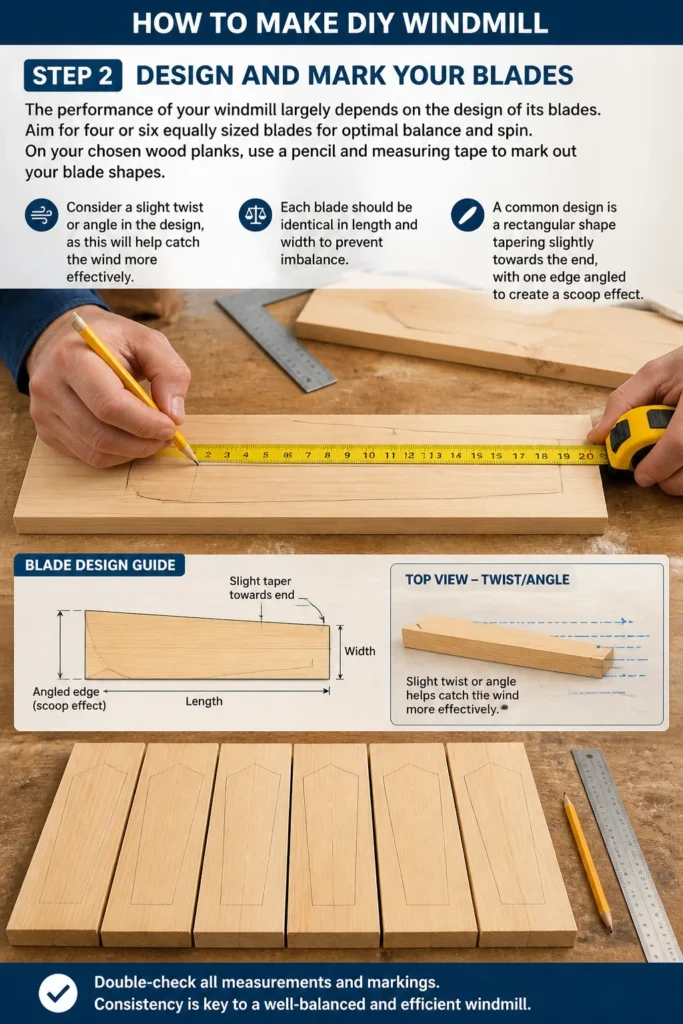
On your chosen wood planks, use a pencil and measuring tape to mark out your blade shapes. Consider a slight twist or angle in the design, as this will help catch the wind more effectively.
Each blade should be identical in length and width to prevent imbalance. A common design is a rectangular shape tapering slightly towards the end, with one edge angled to create a scoop effect.
Step 3: Cut and Shape the Blades
Carefully cut out each blade along your marked lines using your saw. Precision here is key for a balanced windmill head.
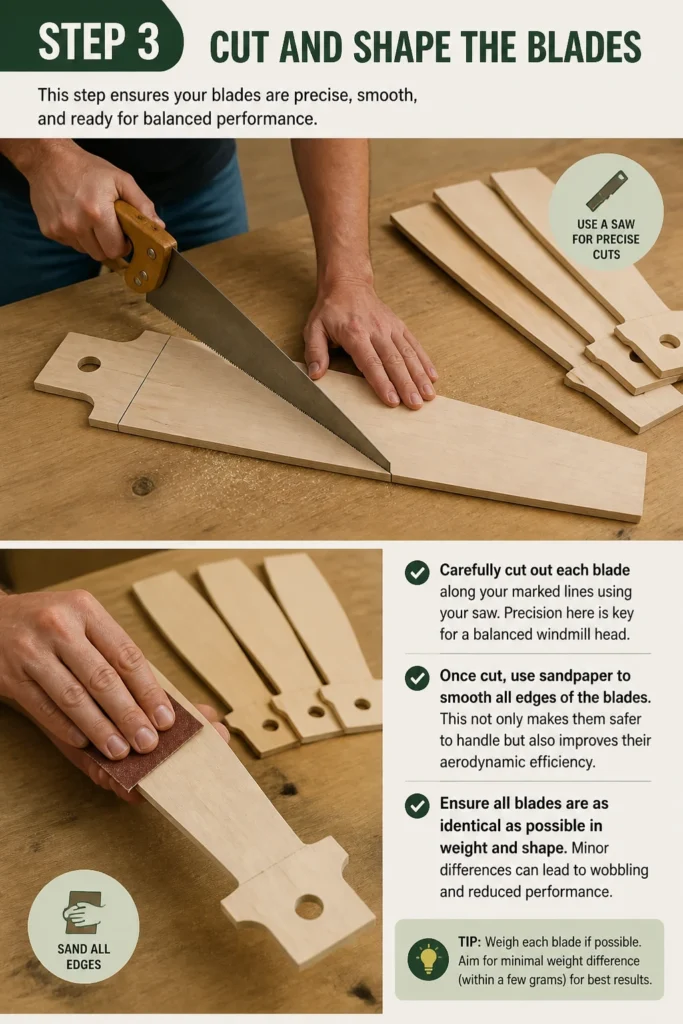
Once cut, use sandpaper to smooth all edges of the blades. This not only makes them safer to handle but also improves their aerodynamic efficiency.
Ensure all blades are as identical as possible in weight and shape. Minor differences can lead to wobbling and reduced performance.
Step 4: Construct the Windmill Hub
The hub is the central piece where all your blades attach. Cut a circular or square piece of wood that is thick enough to securely hold the blades and the axle.
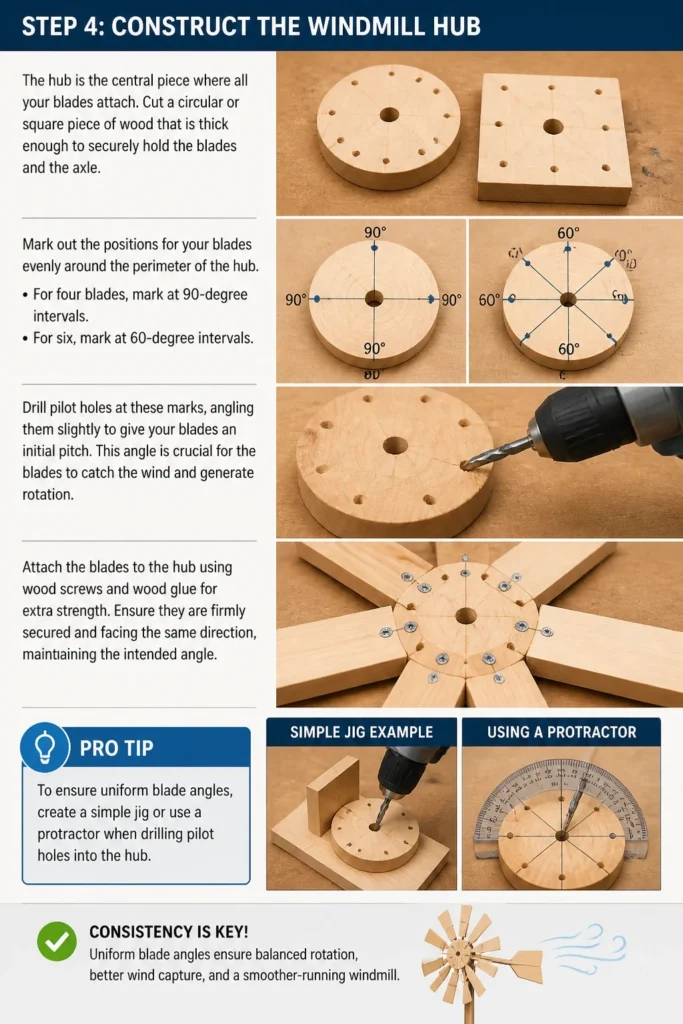
Mark out the positions for your blades evenly around the perimeter of the hub. For four blades, mark at 90-degree intervals; for six, mark at 60-degree intervals.
Drill pilot holes at these marks, angling them slightly to give your blades an initial pitch. This angle is crucial for the blades to catch the wind and generate rotation.
Attach the blades to the hub using wood screws and wood glue for extra strength. Ensure they are firmly secured and facing the same direction, maintaining the intended angle.
Pro Tip: To ensure uniform blade angles, create a simple jig or use a protractor when drilling pilot holes into the hub. Consistency leads to better spin.
Step 5: Build the Tower Support
The tower provides the necessary elevation and stability for your windmill. Choose a sturdy post made of treated wood or a thick PVC pipe.
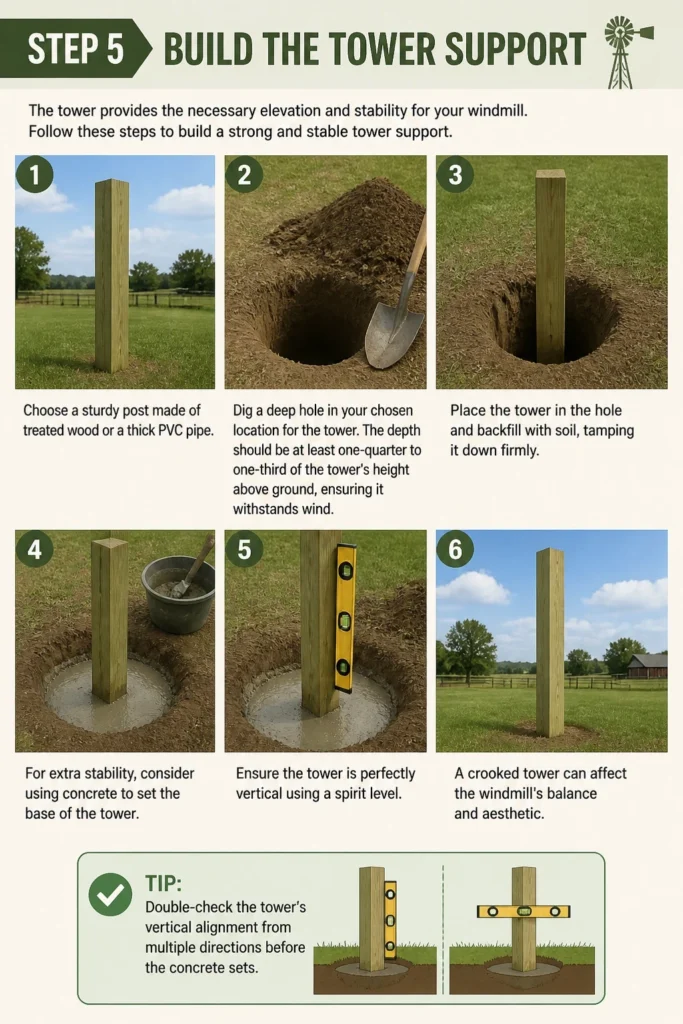
Dig a deep hole in your chosen location for the tower. The depth should be at least one-quarter to one-third of the tower’s height above ground, ensuring it withstands wind.
Place the tower in the hole and backfill with soil, tamping it down firmly. For extra stability, consider using concrete to set the base of the tower.
Ensure the tower is perfectly vertical using a spirit level. A crooked tower can affect the windmill’s balance and aesthetic.
Step 6: Install the Rotation Mechanism
This mechanism allows the windmill head to spin freely on the tower. Drill a hole through the center of your hub, large enough to fit your wooden dowel axle.
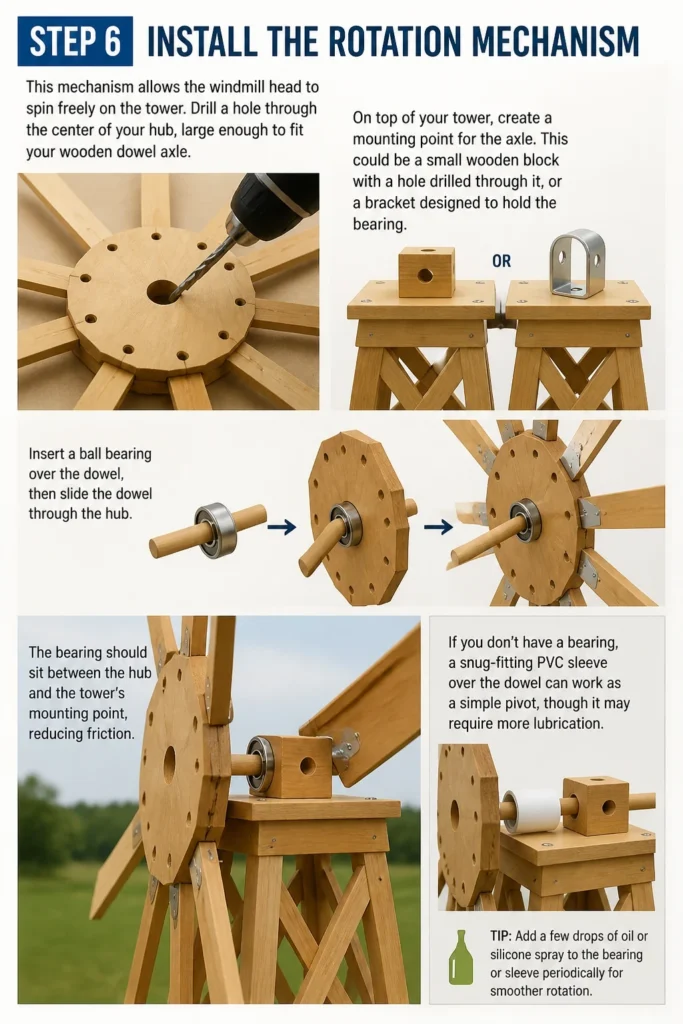
On top of your tower, create a mounting point for the axle. This could be a small wooden block with a hole drilled through it, or a bracket designed to hold the bearing.
Insert a ball bearing over the dowel, then slide the dowel through the hub. The bearing should sit between the hub and the tower’s mounting point, reducing friction.
If you don’t have a bearing, a snug-fitting PVC sleeve over the dowel can work as a simple pivot, though it may require more lubrication.
Step 7: Mount the Windmill Head
With the rotation mechanism in place, it’s time to attach the blade assembly to the tower. Carefully lift the windmill head and align the dowel axle with the bearing on the tower.
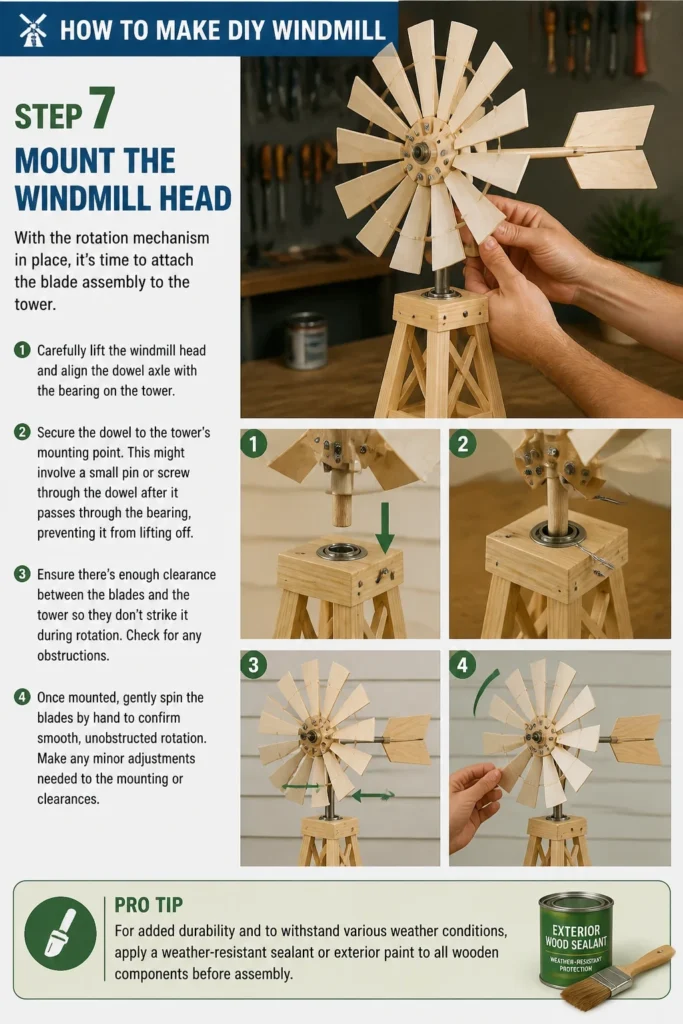
Secure the dowel to the tower’s mounting point. This might involve a small pin or screw through the dowel after it passes through the bearing, preventing it from lifting off.
Ensure there’s enough clearance between the blades and the tower so they don’t strike it during rotation. Check for any obstructions.
Once mounted, gently spin the blades by hand to confirm smooth, unobstructed rotation. Make any minor adjustments needed to the mounting or clearances.
Pro Tip: For added durability and to withstand various weather conditions, apply a weather-resistant sealant or exterior paint to all wooden components before final assembly.
Step 8: Test and Refine
Wait for a gentle breeze and observe your windmill in action. Pay close attention to its spin, balance, and any unusual noises.
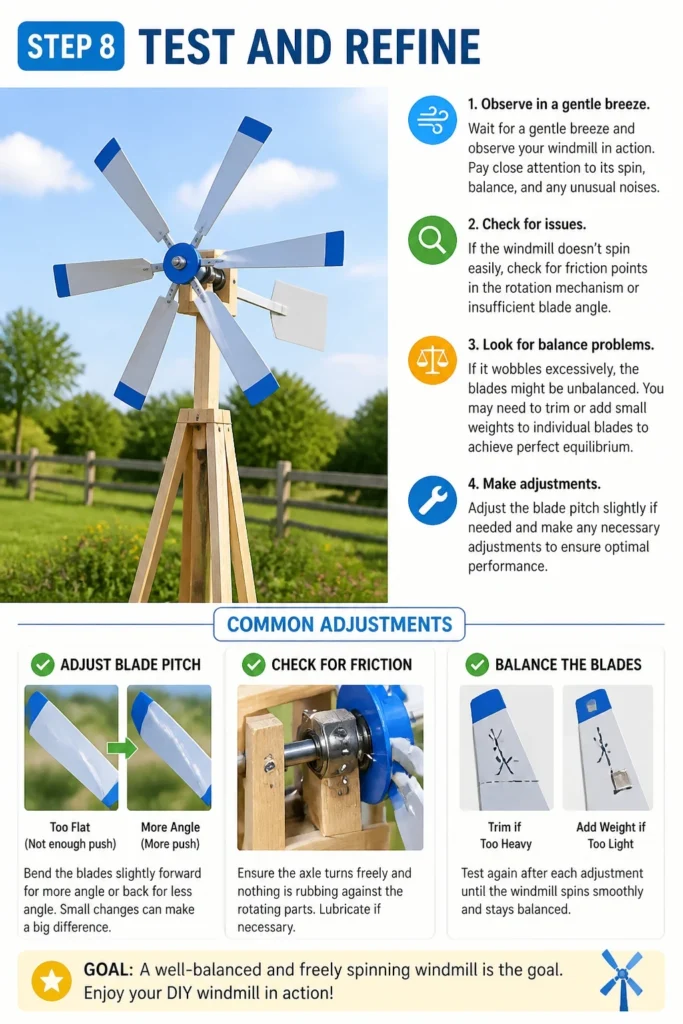
If the windmill doesn’t spin easily, check for friction points in the rotation mechanism or insufficient blade angle. Adjust the blade pitch slightly if needed.
If it wobbles excessively, the blades might be unbalanced. You may need to trim or add small weights to individual blades to achieve perfect equilibrium.
Make any necessary adjustments to ensure optimal performance. A well-balanced and freely spinning windmill is the goal.
Common Mistakes to Avoid
Improper Blade Angle
Many first-time builders fail to give their blades the correct angle or twist. If the blades are too flat, they won’t catch enough wind to spin efficiently. Conversely, too steep an angle can create drag, hindering rotation. The key is a consistent, gentle pitch across all blades to effectively harness the breeze.
Unbalanced Blades
A common issue is creating blades that are not identical in weight or shape. This imbalance causes the windmill head to wobble excessively during rotation, leading to premature wear on the bearing and potential structural stress. Always weigh your finished blades and make minor adjustments until they are as close to identical as possible.
Weak Tower Foundation
Neglecting a sturdy foundation for the tower is a significant oversight. A tower that is not deeply set or properly secured can easily topple in strong winds, damaging the windmill and potentially causing injury. Always ensure your tower is buried deep enough or secured with concrete to withstand local weather conditions.
Ignoring Weatherproofing
Failing to protect wooden components from the elements will drastically shorten your windmill’s lifespan. Untreated wood will rot, warp, and degrade quickly when exposed to rain, sun, and humidity. Applying exterior-grade paint, varnish, or sealant is a crucial step to ensure your DIY windmill lasts for years to come.
Troubleshooting
Windmill Doesn’t Spin
If your windmill isn’t spinning, first check for any friction in the rotation mechanism. Ensure the dowel moves freely within the bearing or sleeve, and lubricate if necessary. Next, examine the blade angles; they might be too flat or incorrectly pitched. Gently adjust the angle of each blade to better catch the wind.
Excessive Wobbling
Excessive wobbling almost always indicates an imbalance in the blade assembly. Carefully remove the windmill head and weigh each blade. You might need to shave a small amount of wood from heavier blades or add a tiny weight to lighter ones. Also, ensure the hub is securely attached to the axle and the tower is plumb.
Noisy Operation
A noisy windmill usually points to friction or loose components. Check the bearing or pivot point for any debris or lack of lubrication; apply a suitable lubricant. Inspect all screws and joints in the blade assembly and hub to ensure they are tight. Loose parts vibrating can create significant noise during rotation.
Key Takeaways
- Precision in blade design and cutting is crucial for optimal performance.
- Balance is paramount; ensure all blades are identical in weight and shape to prevent wobbling.
- A sturdy and level tower foundation is essential for the windmill’s stability and longevity.
- Weatherproofing all wooden components will protect your investment and extend its lifespan.
- Always prioritize safety by wearing appropriate protective gear during construction.
- Testing and making small adjustments are vital steps to achieve a perfectly spinning windmill.
Frequently Asked Questions
What materials are best for the blades?
Lightweight yet durable woods like cedar, pine, or even marine plywood are excellent choices for blades. They are easy to work with and hold up well to outdoor conditions when properly treated. For a more modern look, some builders use rigid PVC sheets.
How do I make my DIY windmill weatherproof?
To weatherproof your windmill, apply multiple coats of exterior-grade paint, marine varnish, or wood sealant to all wooden components. Pay special attention to edges and joints where water might seep in. Reapply these protective coatings annually or bi-annually, depending on your climate.
Can this type of DIY windmill generate electricity?
This guide focuses on building a decorative or simple mechanical windmill. Generating electricity requires specific components like an alternator or generator, charge controllers, and batteries, along with a more complex and larger blade design. This project is not designed for power generation.
How often should I maintain my windmill?
It’s a good practice to inspect your windmill annually, especially before and after harsh weather seasons. Check for loose screws, wear on the bearing, and any signs of wood rot or peeling paint. Lubricate moving parts and touch up any weatherproofing as needed to keep it in top condition.
Our Top Recommended Finds
- Exterior Grade Wood Sealant: Crucial for protecting your wooden components from moisture and UV damage, ensuring longevity.
- High-Quality Ball Bearings: Investing in good bearings will provide smoother, quieter, and more durable rotation for your windmill head.
- Cordless Drill/Driver Kit: An indispensable tool for drilling pilot holes, driving screws, and making quick adjustments during assembly.
Embrace the Breeze: Your Windmill’s Journey Begins
Building your own DIY windmill is a deeply satisfying project, connecting you with basic engineering and the natural world. Imagine the gentle whirring as it catches the wind, a charming focal point in your garden that you built with your own hands.
Don’t let the thought of intricate steps deter you. Each stage is manageable, and the reward of seeing your creation come to life is immense. You now have a comprehensive guide to lead you through every twist and turn.
Why not gather your materials this weekend and begin your windmill adventure? You might even consider adding LED lights for a magical nighttime display or exploring larger designs once you’ve mastered this one. The possibilities are endless.