How To Make Box
Making a custom box is a skill that saves money and adds a personal touch to any gift or storage project.
I have spent years crafting prototypes for packaging designs and home organization systems using simple materials.
This guide provides a foolproof method for creating a sturdy, professional-looking box from scratch using basic tools you likely already own.
Quick Overview
Creating a custom box allows you to tailor dimensions to your specific needs, ensuring a perfect fit every time.
- Time needed: 20 to 30 minutes
- Difficulty: Beginner
- What you’ll need: Cardboard or heavy cardstock, ruler, pencil, scissors or utility knife, and adhesive.
Step 1: Select Your Material
Choose a material that matches the intended use of your box.
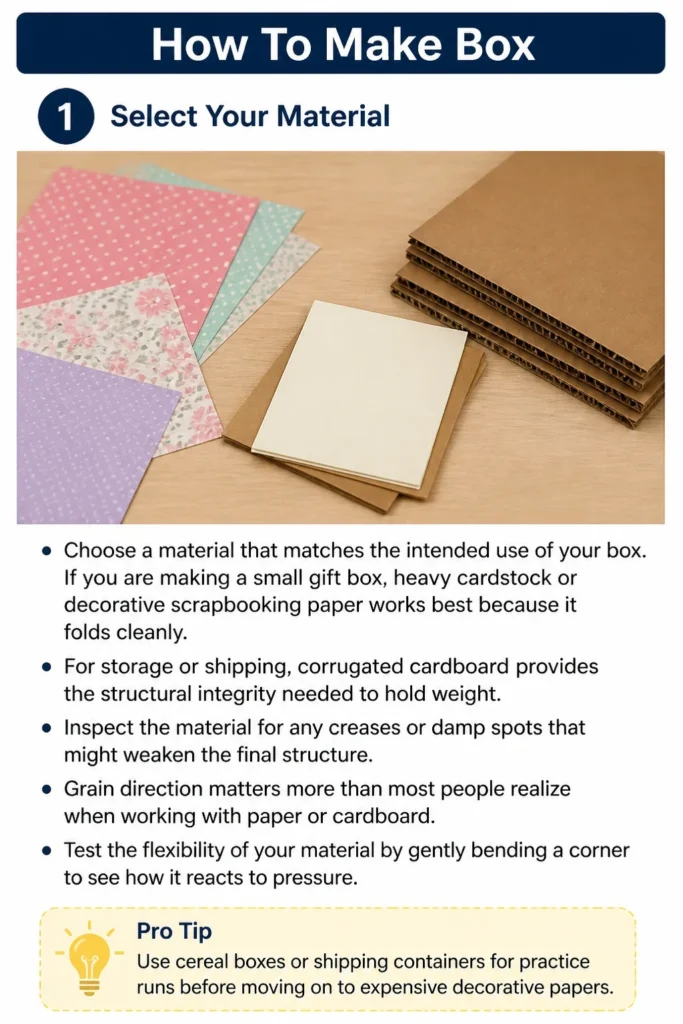
If you are making a small gift box, heavy cardstock or decorative scrapbooking paper works best because it folds cleanly.
For storage or shipping, corrugated cardboard provides the structural integrity needed to hold weight.
Inspect the material for any creases or damp spots that might weaken the final structure.
Grain direction matters more than most people realize when working with paper or cardboard.
Test the flexibility of your material by gently bending a corner to see how it reacts to pressure.
Pro Tip: Use cereal boxes or shipping containers for practice runs before moving on to expensive decorative papers.
Step 2: Determine Your Dimensions
Decide on the length, width, and height of the box you want to create.
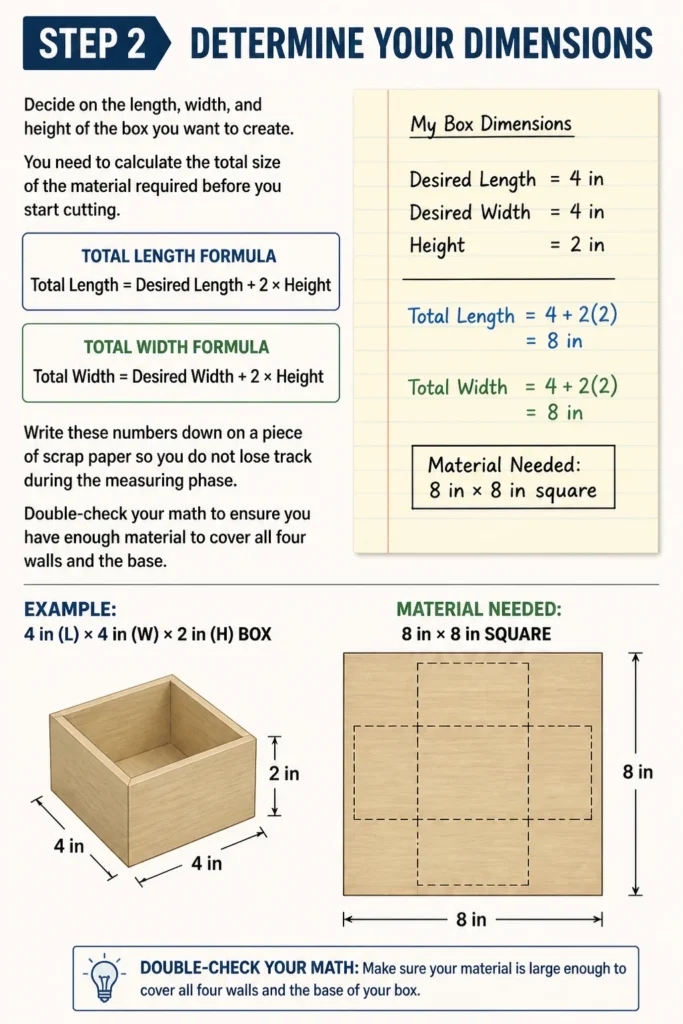
You need to calculate the total size of the material required before you start cutting.
The formula for the total length of your material is the desired length of the box plus twice the height.
The formula for the total width is the desired width of the box plus twice the height.
Write these numbers down on a piece of scrap paper so you do not lose track during the measuring phase.
If you want a box that is 4 inches long, 4 inches wide, and 2 inches high, you will need an 8-inch by 8-inch square of material.
Double-check your math to ensure you have enough material to cover all four walls and the base.
Step 3: Mark the Base and Walls
Place your material flat on a clean, hard work surface.
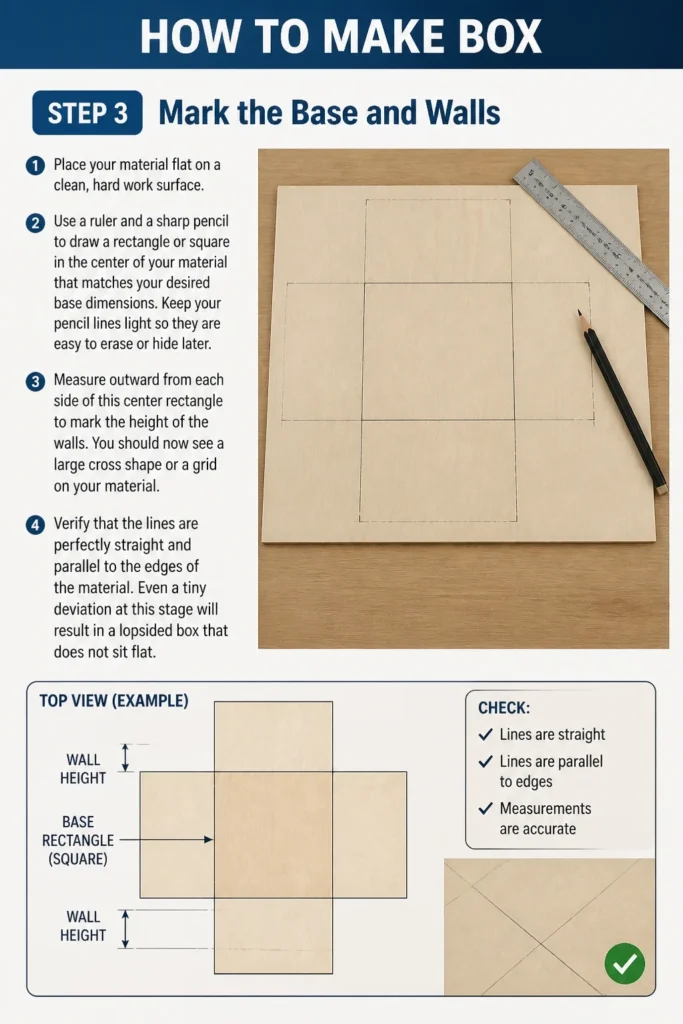
Use a ruler and a sharp pencil to draw a rectangle or square in the center of your material that matches your desired base dimensions.
Keep your pencil lines light so they are easy to erase or hide later.
Measure outward from each side of this center rectangle to mark the height of the walls.
You should now see a large cross shape or a grid on your material.
Verify that the lines are perfectly straight and parallel to the edges of the material.
Even a tiny deviation at this stage will result in a lopsided box that does not sit flat.
Step 4: Create the Corner Tabs
Identify the four square areas at the corners of your material where the wall lines intersect.
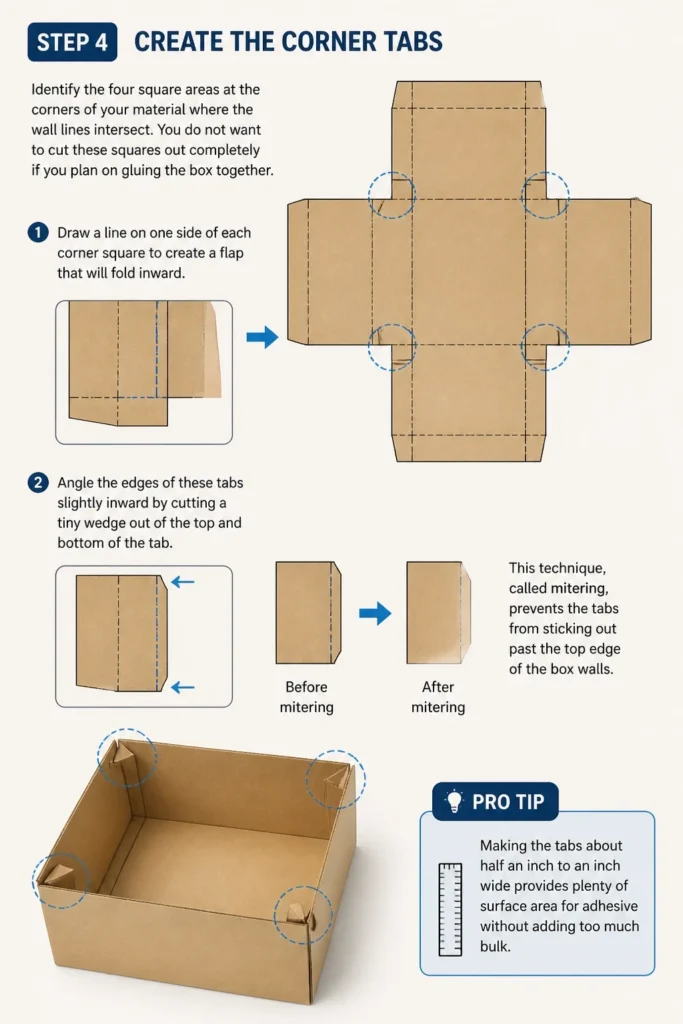
You do not want to cut these squares out completely if you plan on gluing the box together.
Draw a line on one side of each corner square to create a flap that will fold inward.
These flaps, or tabs, are what hold the walls together when you apply glue or tape.
Angle the edges of these tabs slightly inward by cutting a tiny wedge out of the top and bottom of the tab.
This technique, called mitering, prevents the tabs from sticking out past the top edge of the box walls.
Pro Tip: Making the tabs about half an inch to an inch wide provides plenty of surface area for adhesive without adding too much bulk.
Step 5: Cut the Template
Secure your material to a cutting mat or a piece of scrap wood to protect your table.
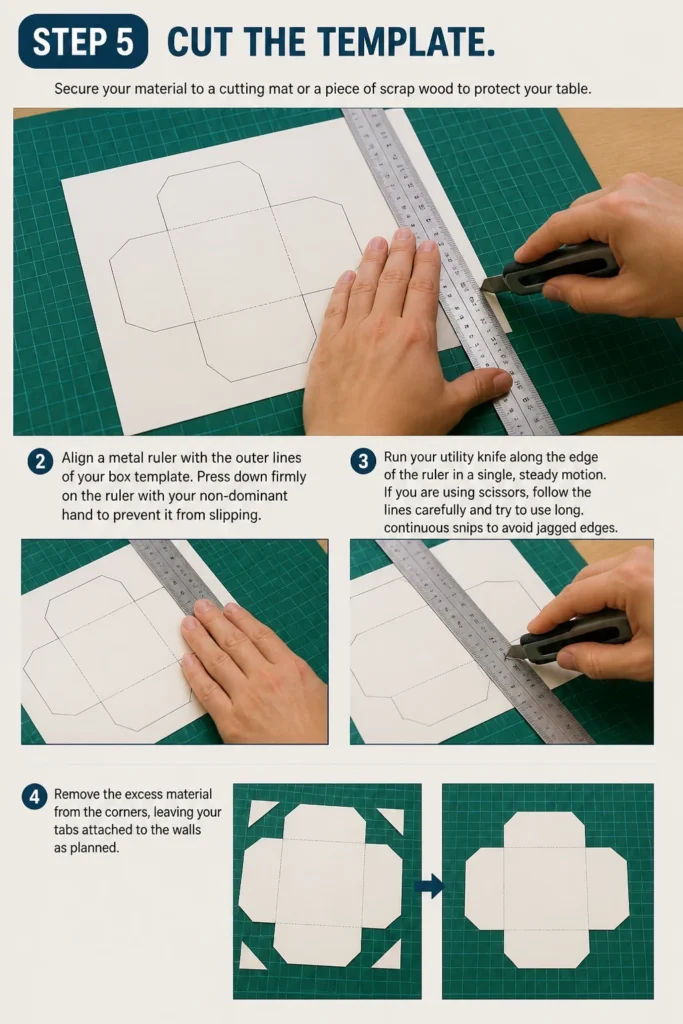
Align a metal ruler with the outer lines of your box template.
Press down firmly on the ruler with your non-dominant hand to prevent it from slipping.
Run your utility knife along the edge of the ruler in a single, steady motion.
If you are using scissors, follow the lines carefully and try to use long, continuous snips to avoid jagged edges.
Remove the excess material from the corners, leaving your tabs attached to the walls as planned.
Step 6: Score the Fold Lines
Find the lines you drew earlier that define the base of the box.
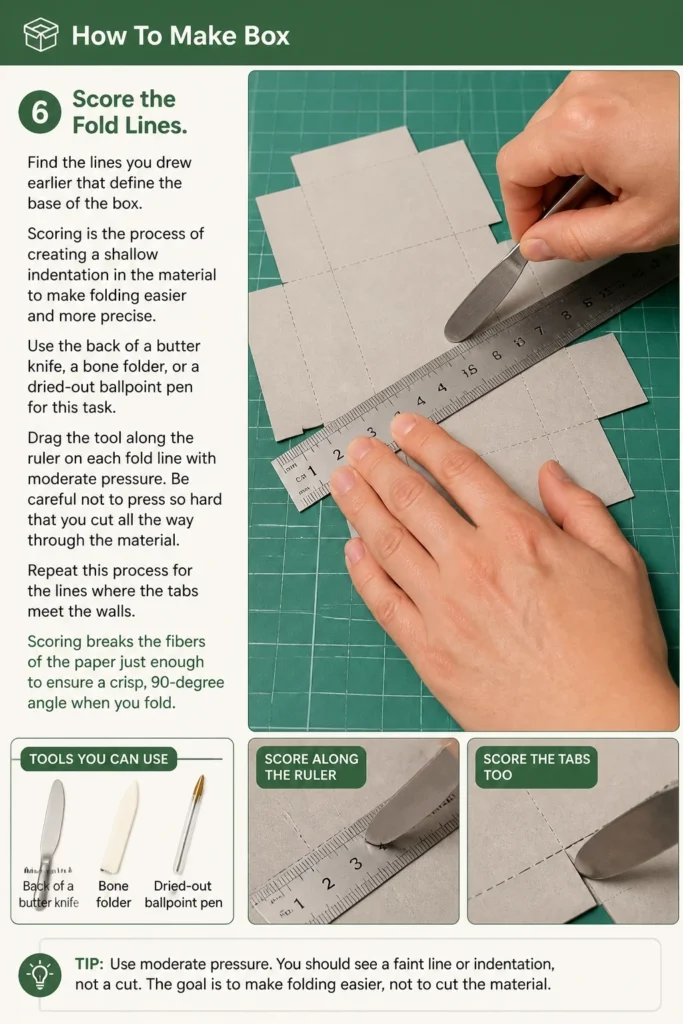
Scoring is the process of creating a shallow indentation in the material to make folding easier and more precise.
Use the back of a butter knife, a bone folder, or a dried-out ballpoint pen for this task.
Drag the tool along the ruler on each fold line with moderate pressure.
Be careful not to press so hard that you cut all the way through the material.
Repeat this process for the lines where the tabs meet the walls.
Scoring breaks the fibers of the paper just enough to ensure a crisp, 90-degree angle when you fold.
Step 7: Pre-Fold the Walls and Tabs
Lift each wall of the box and fold it toward the center of the base.
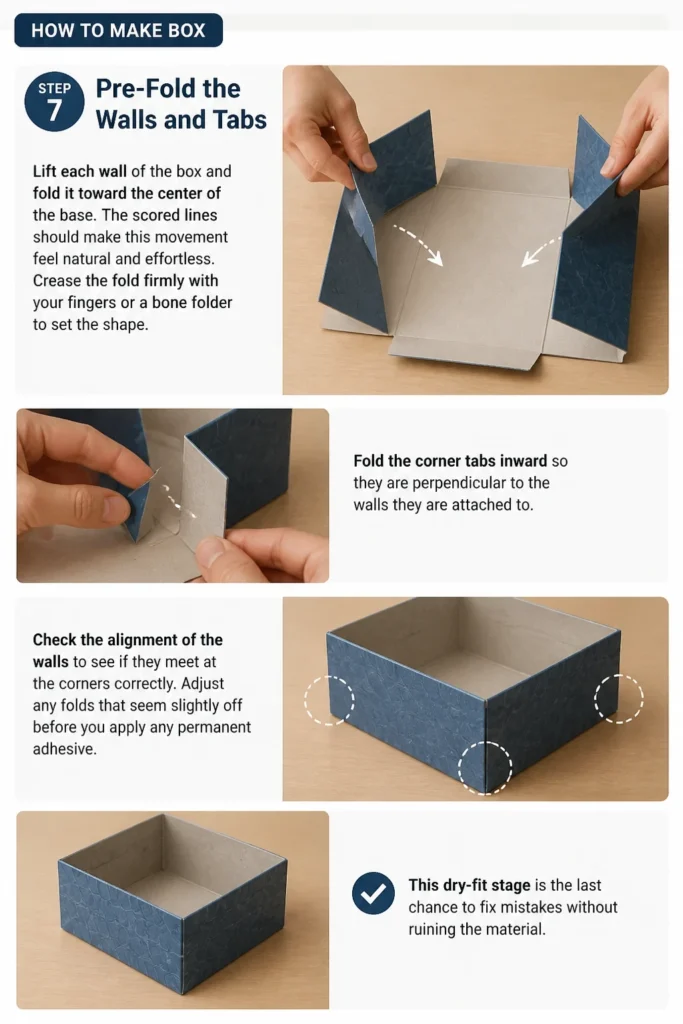
The scored lines should make this movement feel natural and effortless.
Crease the fold firmly with your fingers or a bone folder to set the shape.
Fold the corner tabs inward so they are perpendicular to the walls they are attached to.
Check the alignment of the walls to see if they meet at the corners correctly.
Adjust any folds that seem slightly off before you apply any permanent adhesive.
This dry-fit stage is the last chance to fix mistakes without ruining the material.
Step 8: Apply Adhesive and Assemble
Select an adhesive that is appropriate for your material, such as white glue, a glue stick, or double-sided tape.
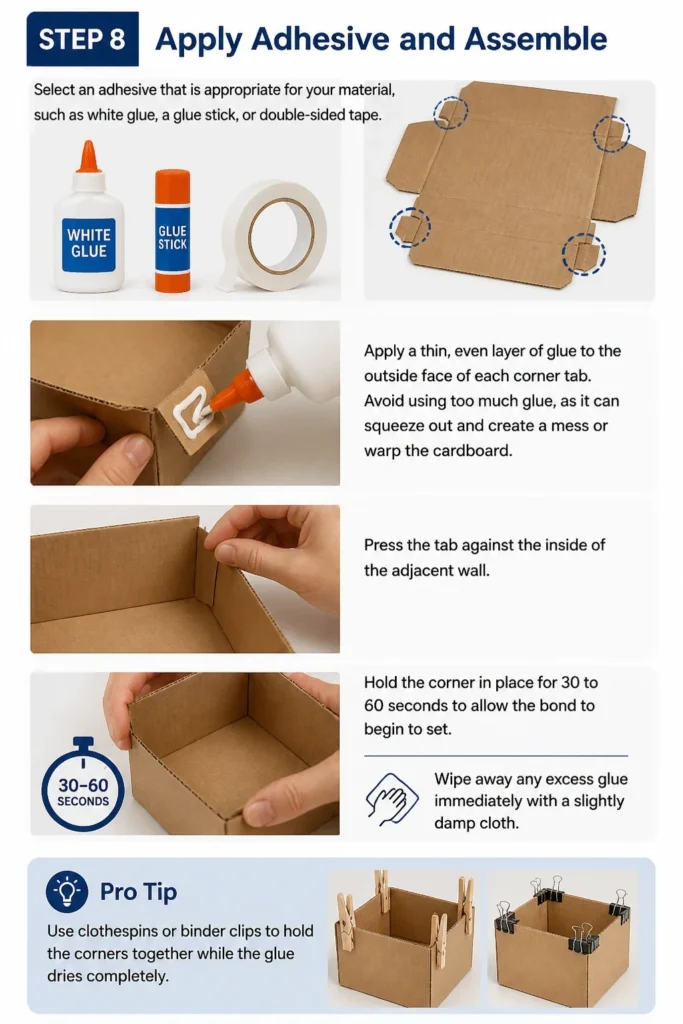
Apply a thin, even layer of glue to the outside face of each corner tab.
Avoid using too much glue, as it can squeeze out and create a mess or warp the cardboard.
Press the tab against the inside of the adjacent wall.
Hold the corner in place for 30 to 60 seconds to allow the bond to begin to set.
Wipe away any excess glue immediately with a slightly damp cloth.
Pro Tip: Use clothespins or binder clips to hold the corners together while the glue dries completely.
Step 9: Create the Lid (Optional)
Follow the same steps as above to create a lid for your box.
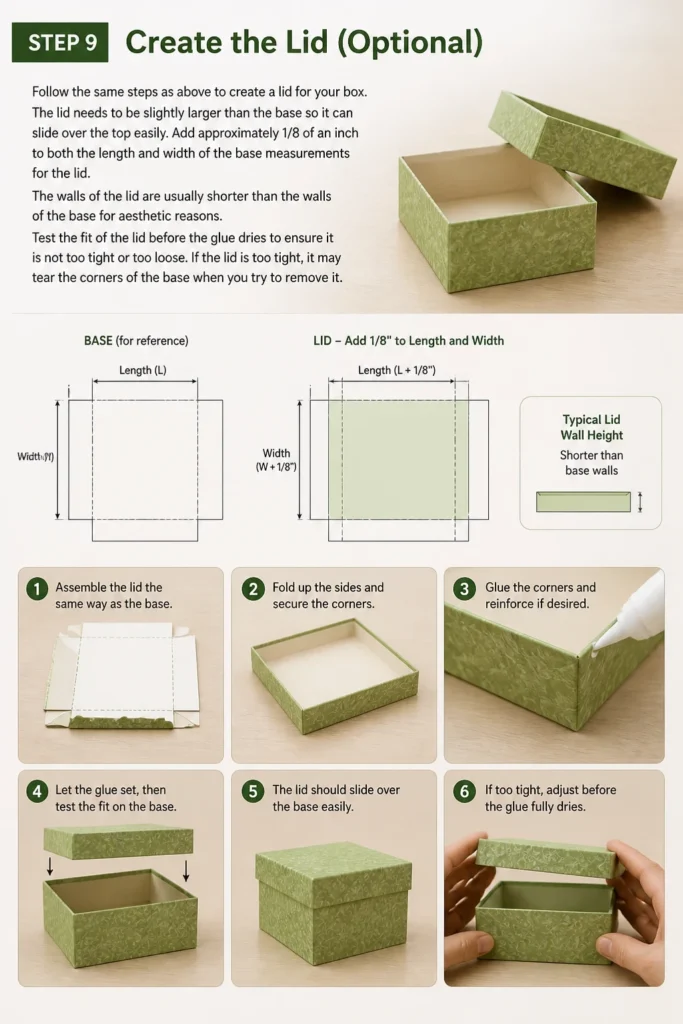
The lid needs to be slightly larger than the base so it can slide over the top easily.
Add approximately 1/8 of an inch to both the length and width of the base measurements for the lid.
The walls of the lid are usually shorter than the walls of the base for aesthetic reasons.
Test the fit of the lid before the glue dries to ensure it is not too tight or too loose.
If the lid is too tight, it may tear the corners of the base when you try to remove it.
Common Mistakes to Avoid
Ignoring Material Thickness
Many people measure the base and walls perfectly but forget that the material itself has thickness. When the walls fold up, they take up a small amount of space on the base. If you are using thick corrugated cardboard, your interior space will be smaller than your exterior measurements. Always account for this by adding a few millimeters to your dimensions if the internal size is critical.
Using Dull Cutting Tools
A dull blade is the enemy of a clean box. It tends to tear the fibers of the cardboard rather than slicing them, leading to fuzzy edges and weak corners. If you notice the blade pulling at the material, stop immediately and change it. A sharp blade requires less pressure and provides much better control for straight lines.
Over-Gluing the Tabs
It is tempting to use a lot of glue to ensure the box stays together, but this often backfires. Excessive moisture from liquid glue can cause the cardboard to ripple or soften. This weakens the structure and makes the corners look bulky. A thin, even layer of glue or high-quality double-sided tape is usually more than enough for a secure hold.
Troubleshooting
The Box is Lopsided
If your box looks tilted or does not sit flat, the issue usually stems from the initial measurements. Check if your base is a perfect rectangle with four 90-degree corners. You can use a carpenter’s square or the corner of a piece of printer paper to verify the angles. If the base is uneven, you may need to trim the walls or start over with a fresh template.
The Corners are Tearing
Tearing at the corners usually happens when you fold the material without scoring it first. If you have already folded it and see cracks, you can reinforce the inside of the corner with a small strip of packing tape. For future projects, ensure you score the lines deep enough to guide the fold but not so deep that you cut the material. Using a material with a higher moisture content can also help prevent cracking in dry environments.
The Lid Won’t Slide On
This is a common issue caused by not adding a “clearance” measurement to the lid. If the lid is the exact same size as the base, the friction between the walls will prevent it from closing. To fix this on a finished box, you can try gently sanding the outside of the base walls. If that doesn’t work, you will need to make a new lid that is slightly larger by at least 1/8 of an inch.
Key Takeaways
- Precision is key: Use a metal ruler and a sharp pencil for every measurement.
- Score before folding: This ensures clean, professional edges and prevents the material from cracking.
- Account for thickness: Remember that thick materials require slightly larger lid dimensions.
- Use the right adhesive: Match your glue to the weight of your material for the best results.
- Miter your tabs: Cutting the corners of your tabs at an angle prevents them from peeking over the edges.
- Dry fit first: Always fold and test the box shape before applying glue.
Frequently Asked Questions
What is the best glue for making a cardboard box?
For most projects, a high-quality PVA glue (white craft glue) is the best choice because it creates a strong bond and dries clear. If you are in a hurry, a hot glue gun works well, but it can add bulk to the joints. For thin cardstock, double-sided tape is often the cleanest option as it provides an instant hold without any drying time.
Can I make a box without using any glue?
Yes, you can create an origami-style box or a tab-and-slot box that stays together through tension and friction. These designs require more complex cutting and folding patterns but eliminate the need for adhesives. Tab-and-slot designs are especially popular for laser-cut projects or heavy-duty shipping boxes.
How do I make the box stronger for heavy items?
To increase the strength of your box, you can double the thickness of the base by gluing an extra piece of cardboard inside. You can also use “reinforced corners” by taping the outside edges with filament tape or heavy-duty packing tape. Using a cross-grain orientation for the base and walls can also help distribute weight more effectively.
What kind of cardboard should I use for shipping?
For shipping, you should use corrugated cardboard, which consists of a fluted inner layer sandwiched between two flat liners. This construction provides excellent crush resistance and protects the contents from impact. Look for “B-flute” or “C-flute” cardboard for standard shipping needs, as these offer a good balance of strength and weight.
Our Top Recommended Finds
- Self-Healing Cutting Mat: This protects your work surface and provides a grid for easy measuring and alignment.
- Stainless Steel Ruler with Cork Backing: The metal edge is perfect for guiding a utility knife, and the cork prevents the ruler from sliding.
- Precision Utility Knife: A sharp, retractable blade allows for detailed cuts and is safer to use than a standard kitchen knife.
Master Your Crafting Skills
Once you have mastered the basic square box, you can experiment with different shapes like hexagons or triangles.
You might also consider exploring decorative techniques such as fabric wrapping or decoupage to elevate your creations.
The skills you learned today are the foundation for more advanced packaging design and home organization projects.
Grab your materials and start building your first custom box today to see how easy and rewarding it can be.