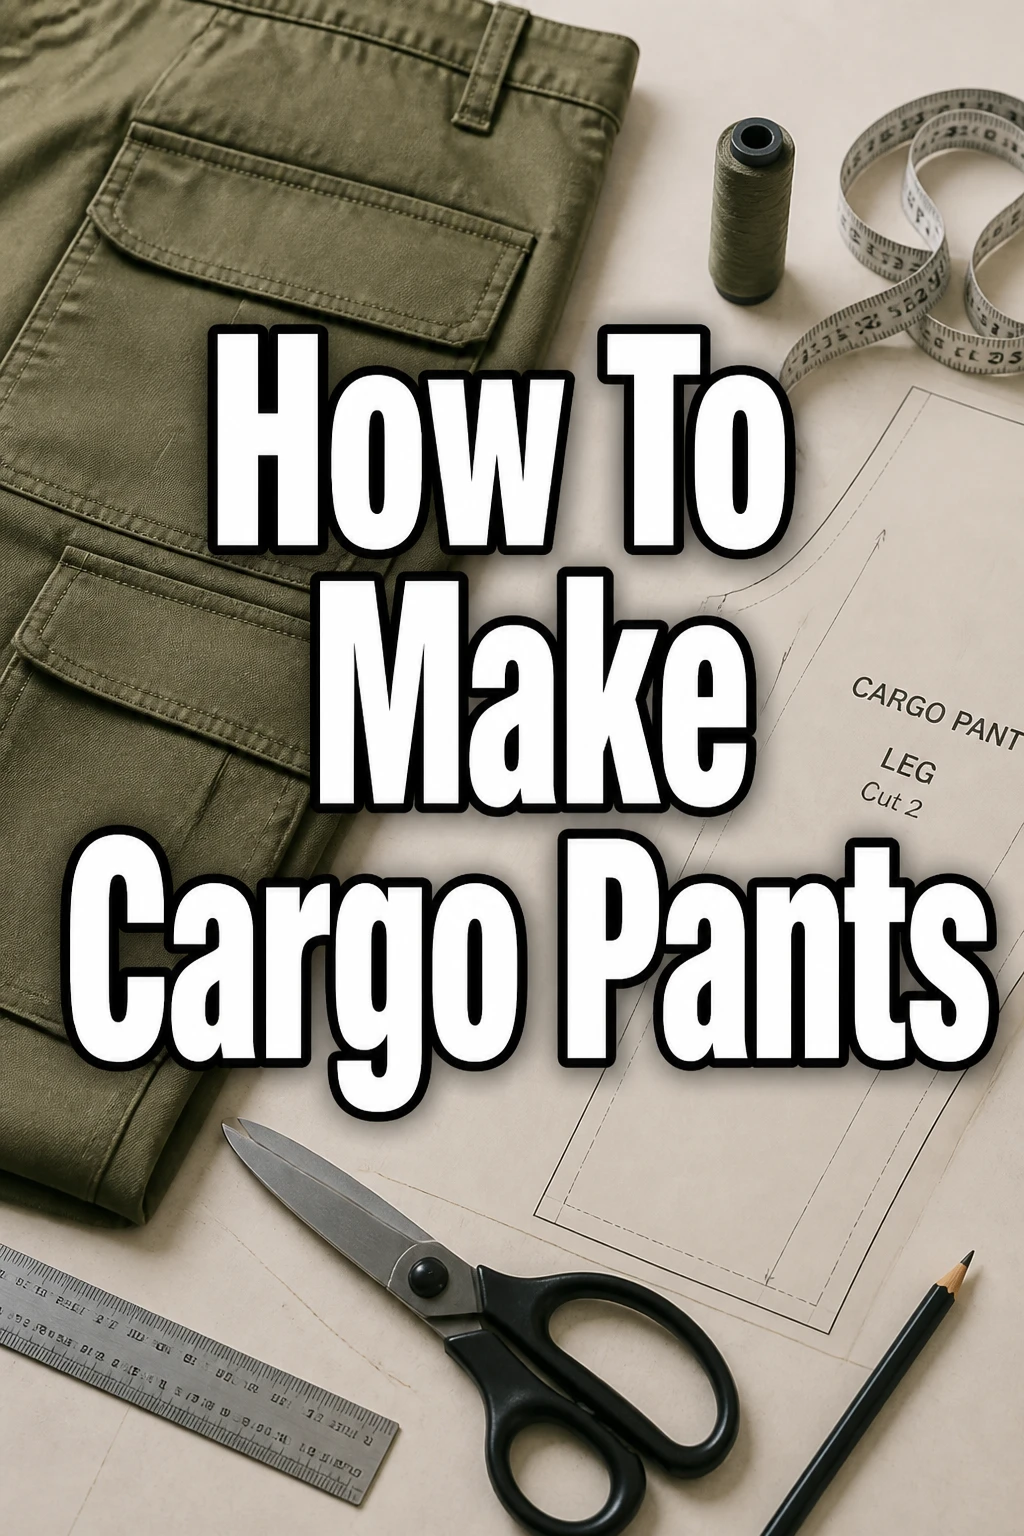
How To Make Cargo Pants
I remember the first time I tried to sew a pair of utility trousers for a rugged hiking trip.
I completely botched the pocket placement, and my phone hit my knee with every step I took for three miles.
After years of refining my technique and learning how to handle heavy-duty fabrics, I have developed a foolproof method for creating durable, professional-looking cargo pants.
Quick Overview
This guide will walk you through the entire process of constructing utility trousers from scratch.
You will learn how to draft bellows pockets, install a secure fly, and reinforce high-stress seams for longevity.
- Time needed: 8 to 12 hours depending on experience level
- Difficulty: Intermediate
- What you’ll need: 2.5 yards of heavy fabric, matching thread, 7-inch zipper, buttons or snaps, and a sewing machine with a heavy-duty needle.
Step 1: Select Your Fabric and Pattern
Choose a durable textile that can handle the weight of multiple pockets and heavy use.
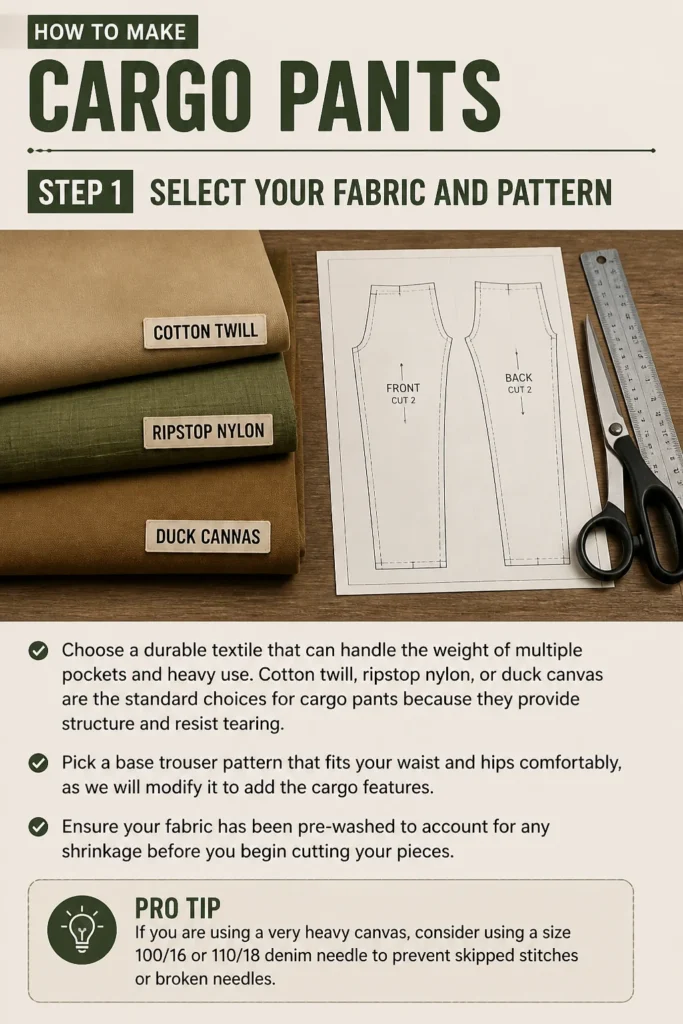
Cotton twill, ripstop nylon, or duck canvas are the standard choices for cargo pants because they provide structure and resist tearing.
Pick a base trouser pattern that fits your waist and hips comfortably, as we will modify it to add the cargo features.
Ensure your fabric has been pre-washed to account for any shrinkage before you begin cutting your pieces.
Pro Tip: If you are using a very heavy canvas, consider using a size 100/16 or 110/18 denim needle to prevent skipped stitches or broken needles.
Step 2: Cut the Pattern Pieces
Lay your fabric out on a flat surface, ensuring the grain line runs parallel to the selvage edge.
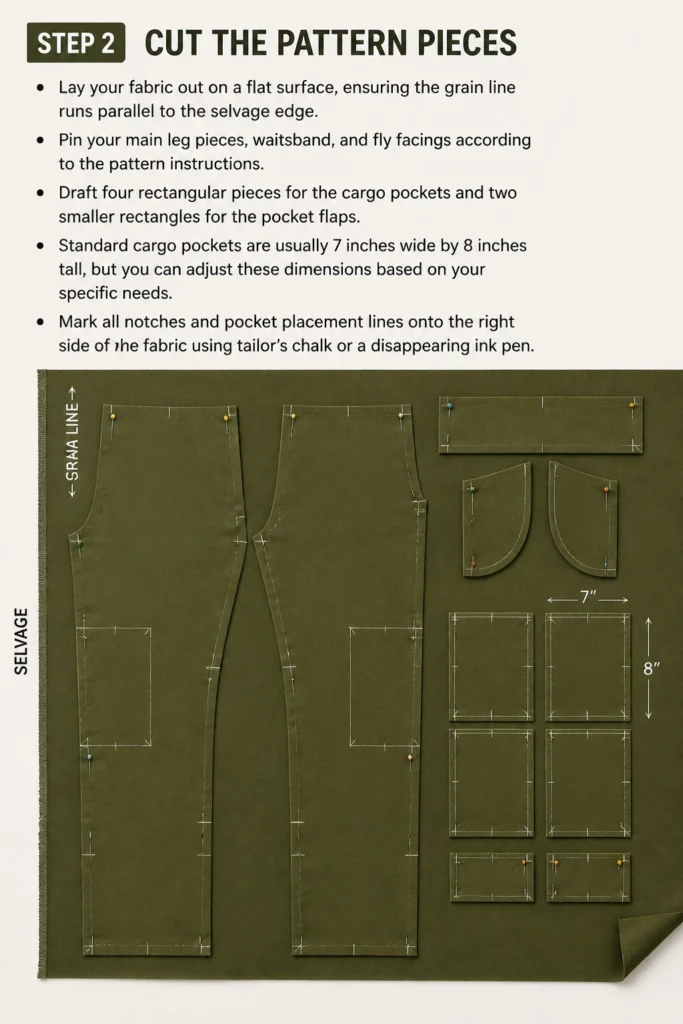
Pin your main leg pieces, waistband, and fly facings according to the pattern instructions.
Draft four rectangular pieces for the cargo pockets and two smaller rectangles for the pocket flaps.
Standard cargo pockets are usually 7 inches wide by 8 inches tall, but you can adjust these dimensions based on your specific needs.
Mark all notches and pocket placement lines onto the right side of the fabric using tailor’s chalk or a disappearing ink pen.
Step 3: Prepare the Bellows Pockets
Finish the top edge of your pocket pieces by folding them down half an inch and then another inch to create a clean hem.
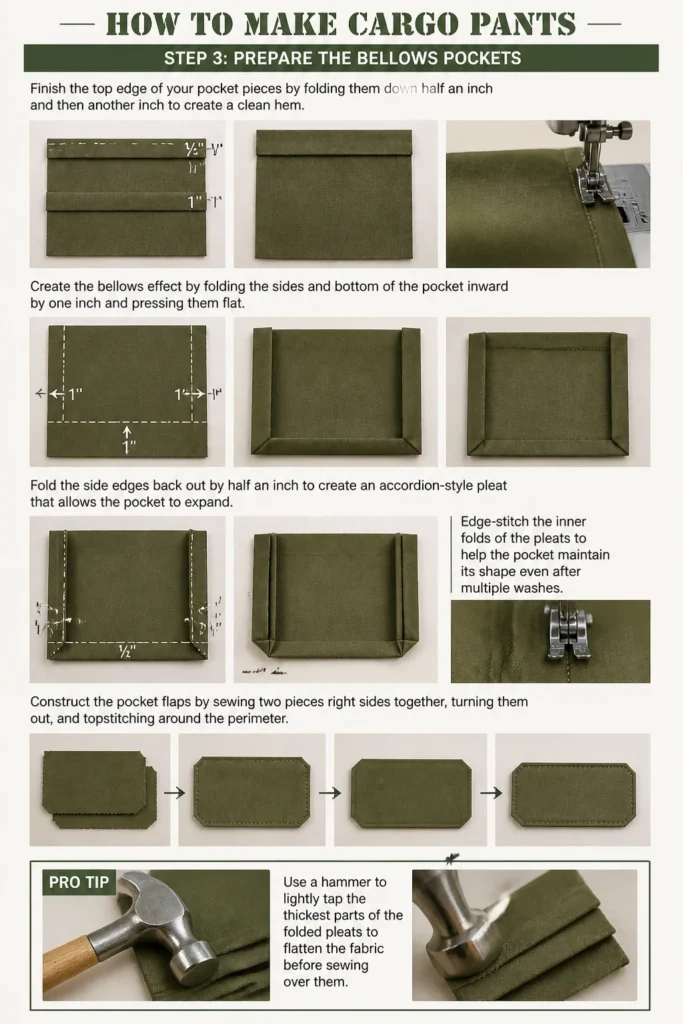
Create the bellows effect by folding the sides and bottom of the pocket inward by one inch and pressing them flat.
Fold the side edges back out by half an inch to create an accordion-style pleat that allows the pocket to expand.
Edge-stitch the inner folds of the pleats to help the pocket maintain its shape even after multiple washes.
Construct the pocket flaps by sewing two pieces right sides together, turning them out, and topstitching around the perimeter.
Pro Tip: Use a hammer to lightly tap the thickest parts of the folded pleats to flatten the fabric before sewing over them.
Step 4: Attach the Cargo Pockets to the Legs
Position the prepared pockets on the side seams of the outer leg panels, usually centered between the hip and the knee.
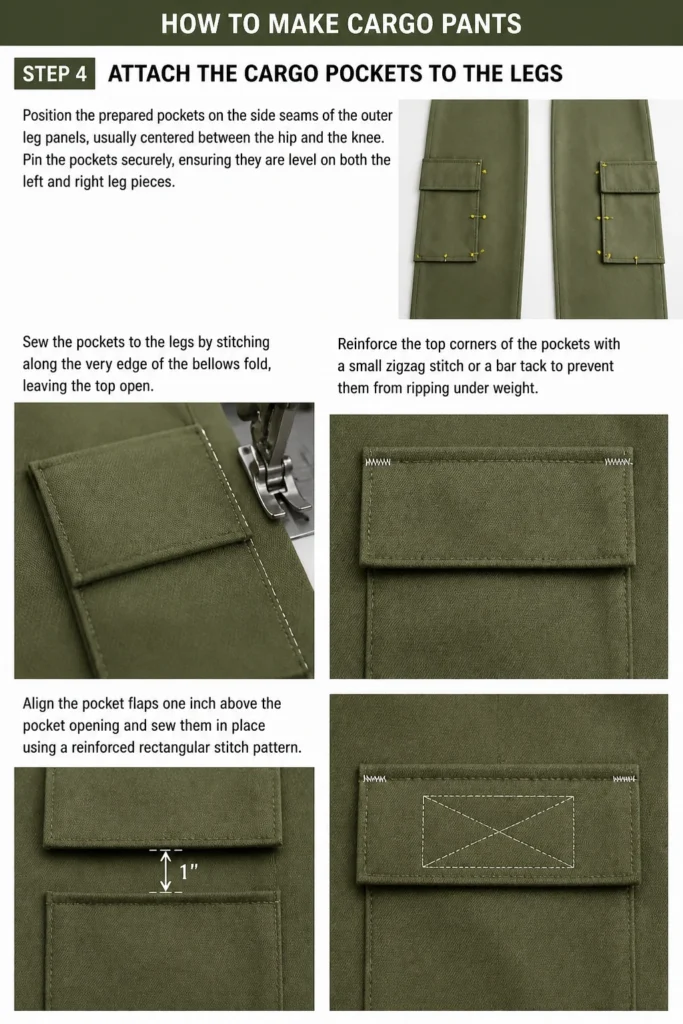
Pin the pockets securely, ensuring they are level on both the left and right leg pieces.
Sew the pockets to the legs by stitching along the very edge of the bellows fold, leaving the top open.
Reinforce the top corners of the pockets with a small zigzag stitch or a bar tack to prevent them from ripping under weight.
Align the pocket flaps one inch above the pocket opening and sew them in place using a reinforced rectangular stitch pattern.
Step 5: Construct the Front Slant Pockets
Attach the pocket bags to the front leg panels at the waist and side seams.
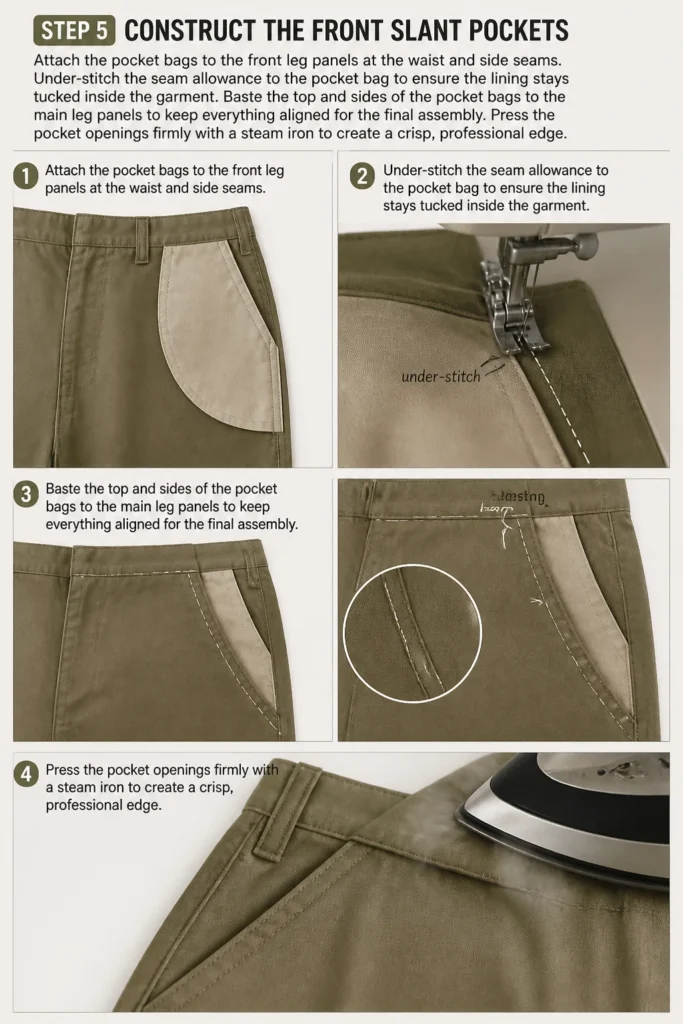
Under-stitch the seam allowance to the pocket bag to ensure the lining stays tucked inside the garment.
Baste the top and sides of the pocket bags to the main leg panels to keep everything aligned for the final assembly.
Press the pocket openings firmly with a steam iron to create a crisp, professional edge.
Step 6: Install the Zipper Fly
Apply a strip of lightweight interfacing to the fly area to provide stability for the zipper teeth.
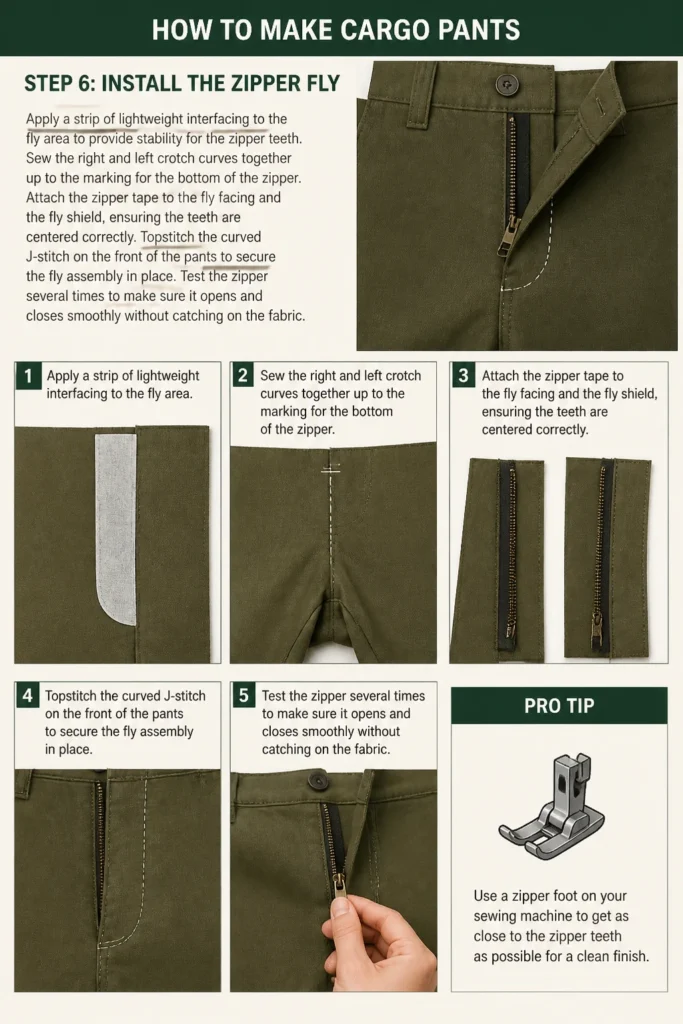
Sew the right and left crotch curves together up to the marking for the bottom of the zipper.
Attach the zipper tape to the fly facing and the fly shield, ensuring the teeth are centered correctly.
Topstitch the curved J-stitch on the front of the pants to secure the fly assembly in place.
Test the zipper several times to make sure it opens and closes smoothly without catching on the fabric.
Pro Tip: Use a zipper foot on your sewing machine to get as close to the zipper teeth as possible for a clean finish.
Step 7: Assemble the Leg Seams
Pin the front leg panels to the back leg panels at the inseams with the right sides facing each other.
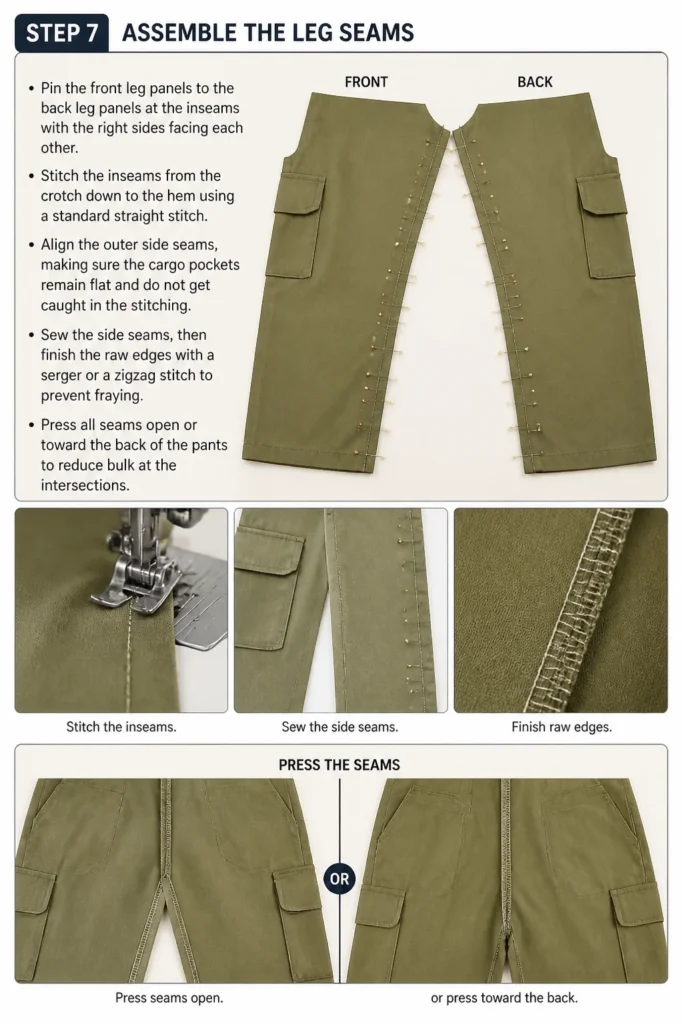
Stitch the inseams from the crotch down to the hem using a standard straight stitch.
Align the outer side seams, making sure the cargo pockets remain flat and do not get caught in the stitching.
Sew the side seams, then finish the raw edges with a serger or a zigzag stitch to prevent fraying.
Press all seams open or toward the back of the pants to reduce bulk at the intersections.
Step 8: Construct and Attach the Waistband
Interface the waistband piece to give it the necessary rigidity to support the weight of the pants.
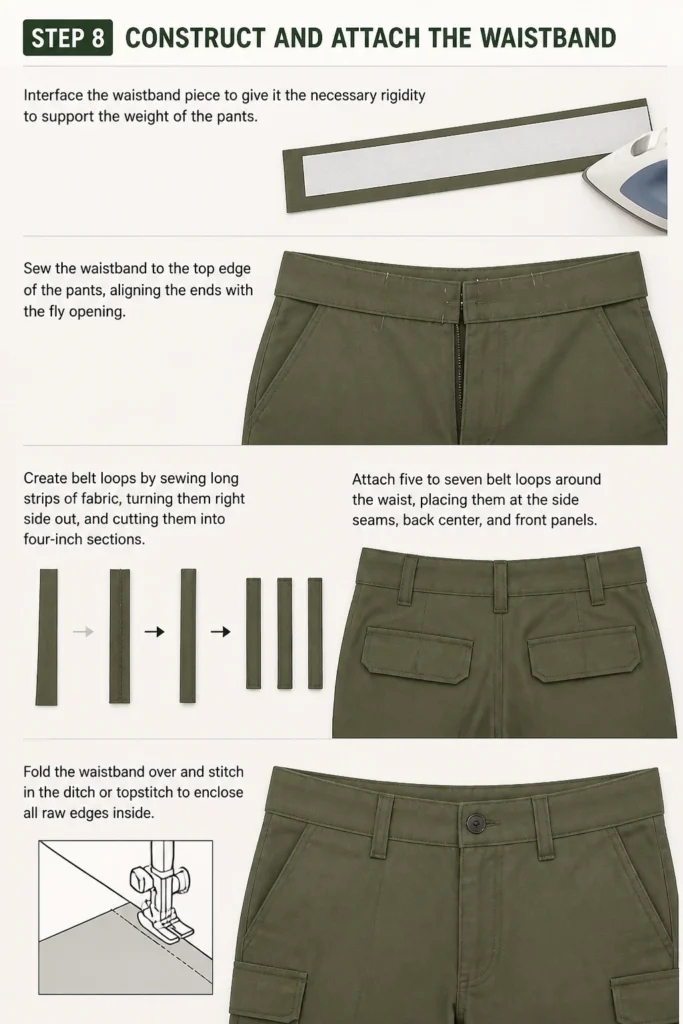
Sew the waistband to the top edge of the pants, aligning the ends with the fly opening.
Create belt loops by sewing long strips of fabric, turning them right side out, and cutting them into four-inch sections.
Attach five to seven belt loops around the waist, placing them at the side seams, back center, and front panels.
Fold the waistband over and stitch in the ditch or topstitch to enclose all raw edges inside.
Step 9: Finish the Hems and Hardware
Try on the pants to determine the final length and mark the hemline with pins.
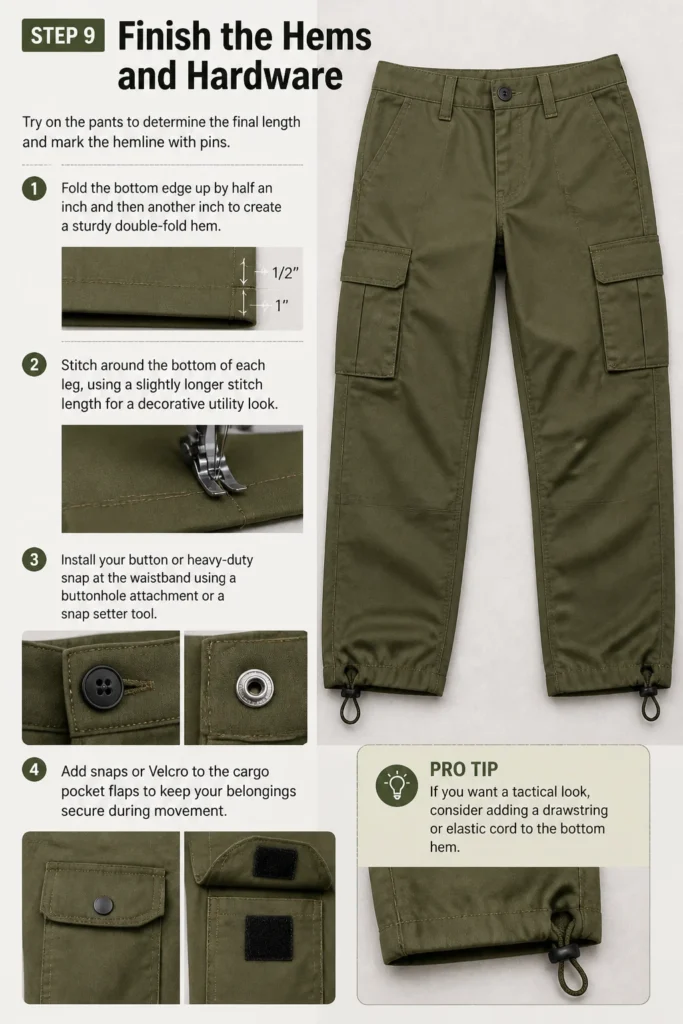
Fold the bottom edge up by half an inch and then another inch to create a sturdy double-fold hem.
Stitch around the bottom of each leg, using a slightly longer stitch length for a decorative utility look.
Install your button or heavy-duty snap at the waistband using a buttonhole attachment or a snap setter tool.
Add snaps or Velcro to the cargo pocket flaps to keep your belongings secure during movement.
Pro Tip: If you want a tactical look, consider adding a drawstring or elastic cord to the bottom hem.
Common Mistakes to Avoid
Inconsistent Pocket Placement
One of the most visible errors in cargo pant construction is having pockets that are not symmetrical.
If one pocket sits even half an inch higher than the other, the entire garment will look lopsided when worn.
Always measure from the waistband down to the pocket top on both legs to ensure perfect alignment before sewing.
Ignoring the Grain Line
Cutting your pocket pieces or leg panels off-grain can cause the fabric to twist around your leg over time.
This is especially problematic with heavy fabrics like twill, which have a very distinct diagonal weave.
Double-check that your pattern pieces are perfectly parallel to the selvage to maintain the structural integrity of the pants.
Skipping the Reinforcement Stitches
Cargo pants are designed to carry items, which puts significant stress on the corners of the pockets.
Standard straight stitches will eventually pop if you frequently put your hands or heavy tools in the pockets.
Always take the extra minute to sew bar tacks or small squares at the stress points to ensure the pants last for years.
Troubleshooting
The Sewing Machine is Skipping Stitches
Skipped stitches usually happen when the needle is too dull or too thin for the fabric weight.
Switch to a brand-new denim needle and ensure you are using a heavy-duty polyester thread.
You may also need to increase the presser foot pressure to keep the thick fabric from moving during the stitch cycle.
The Zipper Fly is Puckering
Puckering often occurs when the fabric is stretched while the zipper is being sewn to the facing.
To fix this, unpick the stitches and use a wash-away hem tape to hold the zipper in place without pins.
Sew the zipper again without pulling on the fabric, letting the feed dogs move the material naturally.
The Waistband is Gapping in the Back
If the waistband pulls away from your lower back, the curve of the pattern may not match your body shape.
You can resolve this by adding two small darts to the back of the pants before attaching the waistband.
Alternatively, you can use a contoured waistband pattern piece instead of a straight rectangular strip.
Key Takeaways
- Choose a heavy-duty fabric like cotton twill or ripstop for authentic utility performance.
- Master the bellows fold technique to create pockets that actually expand and hold gear.
- Reinforce every pocket corner and belt loop with bar tacks to prevent tearing.
- Use denim-specific needles and high-quality polyester thread to handle the thick seam intersections.
- Always pre-wash your fabric to avoid the disappointment of your pants shrinking after the first laundry cycle.
- Take your time with the zipper fly installation as it is the most technical part of the build.
Frequently Asked Questions
What is the best fabric for DIY cargo pants?
Cotton twill is the most popular choice because it is breathable yet extremely durable.
For a more technical or outdoor version, look for ripstop nylon which is lightweight and resists snagging.
Do I need an industrial sewing machine to make these?
No, most modern home sewing machines can handle heavy fabrics if you use the correct needle and go slowly.
However, you should avoid sewing over too many layers at once and use a “hump jumper” tool to help the foot level out over thick seams.
How do I make the pockets look more professional?
The secret to professional-looking cargo pockets is consistent topstitching.
Use a slightly longer stitch length and a contrasting thread color if you want to highlight the construction details.
Can I add cargo pockets to a pair of pants I already own?
Yes, you can follow the pocket construction steps in this guide and sew them onto an existing pair of chinos or jeans.
Just make sure the fabric of the pockets matches the weight and color of the existing pants for a cohesive look.
Our Top Recommended Finds
- Heavy-Duty Denim Needle Set: These needles are designed to pierce through multiple layers of canvas without bending or breaking.
- Magnetic Seam Guide: This tool helps you maintain perfectly straight topstitching lines, which is vital for the utility aesthetic.
- Tailor’s Clapper: A wooden clapper helps you set flat, crisp seams in heavy fabric by trapping steam and heat.
Master Your New Utility Wardrobe
Now that you have the blueprint for creating high-quality cargo pants, it is time to start your project.
You can experiment with different pocket configurations, such as adding hidden interior compartments or specialized tool loops.
Once you master this technique, you will never have to settle for poorly fitting store-bought trousers again.
Clear off your sewing table, grab your fabric shears, and begin cutting your first pair today.