
How To Make Ceramic Clay
I spent years buying bags of commercial clay before I realized the ground beneath my feet held everything I needed.
Processing your own ceramic clay connects you to the ancient traditions of pottery in a way store-bought materials never can.
This guide draws from my experience refining local riverbed deposits into workable, kiln-ready bodies.

Quick Overview
Making your own clay involves sourcing raw earth, removing impurities, and refining the texture to a workable state.
It is a slow, methodical process that rewards patience with a unique material that carries the character of your local landscape.
- Time needed: 3 to 7 days (including drying and settling time)
- Difficulty: Intermediate
- What you will need: Raw clay soil, two 5-gallon buckets, a fine-mesh sieve, a large cloth or pillowcase, and a flat drying surface.
Step 1: Source Your Raw Material
Identify a location where clay naturally occurs, such as a dried creek bed, a construction site, or a steep embankment.
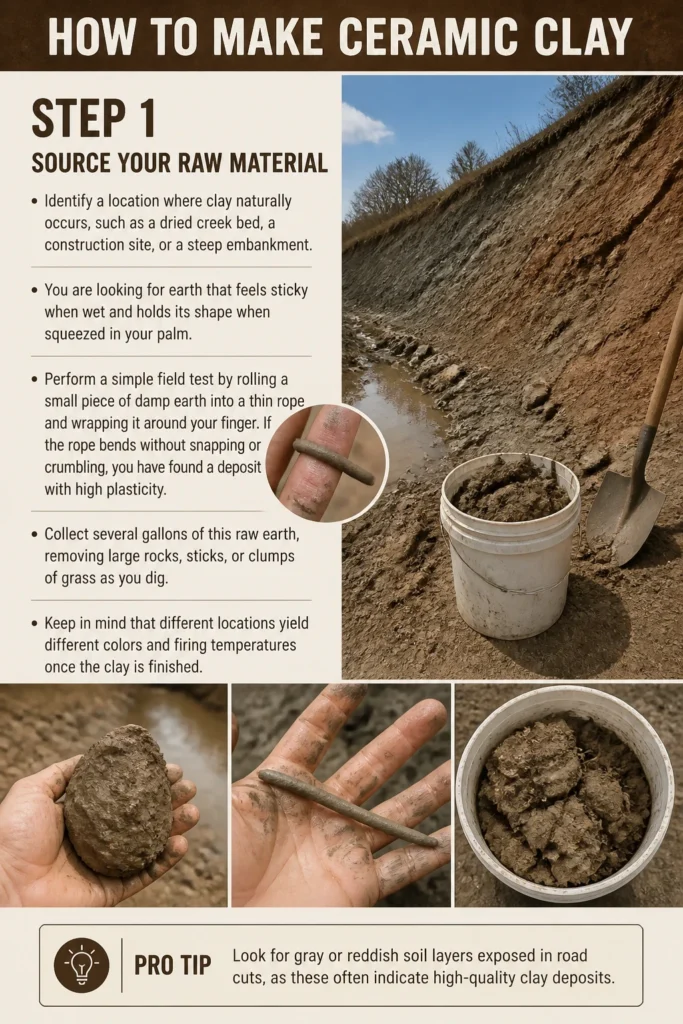
You are looking for earth that feels sticky when wet and holds its shape when squeezed in your palm.
Perform a simple field test by rolling a small piece of damp earth into a thin rope and wrapping it around your finger.
If the rope bends without snapping or crumbling, you have found a deposit with high plasticity.
Collect several gallons of this raw earth, removing large rocks, sticks, or clumps of grass as you dig.
Keep in mind that different locations yield different colors and firing temperatures once the clay is finished.
Pro Tip: Look for gray or reddish soil layers exposed in road cuts, as these often indicate high-quality clay deposits.
Step 2: Dry and Crush the Earth
Spread your collected raw earth onto a tarp or a flat wooden board in a thin, even layer.
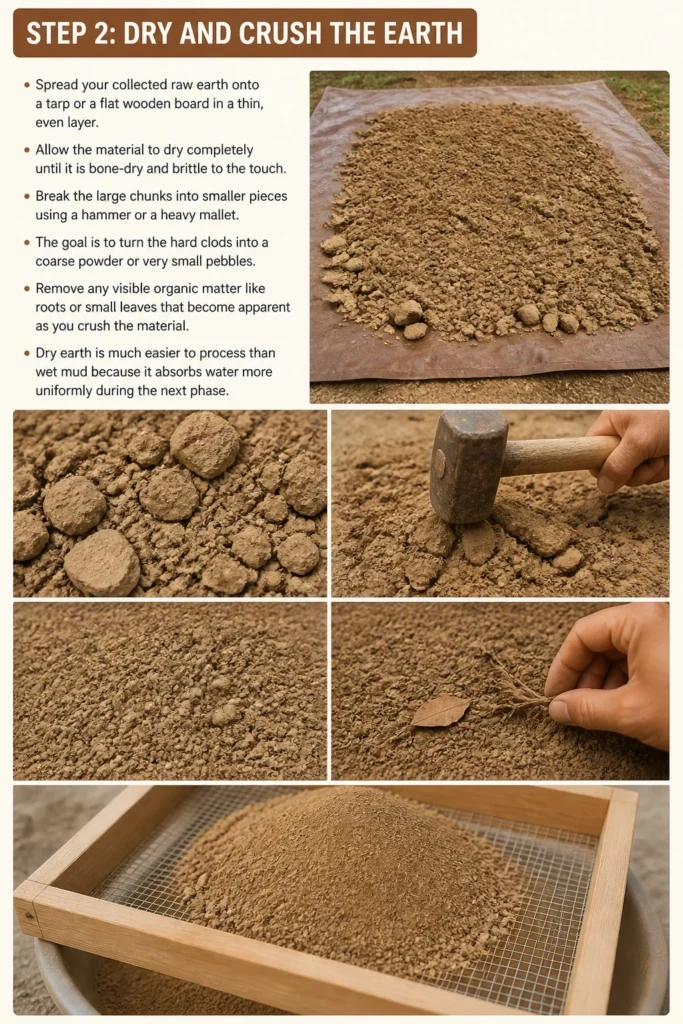
Allow the material to dry completely until it is bone-dry and brittle to the touch.
Break the large chunks into smaller pieces using a hammer or a heavy mallet.
The goal is to turn the hard clods into a coarse powder or very small pebbles.
Remove any visible organic matter like roots or small leaves that become apparent as you crush the material.
Dry earth is much easier to process than wet mud because it absorbs water more uniformly during the next phase.
Step 3: Slake the Clay
Fill a large 5-gallon bucket about halfway with clean, room-temperature water.
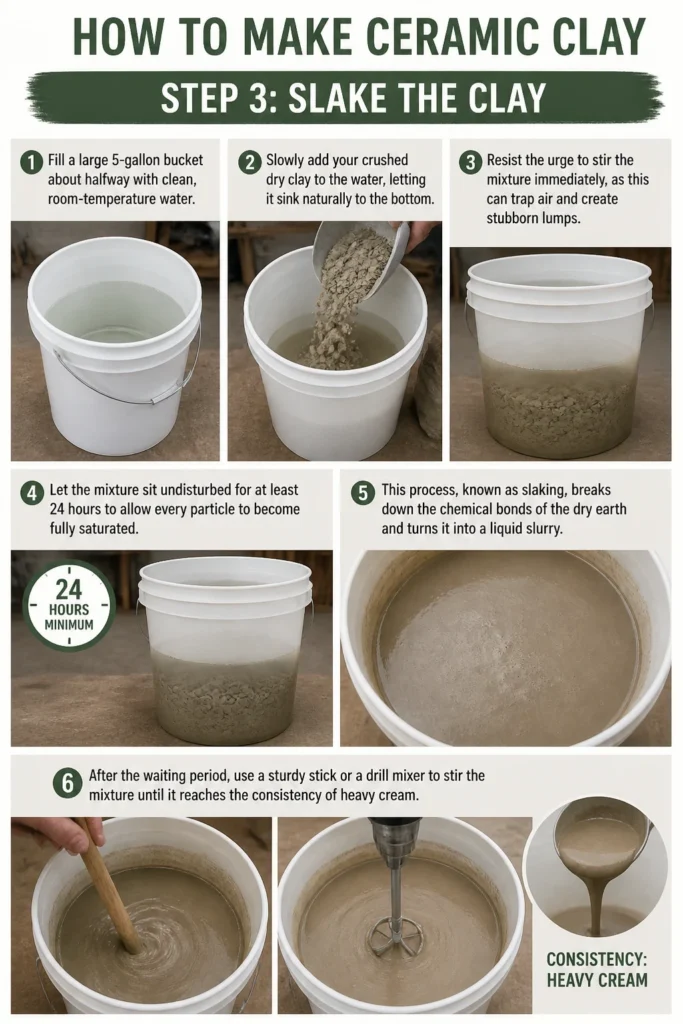
Slowly add your crushed dry clay to the water, letting it sink naturally to the bottom.
Resist the urge to stir the mixture immediately, as this can trap air and create stubborn lumps.
Let the mixture sit undisturbed for at least 24 hours to allow every particle to become fully saturated.
This process, known as slaking, breaks down the chemical bonds of the dry earth and turns it into a liquid slurry.
After the waiting period, use a sturdy stick or a drill mixer to stir the mixture until it reaches the consistency of heavy cream.
Step 4: Sieve the Slurry
Place a fine-mesh screen or a professional pottery sieve over a second clean bucket.
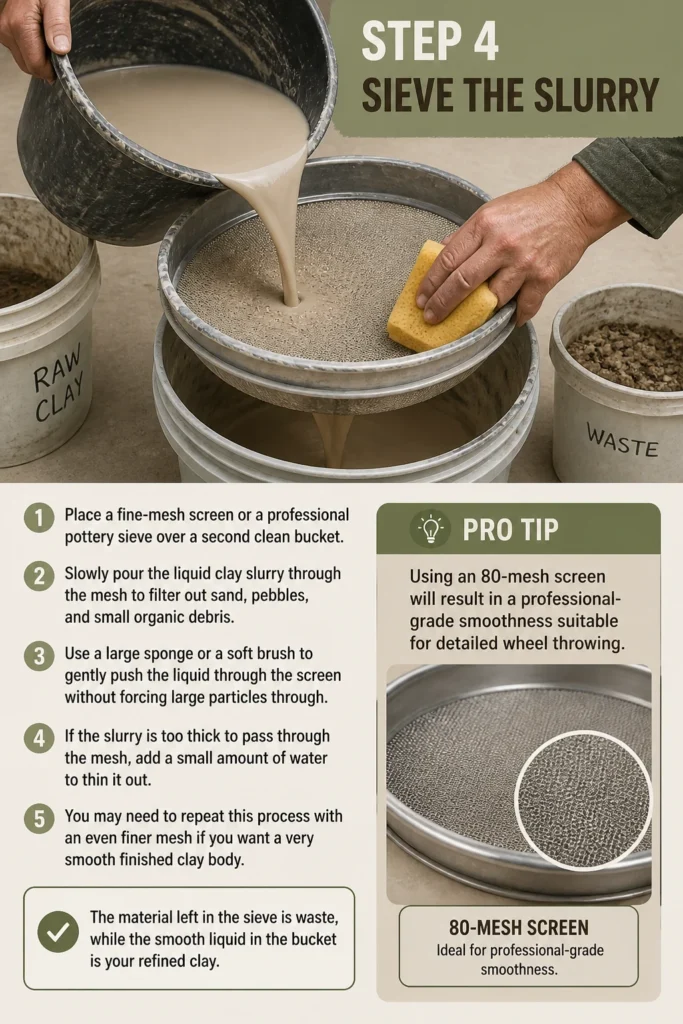
Slowly pour the liquid clay slurry through the mesh to filter out sand, pebbles, and small organic debris.
Use a large sponge or a soft brush to gently push the liquid through the screen without forcing large particles through.
If the slurry is too thick to pass through the mesh, add a small amount of water to thin it out.
You may need to repeat this process with an even finer mesh if you want a very smooth finished clay body.
The material left in the sieve is waste, while the smooth liquid in the bucket is your refined clay.
Pro Tip: Using an 80-mesh screen will result in a professional-grade smoothness suitable for detailed wheel throwing.
Step 5: Let the Clay Settle
Cover the bucket of refined slurry with a lid or a piece of plastic to prevent dust from falling in.
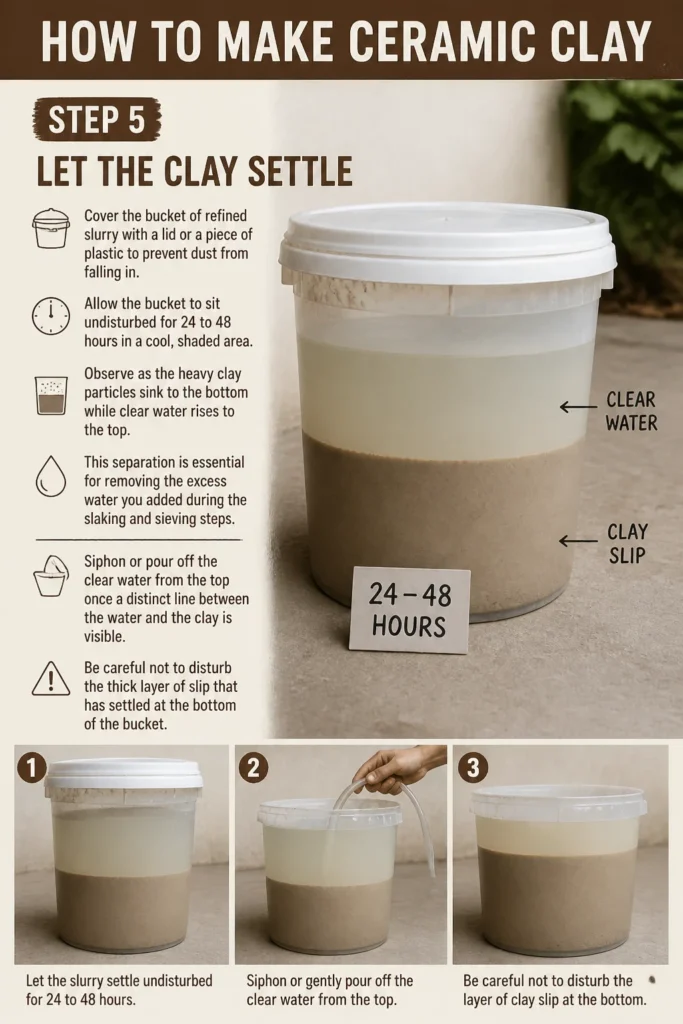
Allow the bucket to sit undisturbed for 24 to 48 hours in a cool, shaded area.
Observe as the heavy clay particles sink to the bottom while clear water rises to the top.
This separation is essential for removing the excess water you added during the slaking and sieving steps.
Siphon or pour off the clear water from the top once a distinct line between the water and the clay is visible.
Be careful not to disturb the thick layer of “slip” that has settled at the bottom of the bucket.
Step 6: De-water the Clay
Prepare a drainage system by lining a large colander or a wooden crate with a clean pillowcase or a piece of canvas.
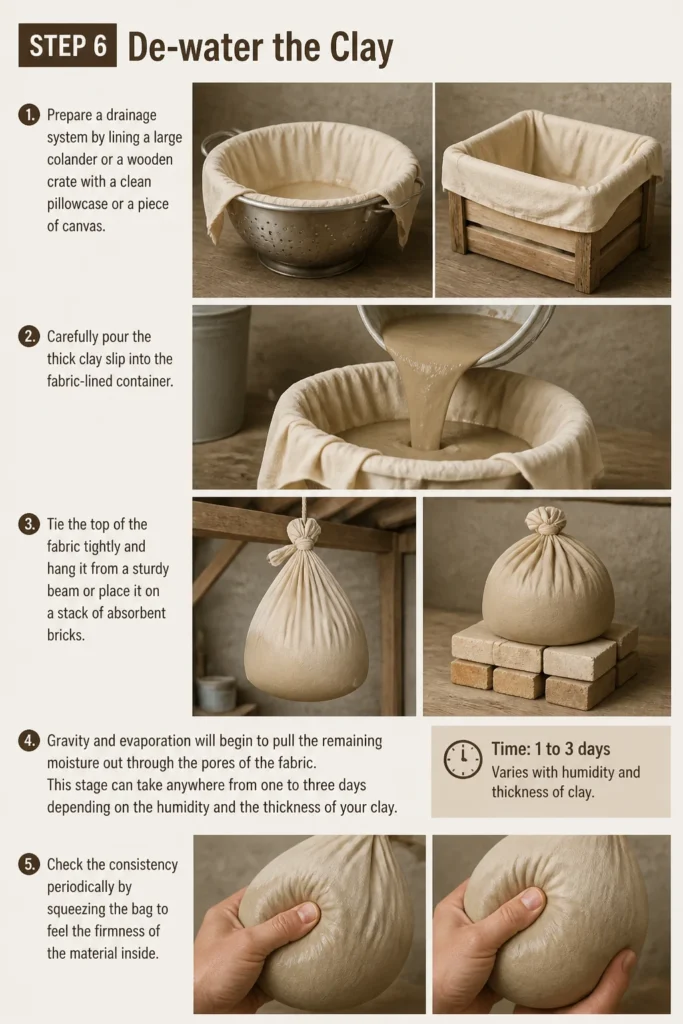
Carefully pour the thick clay slip into the fabric-lined container.
Tie the top of the fabric tightly and hang it from a sturdy beam or place it on a stack of absorbent bricks.
Gravity and evaporation will begin to pull the remaining moisture out through the pores of the fabric.
This stage can take anywhere from one to three days depending on the humidity and the thickness of your clay.
Check the consistency periodically by squeezing the bag to feel the firmness of the material inside.
Step 7: Dry to Working Consistency
Remove the clay from the fabric bag once it has reached the consistency of thick pudding.
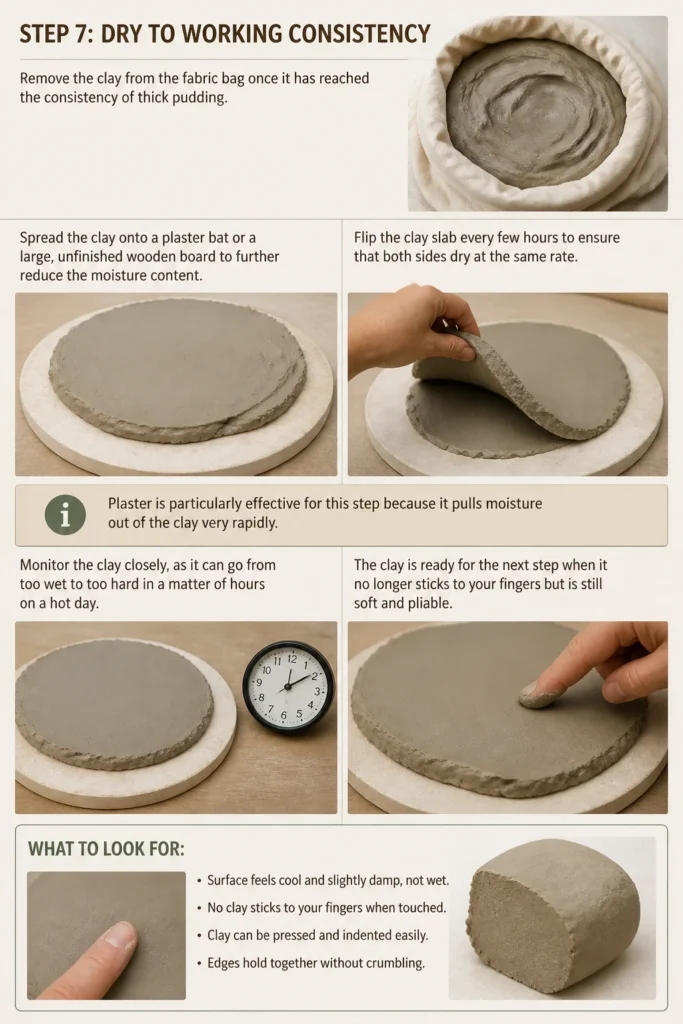
Spread the clay onto a plaster bat or a large, unfinished wooden board to further reduce the moisture content.
Flip the clay slab every few hours to ensure that both sides dry at the same rate.
Plaster is particularly effective for this step because it pulls moisture out of the clay very rapidly.
Monitor the clay closely, as it can go from too wet to too hard in a matter of hours on a hot day.
The clay is ready for the next step when it no longer sticks to your fingers but is still soft and pliable.
Step 8: Wedge the Clay
Gather the refined clay into a manageable ball and place it on a clean, non-stick surface.
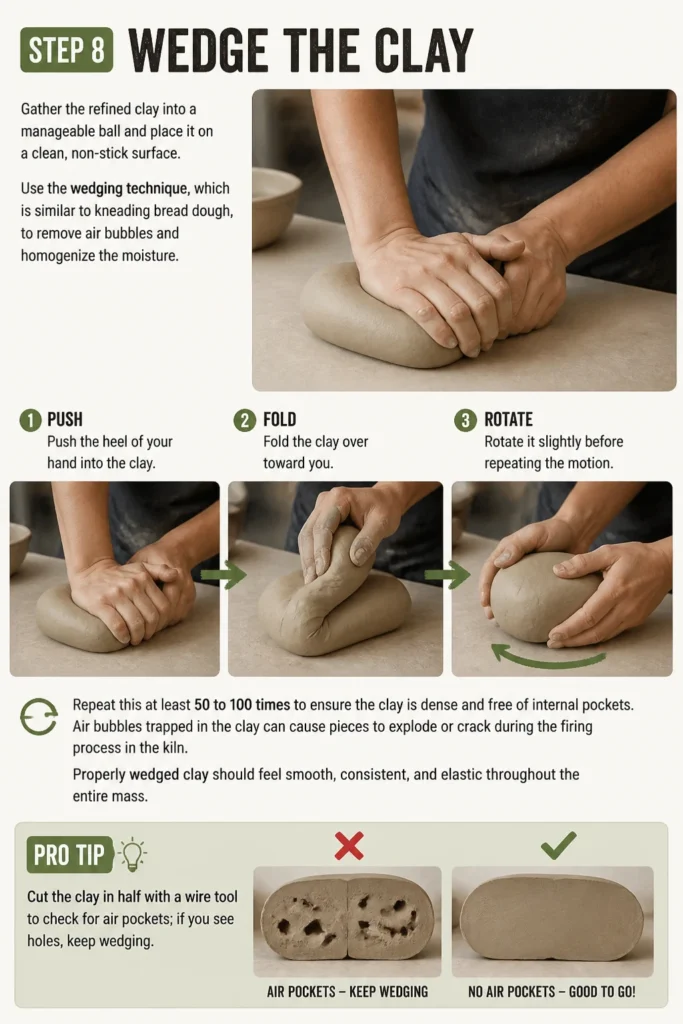
Use the wedging technique, which is similar to kneading bread dough, to remove air bubbles and homogenize the moisture.
Push the heel of your hand into the clay, fold it over, and rotate it slightly before repeating the motion.
Repeat this at least 50 to 100 times to ensure the clay is dense and free of internal pockets.
Air bubbles trapped in the clay can cause pieces to explode or crack during the firing process in the kiln.
Properly wedged clay should feel smooth, consistent, and elastic throughout the entire mass.
Pro Tip: Cut the clay in half with a wire tool to check for air pockets; if you see holes, keep wedging.
Step 9: Test and Fire
Create several small test tiles or “biscuits” from your finished clay to determine its properties.
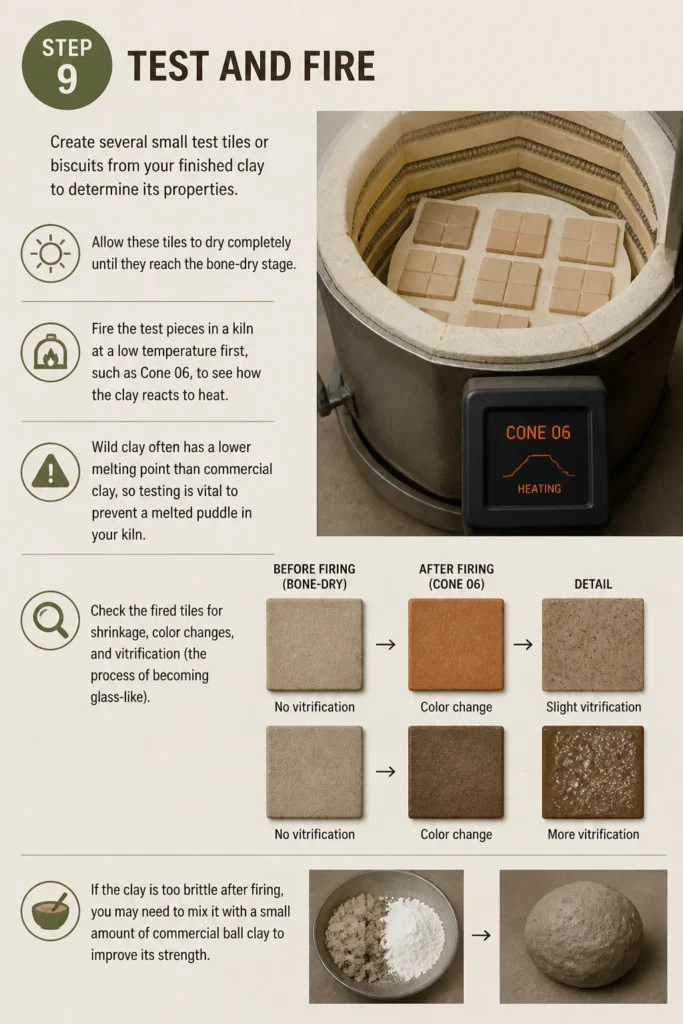
Allow these tiles to dry completely until they reach the bone-dry stage.
Fire the test pieces in a kiln at a low temperature first, such as Cone 06, to see how the clay reacts to heat.
Wild clay often has a lower melting point than commercial clay, so testing is vital to prevent a “melted puddle” in your kiln.
Check the fired tiles for shrinkage, color changes, and vitrification (the process of becoming glass-like).
If the clay is too brittle after firing, you may need to mix it with a small amount of commercial ball clay to improve its strength.
Common Mistakes to Avoid
Using Wet Mud for Slaking
Starting with wet chunks of earth is a common error that leads to a lumpy, inconsistent slurry.
When you drop wet mud into water, the exterior becomes slick and prevents the water from reaching the center of the clump.
Always dry your raw material completely and crush it into small pieces to ensure every particle hydrates evenly.
Neglecting the Sieve Size
Using a screen that is too coarse will leave tiny pebbles and organic matter in your clay body.
These impurities create weak points in the finished pottery and can cause the clay to crack as it dries.
Invest in a high-quality stainless steel sieve to ensure your clay is smooth enough for professional work.
Rushing the Drying Process
Attempting to dry your clay too quickly using a heater or direct sunlight can cause the edges to harden while the center remains wet.
This uneven drying leads to warping and internal stresses that ruin the plasticity of the material.
Patience is the most important tool in clay making, so allow the moisture to evaporate slowly and naturally.
Troubleshooting
The Clay is Crumbly and Lacks Plasticity
This usually happens when the raw earth has a high sand content and not enough actual clay particles.
You can fix this by adding a small percentage of bentonite or commercial ball clay to your refined batch.
These additives increase the “stickiness” of the material and make it much easier to shape on a wheel or by hand.
The Finished Clay Smells Like Sulfur
A strong, unpleasant odor indicates that there is organic matter or bacteria decomposing within the clay.
While the smell is bothersome, it actually improves the plasticity of the clay over time.
If the smell is too intense, you can add a few drops of bleach to the slurry during the settling phase to kill the bacteria.
The Clay Cracks During the Firing
Cracking in the kiln often means the clay is shrinking too much as it loses its chemically bonded water.
To solve this, you can add “grog,” which is pre-fired clay that has been ground into a fine powder.
Grog provides a structural skeleton for the clay, reducing shrinkage and helping the piece maintain its shape under high heat.
Key Takeaways
- Always dry and crush raw earth before adding it to water to ensure a smooth, lump-free slurry.
- Slaking and sieving are the most critical steps for removing rocks and organic debris from your material.
- Use a fabric bag or pillowcase to slowly drain excess water until the clay reaches a workable state.
- Wedging is essential to remove air bubbles that could cause your pottery to explode in the kiln.
- Test firing small tiles is the only way to safely determine the melting point and shrinkage of wild clay.
- The color and texture of your clay will vary depending on the minerals present in your local soil.
Frequently Asked Questions
Can I use any dirt from my backyard to make clay?
Not all soil contains enough clay particles to be useful for pottery.
Most backyard soil is a mix of sand, silt, and organic topsoil, which will not hold its shape when fired.
You must find a specific clay deposit, usually located deeper underground or near water sources, to get a functional result.
How long can I store my homemade clay?
Homemade clay can be stored indefinitely as long as it is kept in an airtight container.
In fact, many potters believe that “aging” clay for several months improves its plasticity and workability.
If the clay dries out during storage, you can simply break it down and re-process it using the slaking method again.
Is homemade clay safe for food use?
Wild clay can contain heavy metals or minerals that may leach into food if not fired to the correct temperature.
You should always perform a leach test on your finished, glazed pieces before using them for eating or drinking.
If you are unsure about the chemical makeup of your local soil, it is safer to use homemade clay for decorative items only.
Our Top Recommended Finds
- Stainless Steel 80-Mesh Sieve: A durable sieve is the best way to ensure your clay is free of grit and impurities.
- Plaster Drying Bat: Plaster is an incredible tool for quickly pulling moisture out of wet clay without causing it to stick.
- Heavy-Duty Canvas Fabric: Using thick canvas for de-watering and wedging provides a clean, professional surface that lasts for years.
Expanding Your Ceramic Horizons
Once you have mastered the art of refining your own clay, you can begin experimenting with local glazes made from wood ash or crushed stones.
The knowledge of how to process raw materials gives you total control over the finished aesthetic of your work.
You might even find that mixing different local clays creates colors and textures that are impossible to find in a store.
Take a walk through your local landscape today and keep an eye out for the hidden potential in the earth beneath your feet.