How To Use Polymer Clay
My first time working with polymer clay, I was amazed at how easily a simple block transformed into a tiny, colorful charm.
It’s a truly rewarding creative journey, offering endless possibilities for jewelry, sculptures, and home decor.
This guide draws from years of hands-on experience, providing clear, practical steps to help you start crafting with confidence today.
Quick Overview
By following this guide, you will learn the fundamental techniques to prepare, sculpt, bake, and finish your very first polymer clay creations.
You’ll gain the skills needed to bring your imaginative designs to life, from simple shapes to more intricate pieces.
- Time needed: 1-3 hours (depending on project complexity)
- Difficulty: Beginner
- What you’ll need: Polymer clay, a clean work surface, basic sculpting tools, an oven, and sealant.
Step-by-Step Instructions
Step 1: Gather Your Supplies
Before you begin, collect all the necessary materials. Having everything ready streamlines your creative process and prevents interruptions.
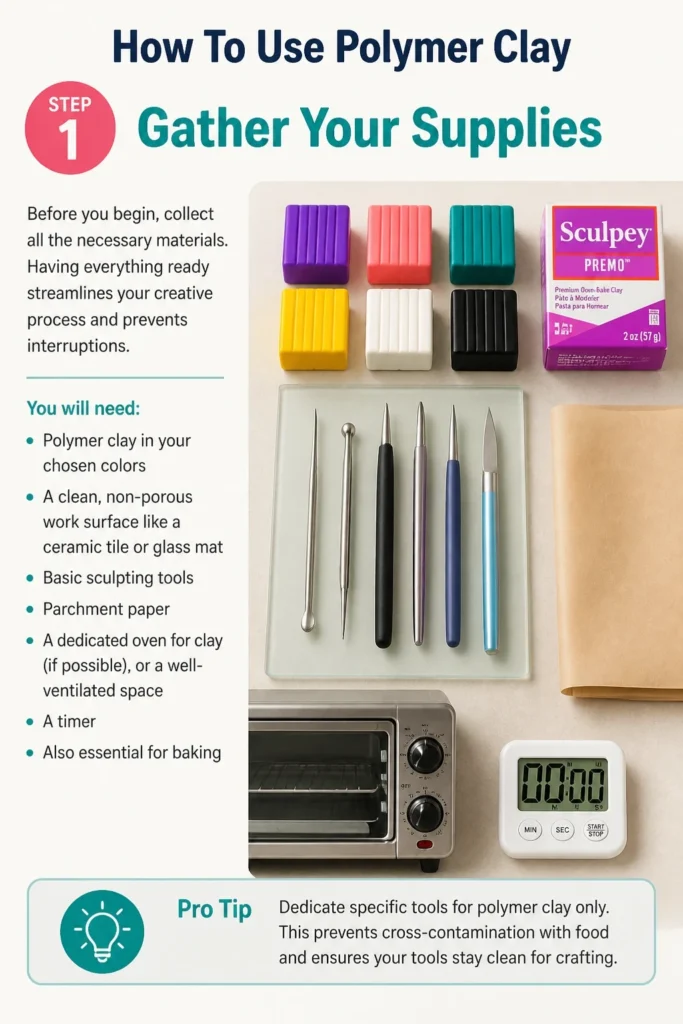
You will need polymer clay in your chosen colors, a clean, non-porous work surface like a ceramic tile or glass mat, and basic sculpting tools.
Parchment paper, a dedicated oven for clay (if possible), or a well-ventilated space, and a timer are also essential for baking.
Pro Tip: Dedicate specific tools for polymer clay only. This prevents cross-contamination with food and ensures your tools stay clean for crafting.
Step 2: Condition the Clay
Polymer clay is initially firm and sometimes crumbly. You need to condition it to make it pliable and easy to work with.
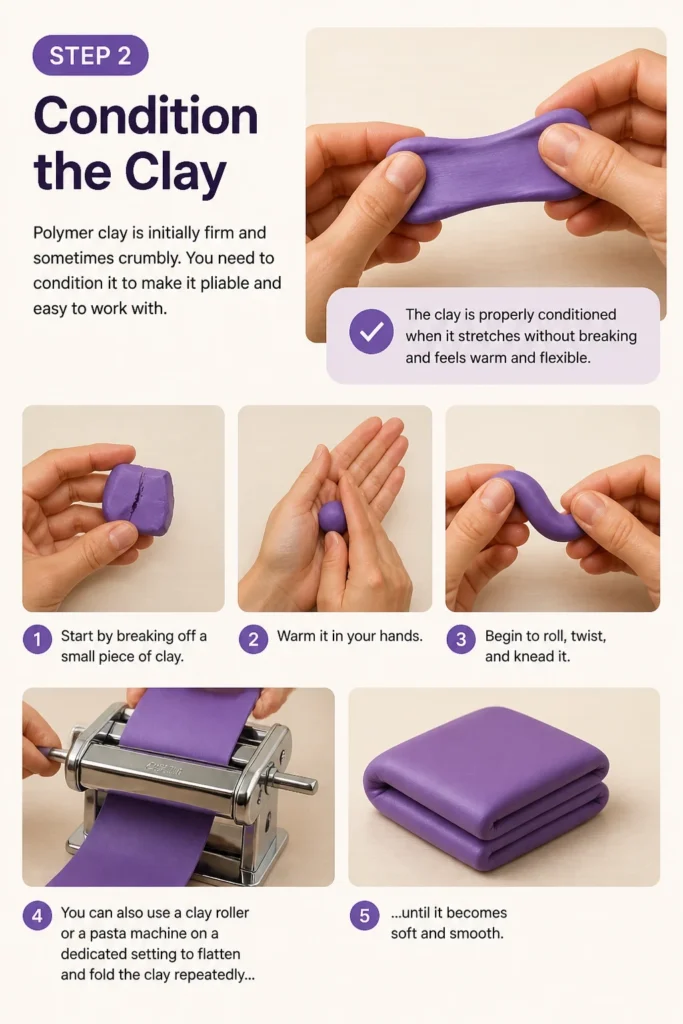
Start by breaking off a small piece of clay. Warm it in your hands, then begin to roll, twist, and knead it.
You can also use a clay roller or a pasta machine on a dedicated setting to flatten and fold the clay repeatedly until it becomes soft and smooth.
The clay is properly conditioned when it stretches without breaking and feels warm and flexible.
Step 3: Shape Your Creation
Now, you can begin forming your desired shape. Use your hands to roll balls, coils, or flatten sheets of clay.
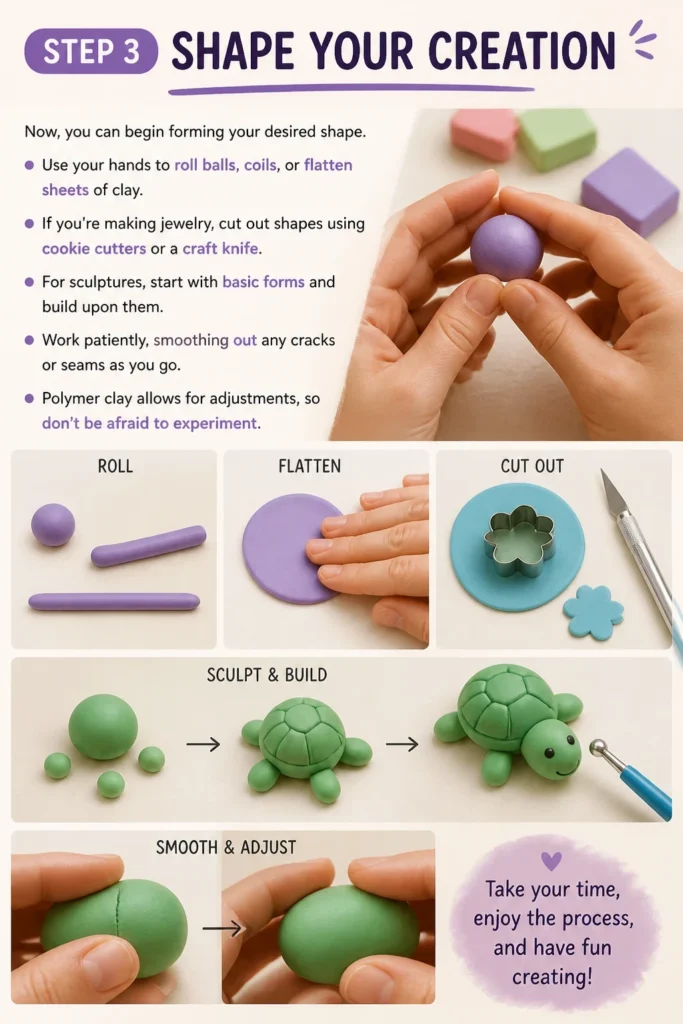
If you’re making jewelry, cut out shapes using cookie cutters or a craft knife. For sculptures, start with basic forms and build upon them.
Work patiently, smoothing out any cracks or seams as you go. Polymer clay allows for adjustments, so don’t be afraid to experiment.
Step 4: Add Details and Textures
This is where your project truly comes to life. Incorporate fine details using various sculpting tools.
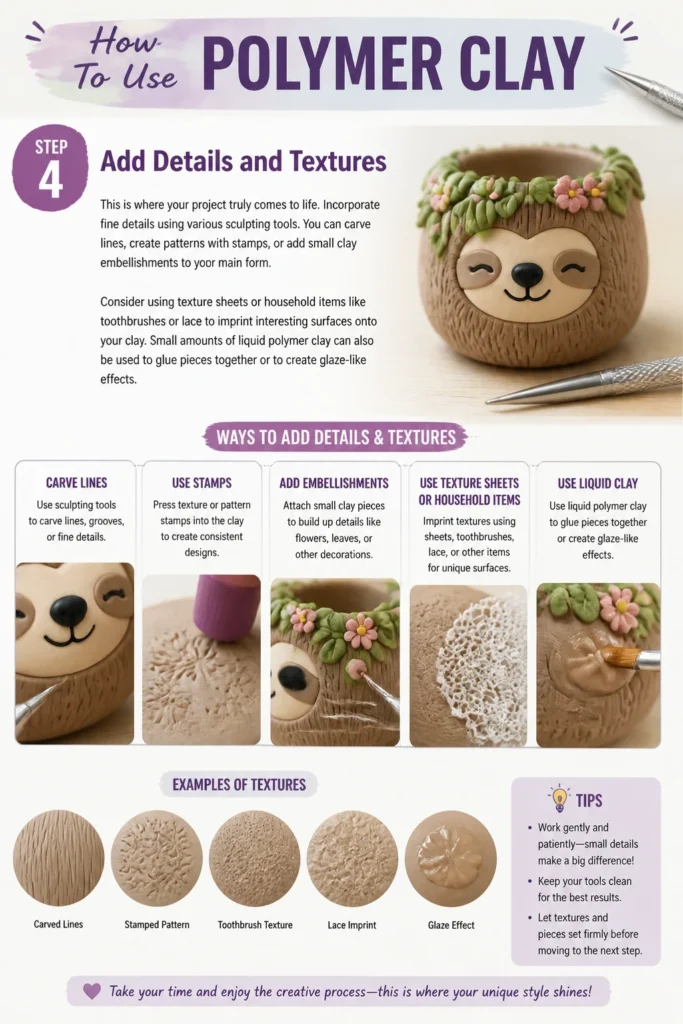
You can carve lines, create patterns with stamps, or add small clay embellishments to your main form.
Consider using texture sheets or household items like toothbrushes or lace to imprint interesting surfaces onto your clay.
Small amounts of liquid polymer clay can also be used to “glue” pieces together or to create glaze-like effects.
Step 5: Prepare for Baking
Once your piece is complete, prepare it for the oven. Carefully transfer your clay creation onto a baking surface.
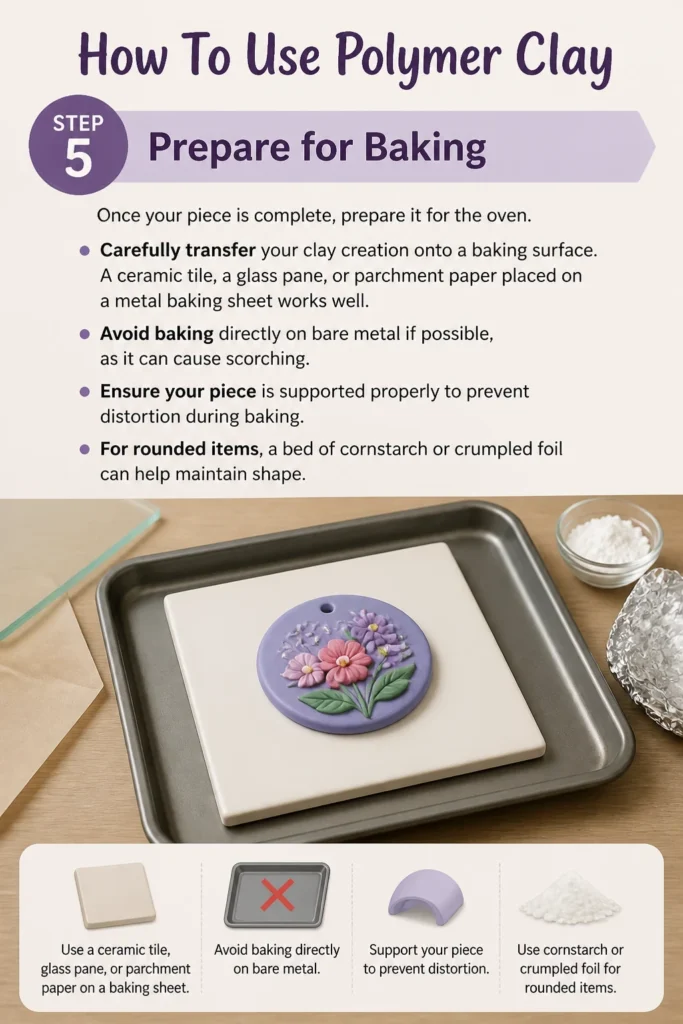
A ceramic tile, a glass pane, or parchment paper placed on a metal baking sheet works well. Avoid baking directly on bare metal if possible, as it can cause scorching.
Ensure your piece is supported properly to prevent distortion during baking. For rounded items, a bed of cornstarch or crumpled foil can help maintain shape.
Step 6: Bake Your Project
Preheat your oven to the temperature specified on your polymer clay packaging. This is critically important; temperatures vary between brands.
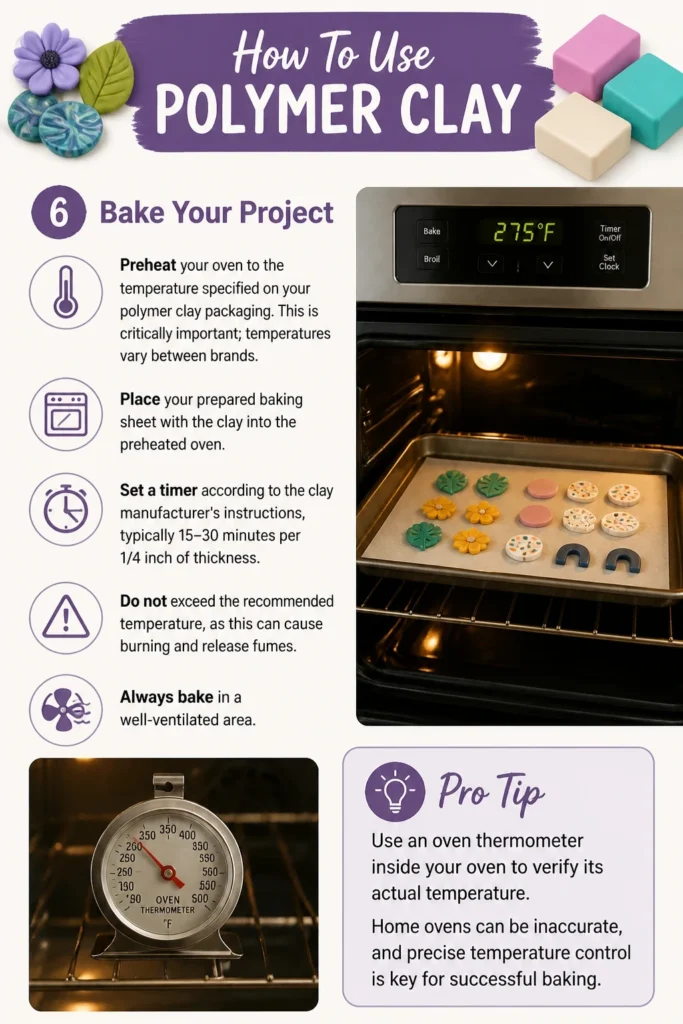
Place your prepared baking sheet with the clay into the preheated oven. Set a timer according to the clay manufacturer’s instructions, typically 15-30 minutes per 1/4 inch of thickness.
Do not exceed the recommended temperature, as this can cause burning and release fumes. Always bake in a well-ventilated area.
Pro Tip: Use an oven thermometer inside your oven to verify its actual temperature. Home ovens can be inaccurate, and precise temperature control is key for successful baking.
Step 7: Cool and Finish
After baking, carefully remove your clay piece from the oven. Let it cool completely on the baking surface.
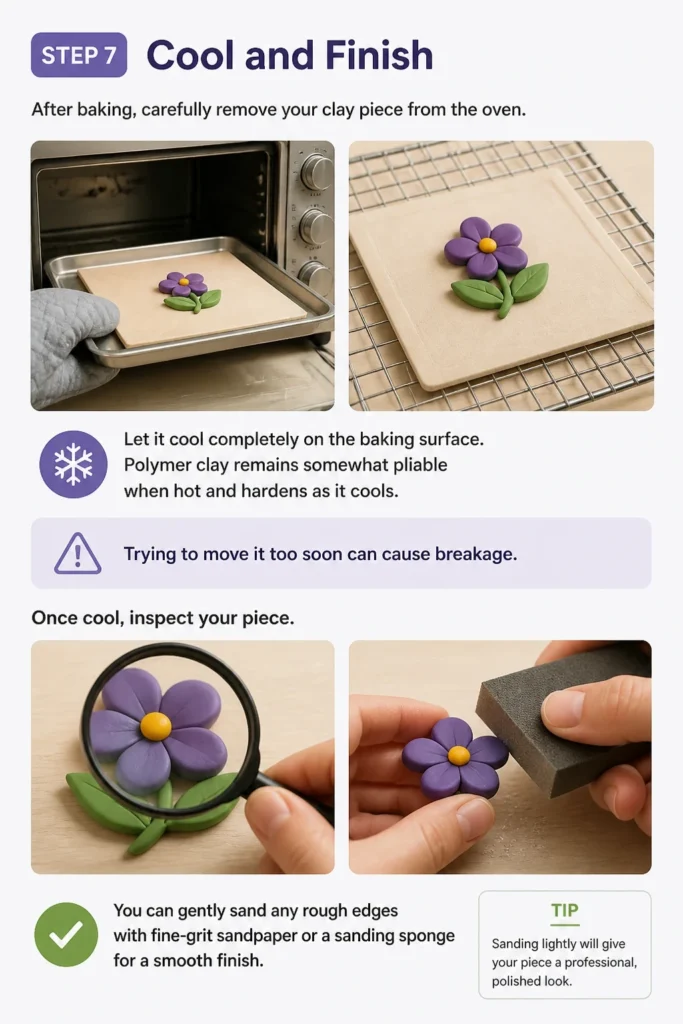
Polymer clay remains somewhat pliable when hot and hardens as it cools. Trying to move it too soon can cause breakage.
Once cool, inspect your piece. You can gently sand any rough edges with fine-grit sandpaper or a sanding sponge for a smooth finish.
Step 8: Seal and Protect
To enhance durability, protect against wear, and achieve a desired finish, apply a sealant to your baked clay.
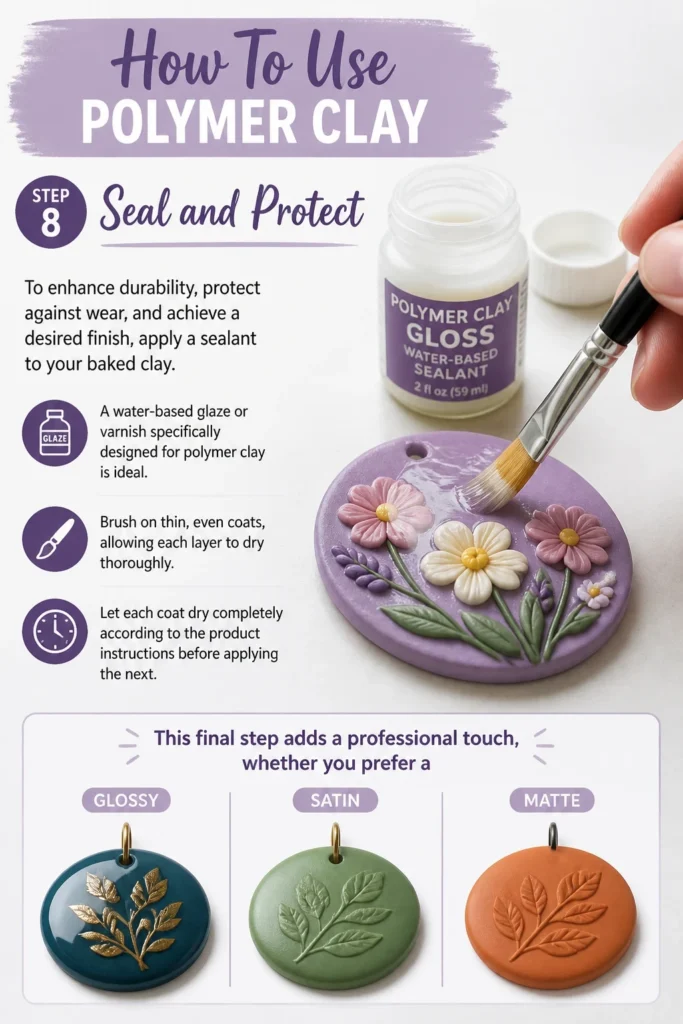
A water-based glaze or varnish specifically designed for polymer clay is ideal. Brush on thin, even coats, allowing each layer to dry thoroughly.
This final step adds a professional touch, whether you prefer a glossy, satin, or matte appearance.
Common Mistakes to Avoid
Underbaking or Overbaking
Underbaked clay will be brittle and break easily, even after cooling. It might also feel soft or gummy.
Overbaked clay, conversely, can burn, turning dark or even black, and become very brittle. It also emits unpleasant fumes.
Always follow the temperature and time guidelines on your clay’s packaging precisely. Use an oven thermometer to ensure accuracy.
Poor Conditioning
If your clay is not properly conditioned, it will be difficult to work with. It will crack, crumble, and resist shaping.
This leads to fragile creations that often break during or after baking. Spend adequate time kneading and working the clay until it’s smooth and pliable.
A well-conditioned piece holds its shape better and cures more uniformly.
Working on Unprotected Surfaces
Polymer clay can react with certain plastics and painted surfaces, potentially damaging them. It can also leave residue or stains.
Always work on a dedicated, non-porous surface like glass, ceramic tile, or a silicone mat. This protects your furniture and keeps your workspace clean.
Avoid direct contact with wooden tables or plastic cutting boards.
Mixing Clay Types
Not all polymer clays are created equal. Different brands and types often have varying baking temperatures and curing properties.
Mixing clays with different baking requirements can lead to parts of your project being underbaked while others are overbaked.
For best results, stick to one brand and type of clay within a single project, or carefully check compatibility if combining.
Troubleshooting
Clay is too crumbly
If your polymer clay is excessively crumbly, it likely needs more conditioning. It might also be old or stored in a very cold environment.
Try kneading it longer, using a clay softener (specifically designed for polymer clay), or even briefly warming it with a heat gun on a low setting (with caution) before conditioning.
A pasta machine can also help quickly condition very stiff clay.
Clay is too soft/sticky
Overly soft or sticky clay can be difficult to handle and may lose its shape. This often happens if the clay is very fresh, warm, or if too much softener was added.
You can leach out some of the plasticizers by placing the clay between two sheets of plain paper and pressing it under a heavy book for a few hours.
Alternatively, chilling the clay in the refrigerator for 10-15 minutes can firm it up temporarily, making it easier to work with.
Baked piece is brittle
A brittle baked piece is almost always a sign of underbaking. The clay did not cure sufficiently to achieve its intended strength.
Make sure your oven temperature is accurate using an oven thermometer. Also, ensure you’re baking for the full duration specified for the thickest part of your piece.
Sometimes, a slightly longer bake time at the correct temperature can make a significant difference in durability.
Color changes after baking
If your clay’s color appears different after baking, it could be due to a few factors. Overbaking can cause colors to darken or scorch.
Some pigments naturally shift slightly during the curing process, especially lighter or translucent colors.
Always use an oven thermometer to prevent overheating. Testing a small, inconspicuous piece first can also help you predict color changes.
Key Takeaways
- Always condition your polymer clay thoroughly to achieve optimal workability and strength.
- Adhere strictly to the manufacturer’s baking instructions for temperature and time, using an oven thermometer for accuracy.
- Protect your work surface with non-porous materials to prevent damage and contamination.
- Allow your baked creations to cool completely before handling to prevent breakage.
- Apply a suitable sealant to enhance durability and achieve your desired finish.
- Experiment with tools and techniques; polymer clay is forgiving and encourages creativity.
Frequently Asked Questions
Is polymer clay toxic?
No, polymer clay is generally considered non-toxic when used as directed. It contains no hazardous chemicals and is safe for crafting.
However, it is not food-safe, so avoid using tools or surfaces for clay that you also use for food preparation.
Always bake in a well-ventilated area to dissipate any fumes, which can be irritating, especially if the clay burns.
Can I bake polymer clay in a regular oven?
Yes, you can use a regular home oven to bake polymer clay. Many crafters use their kitchen ovens without issue.
It’s best to dedicate a separate baking sheet for clay projects. Ensure your oven is well-ventilated and consider opening a window during baking.
Clean your oven regularly, and avoid baking food immediately after baking clay without proper ventilation.
How long does polymer clay last?
Unbaked polymer clay, when stored correctly in a cool, dark place, can last for many years, often indefinitely.
Keep it wrapped tightly to prevent it from drying out or reacting with storage containers. Avoid extreme temperatures.
Once baked and properly sealed, polymer clay creations are very durable and can last for decades without degrading.
What’s the difference between polymer clay and air-dry clay?
The primary difference is how they cure. Polymer clay requires baking in an oven at specific temperatures to harden and become durable.
Air-dry clay, as its name suggests, hardens simply by being exposed to air over a period of 24-72 hours, without needing an oven.
Polymer clay is generally more durable and water-resistant after baking, while air-dry clay can be more brittle and may require sealing to protect against moisture.
Our Top Recommended Finds
- Basic Polymer Clay Starter Kit: A great way to begin, typically includes several clay colors and a few essential tools.
- Acrylic Clay Roller: Indispensable for conditioning clay evenly and creating smooth, consistent sheets.
- Clay Sculpting Tool Set: Offers a variety of tips for detailing, texturing, and shaping, from fine points to broad blades.
Embark On Your Creative Journey
You now have the foundational knowledge to begin your exciting adventure into the world of polymer clay.
From simple beads to intricate figurines, the only limit is your imagination. Don’t hesitate to start with a small, manageable project.
Grab your clay and tools today, and discover the joy of creating something beautiful with your own hands. Share your first creations with friends and family!