How To Embroider Letters
Learning to embroider letters opens up a world of creative possibilities. From personalizing gifts to decorating your home, stitched lettering adds a unique, handmade touch. I remember the thrill of seeing my first name perfectly stitched onto a tote bag; it felt like magic.
This guide will walk you through each step, helping you master the art of embroidering letters with confidence and skill. You’ll gain the foundational knowledge to create beautiful, lasting pieces.
Quick Overview
Embroidery letters might seem intricate, but with the right guidance, anyone can achieve charming results. This guide focuses on clear, actionable steps to get you started on your lettering journey. You’ll learn how to transfer designs, execute essential stitches, and refine your work.
- Time needed: 2-5 hours for a small project (depending on complexity and stitch choice)
- Difficulty: Beginner
- What you’ll need: Embroidery hoop, fabric, embroidery floss, embroidery needle, scissors, pattern transfer tool, chosen letter design.
Step-by-Step Instructions
Step 1: Gather Your Materials

Before you begin, ensure you have all necessary items laid out. Having everything ready prevents interruptions and keeps your workflow smooth. High-quality materials make a noticeable difference in your finished piece.
You will need an embroidery hoop, typically wood or plastic, to keep your fabric taut. Choose a size that comfortably fits your design. Select a suitable fabric like cotton, linen, or a cotton-linen blend; these are easy for beginners to work with.
Pick your embroidery floss, which comes in various colors and materials. DMC is a popular brand known for its wide color range. You will also need an embroidery needle with an eye large enough for your chosen floss, and sharp small scissors for trimming threads.
Finally, have your letter design ready, either printed or drawn. You’ll also need a method to transfer this design to your fabric, such as a water-soluble pen or carbon paper.
Pro Tip: Invest in good quality embroidery floss. Cheaper floss can tangle easily and fray, making the stitching process more frustrating.
Step 2: Prepare Your Fabric and Design
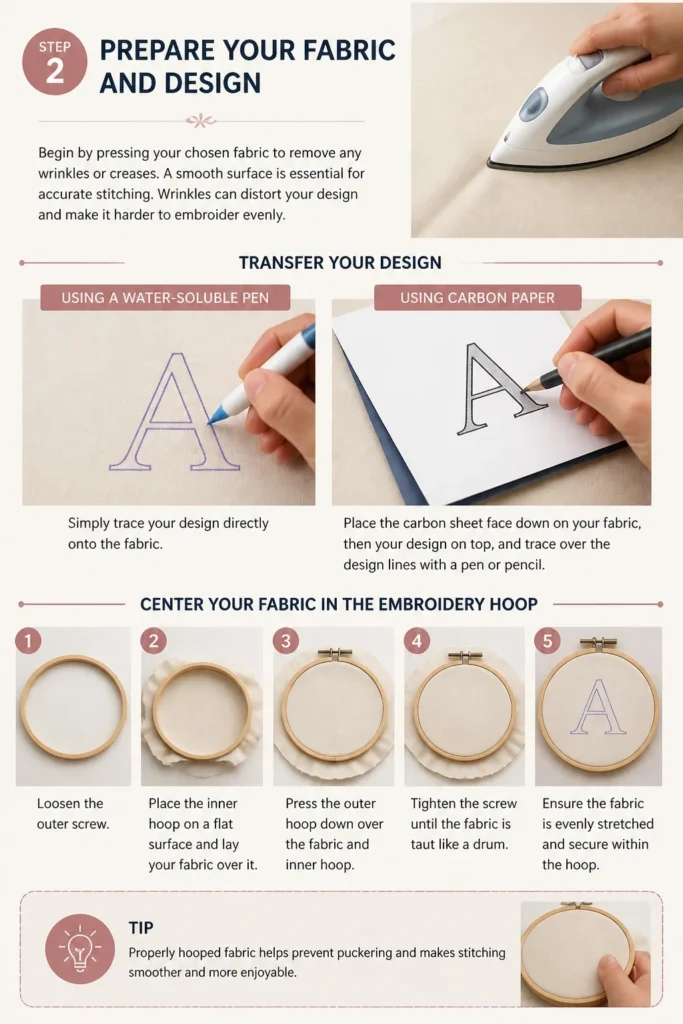
Begin by pressing your chosen fabric to remove any wrinkles or creases. A smooth surface is essential for accurate stitching. Wrinkles can distort your design and make it harder to embroider evenly.
Next, transfer your letter design onto the fabric. If using a water-soluble pen, simply trace your design directly onto the fabric. For carbon paper, place the carbon sheet face down on your fabric, then your design on top, and trace over the design lines with a pen or pencil.
Center your fabric in the embroidery hoop. Loosen the outer screw, place the inner hoop on a flat surface, and lay your fabric over it. Press the outer hoop down over the fabric and inner hoop, then tighten the screw until the fabric is taut like a drum.
Ensure the fabric is evenly stretched and secure within the hoop. It shouldn’t be too tight to distort the weave, but firm enough to prevent sagging while you work.
Step 3: Thread Your Needle and Start Stitching

Cut a comfortable length of embroidery floss, about 18-24 inches (45-60 cm). This length is long enough to work with but short enough to minimize tangling. Separate the desired number of strands; for most lettering, 2-3 strands of six-strand floss work well for definition.
Thread your needle by moistening the end of the floss slightly and pushing it through the needle’s eye. Tie a small knot at the longer end of the floss. This knot will secure your thread when you start stitching.
Bring your needle up from the back of the fabric, about 1/8 inch (3mm) away from where you want your first stitch to begin. This ensures the knot is hidden on the back of your work.
You are now ready to make your first stitch. Start with the outline of your letter, choosing a foundational stitch that suits the letter’s shape.
Step 4: Outline Your Letters with Backstitch or STEM Stitch
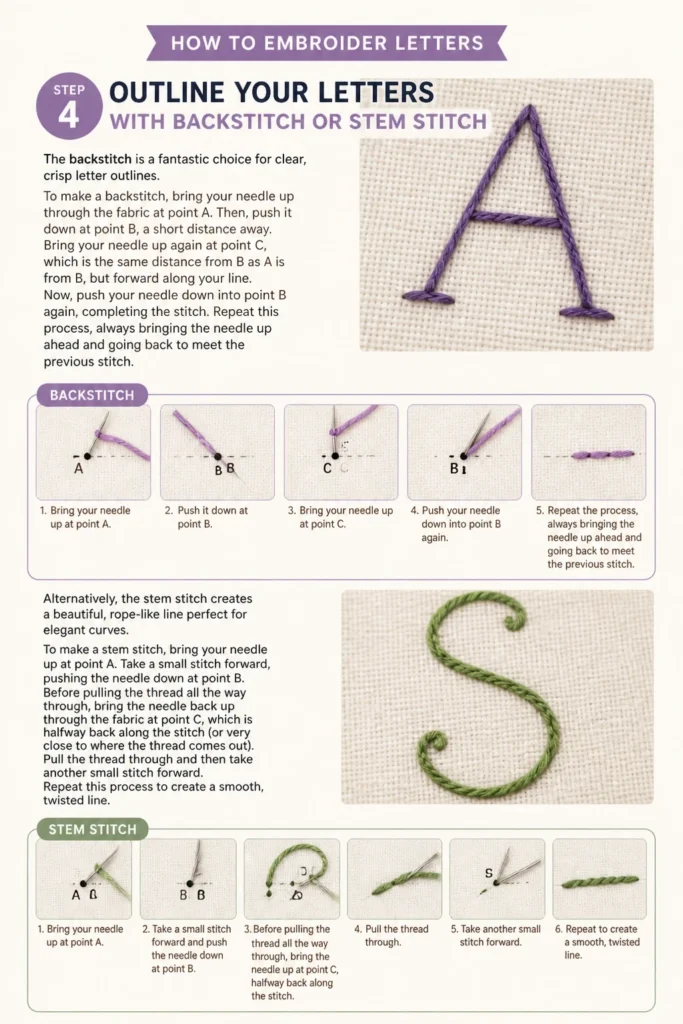
The backstitch is a fantastic choice for clear, crisp letter outlines. To make a backstitch, bring your needle up through the fabric at point A. Then, push it down at point B, a short distance away.
Bring your needle up again at point C, which is the same distance from B as A is from B, but forward along your line. Now, push your needle down into point B again, completing the stitch. Repeat this process, always bringing the needle up ahead and going back to meet the previous stitch.
Alternatively, the stem stitch creates a beautiful, rope-like line perfect for elegant curves. To make a stem stitch, bring your needle up at point A. Take a small stitch forward, pushing the needle down at point B.
Before pulling the thread all the way through, bring the needle back up through the fabric at point C, which is halfway between A and B, keeping the working thread below the needle. Pull the thread through to create a twisted line. Repeat, always bringing the needle up through the middle of the previous stitch.
Pro Tip: Keep your stitch lengths consistent for a smooth, professional-looking outline. Shorter stitches are easier to manage around tight curves.
Step 5: Fill In Your Letters (Optional)
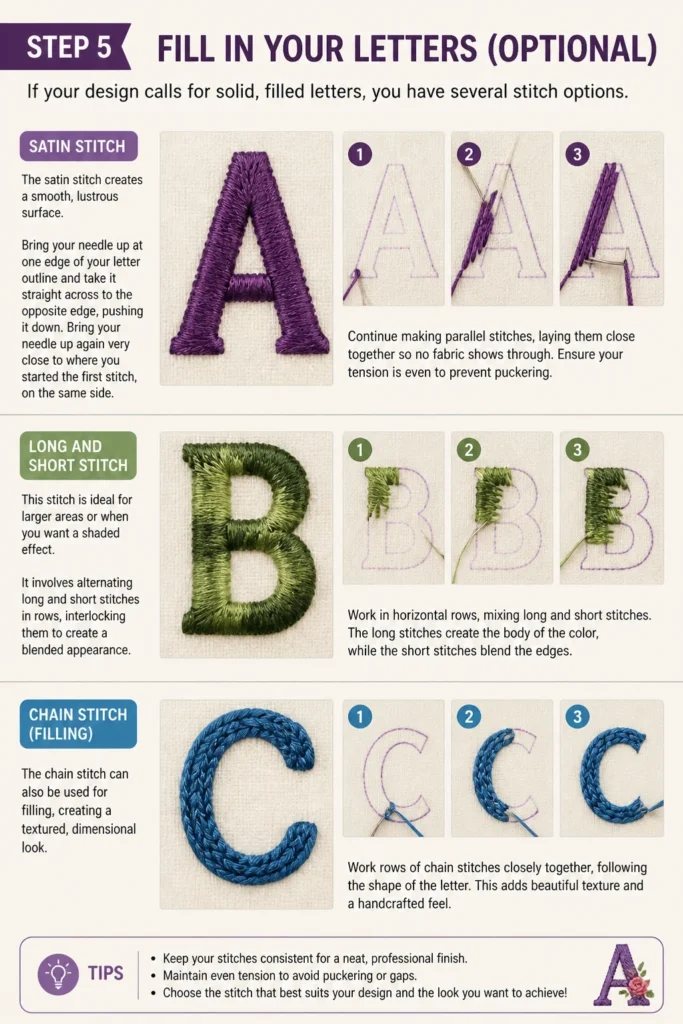
If your design calls for solid, filled letters, you have several stitch options. The satin stitch creates a smooth, lustrous surface. For this stitch, bring your needle up at one edge of your letter outline and take it straight across to the opposite edge, pushing it down.
Bring your needle up again very close to where you started the first stitch, on the same side. Continue making parallel stitches, laying them close together so no fabric shows through. Ensure your tension is even to prevent puckering.
Another excellent filling stitch is the long and short stitch. This stitch is ideal for larger areas or when you want a shaded effect. It involves alternating long and short stitches in rows, interlocking them to create a blended appearance.
The chain stitch can also be used for filling, creating a textured, linked effect. Whichever stitch you choose, work carefully to maintain even tension and full coverage.
Step 6: Secure Your Stitches
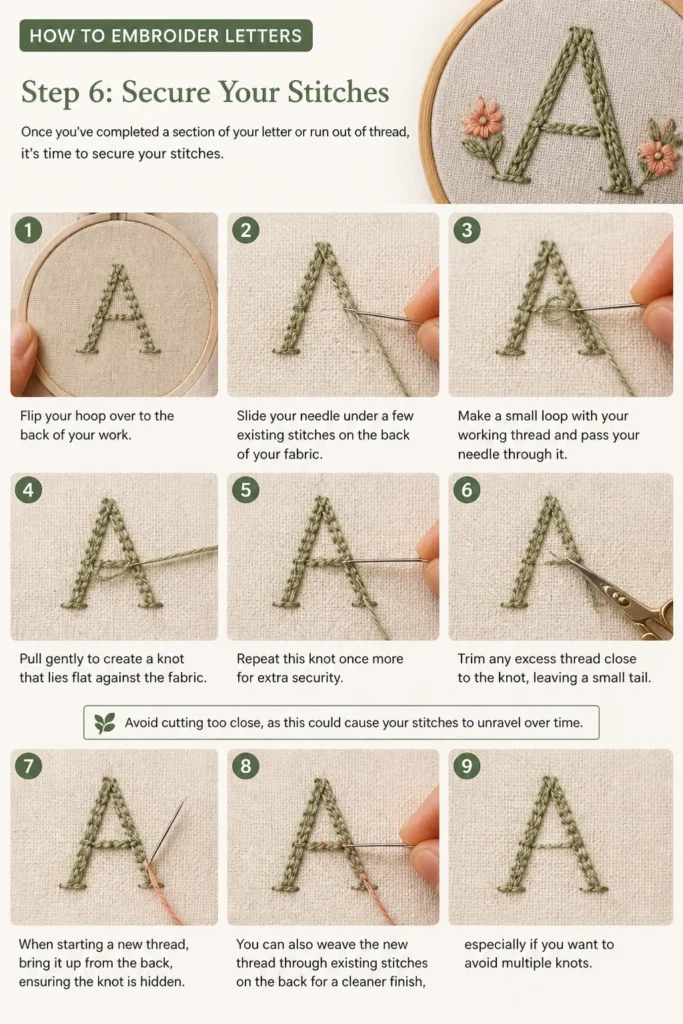
Once you’ve completed a section of your letter or run out of thread, it’s time to secure your stitches. Flip your hoop over to the back of your work. Slide your needle under a few existing stitches on the back of your fabric.
Make a small loop with your working thread and pass your needle through it. Pull gently to create a knot that lies flat against the fabric. Repeat this knot once more for extra security.
Trim any excess thread close to the knot, leaving a small tail. Avoid cutting too close, as this could cause your stitches to unravel over time.
When starting a new thread, bring it up from the back, ensuring the knot is hidden. You can also weave the new thread through existing stitches on the back for a cleaner finish, especially if you want to avoid multiple knots.
Step 7: Remove from Hoop and Finish
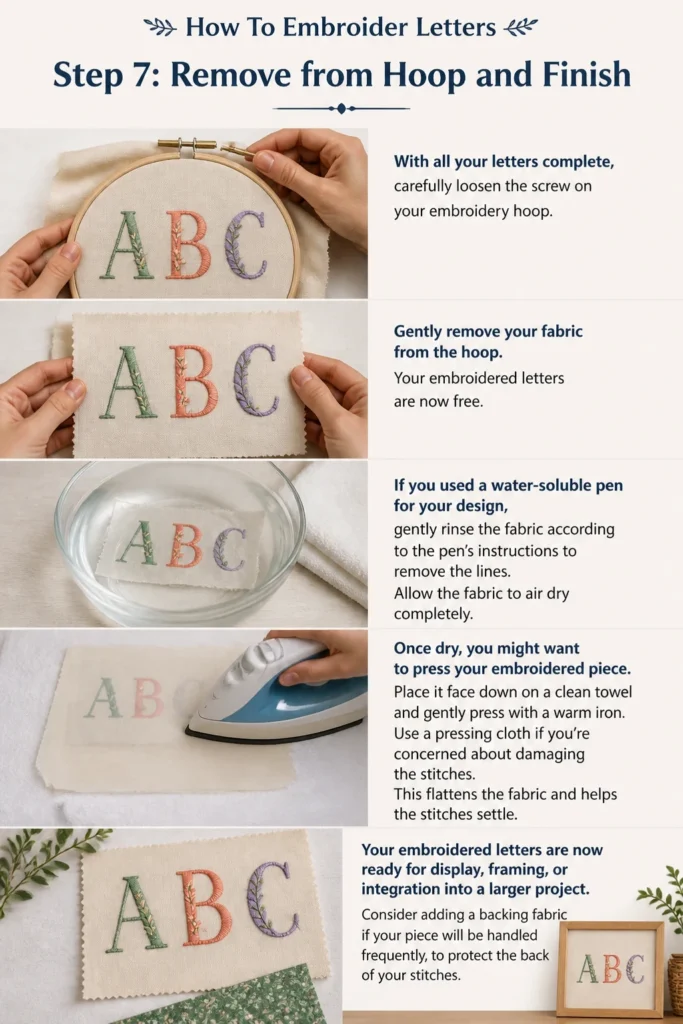
With all your letters complete, carefully loosen the screw on your embroidery hoop. Gently remove your fabric from the hoop. Your embroidered letters are now free.
If you used a water-soluble pen for your design, gently rinse the fabric according to the pen’s instructions to remove the lines. Allow the fabric to air dry completely.
Once dry, you might want to press your embroidered piece. Place it face down on a clean towel and gently press with a warm iron. Use a pressing cloth if you’re concerned about damaging the stitches. This flattens the fabric and helps the stitches settle.
Your embroidered letters are now ready for display, framing, or integration into a larger project. Consider adding a backing fabric if your piece will be handled frequently, to protect the back of your stitches.
Common Mistakes to Avoid
Uneven Tension
One of the most common pitfalls for beginners is inconsistent thread tension. If your stitches are too tight, the fabric will pucker and distort, making your letters look uneven and misshapen. Conversely, if your stitches are too loose, they will appear sloppy and lack definition. Aim for a consistent, gentle pull on your thread with each stitch. Practice helps you find that sweet spot where stitches lie flat and smooth.
Using the Wrong Needle Size
The size of your embroidery needle matters significantly. Using a needle that is too thick for your fabric can leave large, unsightly holes around your stitches. A needle that is too thin for your floss can be difficult to thread and may cause the floss to fray. Match your needle size to your fabric and the number of floss strands you are using for optimal results. A good general-purpose embroidery needle (e.g., a size 7 or 8) is a great starting point.
Poor Pattern Transfer
A blurry or smudged design transfer can make it incredibly difficult to stitch accurately. If your lines are unclear, your stitches will likely follow the blurred lines, leading to an imprecise final product. Always ensure your transfer method creates clear, crisp lines that are easy to see and follow. Test your transfer method on a scrap piece of fabric first to ensure it works well and won’t bleed or smudge.
Overly Long Stitches
While tempting to cover ground quickly, making stitches too long can lead to problems. Long stitches are more prone to snagging, fraying, and becoming loose over time. They also tend to create a less defined and less durable letter shape. Break down long lines into several shorter, consistent stitches. This creates a more robust and aesthetically pleasing result, especially for outlines and curves.
Troubleshooting
Thread Knots Up Constantly
If your embroidery floss keeps tangling and knotting, it’s a common frustration. This often happens if your thread is too long, or if you’re pulling it through the fabric too quickly. Try cutting shorter lengths of floss, around 18 inches, to reduce tangles.
Slow down your stitching pace and gently pull the thread through. You can also let your needle and thread dangle periodically to allow the thread to untwist, which helps prevent knotting. Using a thread conditioner can also smooth the floss and minimize tangles.
Fabric Puckering Around Stitches
Puckering occurs when your stitches are pulled too tightly, causing the fabric to gather. This often signals uneven tension or an overly tight hoop. First, ensure your fabric is taut but not stretched excessively in the hoop.
When stitching, try to maintain a gentle, consistent tension. Don’t yank the thread. If you notice puckering, you might need to loosen your hoop slightly, or simply practice easing up on your pull. Pressing your finished piece can sometimes help flatten minor puckers.
Stitches Look Messy or Uneven
If your embroidered letters aren’t as neat as you’d like, several factors could be at play. Inconsistent stitch length is a primary culprit; try to make each stitch the same size. Uneven tension also contributes to a messy appearance.
Ensure you are following your design lines closely and not straying. Practice is truly key here; the more you stitch, the more consistent and controlled your hand will become. Don’t be afraid to unpick stitches that aren’t quite right and redo them.
Key Takeaways
- Preparation is paramount: Gather all your materials, press your fabric, and transfer your design clearly before you start stitching.
- Choose the right stitch: Backstitch or stem stitch are excellent for outlines, while satin stitch provides a smooth fill.
- Master consistent tension: Practice pulling your thread evenly to avoid puckering and ensure neat, defined stitches.
- Keep stitches short and even: Shorter, consistent stitches create a more durable, precise, and aesthetically pleasing result.
- Secure your threads properly: Always knot your threads securely on the back to prevent unraveling.
- Patience and practice: Embroidery is a skill that improves with time and repetition; don’t be discouraged by initial imperfections.
Frequently Asked Questions
What is the best stitch for embroidering letters?
For outlining letters, the backstitch and stem stitch are highly recommended due to their clean, defined lines. For filling in letters, the satin stitch creates a smooth, solid appearance, while the long and short stitch offers a softer, blended fill. The best stitch depends on the look you want to achieve.
What type of fabric is best for letter embroidery?
Beginners will find it easiest to work with natural fabrics like cotton, linen, or a cotton-linen blend. These fabrics have a stable weave that holds stitches well and are forgiving. A medium-weight fabric is usually ideal, as it’s not too thin to show through and not too thick to stitch through easily.
How many strands of embroidery floss should I use?
Standard embroidery floss comes with six strands. For fine details and delicate lettering, 1-2 strands are often used. For a clearer, more defined outline or a moderate fill, 2-3 strands are common. If you want bold, chunky letters, you might use 4-6 strands. Experiment to find the look you prefer.
Can I wash embroidered items?
Yes, most embroidered items can be washed, but gentle care is crucial. Hand washing in cool water with a mild detergent is often recommended. Avoid harsh scrubbing or wringing. Lay the item flat to air dry. If you used a water-soluble pen, ensure all ink is removed before washing and drying, as heat can set the lines permanently.
Our Top Recommended Finds
- DMC Embroidery Floss Variety Pack: A great way to build your color collection with high-quality, vibrant threads that resist tangling.
- Wooden Embroidery Hoops (Assorted Sizes): Essential for keeping your fabric taut and preventing puckering, having various sizes is always handy.
- Water-Soluble Fabric Marking Pens: These pens allow you to transfer designs clearly, and the lines disappear completely with water, leaving no trace.
Embark on Your Stitching Journey
You now have a comprehensive guide to begin your journey into embroidering letters. This skill is incredibly rewarding, allowing you to personalize items and create unique gifts. Imagine the joy of seeing your own beautifully stitched initials or a meaningful word come to life.
Don’t hesitate to start with a simple design and build your confidence. Experiment with different fonts and colors as you grow more comfortable. Grab your materials, choose a favorite letter, and begin stitching today. The world of handmade artistry awaits you.