How To Solve Pyramid Cube
Learning to solve the Pyramid Cube, also known as the Pyraminx, is a satisfying journey that’s easier than you might think.
I remember the frustration of my first attempts, but with a clear method, anyone can master it.
This guide breaks down the process into simple, manageable steps, drawing on years of personal experience to help you succeed.
Quick Overview
This guide will equip you with the fundamental understanding and step-by-step algorithms needed to solve any Pyraminx. You will learn to identify the different pieces and apply a methodical approach to bring order to the scrambled puzzle.
- Time needed: 15-30 minutes for first solve, 1-2 minutes with practice
- Difficulty: Beginner
- What you’ll need: A scrambled Pyramid Cube (Pyraminx)
Step-by-Step Instructions
Step 1: Understand the Cube’s Anatomy
Before you begin, familiarize yourself with the Pyraminx’s distinct pieces. Unlike a Rubik’s Cube, it has four faces and a simpler structure.
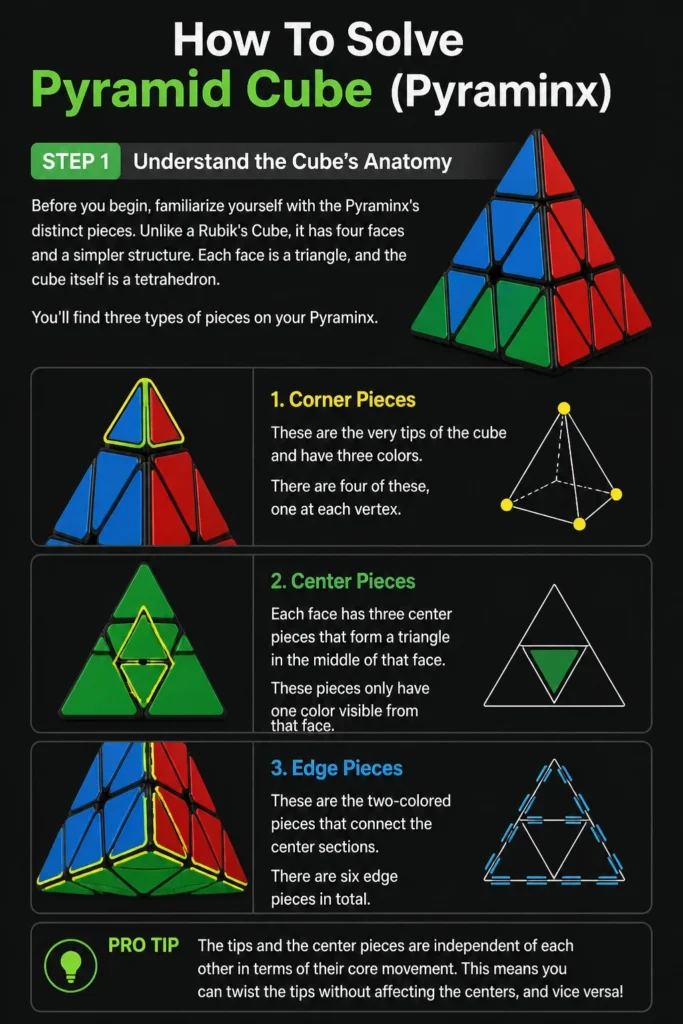
Each face is a triangle, and the cube itself is a tetrahedron. You’ll find three types of pieces on your Pyraminx.
Identify the corner pieces, which are the very tips of the cube and have three colors. There are four of these, one at each vertex.
Next, locate the center pieces. Each face has three center pieces that form a triangle in the middle of that face. These pieces only have one color visible from that face.
Finally, find the edge pieces. These are the two-colored pieces that connect the center sections. There are six edge pieces in total.
Pro Tip: The tips and the center pieces are independent of each other in terms of their core movement. The tips only rotate in place, and the centers only rotate with their respective faces. Only the edge pieces move freely around the puzzle.
Step 2: Solve the Tips
The first and easiest step is to align the tips. These are the smallest corner pieces at each of the cube’s four vertices.
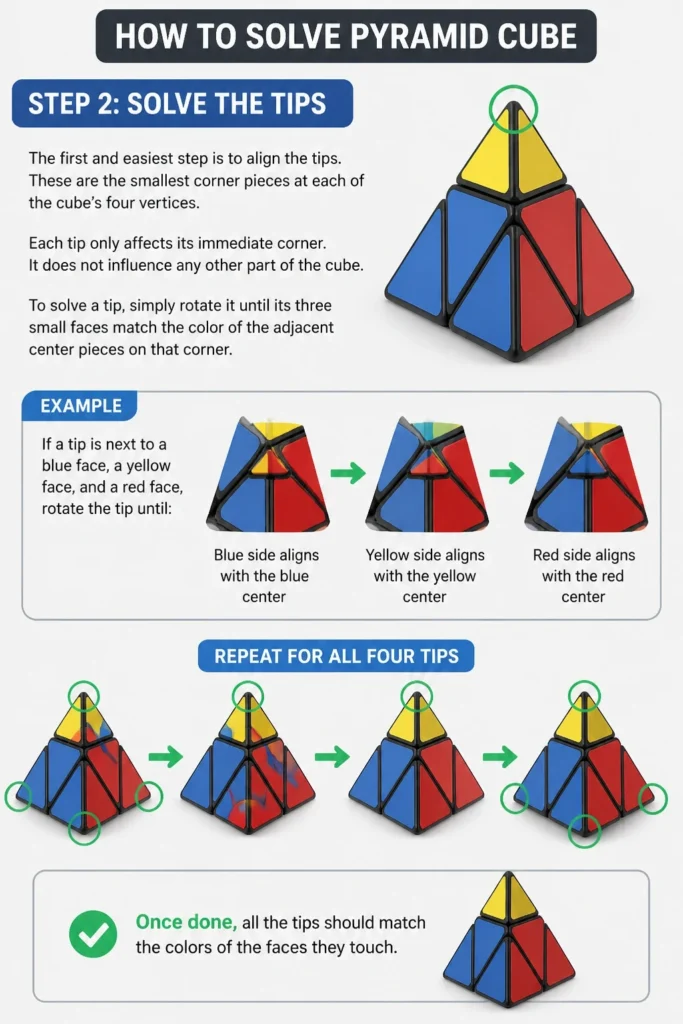
Each tip only affects its immediate corner. It does not influence any other part of the cube.
To solve a tip, simply rotate it until its three small faces match the color of the adjacent center pieces on that corner.
For example, if a tip is next to a blue face, a yellow face, and a red face, rotate the tip until its blue side aligns with the blue face’s center, its yellow side with the yellow center, and its red side with the red center.
Repeat this process for all four tips. Once done, all the tips should match the colors of the faces they touch.
Step 3: Solve One Face’s Centers
Now, choose one face to solve first. It’s often easiest to start with the bottom face, but any face will work.
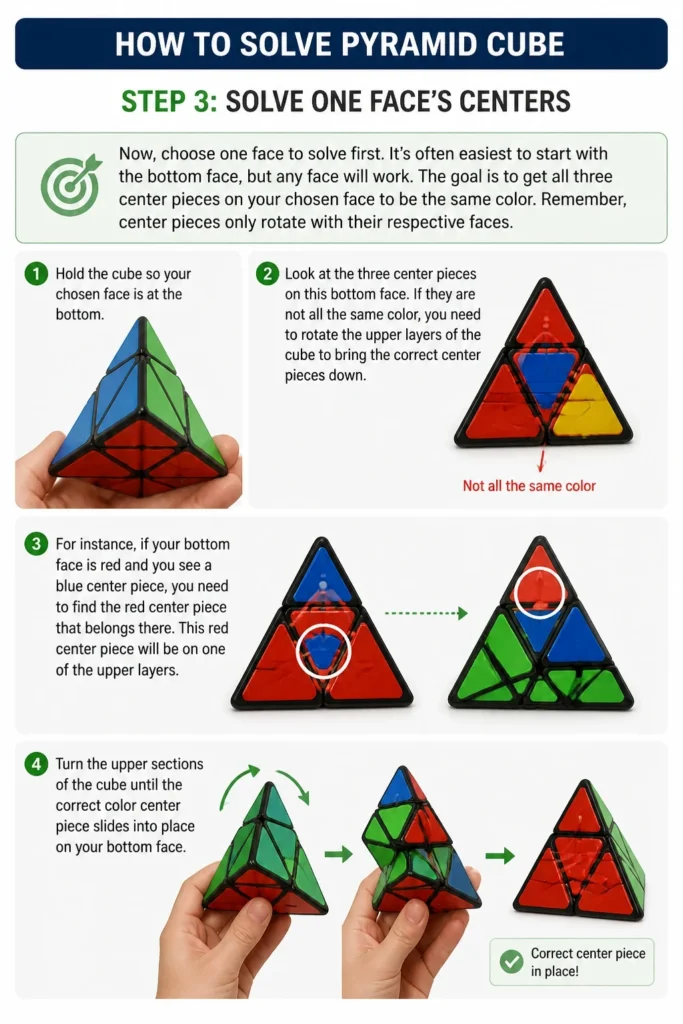
The goal is to get all three center pieces on your chosen face to be the same color. Remember, center pieces only rotate with their respective faces.
Hold the cube so your chosen face is at the bottom. Look at the three center pieces on this bottom face.
If they are not all the same color, you need to rotate the upper layers of the cube to bring the correct center pieces down.
For instance, if your bottom face is red and you see a blue center piece, you need to find the red center piece that belongs there. This red center piece will be on one of the upper layers.
Turn the upper sections of the cube until the correct color center piece slides into place on your bottom face. You’ll often need to rotate the entire top section of the cube (the upper three faces) to align these.
Once you have all three center pieces on your chosen bottom face matching, you have completed the first face’s centers.
Pro Tip: When rotating the upper sections to align centers, ensure you are only moving the top three faces together, not just one individual tip or a single edge. This preserves the tips you already solved.
Step 4: Align Remaining Centers
With the bottom face’s centers solved, hold the cube so this solved face is on the bottom.
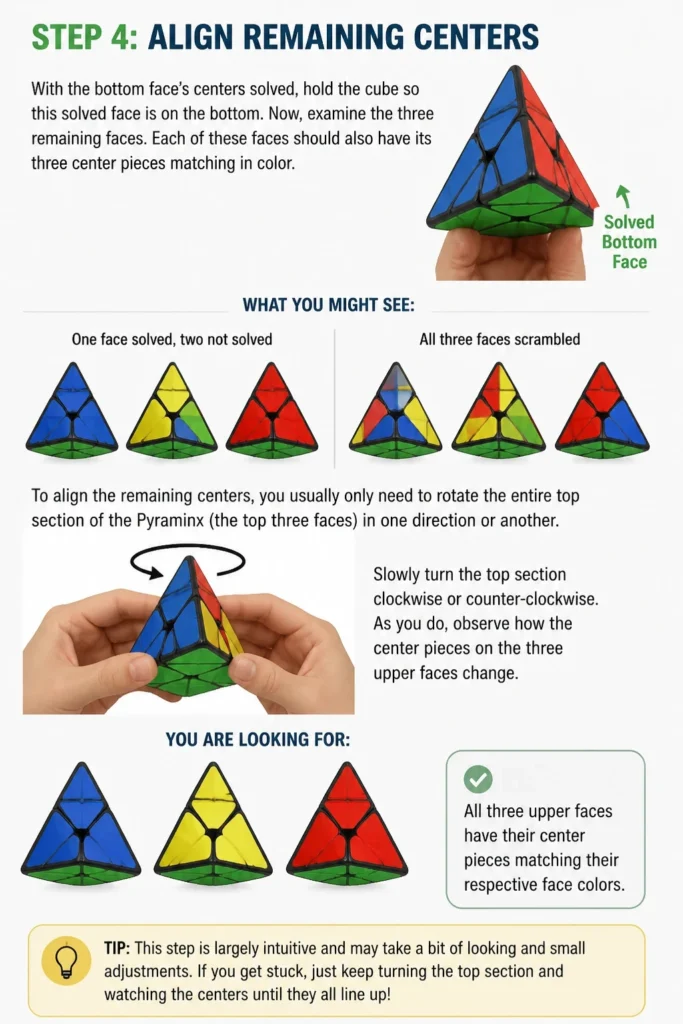
Now, examine the three remaining faces. Each of these faces should also have its three center pieces matching in color.
If they don’t, you’ll typically find that one of these upper faces is solved, and the other two are not. Or, all three might be scrambled.
To align the remaining centers, you usually only need to rotate the entire top section of the Pyraminx (the top three faces) in one direction or another.
Slowly turn the top section clockwise or counter-clockwise. As you do, observe how the center pieces on the three upper faces change.
You are looking for the orientation where all three upper faces have their center pieces matching their respective face colors. This step is largely intuitive and requires observation.
Once you complete this, all four faces of your Pyraminx should have their center pieces solved. Only the edge pieces will remain out of place.
Step 5: Position the First Layer Edges
Now that all centers are aligned, focus on the edge pieces. Start by solving the edges for your chosen bottom face.
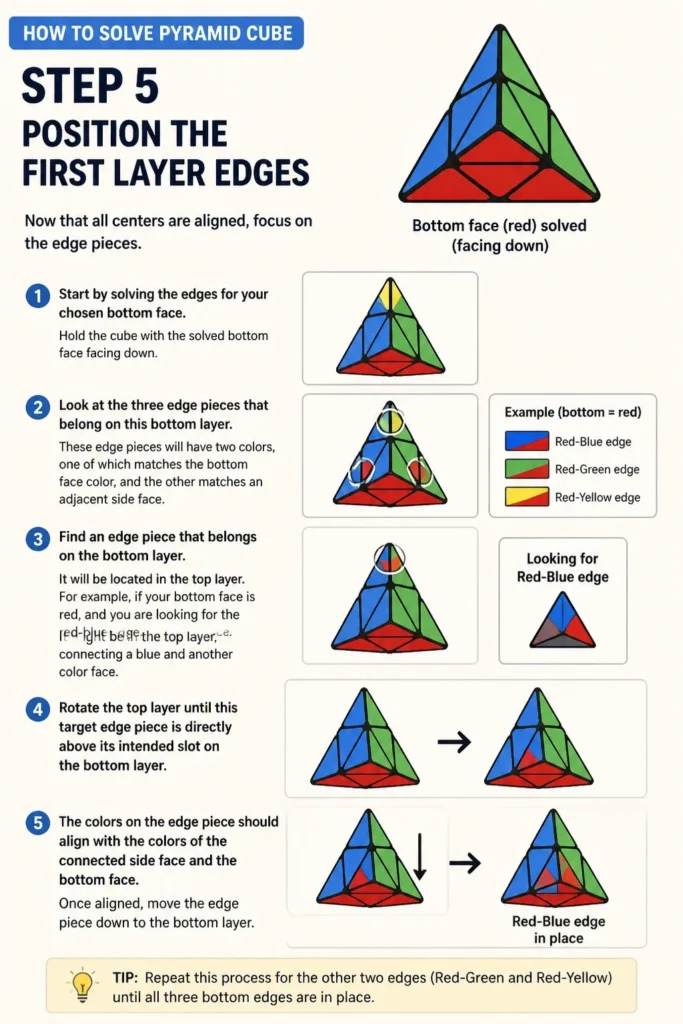
Hold the cube with the solved bottom face facing down. Look at the three edge pieces that belong on this bottom layer.
These edge pieces will have two colors, one of which matches the bottom face color, and the other matches an adjacent side face.
Find an edge piece that belongs on the bottom layer. It will be located in the top layer.
For example, if your bottom face is red, and you are looking for the red-blue edge, find that piece. It might be in the top layer, connecting a blue and another color face.
Rotate the top layer until this target edge piece is directly above its intended slot on the bottom layer. The colors on the edge piece should align with the colors of the center pieces on the faces it will join.
Once aligned, you need a simple algorithm to insert it. If the edge piece is above its slot and its front color matches the front face center:
- Turn the Right layer up (R).
- Turn the Top layer right (U’).
- Turn the Right layer down (R’).
If the edge piece is above its slot and its front color matches the right face center (meaning it needs to flip):
- Turn the Top layer right (U’).
- Turn the Right layer up (R).
- Turn the Top layer left (U).
- Turn the Right layer down (R’).
Repeat this for all three edge pieces on the bottom layer. Sometimes an edge piece is already in the bottom layer but incorrectly oriented. If this happens, use one of the algorithms above to move it out into the top layer, then re-insert it correctly.
Step 6: Solve the Remaining Edges (Case 1: No Edges Solved)
After solving the first layer, orient the cube so the solved face is on the bottom. You will now have three edge pieces left to solve in the top layer.
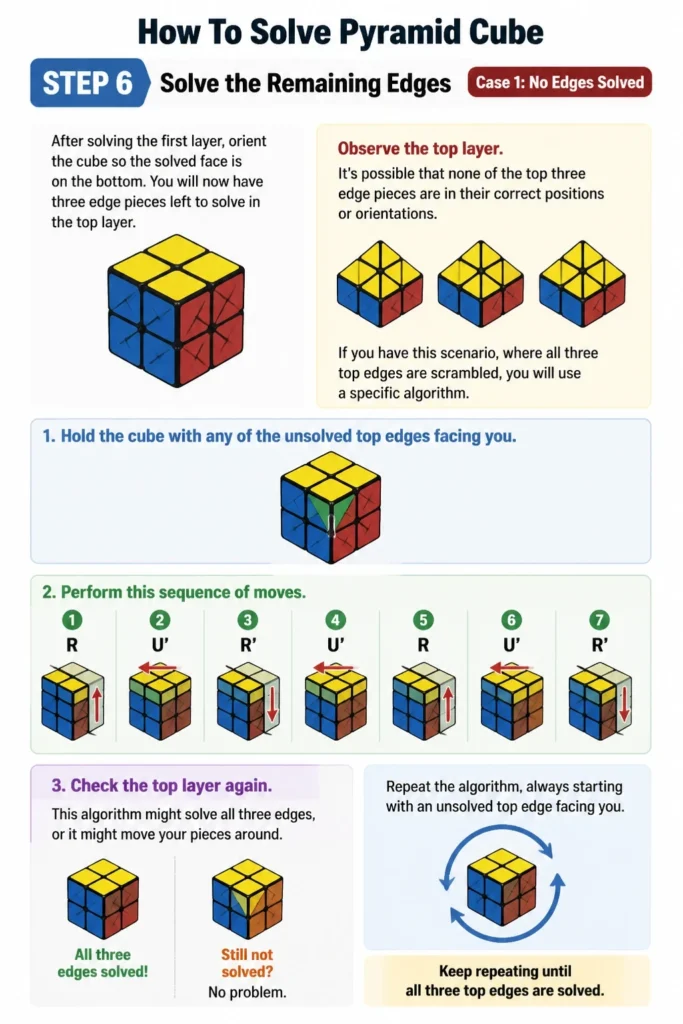
Observe the top layer. It’s possible that none of the top three edge pieces are in their correct positions or orientations.
If you have this scenario, where all three top edges are scrambled, you will use a specific algorithm. Hold the cube with any of the unsolved top edges facing you.
Perform this sequence of moves:
- Turn the Right layer up (R).
- Turn the Top layer right (U’).
- Turn the Right layer down (R’).
- Turn the Top layer right (U’).
- Turn the Right layer up (R).
- Turn the Top layer right (U’).
- Turn the Right layer down (R’).
After performing this, check the top layer again. This algorithm might solve all three edges, or it might move you to the next case where one edge is solved and two are swapped.
Pro Tip: Practice these algorithms slowly at first, focusing on each individual turn. Speed will come with muscle memory.
Step 7: Solve the Remaining Edges (Case 2: One Edge Solved, Two Swapped)
This is the most common scenario for the final step. Hold the cube with the solved bottom face down.
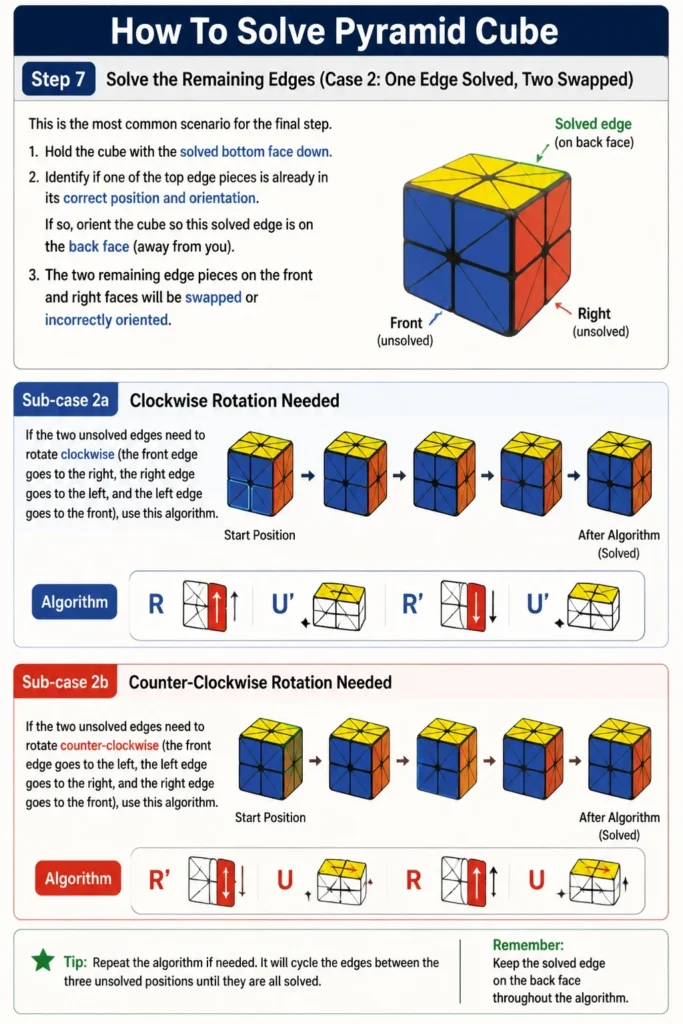
Identify if one of the top edge pieces is already in its correct position and orientation. If so, orient the cube so this solved edge is on the back face (away from you).
The two remaining edge pieces on the front and right faces will be swapped or incorrectly oriented. There are two sub-cases here, depending on how these two edges need to move.
Sub-case 2a: Clockwise Rotation Needed
If the two unsolved edges need to rotate clockwise (the front edge goes to the right, the right edge goes to the left, and the left edge goes to the front), use this algorithm:
- Turn the Right layer up (R).
- Turn the Top layer right (U’).
- Turn the Right layer down (R’).
- Turn the Top layer right (U’).
Sub-case 2b: Counter-Clockwise Rotation Needed
If the two unsolved edges need to rotate counter-clockwise (the front edge goes to the left, the left edge goes to the right, and the right edge goes to the front), use this algorithm:
- Turn the Right layer down (R’).
- Turn the Top layer down (U).
- Turn the Right layer up (R).
- Turn the Top layer up (U).
After applying the correct algorithm for your specific situation, your Pyramid Cube should be completely solved!
Common Mistakes to Avoid
Ignoring Piece Types
Many beginners try to force pieces into place without understanding their function. The tips, centers, and edges move independently or in specific groups. Trying to solve an edge piece before the centers are aligned will lead to frustration and scrambling your progress.
Always respect the hierarchy: tips first, then centers, then edges. Each type of piece has its own rules of movement.
Rushing the Algorithms
It’s tempting to speed through the algorithms, especially when you think you’ve memorized them. However, one incorrect turn can undo several steps of progress, requiring you to backtrack.
Execute each move precisely and deliberately. If you lose your place, pause, re-evaluate your cube’s state, and restart the algorithm from the beginning of that specific sequence.
Not Orienting the Cube Correctly
Algorithms rely on the cube being held in a specific orientation. Forgetting to keep the solved face at the bottom, or rotating the entire cube mid-algorithm, will lead to incorrect results.
Before starting an algorithm, always ensure the cube is oriented exactly as described. If an algorithm says “Right layer,” make sure the correct face is on your right.
Getting Discouraged by Scrambles
It’s normal for the cube to look more scrambled after certain algorithm steps, especially in the final layers. This is part of the process as pieces shift into intermediate positions.
Trust the method and continue with the next steps. The cube will come together as you complete the sequences.
Troubleshooting
My Tips Aren’t Matching
If your tips are not matching, it means you haven’t rotated them correctly. The tips are the simplest pieces and only rotate in place.
Simply twist each individual tip until its three small faces match the colors of the three main faces it touches. This step is purely visual and requires no complex algorithms.
My Centers Are Scrambled After Solving Tips
This is a common issue if you accidentally rotated an entire face instead of just a tip, or if you didn’t align all centers in Step 4.
Re-evaluate Step 3 and Step 4. Ensure you are rotating the top three faces together to align the centers, not just a single face. The centers must align before you attempt to solve any edges.
An Edge Piece is in the Wrong Spot or Flipped
If an edge piece is in its correct slot but the colors are flipped, or it’s in the wrong slot entirely, you need to use an algorithm to get it out and re-insert it.
If it’s in the wrong slot, simply treat it as an unsolved edge in the top layer and use one of the insertion algorithms from Step 5 to put a different, correct edge in its place. This will push the incorrect edge out to the top layer, where you can then work with it.
If it’s in its correct slot but flipped, apply an insertion algorithm (like the one in Step 5 for the front-matching case) to the flipped piece. This will temporarily move it out, then you can re-insert it correctly.
Key Takeaways
- Solving the Pyraminx is a beginner-friendly puzzle that builds foundational cubing skills.
- Always start by solving the tips, as they are independent of other pieces.
- The next crucial step is aligning all face centers before attempting edge placement.
- Algorithms are precise sequences of moves; execute them carefully and deliberately.
- Practice is key to memorizing moves and recognizing cube states quickly.
- Don’t be discouraged by intermediate scrambled states; trust the process.
Frequently Asked Questions
Is the Pyraminx harder than a 3×3 Rubik’s Cube?
Generally, no. The Pyraminx is considered significantly easier than a 3×3 Rubik’s Cube. It has fewer pieces, simpler movements, and fewer complex algorithms, making it an excellent starting point for new puzzlers.
How do I know which way is ‘Up’ or ‘Right’ for an algorithm?
The notation (R, U, L, B) refers to the Right, Up, Left, and Back faces relative to your current view of the cube. ‘R’ is the rightmost face, ‘U’ is the top face, ‘L’ is the leftmost face, and ‘B’ is the face directly opposite the front. An apostrophe (e.g., R’) means a counter-clockwise turn, while no apostrophe means a clockwise turn.
What if I accidentally turn a tip while doing an algorithm?
If you accidentally turn a tip, don’t worry. Tips are independent. Simply re-align the tip to match its surrounding center colors. Then, continue with your algorithm from where you left off, ensuring you don’t accidentally move other pieces.
Can I solve the Pyraminx without memorizing algorithms?
While the first few steps (tips and centers) can be solved intuitively with some practice, the final edge-solving steps almost always require memorization of specific algorithms. These algorithms efficiently move pieces without disrupting previously solved sections.
Our Top Recommended Finds
- GAN Pyraminx Enhanced: Known for its smooth turns and magnetic feel, enhancing the solving experience.
- MoYu Meilong Pyraminx: An excellent budget-friendly option that performs well and is durable for beginners.
- Speed Cube Mat: Provides a soft, stable surface for cubing, protecting your cube and table during practice.
Embrace the Challenge and Enjoy the Solve
You now possess the knowledge and the step-by-step guide to conquer the Pyramid Cube. The satisfaction of solving a puzzle entirely by yourself is truly rewarding.
Take your time with each step, practice the algorithms until they become second nature, and don’t be afraid to refer back to this guide.
Once you’ve mastered the Pyraminx, consider exploring other fascinating puzzles like the 2×2 cube or the classic 3×3 Rubik’s Cube. Each new puzzle offers a fresh challenge and a deeper understanding of spatial reasoning.
Grab your Pyraminx today and start your journey to becoming a confident puzzle solver!