How To Make Pins
There’s a unique satisfaction in wearing or sharing something you’ve made yourself.
Custom pins offer a fantastic way to express creativity, celebrate a cause, or even build a small business.
I’ve spent countless hours experimenting with different materials and techniques, and I’m excited to share a streamlined process that truly works.
Quick Overview
This guide will walk you through creating custom, durable pins from your own designs.
You’ll learn how to transform digital art into a tangible accessory ready to adorn jackets, bags, or bulletin boards.
- Time needed: 1-3 hours (for your first batch, less for subsequent ones)
- Difficulty: Beginner
- What you’ll need: Pin backings, your design, a printer, laminating sheets or sealant, cutting tools, and strong adhesive.
Step-by-Step Instructions
Step 1: Design Your Art
The journey of every great pin begins with a compelling design.
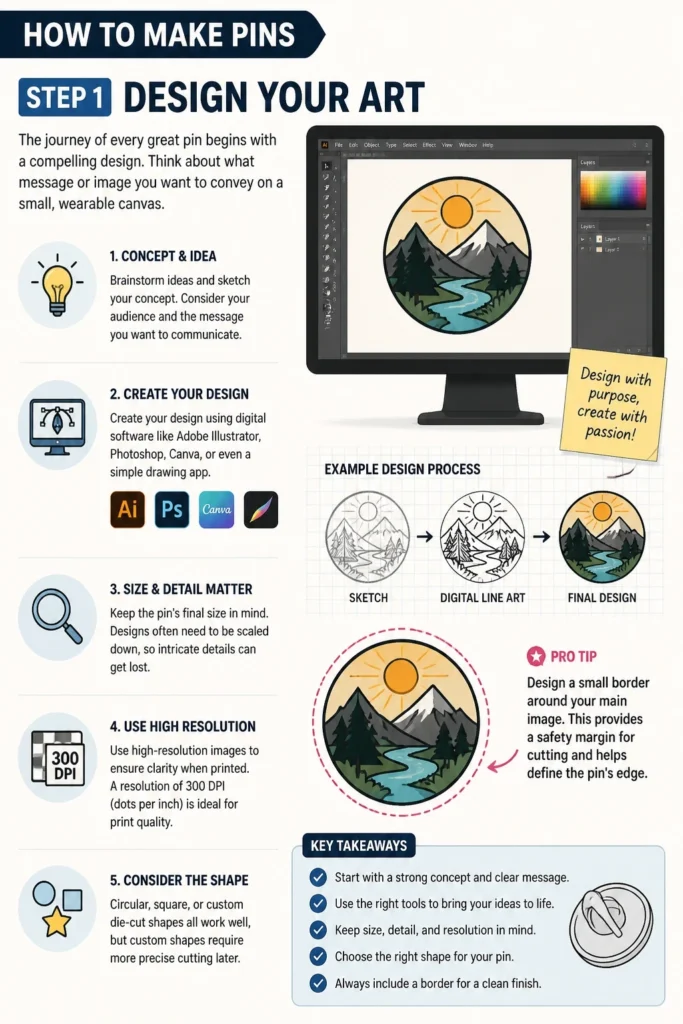
Think about what message or image you want to convey on a small, wearable canvas.
- Create your design using digital software like Adobe Illustrator, Photoshop, Canva, or even a simple drawing app.
- Keep the pin’s final size in mind. Designs often need to be scaled down, so intricate details can get lost.
- Use high-resolution images to ensure clarity when printed. A resolution of 300 DPI (dots per inch) is ideal for print quality.
- Consider the shape of your pin. Circular, square, or custom die-cut shapes all work well, but custom shapes require more precise cutting later.
Pro Tip: Design a small border around your main image. This provides a safety margin for cutting and helps define the pin’s edge.
Step 2: Print Your Designs
Once your design is perfect, it’s time to bring it into the physical world.
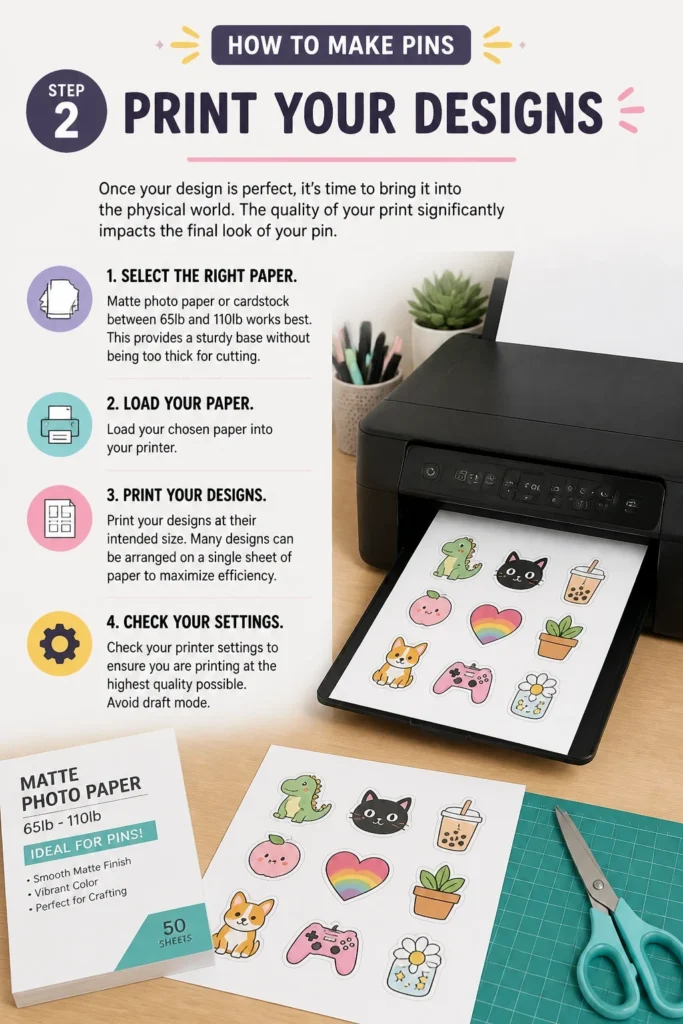
The quality of your print significantly impacts the final look of your pin.
- Select the right paper. Matte photo paper or cardstock between 65lb and 110lb works best. This provides a sturdy base without being too thick for cutting.
- Load your chosen paper into your printer.
- Print your designs at their intended size. Many designs can be arranged on a single sheet of paper to maximize efficiency.
- Check your printer settings to ensure you are printing at the highest quality possible. Avoid draft mode.
Step 3: Protect Your Pins
Pins endure a lot of wear and tear, so protecting your design is crucial for longevity.
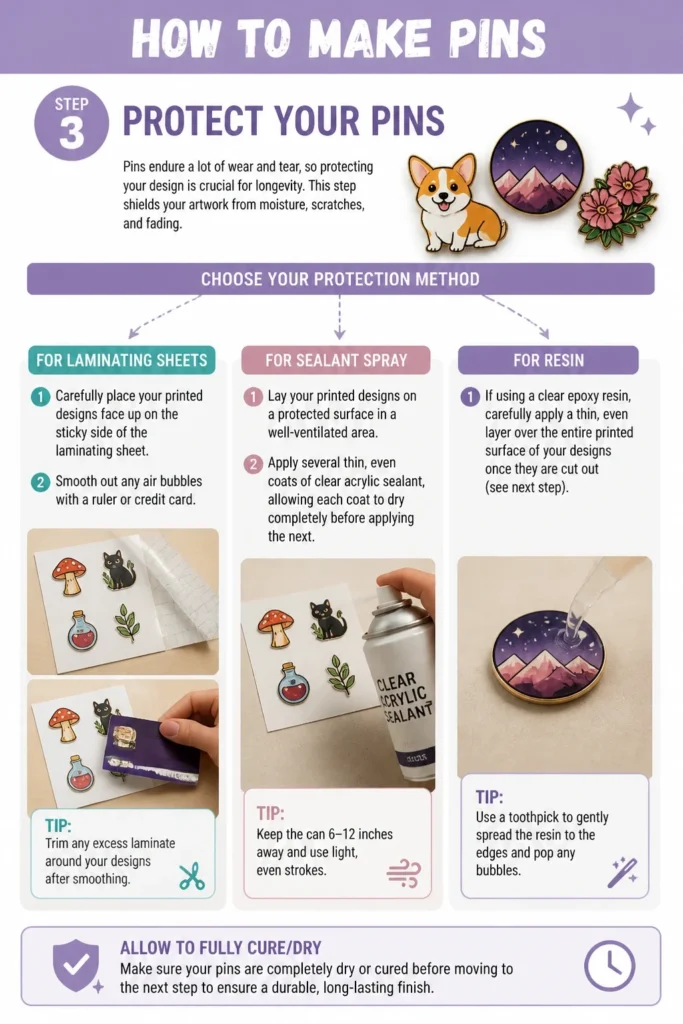
This step shields your artwork from moisture, scratches, and fading.
- Choose your protection method: self-adhesive laminating sheets or a clear sealant spray/resin.
- For laminating sheets: Carefully place your printed designs face up on the sticky side of the laminating sheet. Smooth out any air bubbles with a ruler or credit card.
- For sealant spray: Lay your printed designs on a protected surface in a well-ventilated area. Apply several thin, even coats of clear acrylic sealant, allowing each coat to dry completely before applying the next.
- For resin: If using a clear epoxy resin, carefully apply a thin, even layer over the entire printed surface of your designs once they are cut out (see next step). Follow the resin manufacturer’s instructions for mixing and curing.
Pro Tip: When using laminating sheets, leave a small margin of laminate around each design. This creates a better seal against moisture.
Step 4: Cut Out Your Designs
Precision is key in this step to give your pins a professional finish.
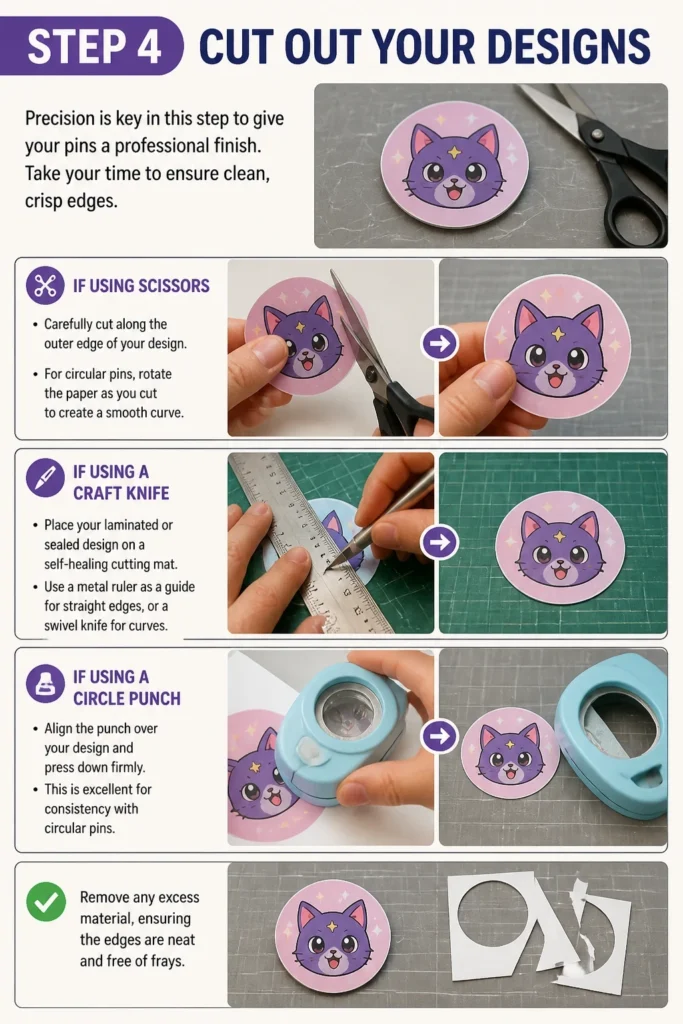
Take your time to ensure clean, crisp edges.
- Use sharp scissors, a craft knife with a cutting mat, or a circle punch.
- If using scissors: Carefully cut along the outer edge of your design. For circular pins, rotate the paper as you cut to create a smooth curve.
- If using a craft knife: Place your laminated or sealed design on a self-healing cutting mat. Use a metal ruler as a guide for straight edges, or a swivel knife for curves.
- If using a circle punch: Align the punch over your design and press down firmly. This is excellent for consistency with circular pins.
- Remove any excess material, ensuring the edges are neat and free of frays.
Step 5: Attach Pin Backs
Now your design pieces are ready to become functional pins.
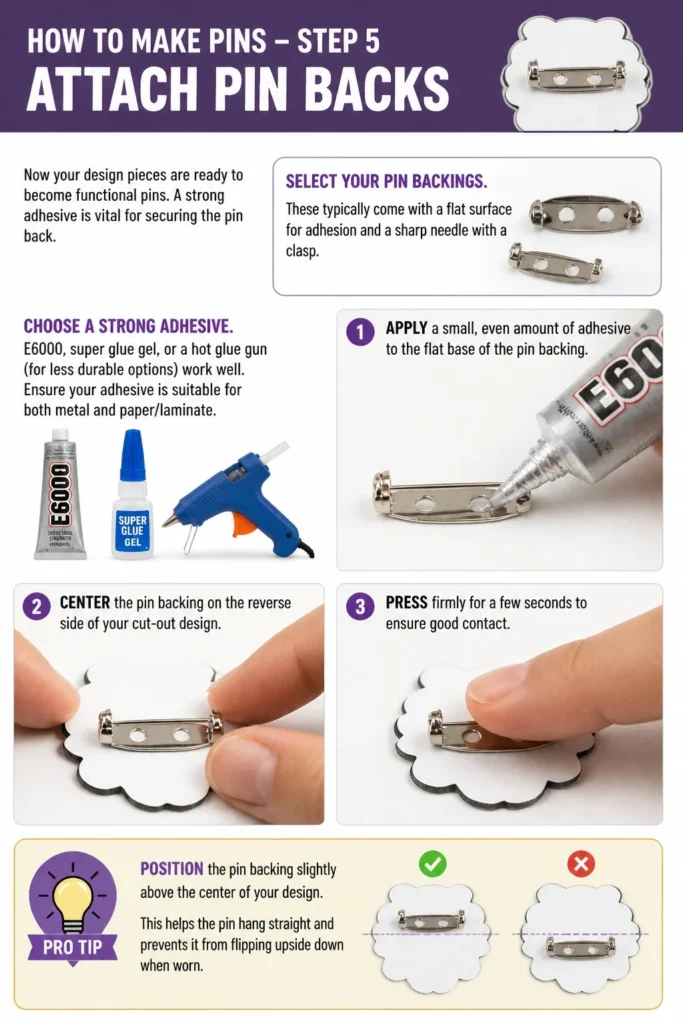
A strong adhesive is vital for securing the pin back.
- Select your pin backings. These typically come with a flat surface for adhesion and a sharp needle with a clasp.
- Choose a strong adhesive. E6000, super glue gel, or a hot glue gun (for less durable options) work well. Ensure your adhesive is suitable for both metal and paper/laminate.
- Apply a small, even amount of adhesive to the flat base of the pin backing.
- Center the pin backing on the reverse side of your cut-out design.
- Press firmly for a few seconds to ensure good contact.
Pro Tip: Position the pin backing slightly above the center of your design. This helps the pin hang straight and prevents it from flipping upside down when worn.
Step 6: Cure and Finish
Patience in this final step ensures your pins are durable and long-lasting.
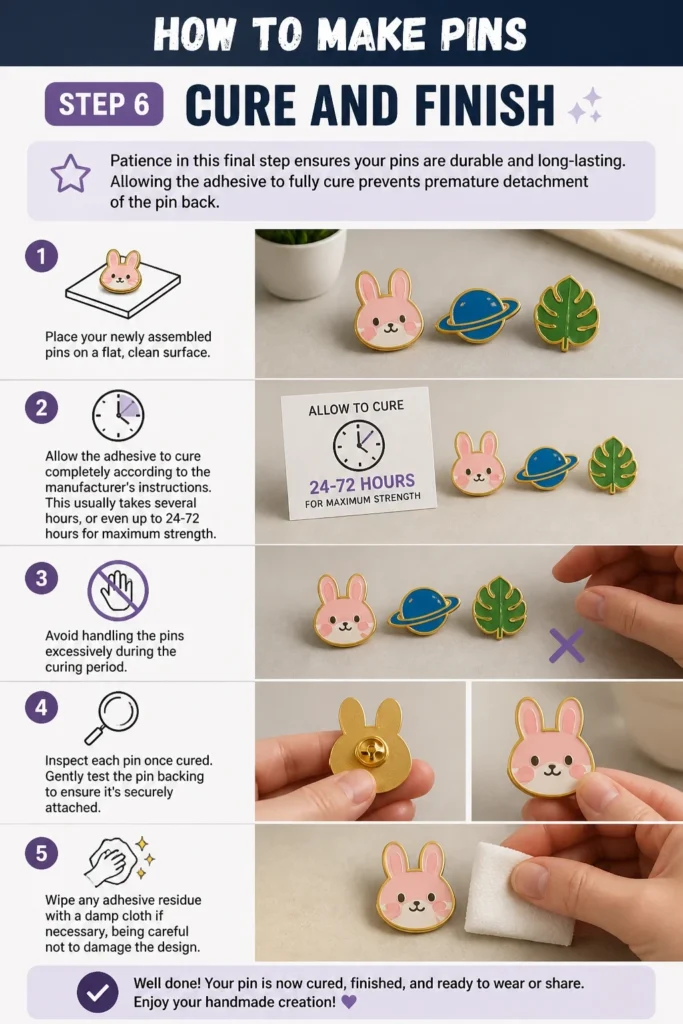
Allowing the adhesive to fully cure prevents premature detachment of the pin back.
- Place your newly assembled pins on a flat, clean surface.
- Allow the adhesive to cure completely according to the manufacturer’s instructions. This usually takes several hours, or even up to 24-72 hours for maximum strength.
- Avoid handling the pins excessively during the curing period.
- Inspect each pin once cured. Gently test the pin backing to ensure it’s securely attached.
- Wipe any adhesive residue with a damp cloth if necessary, being careful not to damage the design.
Step 7: Showcase Your Creations
Your custom pins are now complete and ready for the world.
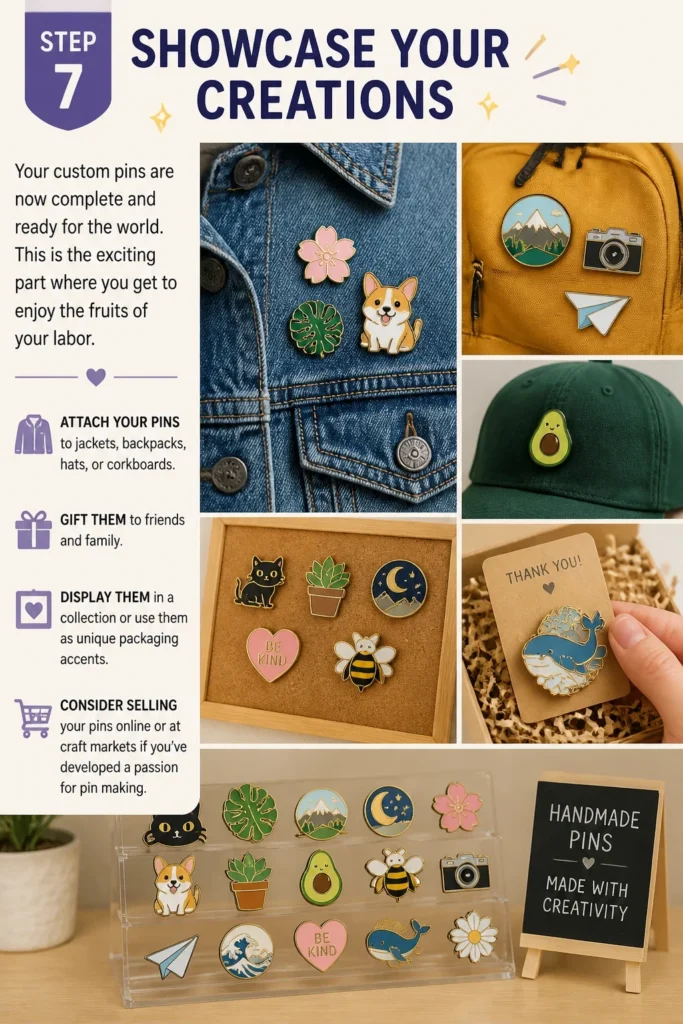
This is the exciting part where you get to enjoy the fruits of your labor.
- Attach your pins to jackets, backpacks, hats, or corkboards.
- Gift them to friends and family.
- Display them in a collection or use them as unique packaging accents.
- Consider selling your pins online or at craft markets if you’ve developed a passion for pin making.
Common Mistakes to Avoid
Poor Design Resolution
Using low-resolution images for your pin designs results in blurry or pixelated prints.
This significantly diminishes the professional appearance of your finished pin. Always start with high-resolution artwork, ideally 300 DPI, to ensure crisp details even when scaled down.
Inadequate Protection/Sealing
Skipping the lamination or sealing step leaves your pins vulnerable to damage.
Moisture, scratches, and UV light can quickly ruin your artwork. Properly protect your designs with laminating sheets, clear sealant spray, or resin for maximum durability and longevity.
Weak Adhesive Application
Using insufficient or inappropriate glue for attaching pin backings is a common cause of failure.
Pins will inevitably fall apart if the adhesive isn’t strong enough or applied correctly. Always use a strong, permanent adhesive suitable for both metal and paper/laminate, and allow it to cure fully.
Rushing the Curing Process
Impatience can lead to pins that don’t last.
Pulling pins off too soon or handling them before the adhesive has fully set can weaken the bond. Follow the adhesive’s recommended curing time precisely to achieve maximum strength and durability.
Troubleshooting
Pin Backs Falling Off
If your pin backs detach, it usually indicates an issue with the adhesive or curing process.
Ensure you are using a strong, permanent adhesive like E6000 or a high-quality super glue gel. Apply enough glue to cover the entire flat surface of the pin back, and most importantly, allow it to cure for the full recommended time, which can be 24-72 hours for maximum strength.
Designs Fading/Smudging
Fading or smudging often points to insufficient protection or exposure to moisture/UV light.
Always laminate your designs or apply multiple coats of a clear, UV-resistant sealant. Make sure your ink is completely dry before applying any protective layer. Consider using archival-quality ink if fading is a persistent issue.
Rough Edges After Cutting
Rough edges detract from the professional look of your pins.
This problem typically arises from dull cutting tools or rushing the cutting process. Use a fresh, sharp craft knife blade, sharp scissors, or a clean-punching circle punch. Take your time and make precise cuts to achieve smooth, clean edges.
Key Takeaways
- Always begin with high-resolution designs for crisp, clear prints.
- Protect your printed designs with lamination or sealant to ensure durability.
- Use sharp tools for precise cutting to achieve professional-looking edges.
- Apply a strong, permanent adhesive to securely attach pin backings.
- Allow adequate curing time for the adhesive to reach its maximum strength.
- Experiment with different materials and techniques to find what works best for your style.
Frequently Asked Questions
What’s the best paper for pin designs?
Matte photo paper or sturdy cardstock (65lb-110lb) works best. These papers offer good print quality and sufficient thickness without being too difficult to cut or adhere to.
Can I use different types of pin backings?
Absolutely. While standard butterfly clutch pins are common, you can also use safety pin backings, magnetic backings, or even brooch pins for larger, heavier designs. Choose the backing that best suits your pin’s size and intended use.
How can I make my pins waterproof?
Laminating your designs completely seals them against moisture. Alternatively, applying several layers of a clear, waterproof sealant spray or a coat of clear epoxy resin provides excellent water resistance. Ensure all edges are fully covered.
How long do handmade pins last?
With proper protection and strong adhesive, handmade pins can last for many years. The key is thorough sealing, secure attachment of the pin back, and avoiding harsh conditions like prolonged direct sunlight or submersion in water.
Our Top Recommended Finds
- Pin Backs Assortment Kit: Provides a variety of sizes and styles, often including butterfly clutches and safety pin options, perfect for starting out.
- Craft Laminator and Pouches: An affordable desktop laminator simplifies the protection step, offering consistent, durable results for your designs.
- Precision Craft Knife Set with Mat: Essential for intricate cuts and custom shapes, offering far more control than standard scissors.
Your Pin-Making Journey Starts Now
You now have the knowledge and steps to create your very own custom pins.
Imagine the satisfaction of wearing your unique art or sharing it with others.
Don’t wait; gather your materials and start transforming your ideas into wearable masterpieces today!