How To Pearl Stitch Knitting
Learning a new knitting stitch brings a unique sense of accomplishment. I remember the moment the purl stitch finally clicked for me, transforming my flat fabric into something textured and beautiful.
This guide shares the exact methods I used to master this essential technique.
You can absolutely achieve perfect purl stitches with these clear steps.
Quick Overview
You are about to learn the fundamental purl stitch, a cornerstone of knitting that, when combined with the knit stitch, forms almost every pattern imaginable. You will create a row of distinct, horizontal bumps on your fabric, adding texture and versatility to your projects.
- Time needed: 30-60 minutes for initial practice
- Difficulty: Beginner
- What you’ll need: Knitting needles, a ball of yarn, a small swatch of knit stitches (optional, but recommended)
Step-by-Step Instructions
Step 1: Prepare Your Work
Hold your working needle, which has the stitches on it, in your left hand. The yarn coming from your ball should be positioned in front of your work.
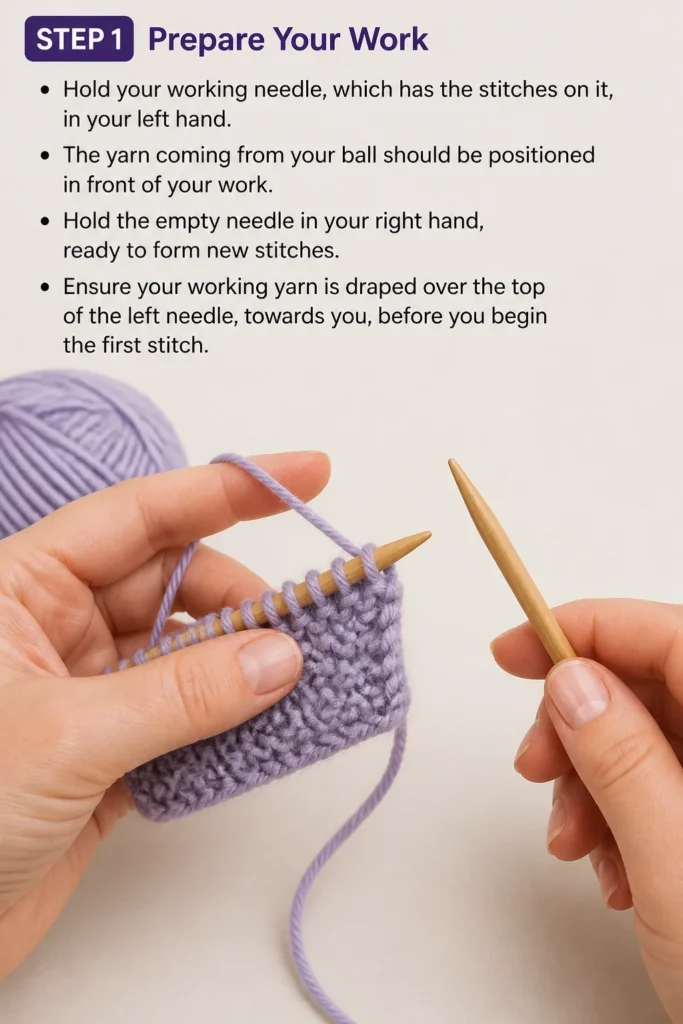
Hold the empty needle in your right hand, ready to form new stitches.
Ensure your working yarn is draped over the top of the left needle, towards you, before you begin the first stitch.
Step 2: Insert Your Needle
Take your right-hand needle and insert it into the first stitch on your left-hand needle.
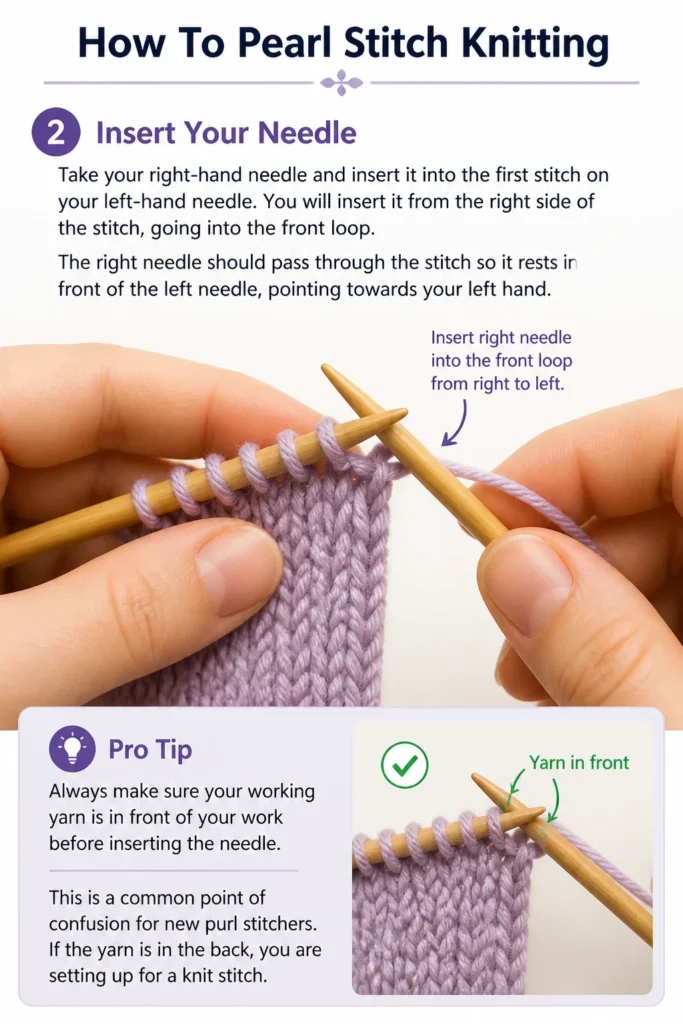
You will insert it from the right side of the stitch, going into the front loop.
The right needle should pass through the stitch so it rests in front of the left needle, pointing towards your left hand.
Pro Tip: Always make sure your working yarn is in front of your work before inserting the needle. This is a common point of confusion for new purl stitchers. If the yarn is in the back, you are setting up for a knit stitch.
Step 3: Wrap the Yarn
With your right needle now through the stitch, take your working yarn.
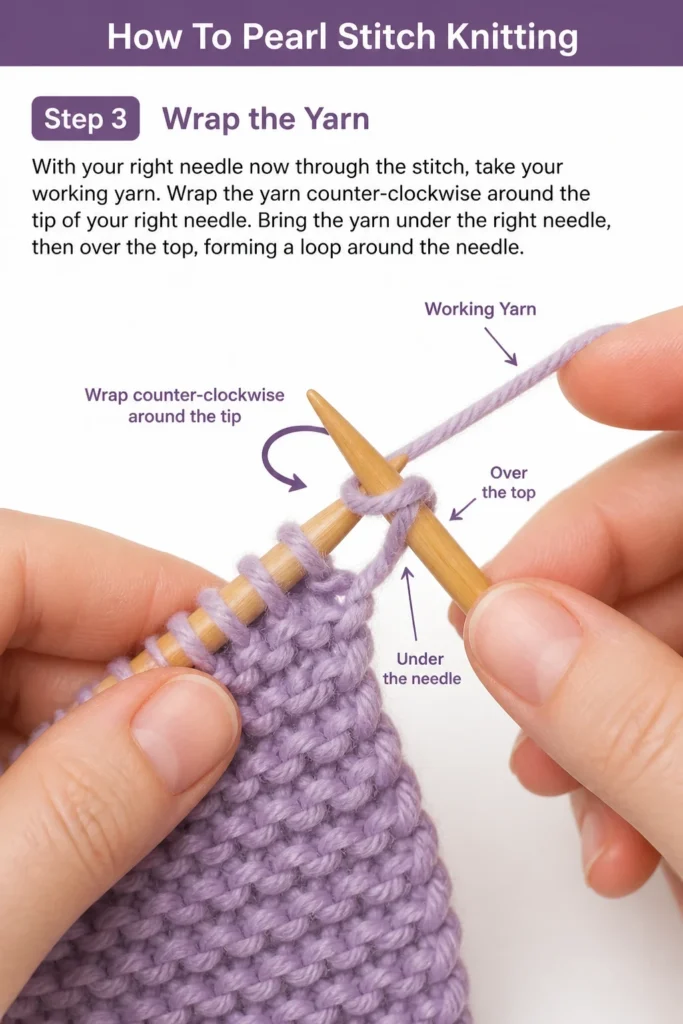
Wrap the yarn counter-clockwise around the tip of your right needle.
Bring the yarn under the right needle, then over the top, forming a loop around the needle.
Step 4: Draw the Loop Through
Carefully pull the tip of your right needle, with the wrapped yarn, back through the stitch on your left needle.
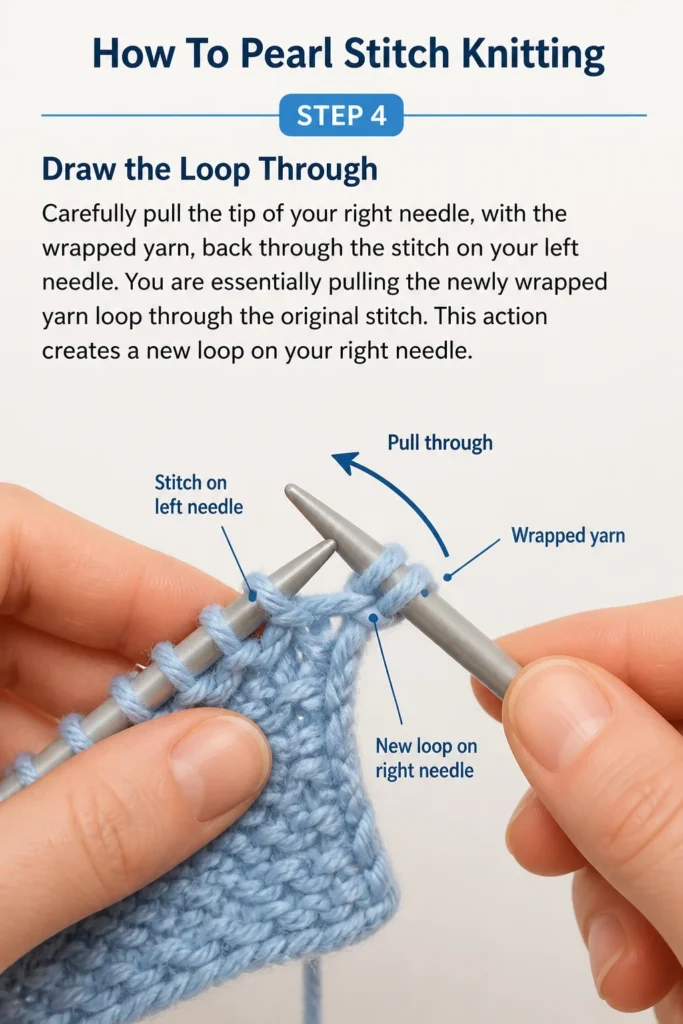
You are essentially pulling the newly wrapped yarn loop through the original stitch.
This action creates a new loop on your right needle.
Step 5: Slip the Old Stitch
Once the new loop is securely on your right needle, gently slide the original stitch off the left needle.
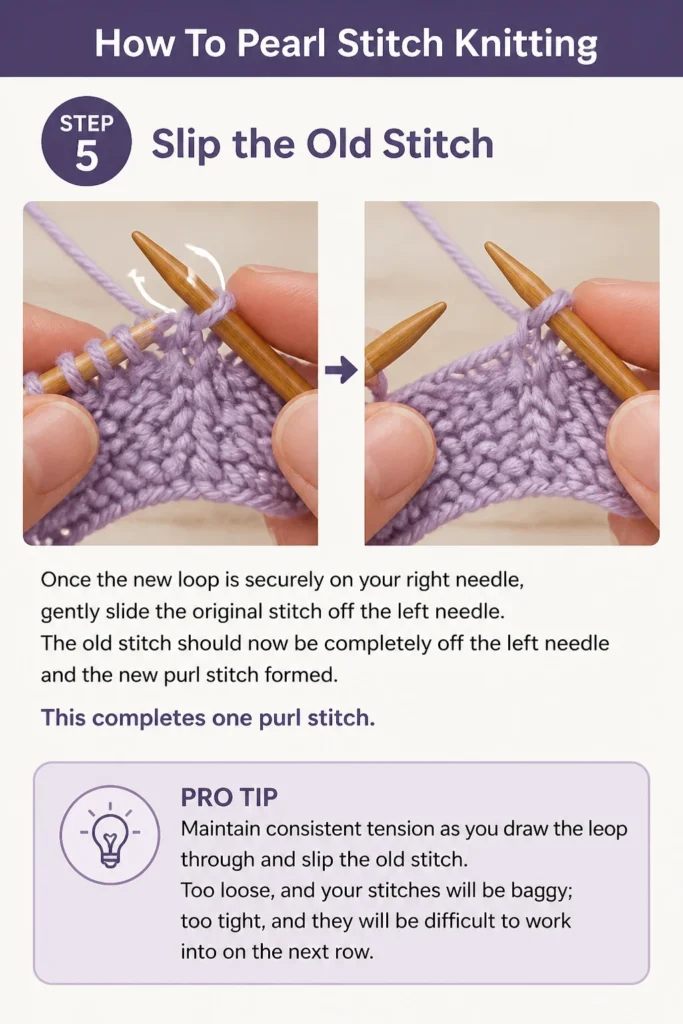
The old stitch should now be completely off the left needle and the new purl stitch formed.
This completes one purl stitch.
Pro Tip: Maintain consistent tension as you draw the loop through and slip the old stitch. Too loose, and your stitches will be baggy; too tight, and they will be difficult to work into on the next row.
Step 6: Repeat Across the Row
Continue these steps for every stitch across your left needle.
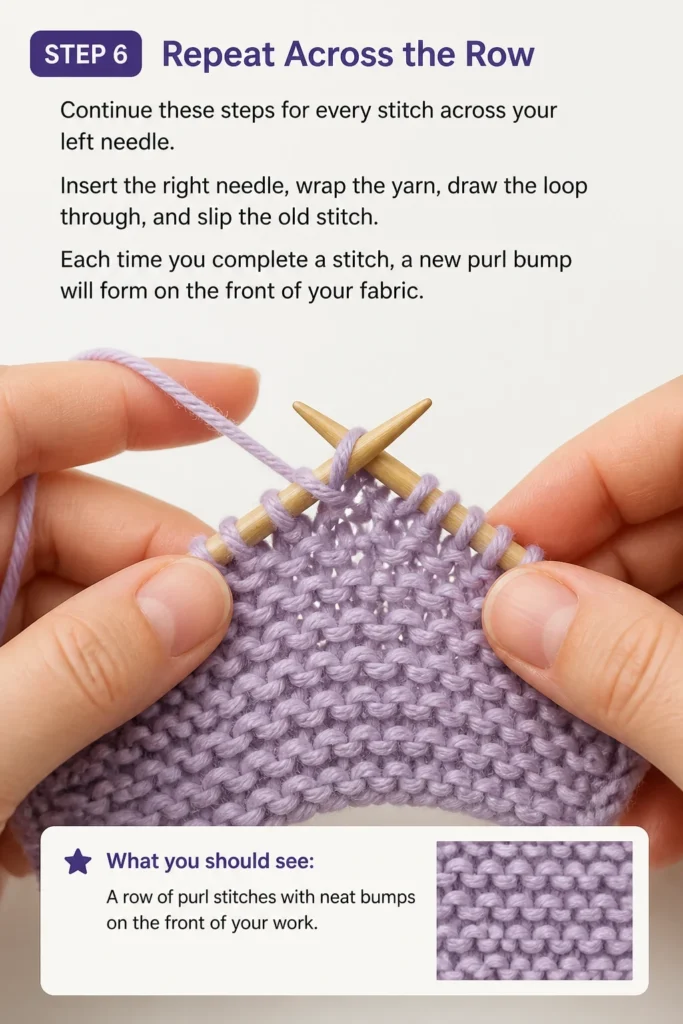
Insert the right needle, wrap the yarn, draw the loop through, and slip the old stitch.
Each time you complete a stitch, a new purl bump will form on the front of your fabric.
Step 7: Turn Your Work
Once you have purled all the stitches on your left needle, you have completed a row.
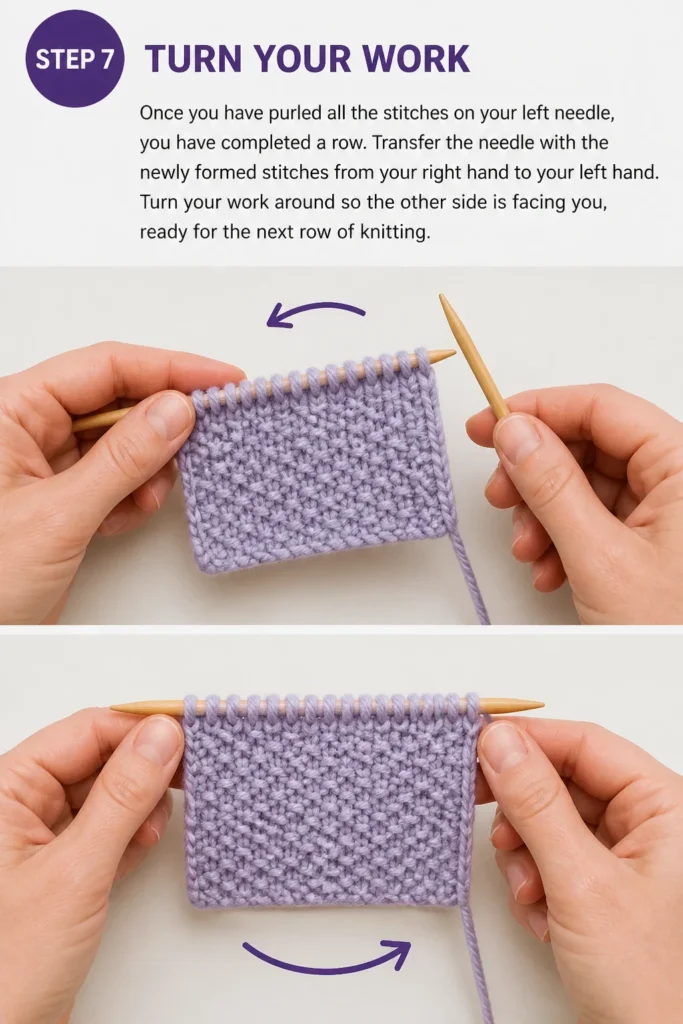
Transfer the needle with the newly formed stitches from your right hand to your left hand.
Turn your work around so the other side is facing you, ready for the next row of knitting.
Step 8: Observe Your Fabric
Take a moment to look at your work after a few rows.
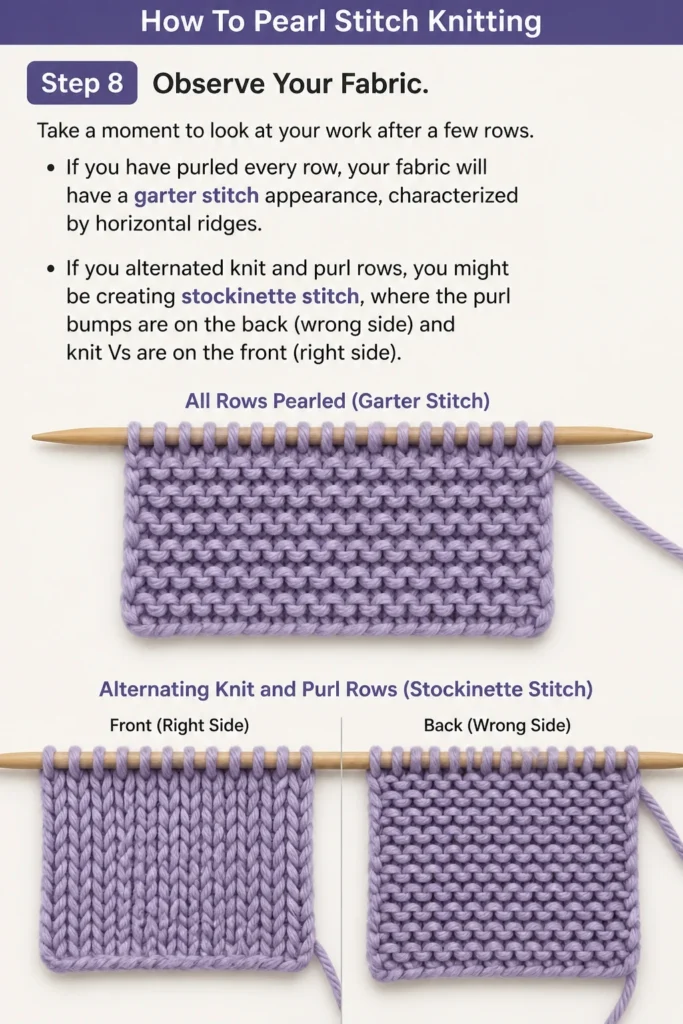
If you have purled every row, your fabric will have a garter stitch appearance, characterized by horizontal ridges.
If you alternated knit and purl rows, you might be creating stockinette stitch, where the purl bumps are on the back (wrong side) and knit Vs are on the front (right side).
Common Mistakes to Avoid
Twisted Stitches
A common mistake is twisting the stitch. This happens when you insert your needle into the back loop of the stitch instead of the front, or when you wrap the yarn incorrectly around the needle. Twisted stitches look tighter and often create a slightly denser, less even fabric.
To avoid this, always ensure you insert your right needle into the front leg of the stitch from right to left. When wrapping the yarn, make sure it goes under the needle first, then over the top, in a consistent counter-clockwise motion.
Inconsistent Tension
Many beginners struggle with keeping their stitches even. Some stitches might be too loose, while others are too tight. This results in an uneven fabric that can look messy and impact the drape of your finished item.
Practice is key to developing consistent tension. Try to keep the yarn taut but not stretched as you wrap and pull through. Experiment with how you hold your yarn – some knitters wrap it around a finger, others simply hold it. Find what feels natural and allows for a steady flow of yarn.
Dropping Stitches
A dropped stitch occurs when a stitch accidentally slips off your needle before it’s securely knitted or purled. This creates a hole in your fabric and can unravel further if not caught quickly.
To prevent dropping stitches, always keep your working stitches relatively close to the tip of your left needle, but not so close they fall off. When pulling the new loop through, ensure it’s fully formed on the right needle before you slip the old stitch off the left. If you do drop a stitch, don’t panic; there are tools like crochet hooks that can help you pick it up.
Yarn in the Wrong Position
This is a fundamental error when switching between knit and purl stitches. If your working yarn is in the back of your work when you try to purl, or in the front when you try to knit, you will create an accidental yarn over, resulting in an extra stitch or a hole.
Always double-check the position of your working yarn before starting a stitch. For purl stitches, the yarn must be in front of your work. For knit stitches, the yarn must be in the back. Make it a habit to consciously move your yarn to the correct position before inserting your needle.
Troubleshooting
My Fabric Looks Uneven or Has Holes
Uneven fabric often points to inconsistent tension. Some stitches might be too loose, others too tight, creating a bumpy texture. Small holes can indicate accidental yarn overs, where you’ve incorrectly moved your yarn between knit and purl stitches, or created an extra loop.
Practice helps regulate tension; try to keep the yarn consistent as you work. For holes, ensure your working yarn is always in the correct position (front for purl, back for knit) before you insert your needle. If you’re seeing large, regular holes, you might be accidentally making yarn overs by wrapping the yarn an extra time.
I Keep Dropping Stitches Off My Left Needle
Dropping stitches is frustrating, especially for beginners. This usually happens when the new loop isn’t fully secured on the right needle before the old stitch is released, or if your needles are too slippery for your yarn type.
Make sure the new loop is well-formed and sitting snugly on the right needle before you slide the old stitch off the left. Try using needles with a bit more grip, like bamboo or wood, if you’re working with very smooth yarn. You can also try holding your needles a bit more firmly, especially when pulling through the loop.
My Stitches Are Too Tight and Hard to Work Into
Stitches that are too tight indicate overly firm tension. This can make it difficult to insert your needle into the next stitch, slowing down your knitting and causing hand strain.
Consciously try to relax your grip on the yarn and needles. Allow the yarn to flow more freely. You can also try going up a needle size, which will naturally make your stitches looser. Remember that knitting should be a relaxing activity, not a battle against tight stitches.
Key Takeaways
- Always keep the working yarn in front of your work for a purl stitch.
- Insert your right needle into the front loop of the stitch from right to left.
- Wrap the yarn counter-clockwise around the right needle.
- Pull the new loop through the old stitch, then slide the old stitch off.
- Consistent tension is vital for an even and attractive fabric.
- Practice regularly to build muscle memory and confidence in your purl stitch.
Frequently Asked Questions
What is the difference between a knit stitch and a purl stitch?
The knit stitch and purl stitch are essentially mirror images of each other. A knit stitch creates a ‘V’ shape on the front of your fabric, while a purl stitch creates a horizontal ‘bump’ or ‘ridge’. When you look at the back of a knit stitch, it appears as a purl stitch, and vice-versa. These two stitches form the basis of almost all knitting patterns.
When should I use the purl stitch in a project?
The purl stitch is used for a wide variety of purposes. When combined with knit stitches, it creates common fabrics like stockinette (knit on one side, purl on the other) and ribbing (alternating knit and purl columns). Purl stitches also create texture in patterns like seed stitch or moss stitch, and they are essential for creating shaping and details in garments.
How can I tell if I’m purling correctly?
After purling a few rows, examine your fabric. If you’ve been purling every stitch, you should see horizontal ridges across your work, characteristic of garter stitch. If you’re alternating knit and purl, you should see the distinct purl bumps on the ‘wrong side’ (back) of your fabric, with smooth ‘V’s on the ‘right side’ (front).
Does the purl stitch use more yarn than the knit stitch?
No, the purl stitch does not inherently use more yarn than the knit stitch. Both stitches, when worked to the same gauge, consume roughly the same amount of yarn to create a unit of fabric. Any perceived difference is usually due to variations in individual knitter’s tension or stitch size.
Our Top Recommended Finds
- Smooth Wooden Knitting Needles: Excellent for beginners as they offer a good grip on the yarn, preventing stitches from slipping off too easily.
- Stitch Markers: Essential for marking pattern repeats, the beginning of a round, or specific stitch counts, helping you keep track of your work.
- Worsted Weight Yarn: A medium-thickness yarn that is easy to see and work with, perfect for practicing new stitches and seeing your progress clearly.
Embrace Your Knitting Journey
You have now taken a crucial step in your knitting adventure by mastering the purl stitch. This fundamental technique opens up a world of possibilities for creating beautiful, textured fabrics.
Don’t stop here. Combine your knit and purl skills to explore patterns like stockinette, ribbing, and seed stitch.
Pick up your needles today and continue building your confidence and creativity, one stitch at a time.