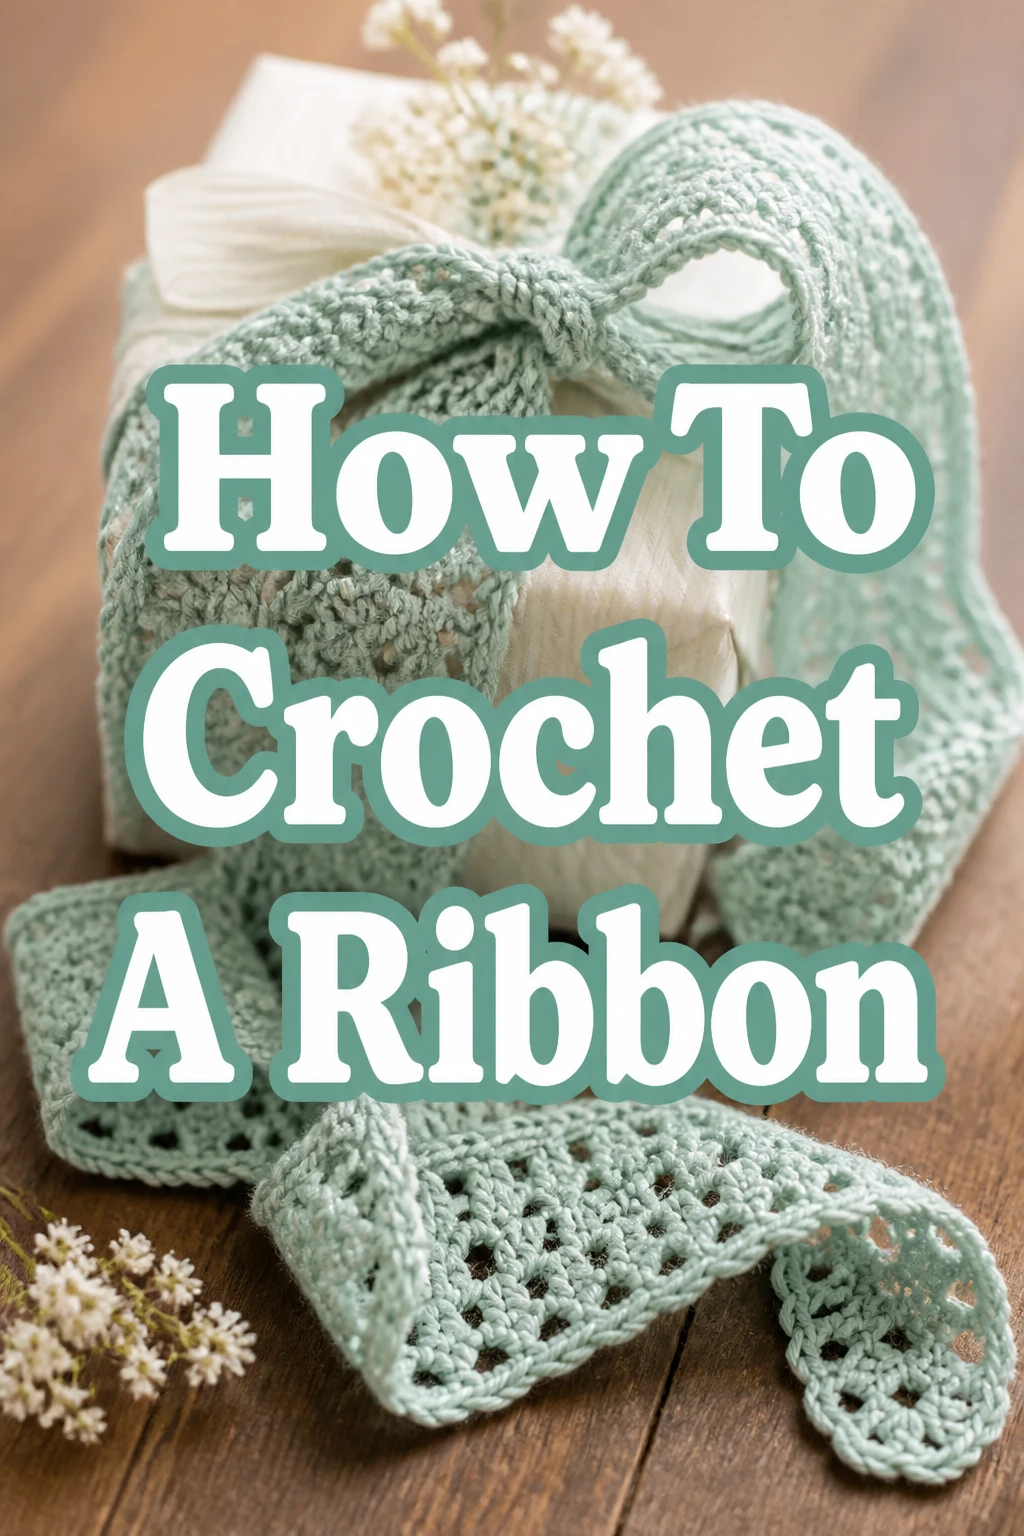
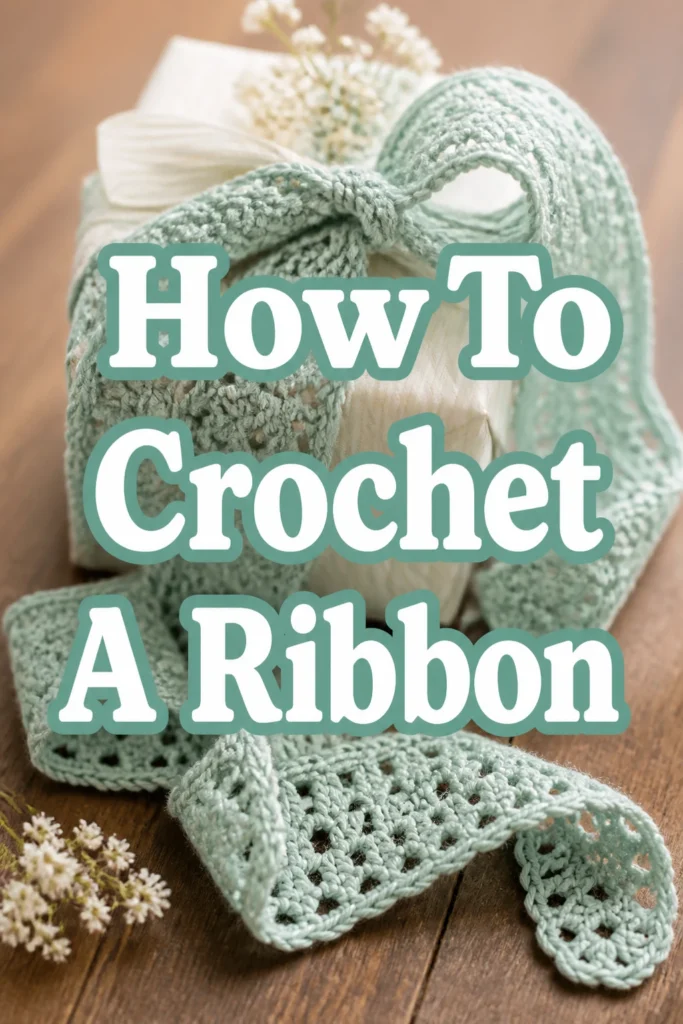
How To Crochet A Ribbon
There’s a special joy in creating something beautiful with your own hands, especially when it’s as versatile as a crocheted ribbon.
I remember making my first one for a gift wrap, and the recipient was so delighted by the handmade touch.
This guide comes from countless hours spent with yarn and hook, ensuring you get practical, easy-to-follow advice.
Quick Overview
You’re about to learn how to crochet a simple, elegant ribbon perfect for embellishing gifts, hair accessories, clothing, or anything that needs a touch of handmade charm.
This project is fantastic for beginners looking to expand their skills beyond basic stitches, and for experienced crocheters wanting a quick, satisfying make.
- Time needed: 1-3 hours (depending on desired length and width)
- Difficulty: Beginner
- What you’ll need: Yarn, crochet hook, scissors, yarn needle
Step-by-Step Instructions
Step 1: Gather Your Materials
Before you begin, ensure you have all the necessary supplies within reach.
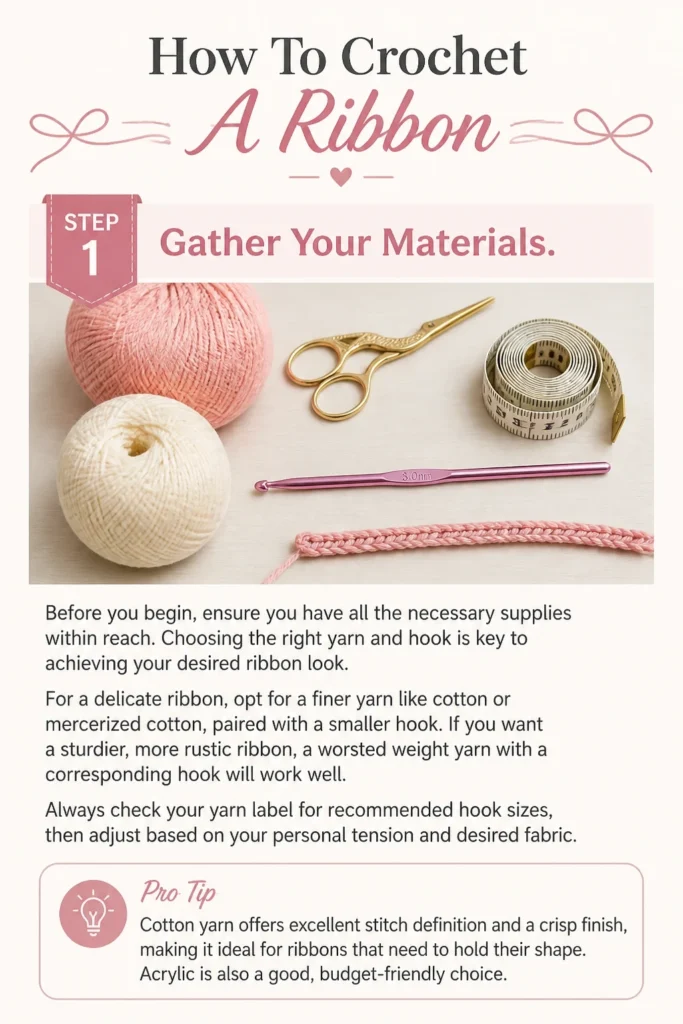
Choosing the right yarn and hook is key to achieving your desired ribbon look.
For a delicate ribbon, opt for a finer yarn like cotton or mercerized cotton, paired with a smaller hook.
If you want a sturdier, more rustic ribbon, a worsted weight yarn with a corresponding hook will work well.
Always check your yarn label for recommended hook sizes, then adjust based on your personal tension and desired fabric.
Pro Tip: Cotton yarn offers excellent stitch definition and a crisp finish, making it ideal for ribbons that need to hold their shape. Acrylic is also a good, budget-friendly choice.
Step 2: Master the Slip Knot
Every crochet project starts with a slip knot, which secures the yarn to your hook.
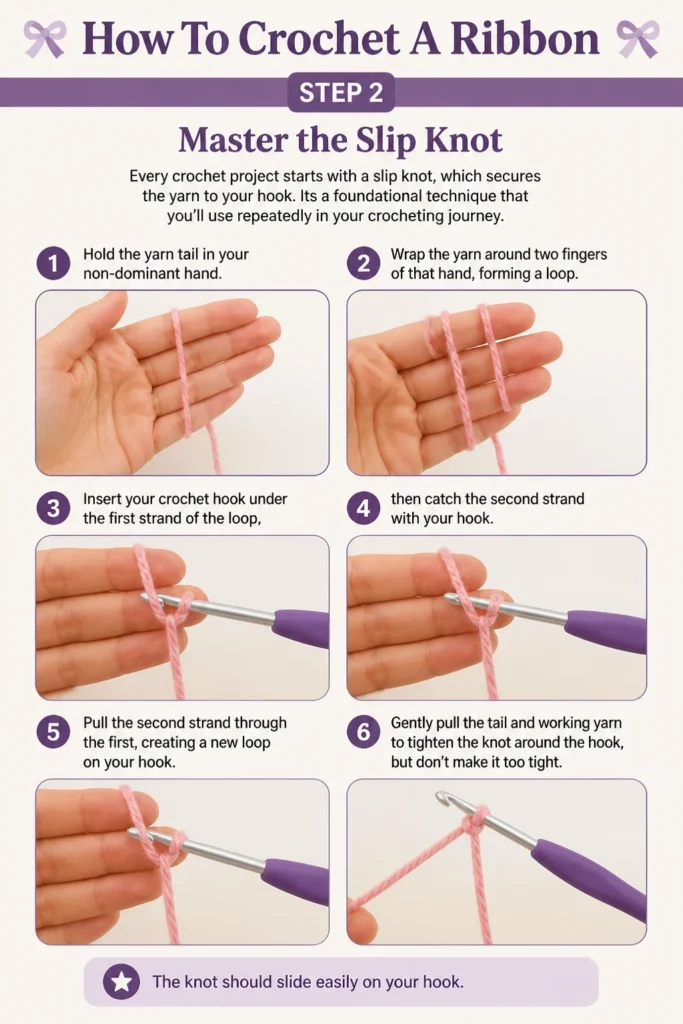
It’s a foundational technique that you’ll use repeatedly in your crocheting journey.
Hold the yarn tail in your non-dominant hand.
Wrap the yarn around two fingers of that hand, forming a loop.
Insert your crochet hook under the first strand of the loop, then catch the second strand with your hook.
Pull the second strand through the first, creating a new loop on your hook.
Gently pull the tail and working yarn to tighten the knot around the hook, but don’t make it too tight.
The knot should slide easily on your hook.
Step 3: Chain Your Foundation
The foundation chain determines the length of your ribbon.
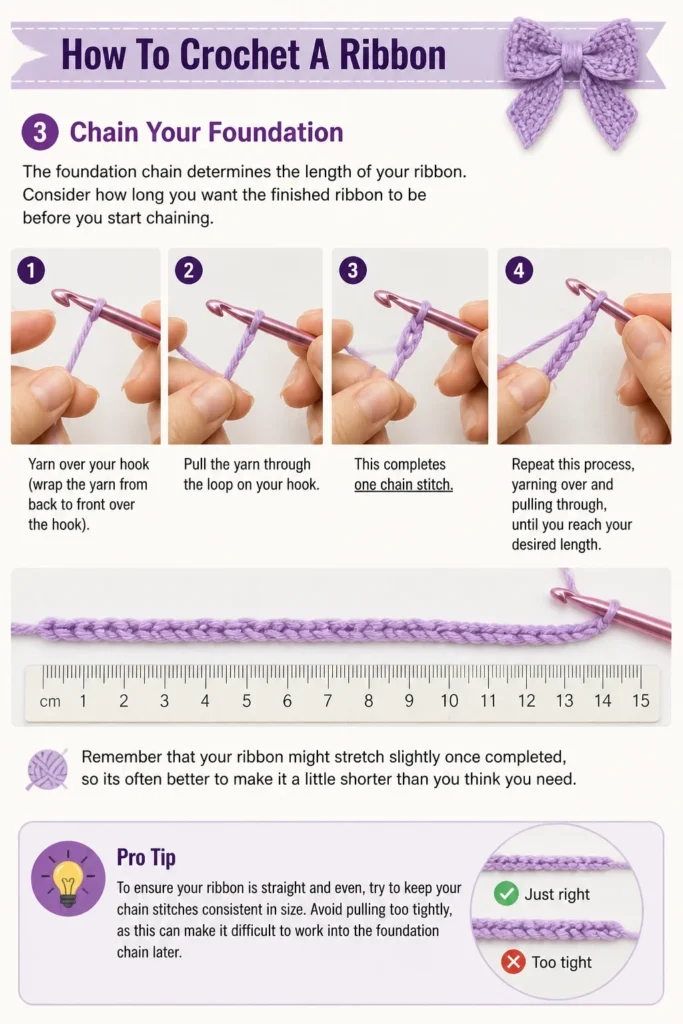
Consider how long you want the finished ribbon to be before you start chaining.
Yarn over your hook (wrap the yarn from back to front over the hook).
Pull the yarn through the loop on your hook.
This completes one chain stitch.
Repeat this process, yarning over and pulling through, until you reach your desired length.
Remember that your ribbon might stretch slightly once completed, so it’s often better to make it a little shorter than you think you need.
Pro Tip: To ensure your ribbon is straight and even, try to keep your chain stitches consistent in size. Avoid pulling too tightly, as this can make it difficult to work into the foundation chain later.
Step 4: Work Your First Row
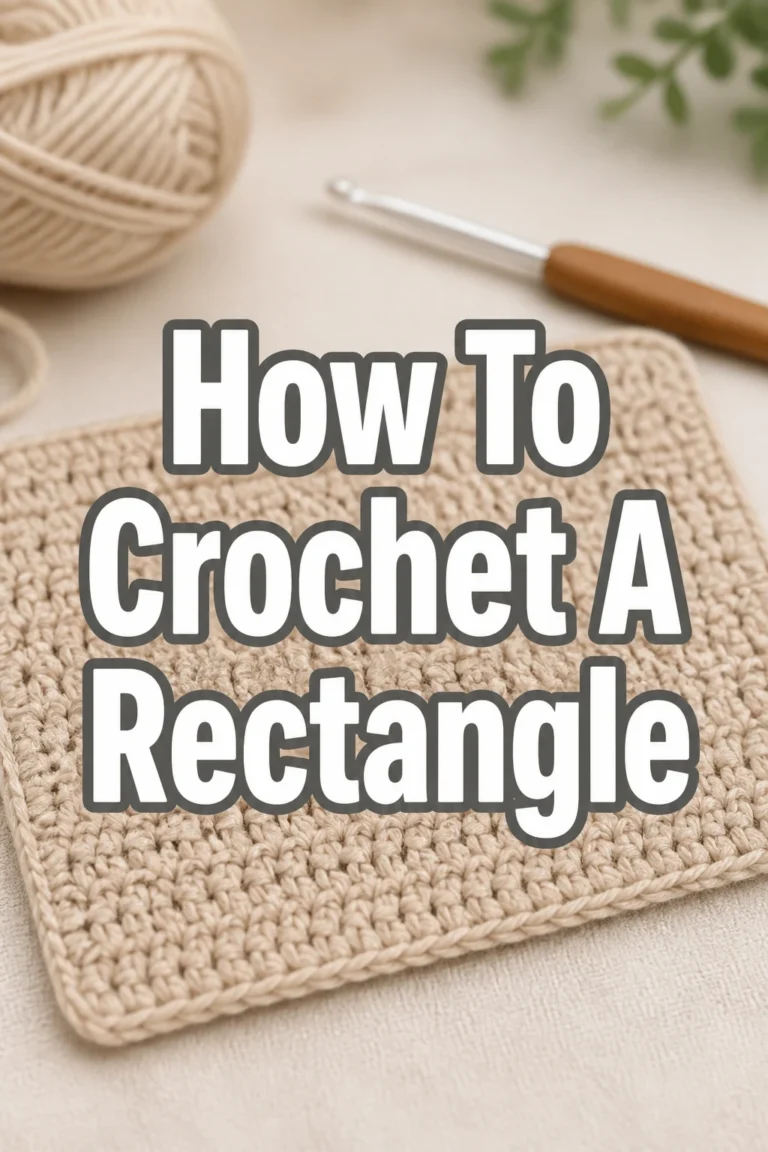
For a simple ribbon, single crochet (SC) is an excellent choice as it creates a dense, sturdy fabric.
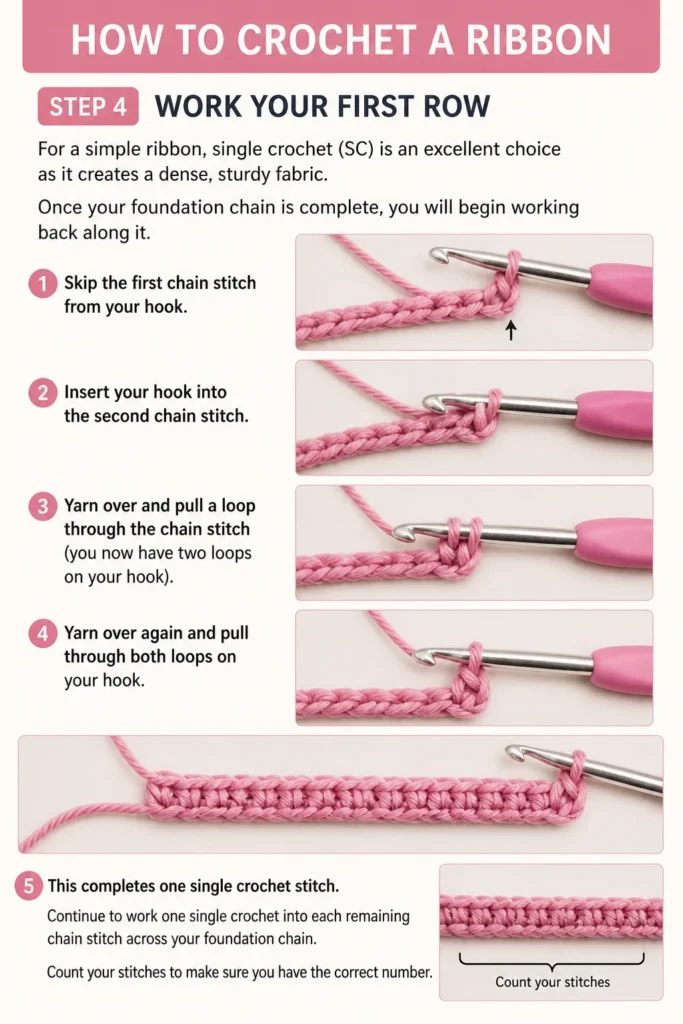
Once your foundation chain is complete, you will begin working back along it.
Skip the first chain stitch from your hook.
Insert your hook into the second chain stitch.
Yarn over and pull a loop through the chain stitch (you now have two loops on your hook).
Yarn over again and pull through both loops on your hook.
This completes one single crochet stitch.
Continue to work one single crochet into each remaining chain stitch across your foundation chain.
Count your stitches to make sure you have the correct number.
Step 5: Continue Crocheting Rows
The number of rows you crochet will determine the width of your ribbon.
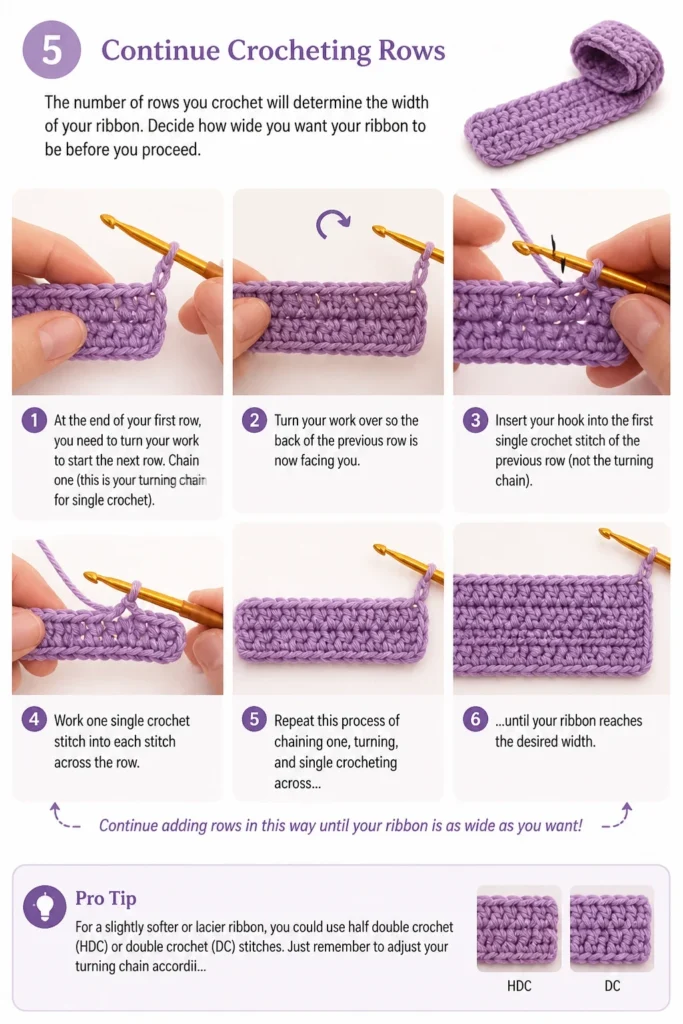
Decide how wide you want your ribbon to be before you proceed.
At the end of your first row, you need to turn your work to start the next row.
Chain one (this is your turning chain for single crochet).
Turn your work over so the back of the previous row is now facing you.
Insert your hook into the first single crochet stitch of the previous row (not the turning chain).
Work one single crochet stitch into each stitch across the row.
Repeat this process of chaining one, turning, and single crocheting across until your ribbon reaches the desired width.
Pro Tip: For a slightly softer or lacier ribbon, you could use half double crochet (HDC) or double crochet (DC) stitches. Just remember to adjust your turning chain accordingly (chain 2 for HDC, chain 3 for DC).
Step 6: Add a Decorative Edge (Optional)
Adding a simple decorative edge can elevate your ribbon from basic to beautiful.
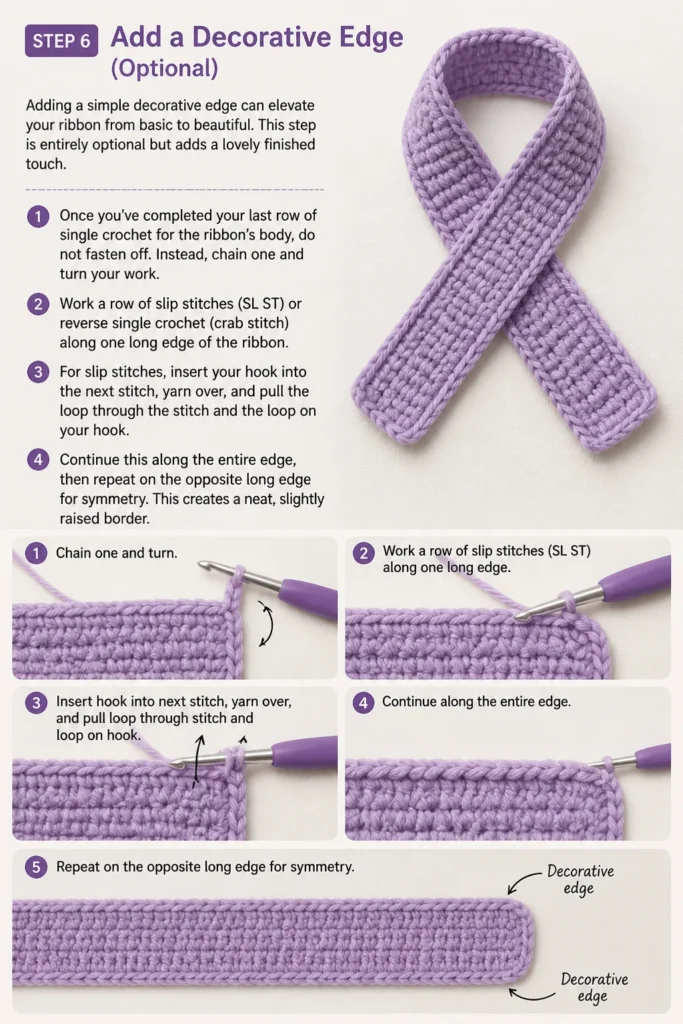
This step is entirely optional but adds a lovely finished touch.
Once you’ve completed your last row of single crochet for the ribbon’s body, do not fasten off.
Instead, chain one and turn your work.
Work a row of slip stitches (SL ST) or reverse single crochet (crab stitch) along one long edge of the ribbon.
For slip stitches, insert your hook into the next stitch, yarn over, and pull the loop through the stitch and the loop on your hook.
Continue this along the entire edge, then repeat on the opposite long edge for symmetry.
This creates a neat, slightly raised border.
Step 7: Finish Off Your Work
Once your ribbon has reached its desired length and width, and any optional edging is complete, it’s time to secure your stitches.
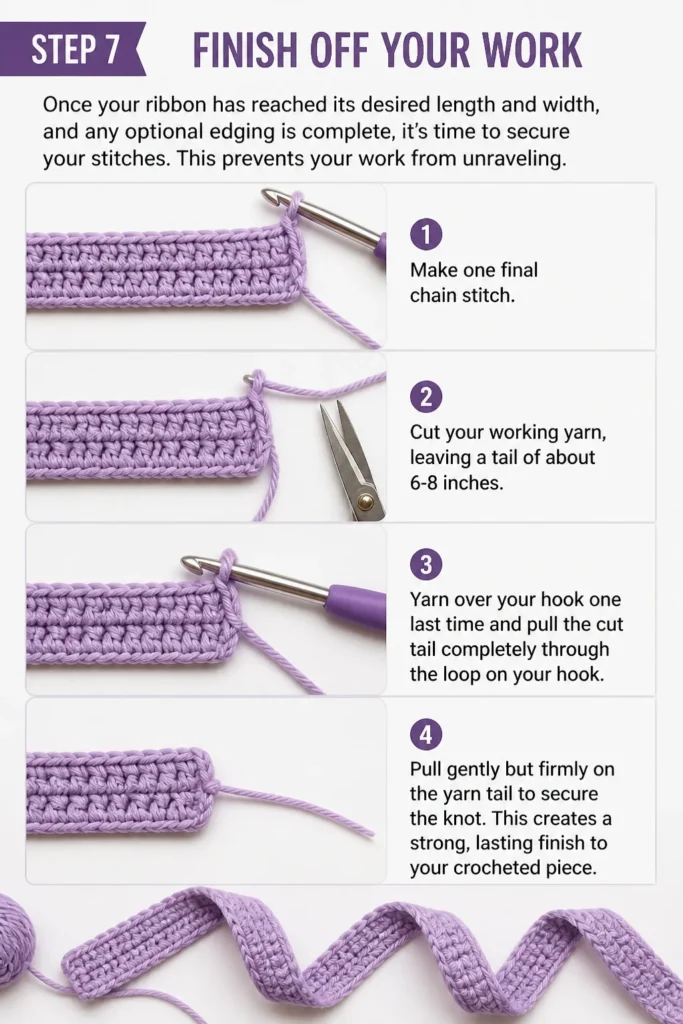
This prevents your work from unraveling.
Make one final chain stitch.
Cut your working yarn, leaving a tail of about 6-8 inches.
Yarn over your hook one last time and pull the cut tail completely through the loop on your hook.
Pull gently but firmly on the yarn tail to secure the knot.
This creates a strong, lasting finish to your crocheted piece.
Step 8: Weave In Ends
Neatly weaving in your yarn tails ensures a professional and clean finish to your ribbon.
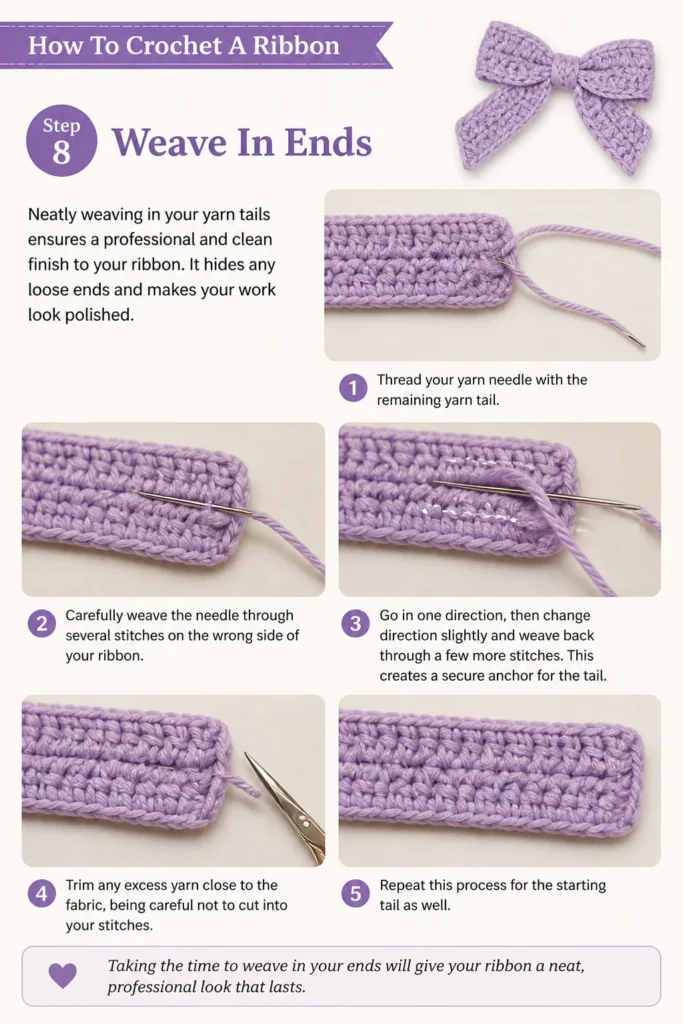
It hides any loose ends and makes your work look polished.
Thread your yarn needle with the remaining yarn tail.
Carefully weave the needle through several stitches on the wrong side of your ribbon.
Go in one direction, then change direction slightly and weave back through a few more stitches.
This creates a secure anchor for the tail.
Trim any excess yarn close to the fabric, being careful not to cut into your stitches.
Repeat this process for the starting tail as well.
Step 9: Block Your Ribbon (Optional)
Blocking is a finishing technique that can dramatically improve the appearance and drape of your crocheted ribbon.
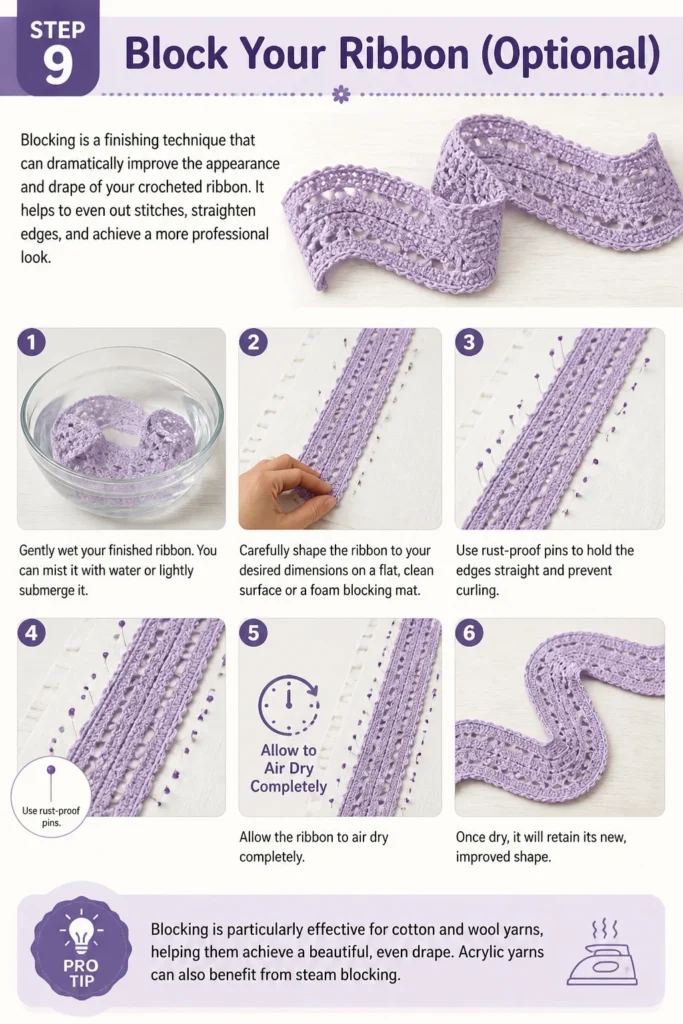
It helps to even out stitches, straighten edges, and achieve a more professional look.
Gently wet your finished ribbon. You can mist it with water or lightly submerge it.
Carefully shape the ribbon to your desired dimensions on a flat, clean surface or a foam blocking mat.
Use rust-proof pins to hold the edges straight and prevent curling.
Allow the ribbon to air dry completely.
Once dry, it will retain its new, improved shape.
Pro Tip: Blocking is particularly effective for cotton and wool yarns, helping them achieve a beautiful, even drape. Acrylic yarns can also benefit from steam blocking.
Common Mistakes to Avoid
Inconsistent Tension
Crocheting with uneven tension can lead to a ribbon that is wider in some sections and narrower in others, or has wavy edges. This happens when you pull the yarn too tightly for some stitches and too loosely for others. Practice makes perfect; try to maintain a consistent grip on your yarn and hook, allowing the yarn to flow smoothly.
Missing Stitches at Row Ends
Forgetting to crochet into the very last stitch of a row, or accidentally crocheting into the turning chain, is a common error that causes your ribbon to become narrower or wider with each row. Always count your stitches at the end of each row to ensure you have the correct number. The last stitch can sometimes be tricky to see, especially with darker yarns.
Too Tight or Too Loose Foundation Chain
If your foundation chain is too tight, it will be difficult to insert your hook into the stitches when working your first row, resulting in a constricted edge. Conversely, a too-loose chain can create a wavy, unstable base. Try using a crochet hook one size larger for your foundation chain, then switch back to your primary hook for the rest of the ribbon. This often helps create a more even base.
Ignoring Gauge
While a ribbon isn’t a fitted garment, ignoring gauge can still lead to unexpected results. If you’re following a pattern (even a simple one like this guide), your ribbon might turn out significantly larger or smaller than intended if your gauge is off. Always check your stitch and row count against the recommendations, or adjust your hook size to match your desired fabric density.
Troubleshooting
Ribbon Edges Are Wavy or Uneven
Wavy edges often indicate inconsistent tension or an incorrect stitch count. If your edges are flaring out, you might be adding stitches. If they are pulling in, you might be skipping stitches. Carefully count your stitches at the end of each row. Also, ensure your turning chain is not too loose or too tight, as this can affect the edge’s appearance. Blocking can sometimes help correct minor waviness.
Ribbon Is Curling
Curling can happen with certain stitches or yarn types, especially if the ribbon is narrow and made with a dense stitch like single crochet. Sometimes, the natural twist of the yarn contributes. To fix this, try blocking your ribbon thoroughly. Pin it flat and let it dry completely. Adding a decorative border of slip stitches or a crab stitch can also add weight and structure, helping to prevent curling.
Holes or Gaps Appearing in the Fabric
Holes or gaps usually occur when you accidentally skip a stitch or insert your hook into the wrong part of a stitch. Double-check where you insert your hook for each stitch. Ensure you are going under both loops of the stitch from the previous row. Pay close attention at the beginning and end of rows, as these are common areas for accidental skips.
Key Takeaways
- Choosing the right yarn and hook size is crucial for the desired ribbon texture and drape.
- Consistent tension throughout your work prevents uneven edges and maintains a uniform look.
- Always count your stitches at the end of each row to ensure straight edges and correct width.
- The foundation chain determines the ribbon’s length, while the number of rows dictates its width.
- Finishing techniques like weaving in ends and optional blocking contribute to a professional appearance.
- Practice the basic stitches like slip knot, chain, and single crochet for a solid foundation.
Frequently Asked Questions
Can I make a wider ribbon with this method?
Absolutely! To make a wider ribbon, simply crochet more rows of single crochet (or your chosen stitch) until it reaches your desired width. The length is determined by your starting chain, and the width by the number of rows you complete.
What type of yarn is best for a crocheted ribbon?
Cotton yarn is highly recommended for ribbons due to its excellent stitch definition, crispness, and ability to hold shape well. Mercerized cotton offers a lovely sheen. Acrylic yarn is also a good, more affordable option, and comes in a vast array of colors.
How do I make a ribbon with pointed ends?
To create pointed ends, you would modify the initial and final rows by decreasing stitches. For example, instead of a straight chain, you might start with a small chain, then gradually increase stitches to the full width, work the main body, and then gradually decrease stitches back down to a point. This is a slightly more advanced technique.
Can I wash a crocheted ribbon?
Yes, most crocheted ribbons can be washed, but always check your yarn label for specific care instructions. Generally, cotton and acrylic ribbons can be hand-washed in cool water with a mild detergent, then gently squeezed and laid flat to dry. Avoid harsh wringing, which can distort the shape.
Our Top Recommended Finds
- Ergonomic Crochet Hook Set: A comfortable hook reduces hand fatigue, allowing you to crochet for longer periods without discomfort. Look for sets with various sizes.
- Stitch Markers: These small clips are invaluable for marking the beginning of rows or specific stitches, especially when you’re learning to count or making a more complex piece.
- Yarn Ball Winder and Swift: If you buy yarn in skeins or hanks, a winder and swift can transform them into neat cakes, preventing tangles and making crocheting much smoother.
Your Next Creative Adventure Awaits
You’ve just created a beautiful, versatile crocheted ribbon, a testament to your growing skills.
This project opens up a world of possibilities for adding handmade charm to everyday items and special occasions.
Don’t stop here; consider making a collection of ribbons in different colors and widths.
You could also try incorporating different stitches, like half double crochet or double crochet, to see how they change the ribbon’s texture and drape.
Embrace the joy of crafting and let your creativity flow.