How To Make Money Roses
Imagine presenting a gift that truly stands out, one that combines thoughtfulness with undeniable financial appeal.
Money roses are a unique craft, perfect for birthdays, graduations, or any special occasion where you want to make a lasting impression.
I’ve personally crafted these for several friends, watching their faces light up with surprise and delight, and I’m excited to share the exact method I use to create these stunning currency bouquets.

Quick Overview
This guide will walk you through transforming ordinary banknotes into beautiful, three-dimensional rose petals, which you’ll then assemble into a full, captivating rose.
You’ll learn precise folding techniques and assembly methods to ensure your money rose looks professional and impressive.
- Time needed: 30-60 minutes per rose, depending on practice
- Difficulty: Intermediate
- What you’ll need: Crisp banknotes, floral wire, floral tape, small rubber bands or clear tape
Step-by-Step Instructions
Step 1: Gather Your Materials
Collect all your necessary supplies before you begin. This helps streamline the entire crafting process.
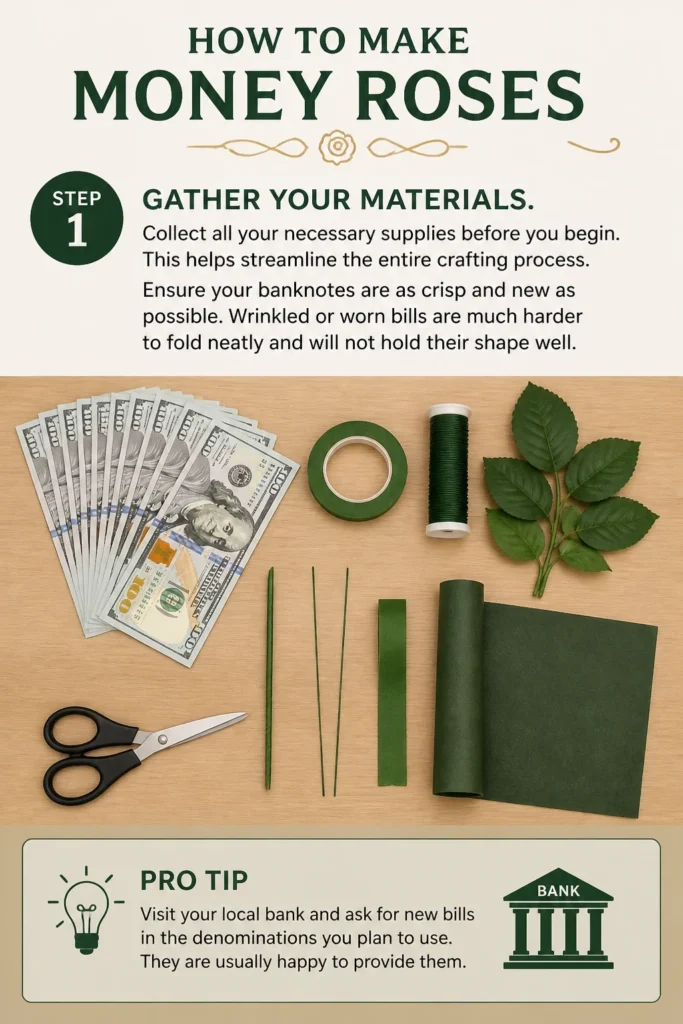
Ensure your banknotes are as crisp and new as possible. Wrinkled or worn bills are much harder to fold neatly and will not hold their shape well.
Pro Tip: Visit your local bank and ask for new bills in the denominations you plan to use. They are usually happy to provide them.
Step 2: Prepare the First Petal Base
Lay a single banknote flat on a clean, hard surface with the short edge facing you. The design side should be facing up.
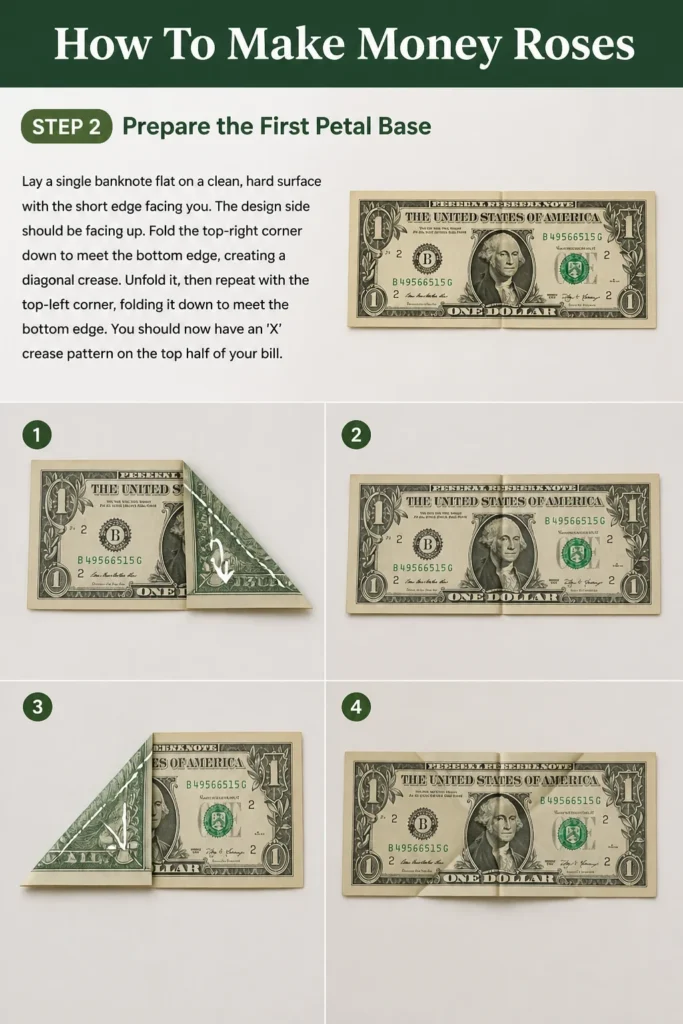
Fold the top-right corner down to meet the bottom edge, creating a diagonal crease. Unfold it, then repeat with the top-left corner, folding it down to meet the bottom edge.
You should now have an ‘X’ crease pattern on the top half of your bill.
Step 3: Create the Petal’s Initial Shape
Push the top edge of the bill inwards along the diagonal creases you just made. This will cause the corners to collapse, forming a triangular flap at the top center of the bill.
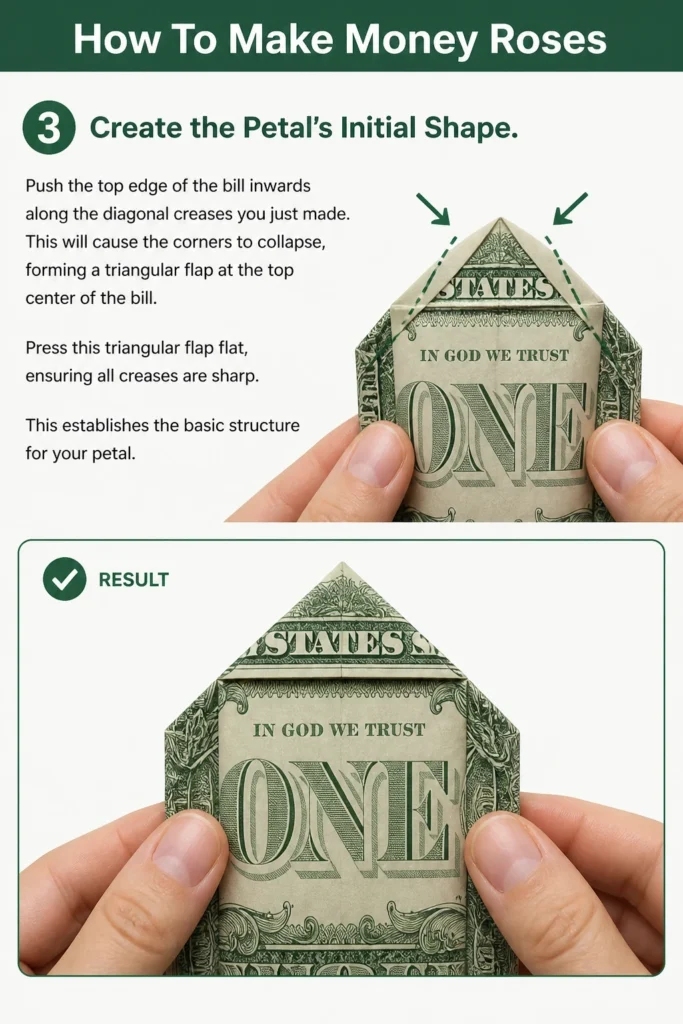
Press this triangular flap flat, ensuring all creases are sharp. This establishes the basic structure for your petal.
Step 4: Refine the Petal’s Edges
Fold the bottom-right corner of the bill upwards, aligning it with the vertical center line of the bill. This creates a diagonal edge.
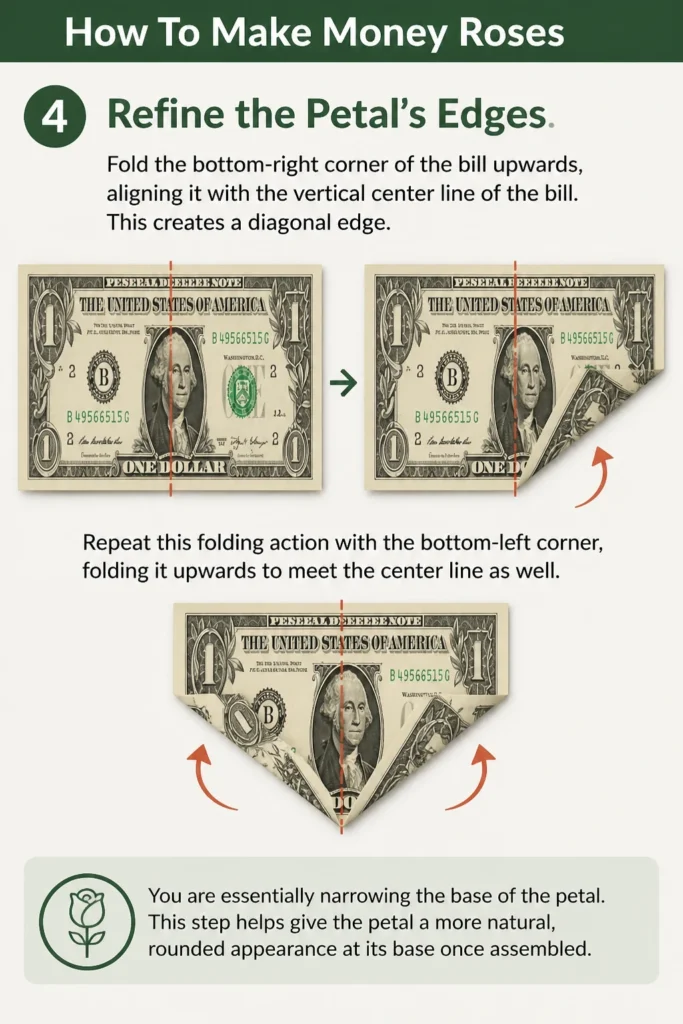
Repeat this folding action with the bottom-left corner, folding it upwards to meet the center line as well. You are essentially narrowing the base of the petal.
This step helps give the petal a more natural, rounded appearance at its base once assembled.
Step 5: Secure the Petal’s Shape
Flip the partially folded bill over. You should see a more defined petal shape emerging.
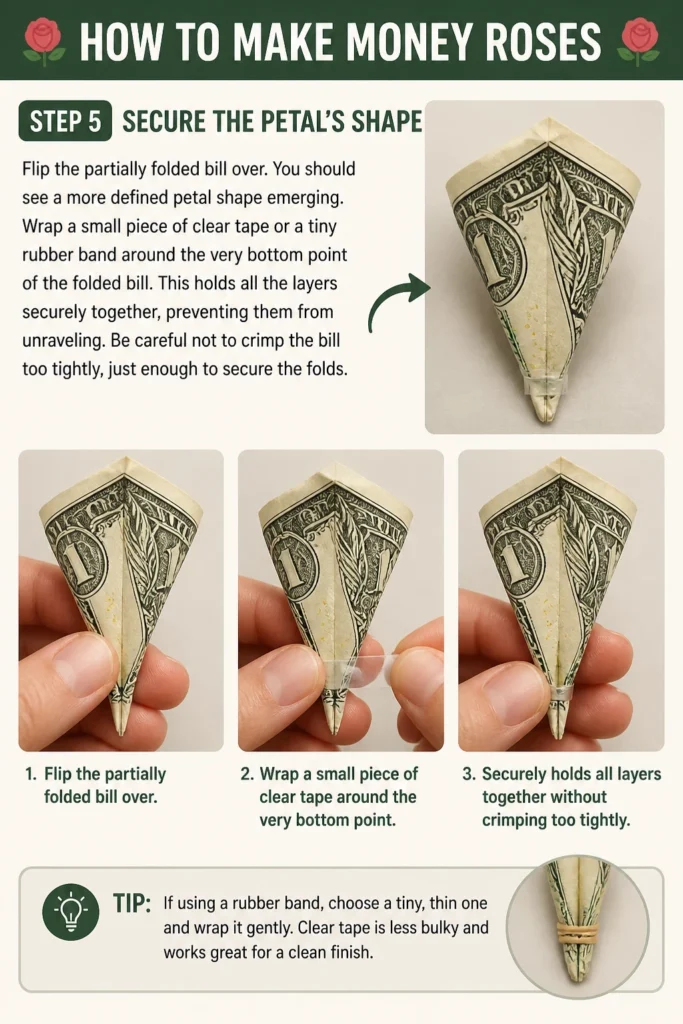
Wrap a small piece of clear tape or a tiny rubber band around the very bottom point of the folded bill. This holds all the layers securely together, preventing them from unraveling.
Be careful not to crimp the bill too tightly, just enough to secure the folds.
Step 6: Repeat for Additional Petals
Create five to seven more identical petals using the same folding technique (Steps 2-5). The number of petals depends on how full you want your rose to appear.
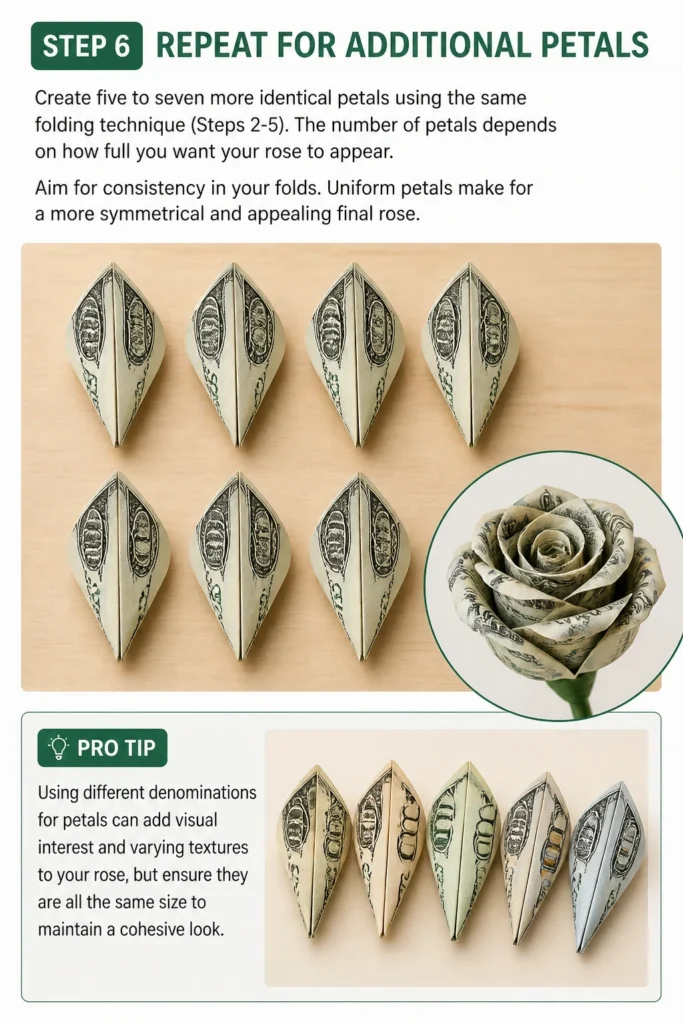
Aim for consistency in your folds. Uniform petals make for a more symmetrical and appealing final rose.
Pro Tip: Using different denominations for petals can add visual interest and varying textures to your rose, but ensure they are all the same size to maintain a cohesive look.
Step 7: Form the Rose’s Center Bud
Select one of your finished petals to be the central bud. This petal will be folded a bit tighter.
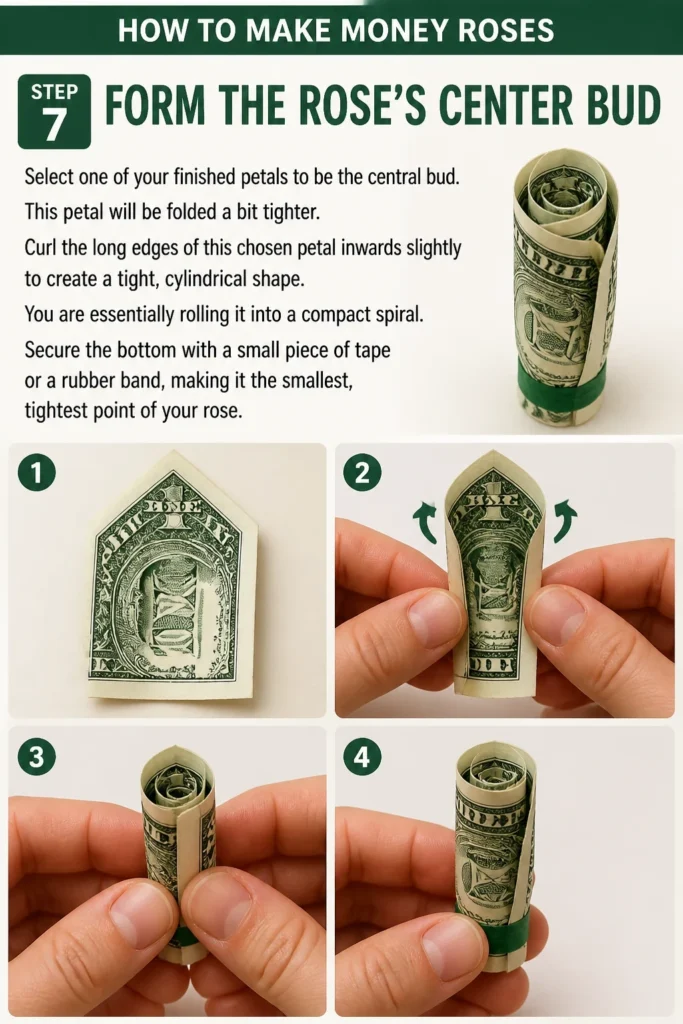
Curl the long edges of this chosen petal inwards slightly to create a tight, cylindrical shape. You are essentially rolling it into a compact spiral.
Secure the bottom with a small piece of tape or a rubber band, making it the smallest, tightest point of your rose.
Step 8: Assemble the Rose
Take a piece of floral wire, about 6-8 inches long. Carefully push one end through the secured base of your center bud petal.
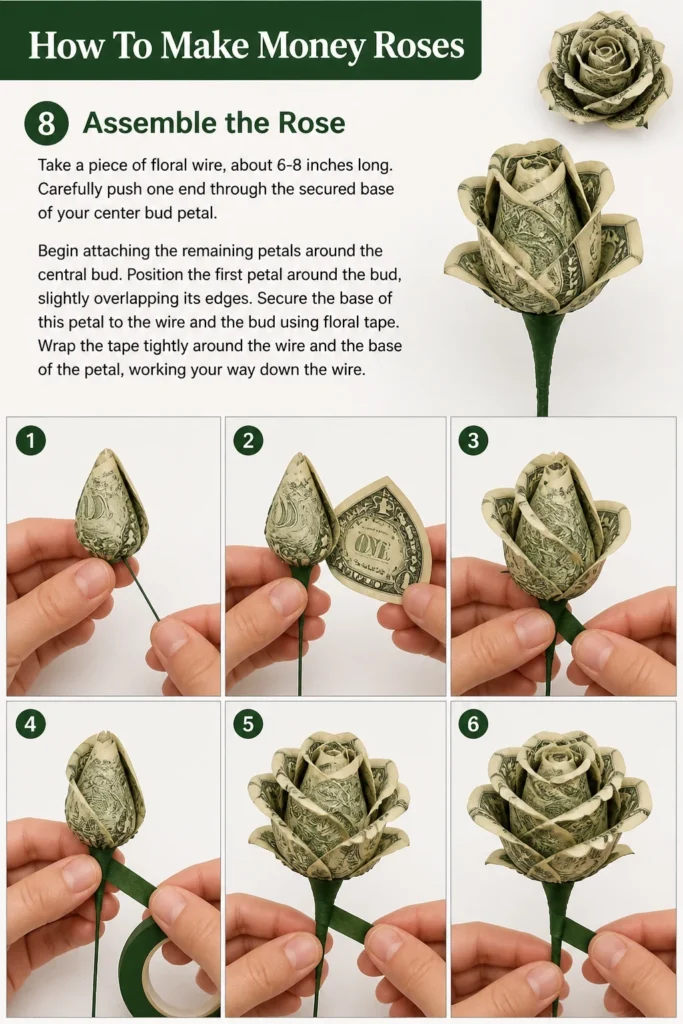
Begin attaching the remaining petals around the central bud. Position the first petal around the bud, slightly overlapping its edges.
Secure the base of this petal to the wire and the bud using floral tape. Wrap the tape tightly around the wire and the base of the petal, working your way down the wire.
Step 9: Build Out the Layers
Continue adding petals one by one, working your way around the central bud in a spiral fashion. Each new petal should slightly overlap the previous one.
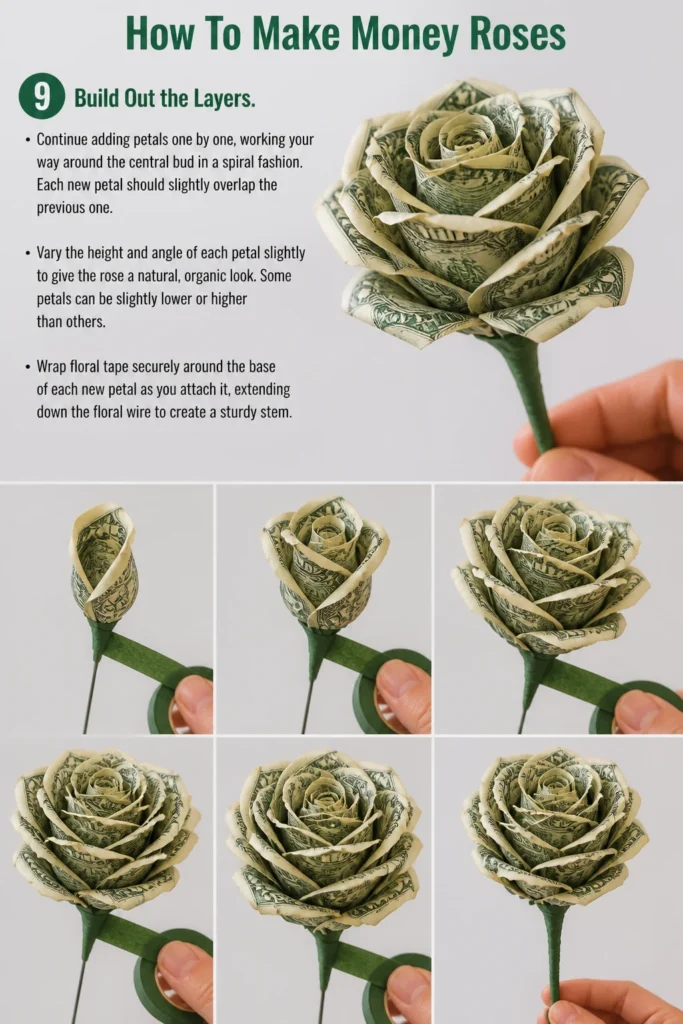
Vary the height and angle of each petal slightly to give the rose a natural, organic look. Some petals can be slightly lower or higher than others.
Wrap floral tape securely around the base of each new petal as you attach it, extending down the floral wire to create a sturdy stem.
Step 10: Refine and Adjust
Once all petals are attached, gently “fluff” and arrange them. You can slightly curl the outer edges of some petals outwards to give the rose more depth and realism.
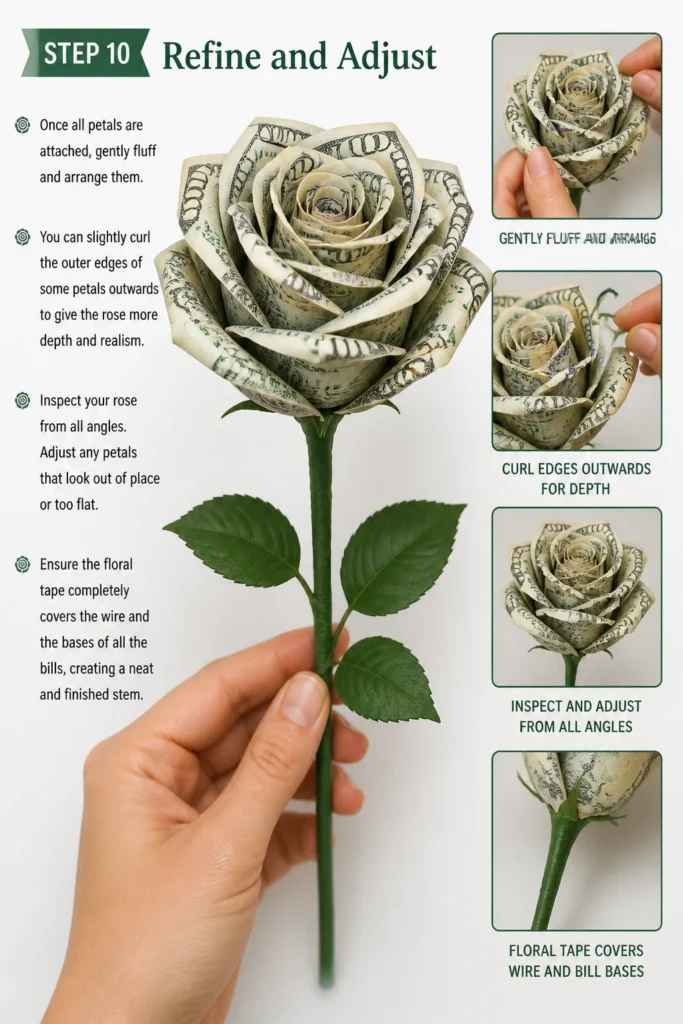
Inspect your rose from all angles. Adjust any petals that look out of place or too flat.
Ensure the floral tape completely covers the wire and the bases of all the bills, creating a neat and finished stem.
Common Mistakes to Avoid
Using Wrinkled Bills
Attempting to fold old, crumpled, or heavily creased banknotes is a common pitfall. These bills resist sharp folds and tend to spring back open, making it very difficult to achieve a crisp, defined petal shape. Always start with the freshest, crispest bills available to ensure your rose holds its form beautifully.
Inconsistent Petal Sizes
If your petals are not folded consistently, your final rose will appear lopsided or uneven. Take your time with each petal, ensuring the folds are precise and symmetrical. Practice a few times with scrap paper first if you are new to paper folding.
Insufficient Securing
Failing to properly secure the base of each petal with tape or rubber bands, and then not wrapping the floral tape tightly during assembly, will lead to a flimsy rose. The petals might unravel, or the entire rose could fall apart. Be diligent in securing every component to ensure durability.
Rushing the Assembly
The assembly phase requires patience and an eye for detail. Rushing through it can result in poorly spaced petals, an unnatural shape, or visible tape. Take your time to position each petal carefully, creating a natural, flowing arrangement that mimics a real rose.
Troubleshooting
Petals Won’t Hold Their Shape
If your folded petals are springing open or losing their form, it’s likely due to using old, soft bills or not pressing your creases firmly enough. Try using brand new, crisp bills from the bank. Also, ensure you are really pressing down on each fold with your fingernail or a bone folder to create sharp, lasting creases.
Rose Looks Flat or Lifeless
A flat-looking rose often means the petals are too uniform or haven’t been adequately shaped during assembly. After attaching all petals, gently cup the rose in your hand and subtly curve the outer edges of the bills outwards. This adds dimension and mimics the natural curl of a real rose petal.
Bills Tear During Folding
Tearing usually occurs when bills are very old and fragile, or if you apply excessive force while creasing. Work gently, especially with older bills. If a bill feels too brittle, it’s best to switch to a newer one. Using a ruler for straight edges can also help prevent accidental tears from uneven pressure.
Key Takeaways
- Always use crisp, new banknotes for the best results and easiest folding.
- Practice the basic petal fold a few times with regular paper before using currency.
- Secure each individual petal’s base firmly with small tape pieces or rubber bands.
- Assemble the rose by attaching petals one by one, spiraling around a central bud.
- Use floral tape tightly and completely to create a strong, finished stem.
- Gently adjust and “fluff” the petals at the end to achieve a natural, realistic appearance.
Frequently Asked Questions
What denominations work best for money roses?
One dollar bills are excellent for practice and smaller roses due to their flexibility and lower cost. For a more impressive gift, five, ten, or twenty dollar bills work well, offering a good balance of size and value. Larger denominations like fifties or hundreds can be used, but they might be stiffer and harder to fold precisely, and the monetary value itself becomes a significant factor.
Can I use foreign currency?
Yes, you can use foreign currency, provided the banknotes are made of paper or a similar flexible material. Some polymer notes, like those found in Canada or Australia, might be too slippery or stiff to hold intricate folds well. Always check the material and crispness of the foreign currency before attempting to fold it.
How can I make the money rose last?
To ensure your money rose lasts, handle it gently. Avoid direct sunlight or extreme humidity, which can degrade the bills over time. You can also lightly spray the finished rose with a clear, matte sealant (like those used for crafts) from a distance, being careful not to saturate the bills. This can offer a slight protective layer.
Is it legal to fold or alter money?
In most countries, including the United States, it is perfectly legal to fold, crease, or even draw on currency as long as it is not rendered unfit for circulation and there is no intent to defraud. The purpose here is artistic and decorative, and the bills remain fully usable. So, yes, you can legally create money roses.
Our Top Recommended Finds
- New Banknotes: Essential for crisp folds and a professional look. Request these directly from your bank.
- 18-Gauge Floral Wire: Provides sturdy support for the stem and allows for easy shaping.
- Green Floral Tape: Adheres well to itself and conceals the wire, giving your rose a natural stem appearance.
Crafting Your Financial Bloom
You now possess the knowledge and steps to create a truly unforgettable gift or a unique decorative piece.
The satisfaction of seeing a collection of bills transform into an elegant rose is incredibly rewarding.
Why not gather your supplies today and begin crafting your very first money rose?