How To Make Fidget Toys
Do you ever find yourself tapping your foot or clicking a pen during a moment of focus or stress?
Fidget toys offer a fantastic way to channel that restless energy into something productive and calming.
I’ve personally found immense satisfaction in crafting my own custom fidgets, and I’m here to show you exactly how to do the same.
Quick Overview
This guide will walk you through creating several popular types of fidget toys using readily available materials. You’ll finish with a collection of calming, tactile tools perfect for focus or relaxation.
- Time needed: 30-60 minutes per toy, depending on complexity
- Difficulty: Beginner to Intermediate
- What you’ll need: Balloons, flour, mesh, pipe cleaners, beads, cardboard, hot glue, scissors
Step-by-Step Instructions
Step 1: Prepare Your Workspace and Gather Materials
A tidy workspace makes any crafting project smoother and more enjoyable. Before you begin, clear a flat surface and lay down some old newspapers or a craft mat.
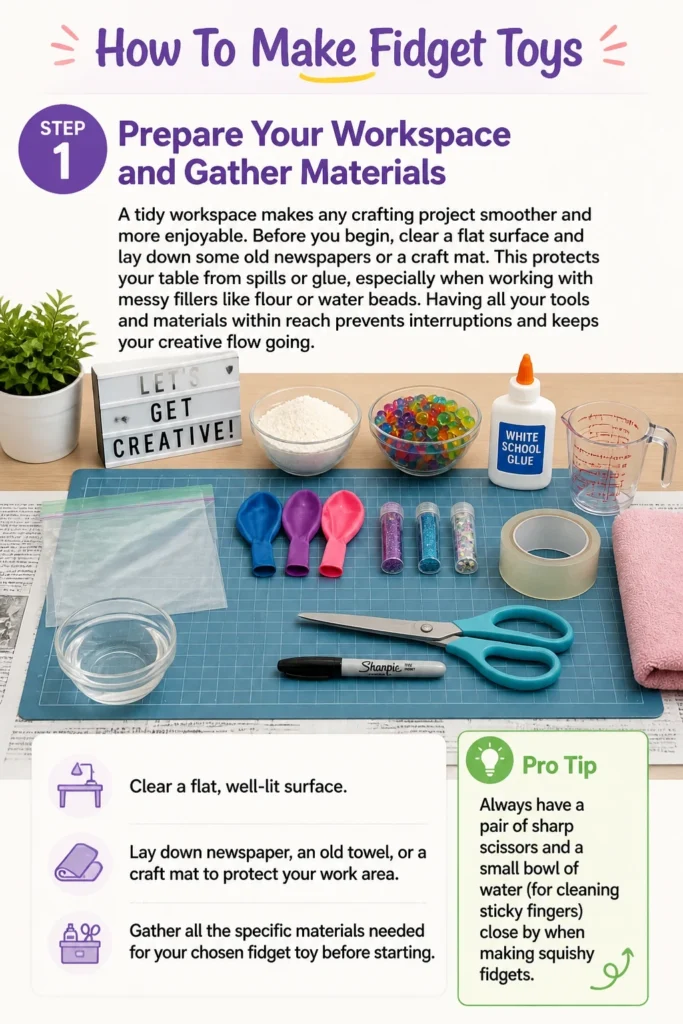
This protects your table from spills or glue, especially when working with messy fillers like flour or water beads.
Having all your tools and materials within reach prevents interruptions and keeps your creative flow going.
- Clear a flat, well-lit surface.
- Lay down newspaper, an old towel, or a craft mat to protect your work area.
- Gather all the specific materials needed for your chosen fidget toy before starting.
Pro Tip: Always have a pair of sharp scissors and a small bowl of water (for cleaning sticky fingers) close by when making squishy fidgets.
Step 2: Craft a Classic Squishy Balloon Fidget
The squishy balloon fidget is a timeless choice, offering a satisfying tactile experience. Its soft, pliable nature makes it perfect for squeezing and manipulating.
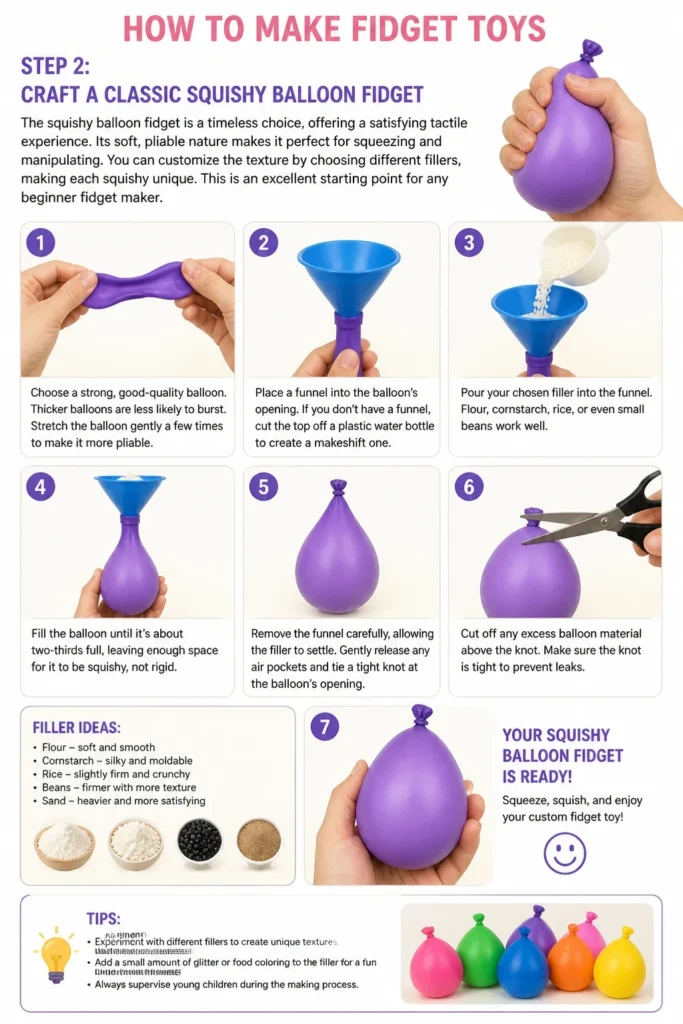
You can customize the texture by choosing different fillers, making each squishy unique.
This is an excellent starting point for any beginner fidget maker.
- Choose a strong, good-quality balloon. Thicker balloons are less likely to burst.
- Stretch the balloon gently a few times to make it more pliable.
- Place a funnel into the balloon’s opening. If you don’t have a funnel, cut the top off a plastic water bottle to create a makeshift one.
- Pour your chosen filler into the funnel. Flour, cornstarch, rice, or even small beans work well.
- Fill the balloon until it’s about two-thirds full, leaving enough space for it to be squishy, not rigid.
- Remove the funnel carefully, squeezing out any excess air from the balloon.
- Tie a double knot tightly at the neck of the balloon to secure the filler.
- Trim off any excess balloon material above the knot for a neater finish.
Pro Tip: For an extra calming effect, add a few drops of essential oil (like lavender) to your flour before filling the balloon. Mix it well to distribute the scent.
Step 3: Create a Textured Mesh Fidget Ball
This fidget combines the satisfying squish of a balloon with an intriguing textured surface. The mesh creates tiny bubbles of balloon material that pop through, providing a unique sensory input.
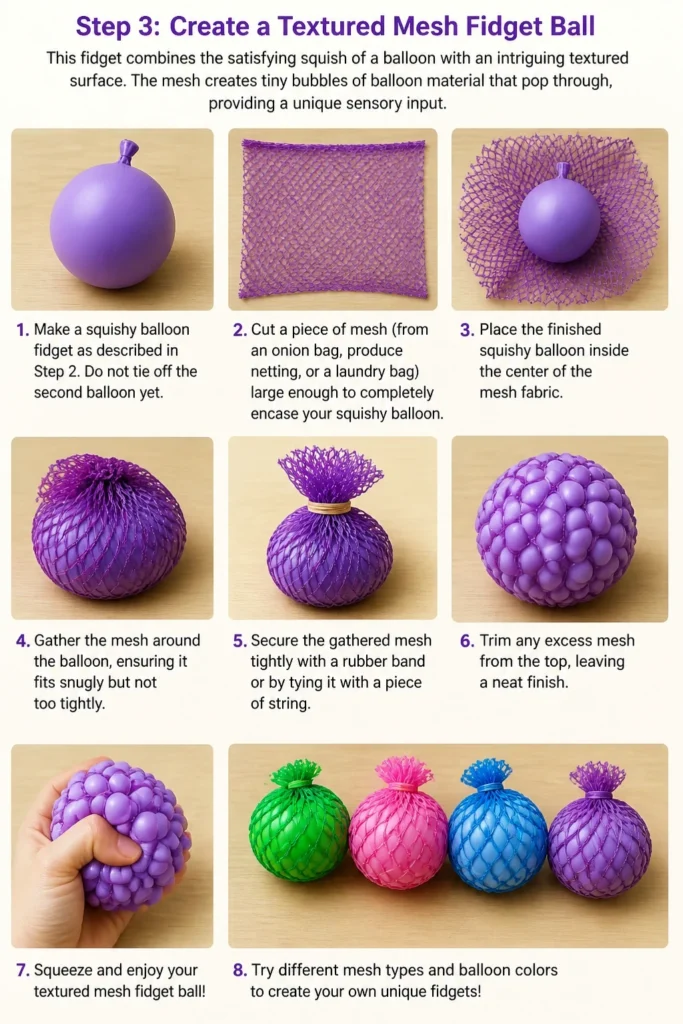
It’s excellent for those who enjoy a bit more tactile stimulation.
You can use old onion bags or produce netting for the mesh layer.
- Make a squishy balloon fidget as described in Step 2. Do not tie off the second balloon yet.
- Cut a piece of mesh (from an onion bag, produce netting, or a laundry bag) large enough to completely encase your squishy balloon.
- Place the finished squishy balloon inside the center of the mesh fabric.
- Gather the mesh around the balloon, ensuring it fits snugly but not too tightly.
- Secure the gathered mesh tightly with a rubber band or by tying it with a piece of string.
- Trim any excess mesh material for a clean look.
Pro Tip: Experiment with different mesh sizes. A finer mesh will create smaller, more numerous “bubbles,” while a wider mesh will yield larger, more distinct ones.
Step 4: Assemble a Pipe Cleaner and Bead Fidget
The pipe cleaner and bead fidget is simple, versatile, and offers a satisfying bend and slide action. It’s great for quiet manipulation and can be made in various shapes and sizes.
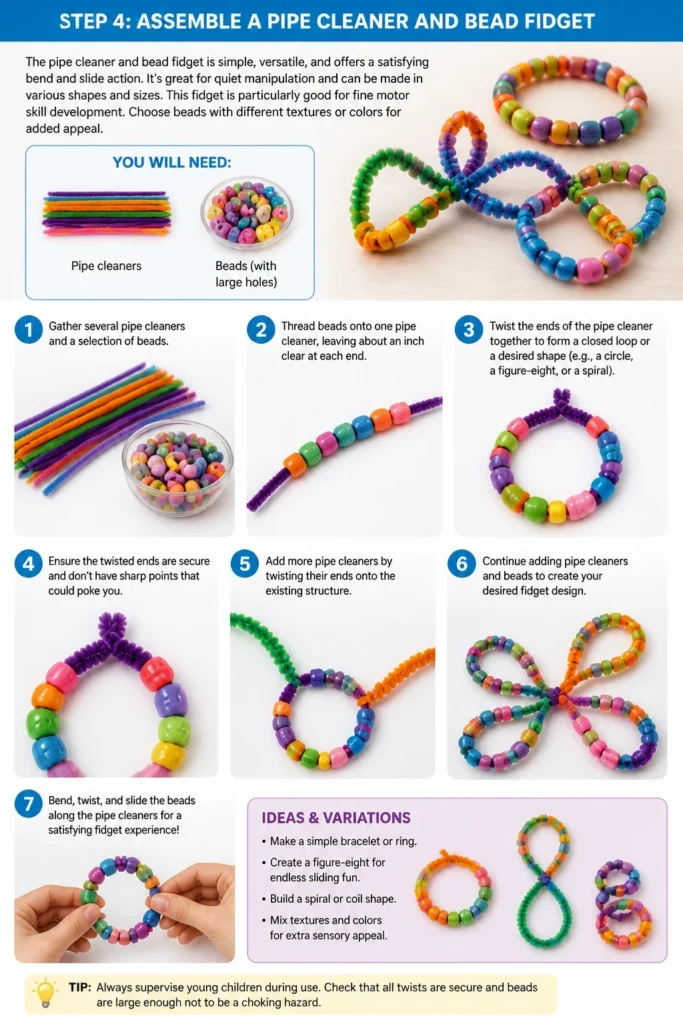
This fidget is particularly good for fine motor skill development.
Choose beads with different textures or colors for added appeal.
- Gather several pipe cleaners and a selection of beads with holes large enough to thread onto the pipe cleaners.
- Thread beads onto one pipe cleaner, leaving about an inch clear at each end.
- Twist the ends of the pipe cleaner together to form a closed loop or a desired shape (e.g., a circle, a figure-eight, or a spiral).
- Ensure the twisted ends are secure and don’t have sharp points that could poke you.
- Add more pipe cleaners by twisting their ends onto the existing structure to create a larger, more complex fidget.
- Bend and manipulate the pipe cleaners into different forms, allowing the beads to slide along the fuzzy surface.
Pro Tip: Use pony beads or larger wooden beads for easier threading, especially for younger crafters. Combine different bead types for varied textures.
Step 5: Construct a Simple Cardboard Slider Fidget
A cardboard slider offers a satisfying push-and-pull motion, often with a subtle resistance or click. It’s a great option for those who enjoy discreet, quiet fidgeting.
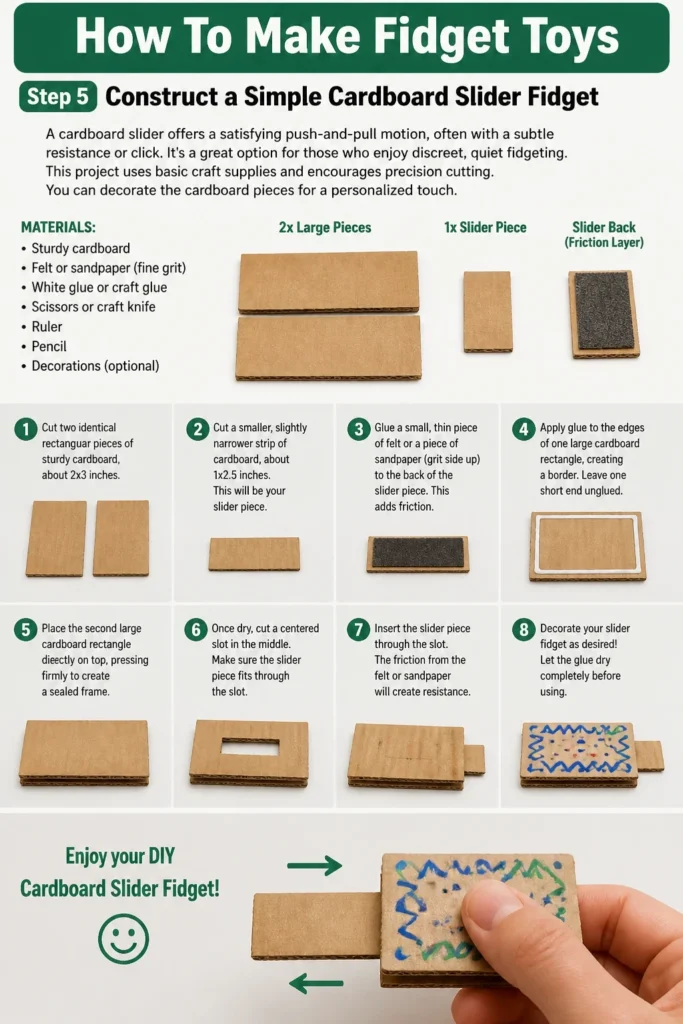
This project uses basic craft supplies and encourages precision cutting.
You can decorate the cardboard pieces for a personalized touch.
- Cut two identical rectangular pieces of sturdy cardboard, about 2×3 inches.
- Cut a smaller, slightly narrower strip of cardboard, about 1×2.5 inches. This will be your slider piece.
- Glue a small, thin piece of felt or a piece of sandpaper (grit side up) to the back of the slider piece. This adds friction.
- Apply glue to the edges of one large cardboard rectangle, creating a border. Leave one short end unglued.
- Place the second large cardboard rectangle directly on top, pressing firmly to create a pocket.
- Insert the smaller slider piece into the open end of the cardboard pocket.
- Allow the glue to dry completely before using, ensuring a strong bond.
- Test the slider’s movement. It should slide back and forth with a slight resistance.
Pro Tip: For extra durability and a smoother slide, cover your cardboard pieces with clear packing tape before assembly. This also makes them more resistant to wear and tear.
Step 6: Make a Basic Hot Glue Pop-It Fidget
Inspired by popular silicone pop-its, this DIY version offers a similar satisfying popping sensation. It’s a creative way to use hot glue and can be customized in shape and color.
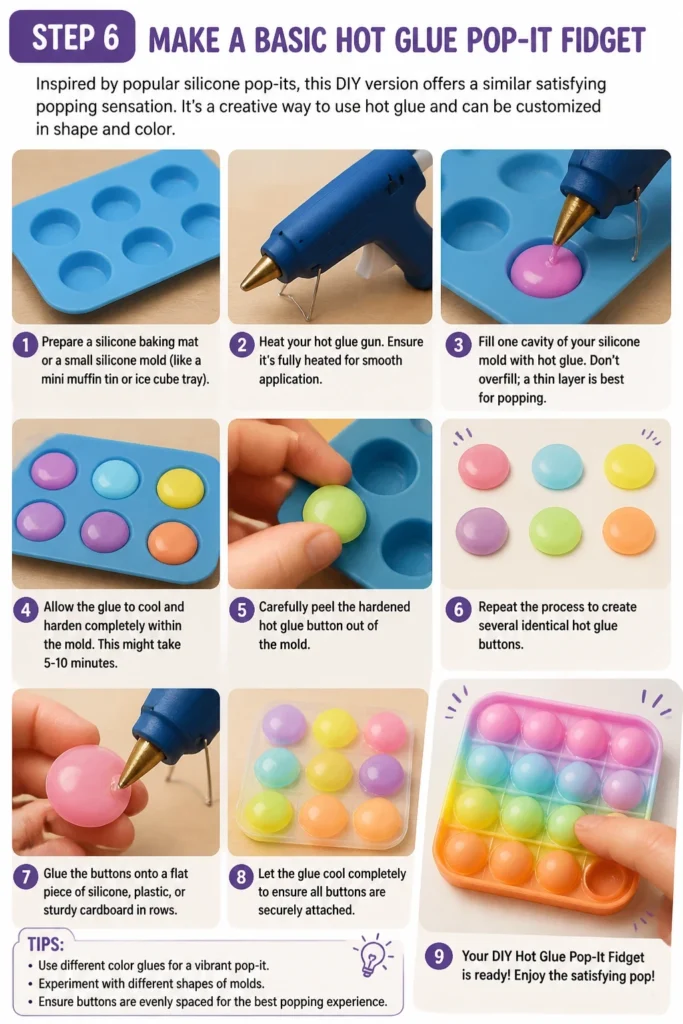
You’ll need a silicone baking mold or a non-stick surface for this one.
Practice makes perfect with hot glue application.
- Prepare a silicone baking mat or a small silicone mold (like a mini muffin tin or ice cube tray).
- Heat your hot glue gun. Ensure it’s fully heated for smooth application.
- Fill one cavity of your silicone mold with hot glue. Don’t overfill; a thin layer is best for popping.
- Allow the glue to cool and harden completely within the mold. This might take 5-10 minutes.
- Carefully peel the hardened hot glue “button” out of the mold.
- Repeat the process to create several identical hot glue buttons.
- Glue these buttons onto a piece of sturdy cardboard or felt, leaving small gaps between them.
- Press each button from the back to “pop” it through, mimicking the action of a store-bought pop-it.
Pro Tip: For colored pop-its, add a tiny drop of acrylic paint or food coloring to the hot glue as it comes out of the gun, then quickly mix it on the silicone mat before it sets. Be quick!
Common Mistakes to Avoid
Using Weak Materials
One common pitfall is using balloons that are too thin or cardboard that’s too flimsy. This leads to fidgets that tear, burst, or fall apart quickly, making your effort wasted.
Always opt for good quality, durable materials. Stronger balloons, sturdy cardboard, and well-secured knots ensure your fidgets last longer and withstand repeated use.
Overfilling Squishy Fidgets
It’s tempting to pack as much filler as possible into a squishy toy. However, an overfilled balloon or fabric pouch becomes rigid and loses its satisfying squishiness.
Aim for about two-thirds full, leaving enough empty space for the filler to move and compress. This creates the ideal tactile experience and reduces the risk of bursting.
Rushing Drying Times
Patience is crucial, especially when working with glues or wet fillers. Trying to use a fidget before the glue is fully cured or the filler has settled can lead to immediate breakage.
Always allow ample drying time as specified by the adhesive instructions. This ensures strong bonds and a durable finished product ready for enjoyment.
Ignoring Sharp Edges
When working with materials like wire, pipe cleaners, or even cut cardboard, sharp edges can be a hazard. These can scratch skin or snag on clothing, making the fidget unsafe or uncomfortable.
Always inspect your finished fidget for any sharp points or rough edges. Trim, file, or cover them with tape or extra glue to ensure a smooth, safe toy.
Troubleshooting
My Squishy Fidget Burst
This usually happens due to overfilling or using a balloon that’s too thin. A balloon under too much pressure or with a weak spot will inevitably give out.
Try again with a thicker, good-quality balloon and fill it less, leaving more room for the filler to move. You can also double-bag it with a second balloon for extra strength.
The Slider Fidget Gets Stuck
A sticky slider often indicates too much friction or an uneven track. Glue might have seeped into the sliding channel, or the cardboard pieces aren’t perfectly aligned.
Gently try to work the slider back and forth to dislodge any minor obstructions. If glue is the issue, carefully trim any excess. Consider adding a very thin layer of clear tape to the inside edges of the track for a smoother glide.
Hot Glue Pop-Its Don’t Pop Well
If your hot glue pop-its aren’t giving that satisfying snap, they might be too thick or too thin. The thickness dictates the flexibility and the “memory” of the glue.
Experiment with the amount of hot glue you use in the mold. A slightly thinner layer usually provides a better pop, but too thin and they might tear. Also, ensure the mold isn’t too deep, as a shallower dome shape works best.
Key Takeaways
- Fidget toys are simple to make with common household items.
- Prioritize strong, durable materials for longevity and safety.
- Proper filling and assembly techniques prevent common issues like bursting or sticking.
- Customization with colors, textures, and scents enhances the sensory experience.
- Always ensure finished fidgets are free of sharp edges or hazards.
- Patience with drying times is essential for durable creations.
Frequently Asked Questions
Are homemade fidget toys safe for children?
Yes, but always supervise young children, especially with fidgets containing small beads or parts that could become choking hazards. Ensure all components are securely attached and materials are non-toxic. Avoid very small pieces for children under three.
How can I clean my homemade fidget toys?
For squishy toys, a quick wipe with a damp cloth and mild soap is usually sufficient. Cardboard fidgets should be kept dry. For pipe cleaner and bead fidgets, a gentle wipe down with a disinfectant wipe works well. Avoid submerging any fidgets unless they are specifically designed to be waterproof.
What are the best fillers for squishy fidgets?
Flour, cornstarch, rice, and small beans are popular choices, each offering a slightly different texture. Water beads (when fully hydrated) also create a unique, gel-like squish. Experiment to find your favorite consistency and feel.
Can I make fidget toys without a hot glue gun?
Absolutely! Many fidgets, like the squishy balloon or pipe cleaner and bead types, don’t require hot glue. For projects needing adhesive, strong craft glue or fabric glue can often be substituted, though drying times will be longer.
Our Top Recommended Finds
- Strong Latex Balloons: Essential for durable squishy fidgets that resist bursting.
- Assorted Pony Beads: Versatile for pipe cleaner fidgets, offering various colors and easy threading.
- Low-Temp Hot Glue Gun: Safer for crafting, reducing the risk of burns while providing strong bonds.
Start Creating Your Calming Companions Today
You now have the knowledge and steps to begin making your own collection of fidget toys. Each one you craft will be a unique tool designed to help you focus, relax, and channel restless energy.
Don’t be afraid to experiment with different materials, colors, and textures. The joy of DIY comes from personalizing your creations to perfectly suit your needs.
Gather your supplies and transform simple items into powerful stress-busters. Happy crafting!