How To Fold Tshirts
There’s a quiet satisfaction in opening a drawer to perfectly stacked t-shirts. For years, my t-shirt drawer was a chaotic mess, a jumble of crumpled fabric.
Learning a few simple folds transformed not just my closet, but my daily routine, making mornings smoother and laundry less daunting.
This guide shares the tried-and-true methods I use daily, ensuring your t-shirts look neat and take up less space.
Quick Overview
Folding t-shirts effectively is a skill that saves space, reduces wrinkles, and brings order to your wardrobe. You’ll learn several techniques, from basic to advanced, to suit any preference or storage solution.
- Time needed: 5-10 minutes to learn, seconds per shirt after that
- Difficulty: Beginner
- What you’ll need: Clean, dry t-shirts; a flat, clean surface
Step-by-Step Instructions
Step 1: Prepare Your T-Shirt
Lay your t-shirt flat on a clean, smooth surface. The front of the shirt should face up.
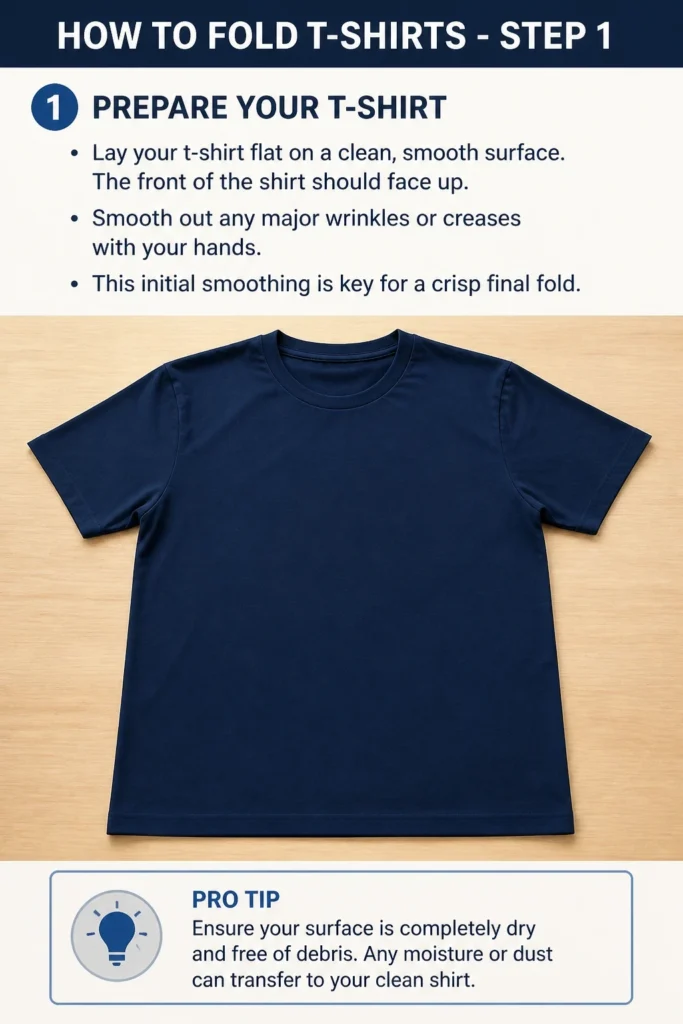
Smooth out any major wrinkles or creases with your hands. This initial smoothing is key for a crisp final fold.
Pro Tip: Ensure your surface is completely dry and free of debris. Any moisture or dust can transfer to your clean shirt.
Step 2: Fold the First Side In
Imagine a vertical line running from the middle of the shoulder down to the bottom hem, about one-third of the way in from the left side.
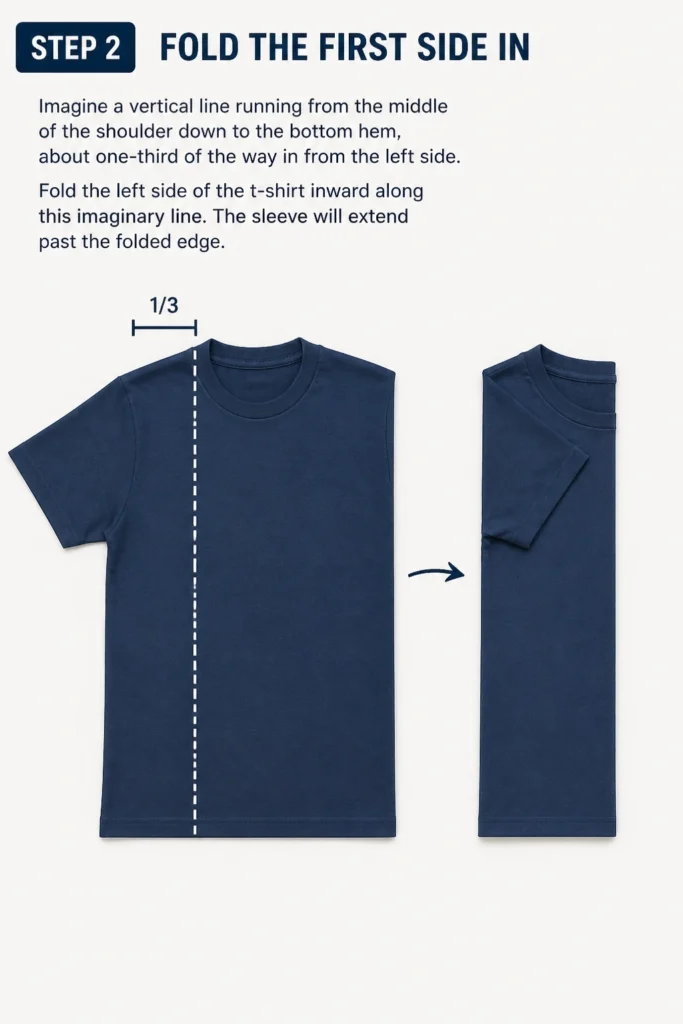
Fold the left side of the t-shirt inward along this imaginary line. The sleeve will extend past the folded edge.
Step 3: Fold the Sleeve Down
Take the folded-over sleeve and fold it back towards the center. It should now align with the newly folded edge of the shirt.
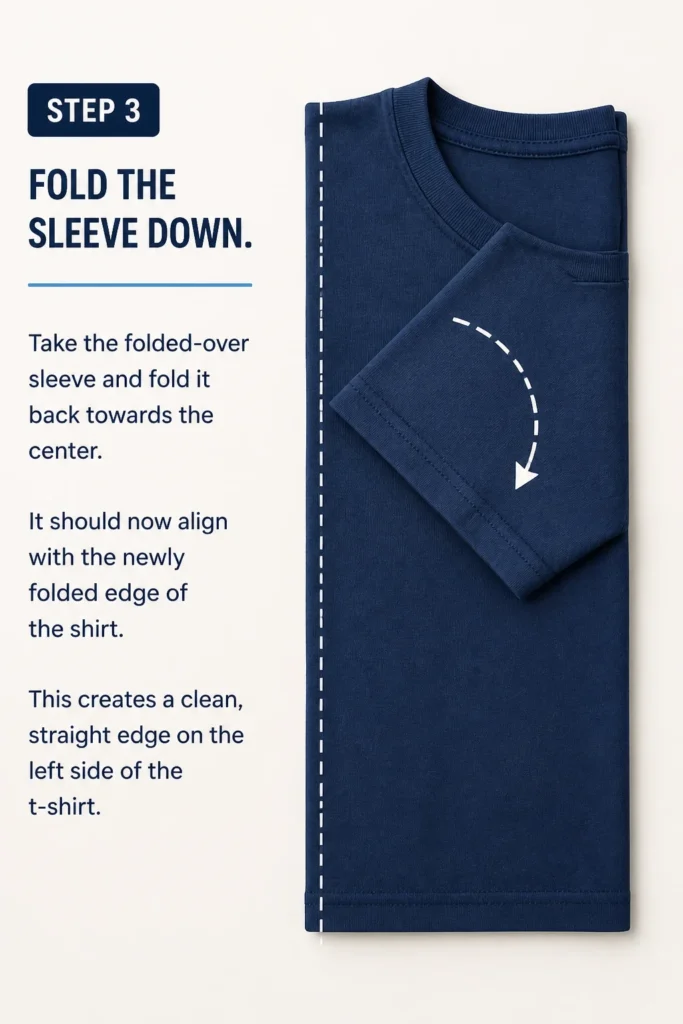
This creates a clean, straight edge on the left side of the t-shirt.
Step 4: Repeat for the Other Side
Perform the same folding action on the right side of the t-shirt.
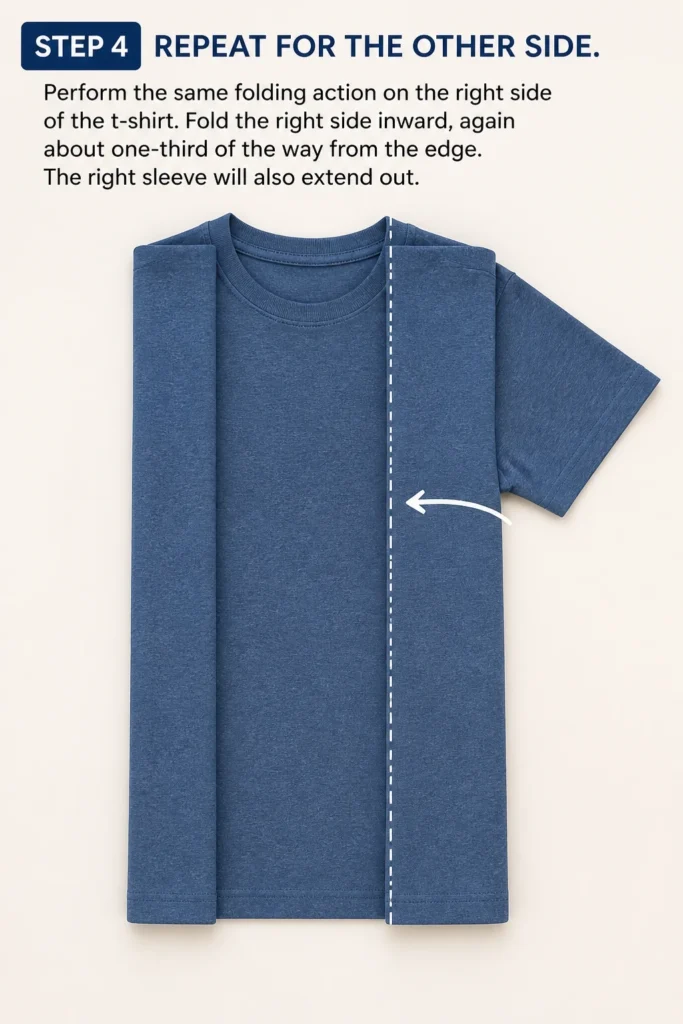
Fold the right side inward, again about one-third of the way from the edge. The right sleeve will also extend out.
Step 5: Fold the Second Sleeve Down
Fold the right sleeve back towards the center, aligning it with the newly folded right edge of the shirt.
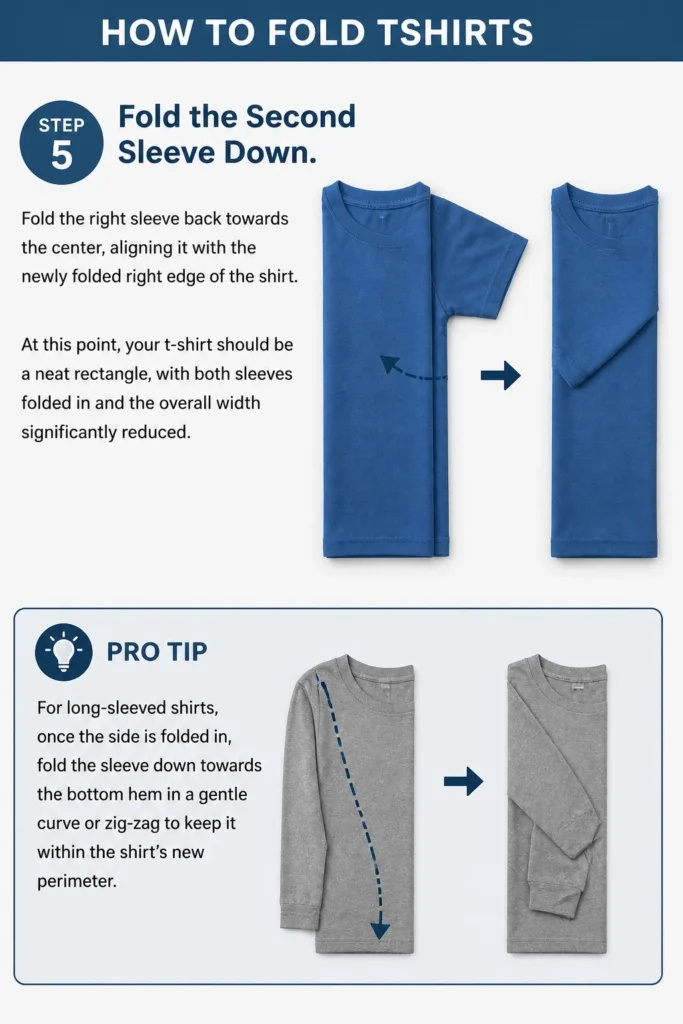
At this point, your t-shirt should be a neat rectangle, with both sleeves folded in and the overall width significantly reduced.
Pro Tip: For long-sleeved shirts, once the side is folded in, fold the sleeve down towards the bottom hem in a gentle curve or zig-zag to keep it within the shirt’s new perimeter.
Step 6: Fold from the Bottom Up (Half Fold)
Grasp the bottom hem of the t-shirt.
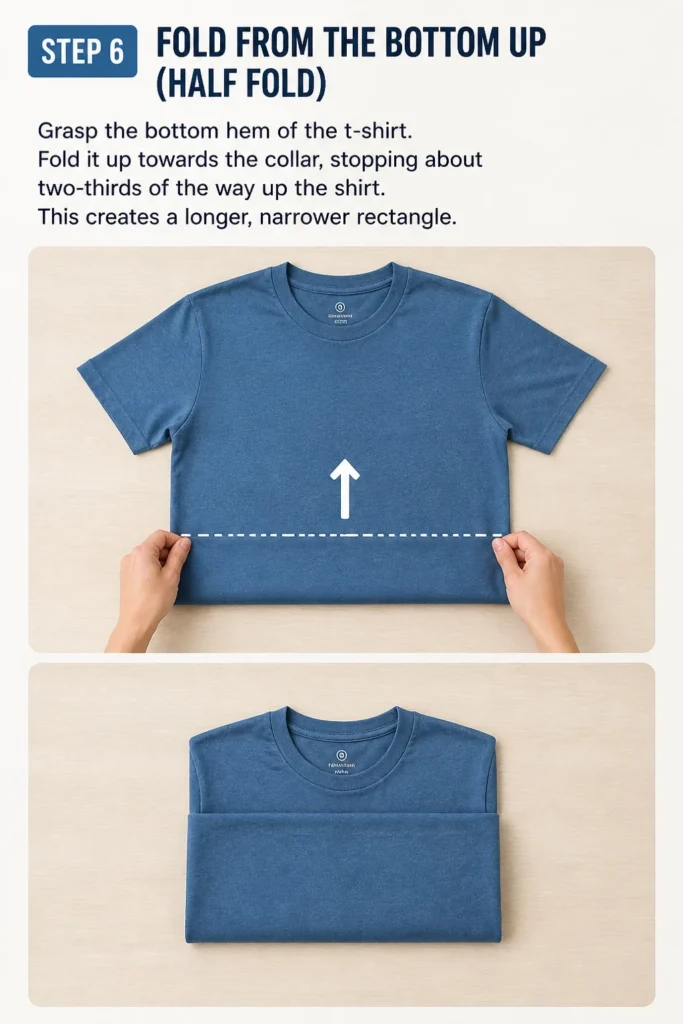
Fold it up towards the collar, stopping about two-thirds of the way up the shirt. This creates a longer, narrower rectangle.
Step 7: Complete the Fold
Take the bottom folded edge and fold it up one more time, aligning it with the collar.
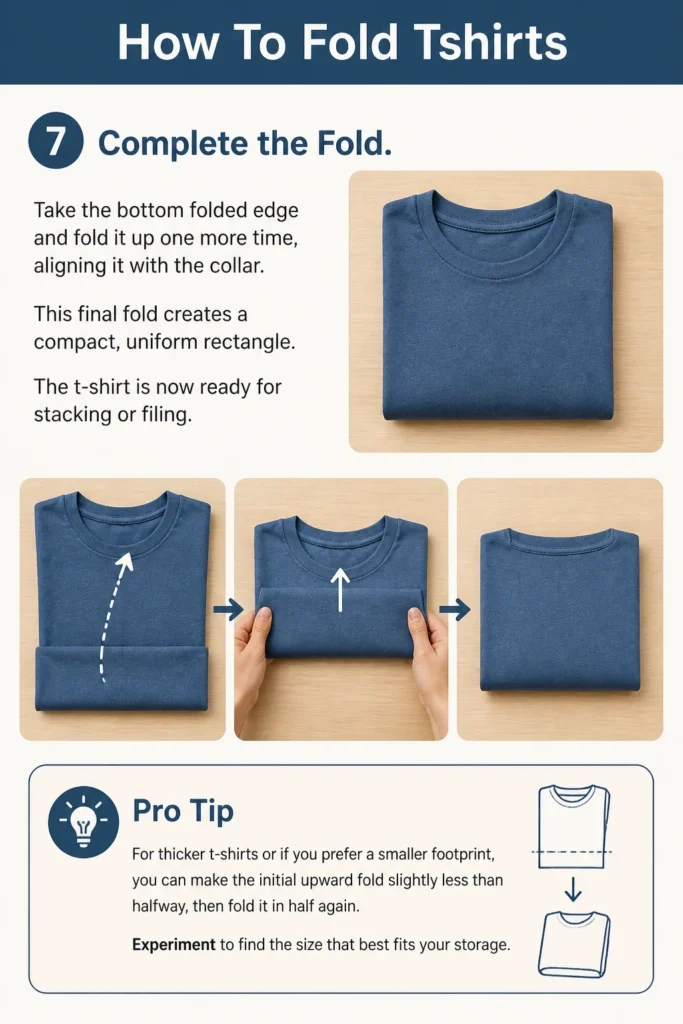
This final fold creates a compact, uniform rectangle. The t-shirt is now ready for stacking or filing.
Pro Tip: For thicker t-shirts or if you prefer a smaller footprint, you can make the initial upward fold slightly less than halfway, then fold it in half again. Experiment to find the size that best fits your storage.
Step 8: The KonMari Vertical Fold (Optional)
If you prefer vertical storage, after Step 7, you can make one more fold.
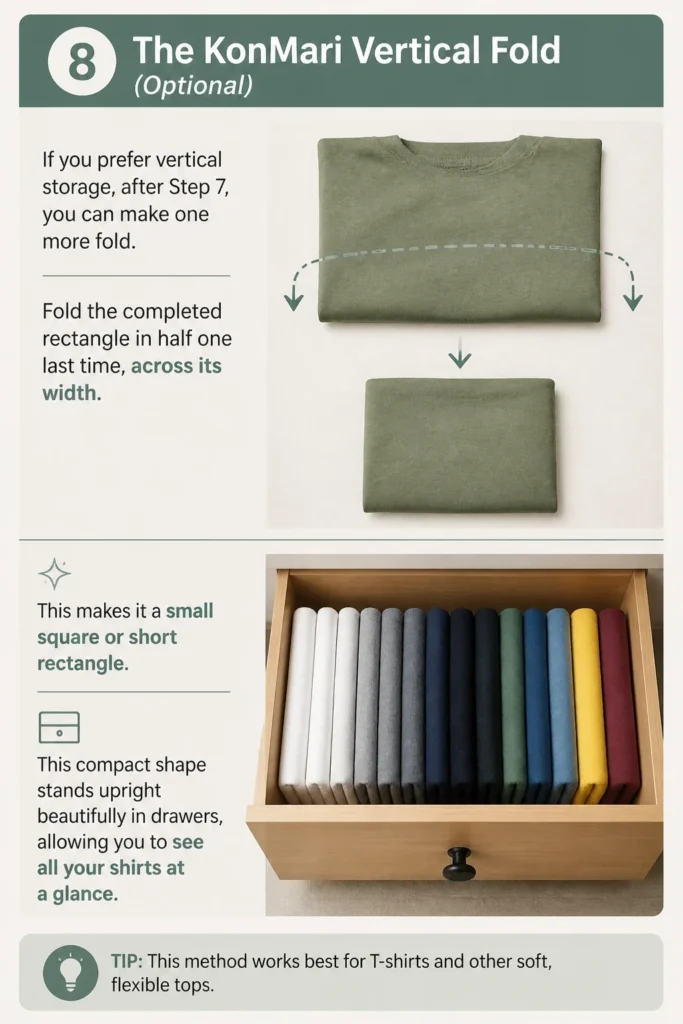
Fold the completed rectangle in half one last time, across its width. This makes it a small square or short rectangle.
This compact shape stands upright beautifully in drawers, allowing you to see all your shirts at a glance.
Common Mistakes to Avoid
Not Smoothing First
Many people skip the crucial first step of smoothing the t-shirt on a flat surface. This oversight leads to a lumpy, uneven fold with trapped wrinkles. Always take a few seconds to flatten the fabric before you begin folding.
Uneven Side Folds
Failing to fold the sides in evenly is another common error. If one side is folded too far or not far enough, the final result will be lopsided and difficult to stack neatly. Aim for roughly one-third of the shirt’s width on each side.
Folding When Damp
Folding t-shirts while they are still slightly damp can lead to mildew and set in wrinkles. Always ensure your shirts are completely dry before folding and storing them. This preserves freshness and prevents damage.
Overstuffing Drawers
Even perfectly folded t-shirts will wrinkle if crammed into an overflowing drawer. Give your folded garments enough space. This helps them maintain their shape and prevents creasing from pressure.
Troubleshooting
My T-Shirts Still Look Messy
Ensure you are consistently smoothing out the shirt at each stage of the fold. If your t-shirts are very thin or stretchy, they might require a firmer hand or a folding board for extra crispness. Practice makes perfect, so don’t get discouraged.
They Unfold in the Drawer
This often happens if the folds aren’t tight enough or if the drawer is too loosely packed. Try making your folds slightly tighter, pressing down gently as you go. For vertical storage, ensure there’s enough gentle pressure from adjacent items to keep them upright.
I Can’t Get the Sides Even
Use visual cues to help. You can lightly press the center of the t-shirt to create a temporary crease as a guide, or even use the edge of a book or magazine as a straight guide for your initial side folds. Consistency is key here.
Key Takeaways
- Always start with a smooth, flat t-shirt to avoid wrinkles.
- Fold each side inward, about one-third of the shirt’s width, to create a uniform rectangle.
- Fold the sleeves back to align with the new side edges for a clean finish.
- Two main folds from the bottom up create a compact, stackable shape.
- Consider the KonMari vertical fold for space-saving drawer organization.
- Dry shirts completely before folding to prevent mildew and set wrinkles.
Frequently Asked Questions
What is the best way to fold t-shirts for travel?
For travel, the “rolling” method is often preferred. After completing Step 5 (where the shirt is a long, narrow rectangle), start from the bottom hem and tightly roll the shirt upwards towards the collar. This minimizes wrinkles and saves space in luggage.
How do I fold graphic t-shirts to protect the design?
When folding graphic t-shirts, always lay the shirt face down in Step 1. This way, the design is folded inward and protected from rubbing or creasing against other fabrics. The graphic will be on the inside of the folded shirt.
Can I use a t-shirt folding board?
Yes, folding boards are excellent tools for achieving perfectly uniform folds quickly. They are especially helpful if you have many t-shirts or want consistent results every time. Simply lay the shirt on the board and follow its guides.
How do I prevent wrinkles when folding?
The key to preventing wrinkles is to smooth the shirt thoroughly at each stage and to avoid overly tight or messy folds. Ensure the shirt is completely dry. Storing them in a drawer with enough space, rather than overstuffing, also helps.
Our Top Recommended Finds
- A sturdy, flat surface: Essential for crisp folds, a clean tabletop or dedicated folding area makes a big difference.
- T-shirt folding board: For those seeking ultimate uniformity and speed, a simple plastic folding board can be a game-changer.
- Drawer dividers: These help maintain order, especially with vertical folding, ensuring your t-shirts stay neat and don’t collapse.
Transform Your Wardrobe Today
Embracing these simple t-shirt folding techniques can bring surprising order and calm to your daily routine. No more rummaging through messy piles or dealing with needlessly wrinkled clothes.
Take a moment with your next load of laundry to apply these steps. You’ll quickly discover the satisfaction of a perfectly organized drawer. Consider exploring other folding techniques for different garment types to extend this newfound order throughout your closet.