How To Make Stickers
Turning your digital art or hand-drawn sketches into physical stickers is one of the most rewarding creative projects you can start.
I spent years perfecting my home setup after ruining dozens of sheets of expensive vinyl, so I know exactly where the pitfalls are.
This guide will show you how to get professional results without needing an industrial printing press or a massive budget.
Quick Overview
You are going to learn how to design, print, and cut high-quality stickers using tools you likely already have or can easily acquire.
- Time needed: 45 to 60 minutes
- Difficulty: Beginner
- What you’ll need: Computer, graphic software, inkjet or laser printer, sticker paper, and a cutting tool.
Step 1: Create Your Design
Start by opening your favorite design software or grabbing a sketchbook to draw your initial ideas.
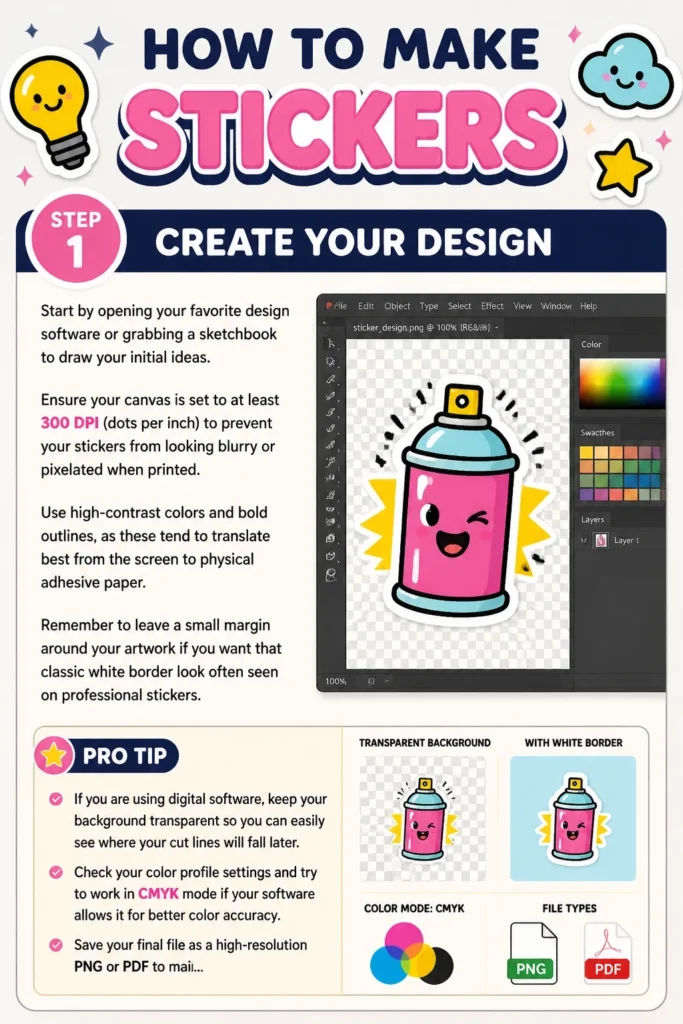
Ensure your canvas is set to at least 300 DPI (dots per inch) to prevent your stickers from looking blurry or pixelated when printed.
Use high-contrast colors and bold outlines, as these tend to translate best from the screen to physical adhesive paper.
Remember to leave a small margin around your artwork if you want that classic white border look often seen on professional stickers.
Pro Tip: If you are using digital software, keep your background transparent so you can easily see where your cut lines will fall later.
Check your color profile settings and try to work in CMYK mode if your software allows it for better color accuracy.
Save your final file as a high-resolution PNG or PDF to maintain the integrity of the lines and colors during the transition to the printer.
Step 2: Set Up Your Layout
Open a new document in your printing software that matches the exact size of the sticker paper you purchased, usually letter size or A4.
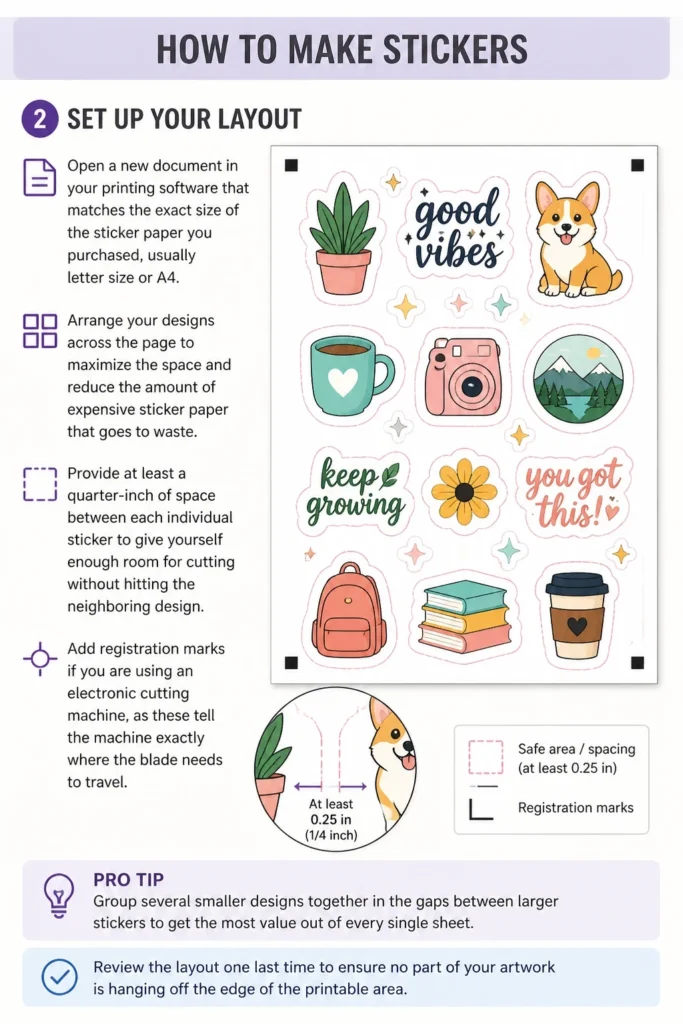
Arrange your designs across the page to maximize the space and reduce the amount of expensive sticker paper that goes to waste.
Provide at least a quarter-inch of space between each individual sticker to give yourself enough room for cutting without hitting the neighboring design.
Add registration marks if you are using an electronic cutting machine, as these tell the machine exactly where the blade needs to travel.
Pro Tip: Group several smaller designs together in the gaps between larger stickers to get the most value out of every single sheet.
Review the layout one last time to ensure no part of your artwork is hanging off the edge of the printable area of the page.
Export this layout as a single file, which makes it much easier to manage when you move to the actual printing phase of the project.
Step 3: Choose the Right Paper
Select a sticker paper that is compatible with your specific printer type, as inkjet paper and laser paper are manufactured with different coatings.
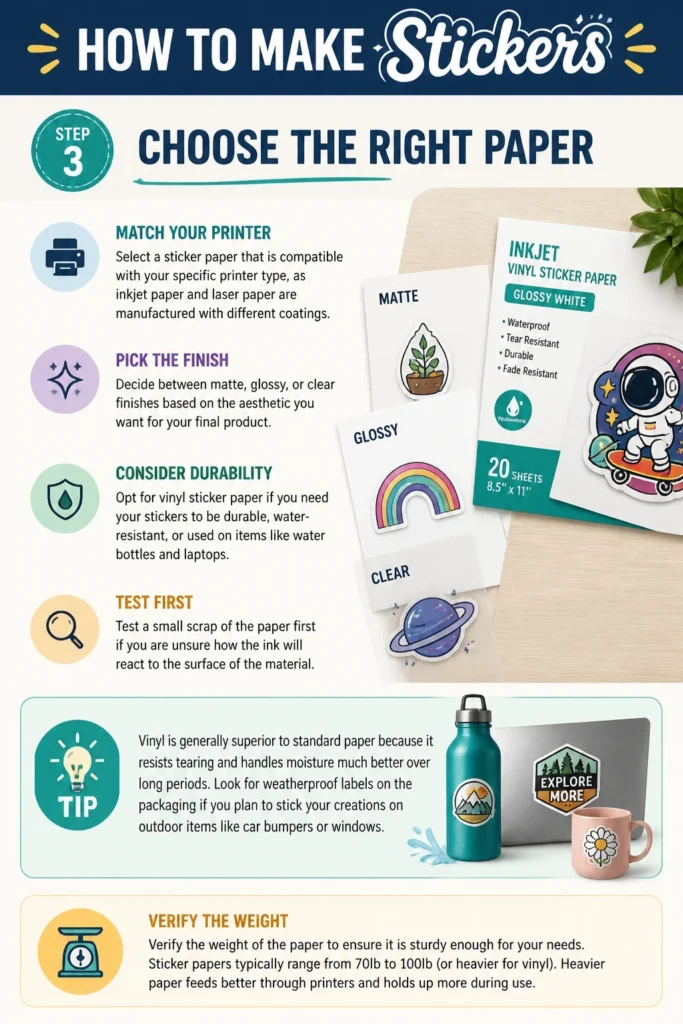
Decide between matte, glossy, or clear finishes based on the aesthetic you want for your final product.
Opt for vinyl sticker paper if you need your stickers to be durable, water-resistant, or used on items like water bottles and laptops.
Test a small scrap of the paper first if you are unsure how the ink will react to the surface of the material.
Pro Tip: Vinyl is generally superior to standard paper because it resists tearing and handles moisture much better over long periods.
Look for “weatherproof” labels on the packaging if you plan to stick your creations on outdoor items like car bumpers or windows.
Verify the weight of the paper to ensure your home printer can feed it through the rollers without causing a paper jam.
Step 4: Configure Your Printer Settings
Load your sticker paper into the printer tray, making sure the printable side is facing the correct direction for your specific model.
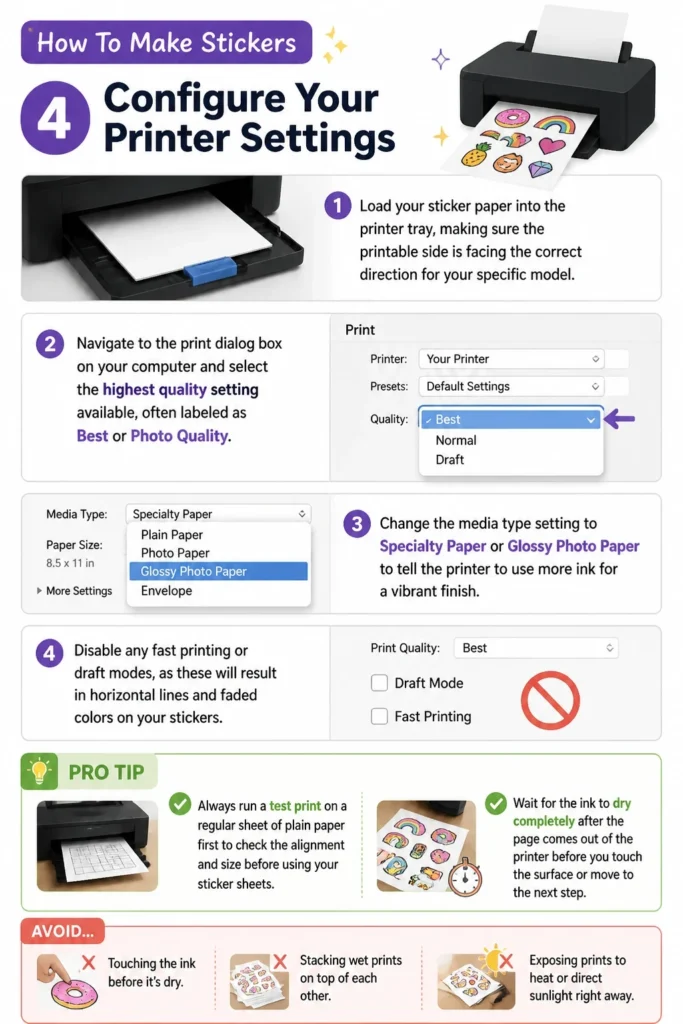
Navigate to the print dialog box on your computer and select the highest quality setting available, often labeled as Best or Photo Quality.
Change the media type setting to Specialty Paper or Glossy Photo Paper to tell the printer to use more ink for a vibrant finish.
Disable any “fast printing” or “draft” modes, as these will result in horizontal lines and faded colors on your stickers.
Pro Tip: Always run a test print on a regular sheet of plain paper first to check the alignment and size before using your sticker sheets.
Wait for the ink to dry completely after the page comes out of the printer before you touch the surface or move to the next step.
Avoid stacking freshly printed sheets on top of each other, as the ink can sometimes transfer or smudge if it hasn’t fully cured.
Step 5: Apply a Protective Laminate
Cut a piece of clear self-adhesive laminating film that is slightly larger than the area covered by your printed stickers.
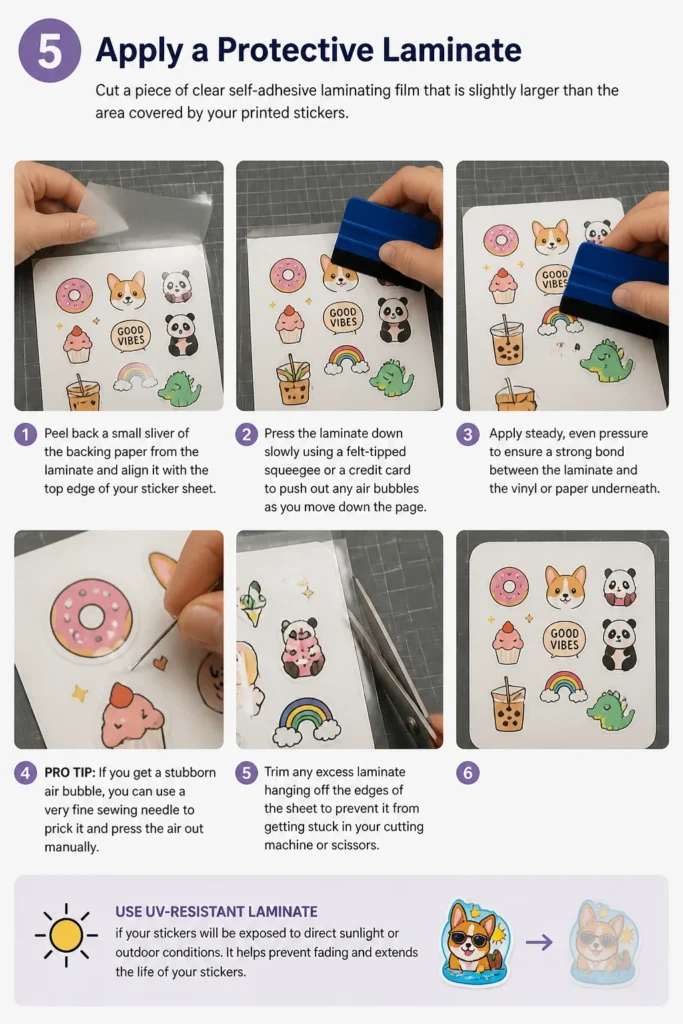
Peel back a small sliver of the backing paper from the laminate and align it with the top edge of your sticker sheet.
Press the laminate down slowly using a felt-tipped squeegee or a credit card to push out any air bubbles as you move down the page.
Apply steady, even pressure to ensure a strong bond between the laminate and the vinyl or paper underneath.
Pro Tip: If you get a stubborn air bubble, you can use a very fine sewing needle to prick it and press the air out manually.
Trim any excess laminate hanging off the edges of the sheet to prevent it from getting stuck in your cutting machine or scissors.
Use UV-resistant laminate if your stickers will be exposed to direct sunlight, which prevents the colors from fading over time.
Step 6: Cut Your Stickers
Determine if you want to create die-cut stickers, which are cut all the way through the backing, or kiss-cut stickers, which stay on the sheet.
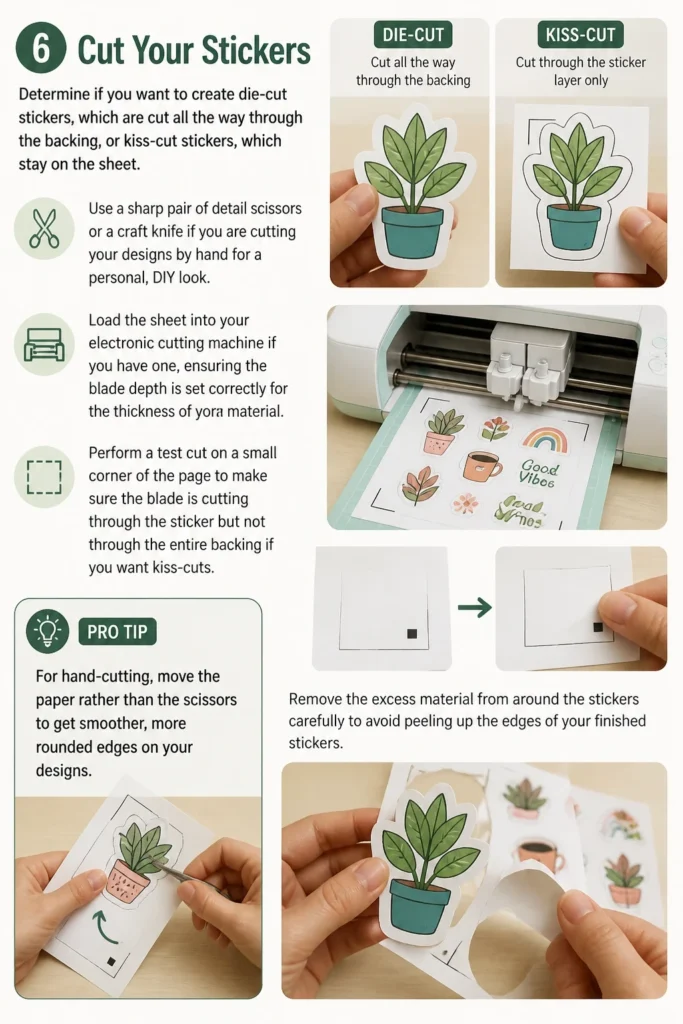
Use a sharp pair of detail scissors or a craft knife if you are cutting your designs by hand for a personal, DIY look.
Load the sheet into your electronic cutting machine if you have one, ensuring the blade depth is set correctly for the thickness of your material.
Perform a test cut on a small corner of the page to make sure the blade is cutting through the sticker but not through the entire backing if you want kiss-cuts.
Pro Tip: For hand-cutting, move the paper rather than the scissors to get smoother, more rounded edges on your designs.
Remove the excess material from around the stickers carefully to avoid peeling up the edges of your finished designs.
Check each sticker for any jagged edges or uneven borders and trim them down for a more professional and polished appearance.
Step 7: Quality Check and Storage
Examine the colors and clarity of each sticker to ensure there was no shifting or smudging during the cutting process.
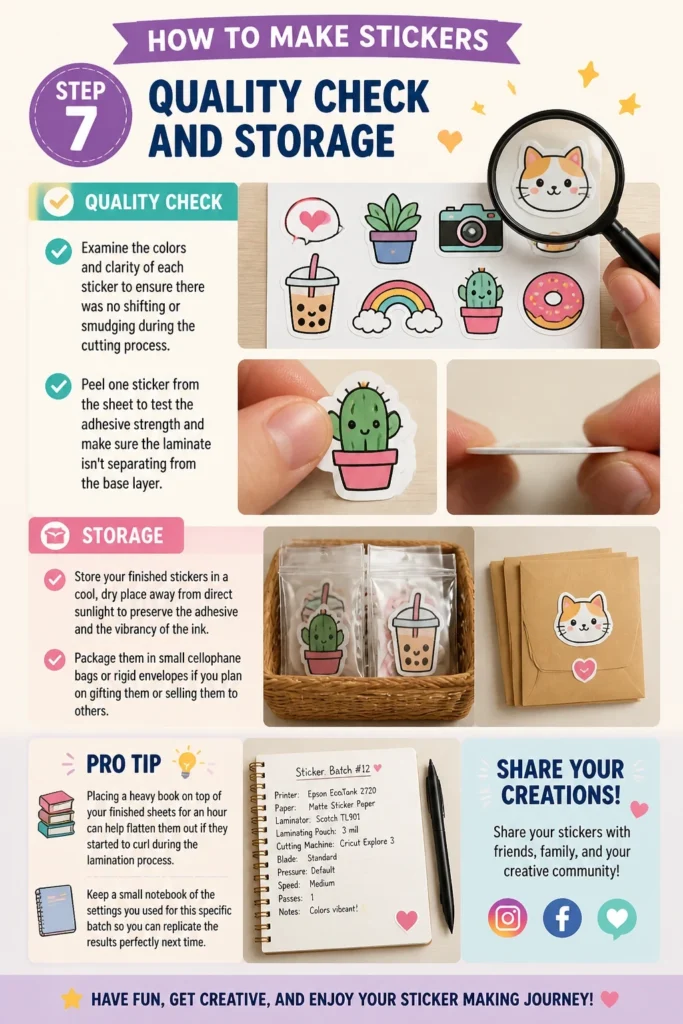
Peel one sticker from the sheet to test the adhesive strength and make sure the laminate isn’t separating from the base layer.
Store your finished stickers in a cool, dry place away from direct sunlight to preserve the adhesive and the vibrancy of the ink.
Package them in small cellophane bags or rigid envelopes if you plan on gifting them or selling them to others.
Pro Tip: Placing a heavy book on top of your finished sheets for an hour can help flatten them out if they started to curl during the lamination process.
Keep a small notebook of the settings you used for this specific batch so you can replicate the results perfectly next time.
Share your creations with friends or on social media to get feedback and inspiration for your next set of designs.
Common Mistakes to Avoid
Using Low Resolution Images
Many beginners grab images from the internet that look great on a phone screen but appear blurry when printed. Printing requires a much higher pixel density than digital viewing, so always aim for 300 DPI or higher. If you start with a low-quality file, no amount of printer settings can make the final sticker look sharp.
Ignoring the Drying Time
It is tempting to touch the stickers as soon as they slide out of the printer, but this is a recipe for disaster. Inkjet ink often needs several minutes to fully bond with the coating on vinyl paper. Touching it too early will leave permanent fingerprints or cause the colors to smear across the page.
Incorrect Blade Depth
If you are using a cutting machine, setting the blade too deep will cut through your cutting mat and ruin the sheet. Conversely, a blade that is too shallow will only score the laminate and leave the sticker stuck to the waste paper. Always perform a small test cut on a scrap piece of the same material before committing to the full sheet.
Forgetting the Bleed Area
When you cut stickers, there is always a tiny margin of error where the blade might shift by a fraction of a millimeter. If your design goes right to the edge of the cut line without a “bleed” or a white border, you might end up with an ugly sliver of unprinted paper on one side. Always extend your background color or border slightly beyond where you intend to cut.
Troubleshooting
Ink Smearing on Vinyl Paper
If the ink is pooling on the surface and never seems to dry, you might be using the wrong type of paper for your printer. Ensure you didn’t accidentally put laser paper in an inkjet printer, as laser paper lacks the absorbent coating needed for liquid ink. You can also try changing your printer settings to “Plain Paper” to reduce the amount of ink being deposited.
The Laminate is Bubbling
Bubbles usually occur when the laminate is applied too quickly or without enough pressure. If this happens consistently, try the “hinge method” where you tape one side down and use a ruler to slowly sweep the laminate onto the sheet. Make sure your workspace is free of dust, as even a tiny speck can create a visible air pocket under the film.
Cutting Machine is Off Center
This is usually caused by poor lighting or dirty sensors on your cutting machine which prevents it from reading the registration marks. Ensure your workspace is well-lit and that the marks on your paper are printed clearly and are not covered by glossy laminate. You may need to trim the laminate so it does not cover the black registration squares at the corners of the page.
Key Takeaways
- Resolution is king: Always design at 300 DPI to ensure your stickers look professional and sharp.
- Match your materials: Use inkjet paper for inkjet printers and laser paper for laser printers to avoid ink failure.
- Laminate for longevity: Adding a clear top layer makes your stickers waterproof and protects them from scratches.
- Test before you commit: Always run a test print and a test cut to save time and expensive materials.
- Maximize your space: Layout your designs efficiently to get the most stickers out of every sheet of paper.
- Patience pays off: Allow proper drying time between printing, laminating, and cutting to prevent smudges.
Frequently Asked Questions
Can I make stickers without a cutting machine?
Yes, you can absolutely make high-quality stickers using only a pair of scissors or a craft knife. While machines provide perfect consistency, hand-cutting allows for a unique, handmade feel that many people appreciate. For complex shapes, a craft knife with a swivel blade can help you navigate tight corners more easily than scissors.
Do I need a special printer for sticker making?
Most standard home printers are capable of making great stickers as long as you use the correct paper. Inkjet printers are generally preferred for stickers because they handle color gradients and photos better than most affordable laser printers. The most important factor is the quality of the paper and the settings you choose in the print menu.
How do I make my stickers waterproof?
The best way to make stickers waterproof is to use printable vinyl paper combined with a clear laminate overlay. The vinyl itself is naturally more resistant to water than paper, and the laminate acts as a physical barrier that keeps moisture away from the ink. This combination allows stickers to survive being washed on a water bottle or exposed to rain.
What is the difference between a die-cut and a kiss-cut?
A die-cut sticker is cut through both the sticker layer and the paper backing, resulting in an individual sticker in the shape of your design. A kiss-cut sticker only cuts through the top adhesive layer, leaving the backing intact so the sticker can be peeled off a larger sheet. Die-cuts are great for selling individually, while kiss-cuts are better for sticker sheets with multiple designs.
Our Top Recommended Finds
- Printable Vinyl Sheets: Look for premium waterproof vinyl that specifically mentions your printer type for the best ink absorption.
- Self-Adhesive Laminating Film: Choose a cold-press laminate to protect your designs without needing a heat-based laminating machine.
- Precision Craft Knife: A high-quality knife with replaceable blades is essential for clean hand-cutting and detailed work.
Start Your First Sticker Project Today
Now that you have the knowledge and the steps, it is time to turn your digital concepts into physical reality.
Start with a simple design to get a feel for how your printer handles the paper and how the laminate applies to the surface.
Once you master the basics, you can experiment with holographic overlays, different textures, and even selling your work online.
The world of DIY stickers is vast and incredibly satisfying, so grab your supplies and begin creating your first batch right now.