How To Make Shoe Laces
I remember the frustration of snapping a lace on my favorite pair of vintage boots right before a big trip.
Finding the exact replacement length and color at a local store felt nearly impossible.
That afternoon, I decided to stop searching and start creating, which changed how I look at footwear forever.
Quick Overview
Making your own shoe laces allows you to customize the fit, color, and durability of your footwear hardware.
- Time needed: 30 to 45 minutes
- Difficulty: Beginner
- What you’ll need: Cordage (paracord or cotton), heat shrink tubing, scissors, a lighter, and a measuring tape.
Step-by-Step Instructions
Step 1: Measure Your Current Laces
Remove the old laces from your shoes and lay them flat on a hard surface like a table or floor.
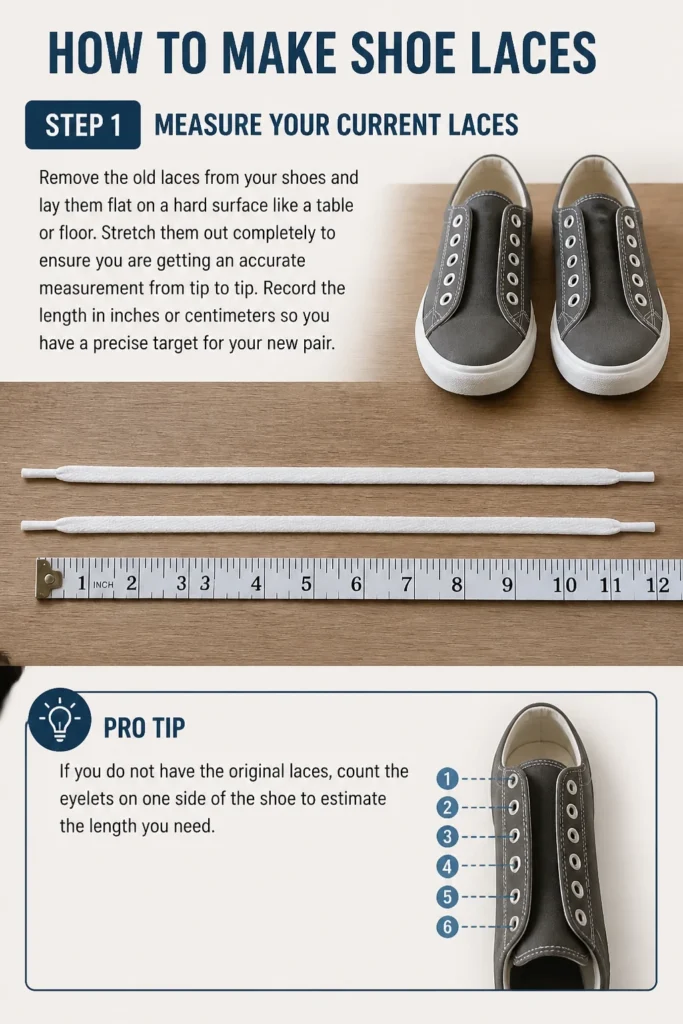
Stretch them out completely to ensure you are getting an accurate measurement from tip to tip.
Record the length in inches or centimeters so you have a precise target for your new pair.
Pro Tip: If you do not have the original laces, count the eyelets on one side of the shoe to estimate the length you need.
Step 2: Choose Your Material
Select a material that matches the style and functional requirements of your specific footwear.
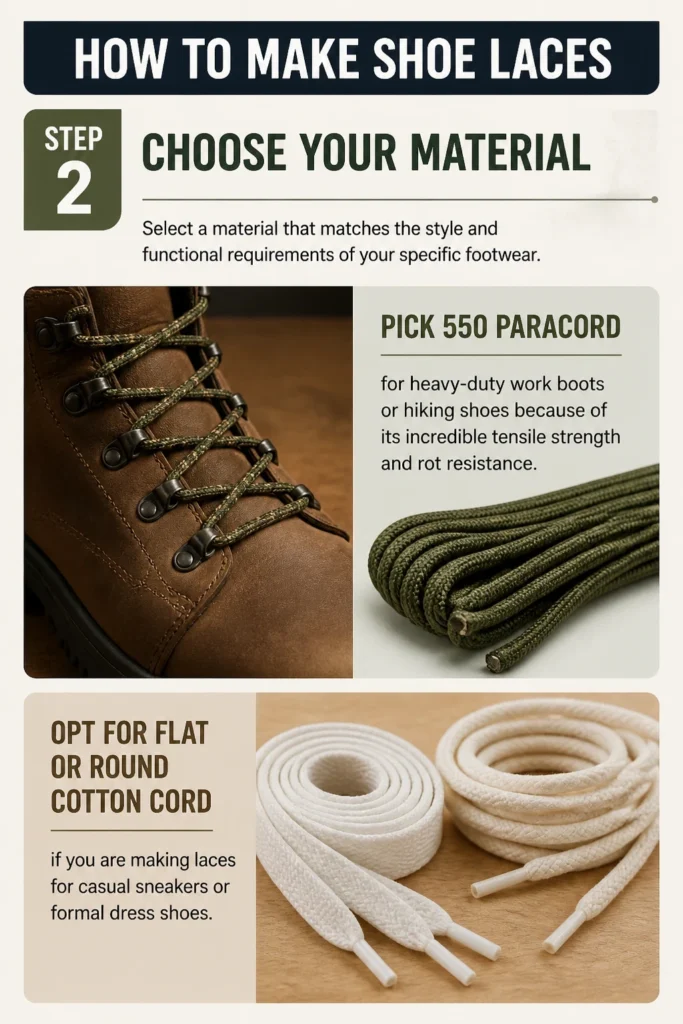
Pick 550 paracord for heavy-duty work boots or hiking shoes because of its incredible tensile strength and rot resistance.
Opt for flat or round cotton cord if you are making laces for casual sneakers or formal dress shoes.
Step 3: Cut the Cord to Length
Add two extra inches to the measurement you recorded in the first step to account for the aglet creation.
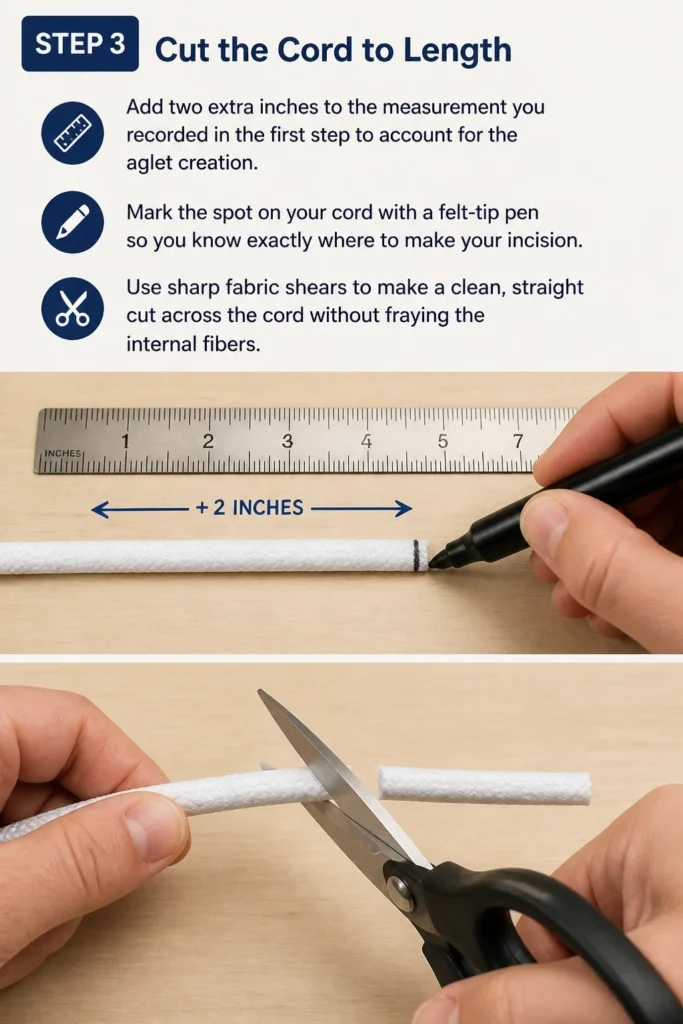
Mark the spot on your cord with a felt-tip pen so you know exactly where to make your incision.
Use sharp fabric shears to make a clean, straight cut across the cord without fraying the internal fibers.
Step 4: Prepare the Ends
Hold the cut end of your cord near a flame if you are using synthetic materials like nylon or polyester.
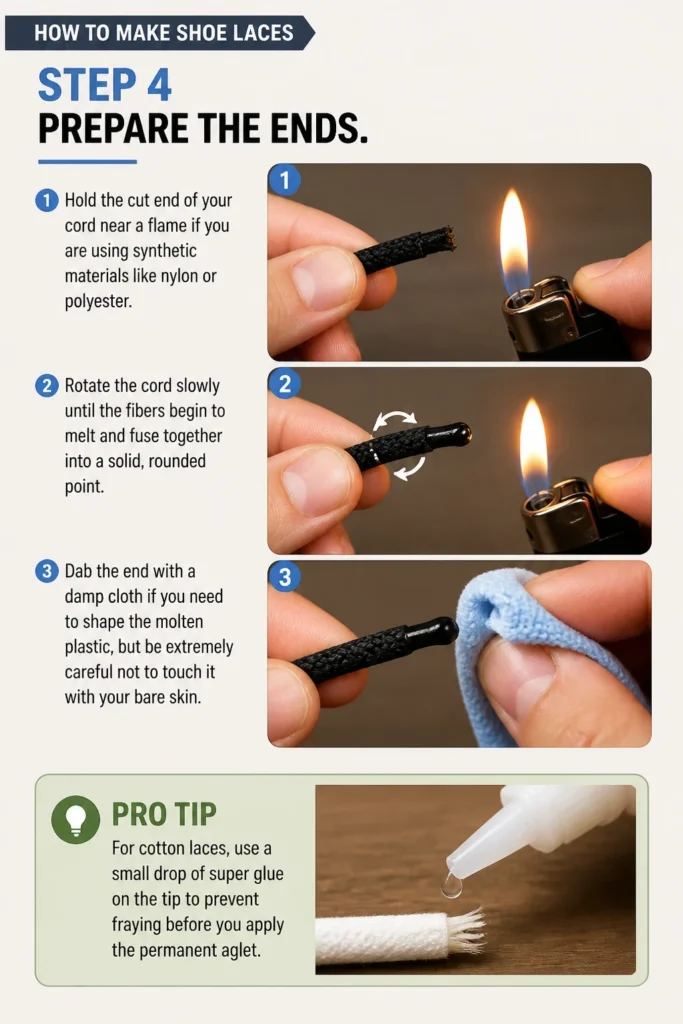
Rotate the cord slowly until the fibers begin to melt and fuse together into a solid, rounded point.
Dab the end with a damp cloth if you need to shape the molten plastic, but be extremely careful not to touch it with your bare skin.
Pro Tip: For cotton laces, use a small drop of super glue on the tip to prevent fraying before you apply the permanent aglet.
Step 5: Size the Heat Shrink Tubing
Identify the diameter of your shoe eyelets to ensure your finished lace tip will actually fit through the holes.
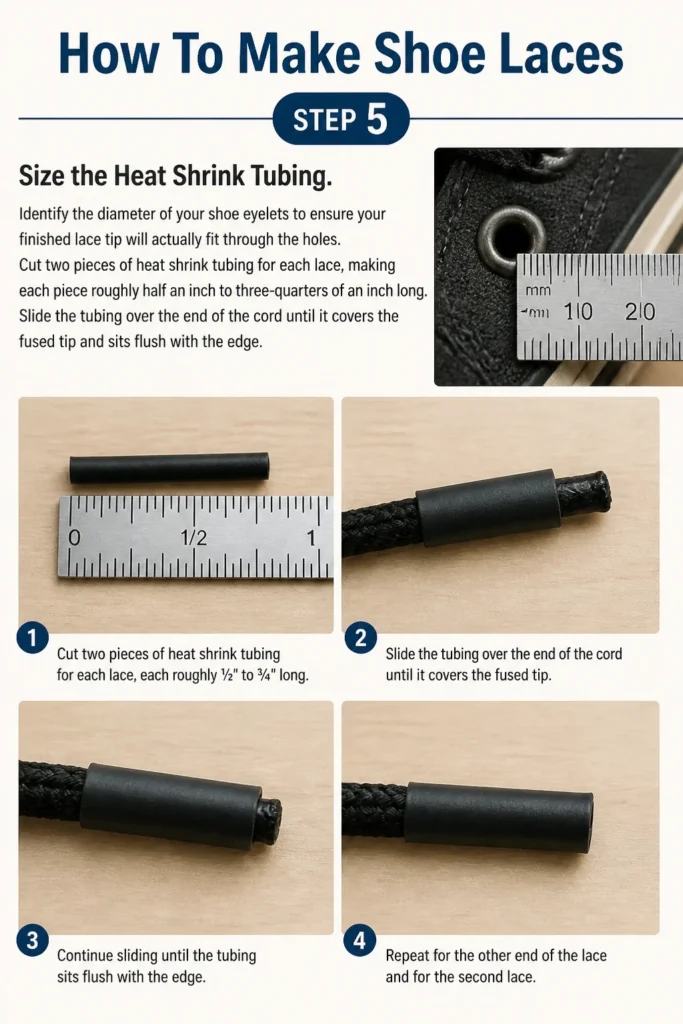
Cut two pieces of heat shrink tubing for each lace, making each piece roughly half an inch to three-quarters of an inch long.
Slide the tubing over the end of the cord until it covers the fused tip and sits flush with the edge.
Step 6: Apply Heat to the Aglets
Position your lighter or a heat gun several inches away from the tubing to avoid scorching the material.
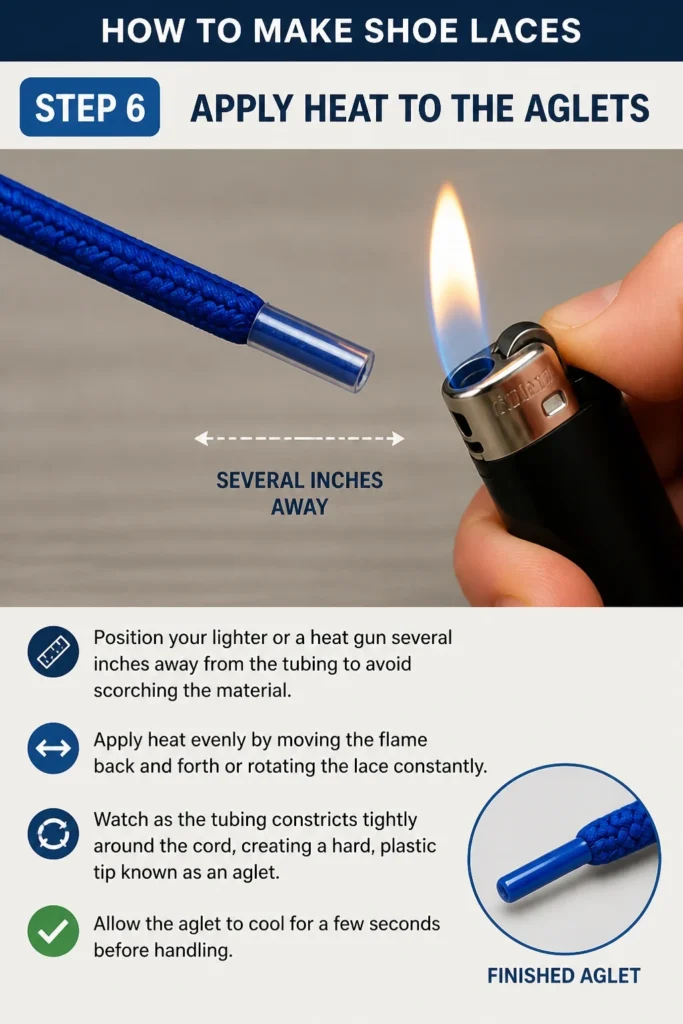
Apply heat evenly by moving the flame back and forth or rotating the lace constantly.
Watch as the tubing constricts tightly around the cord, creating a hard, plastic tip known as an aglet.
Step 7: Trim and Cool
Allow the aglets to cool for at least two minutes before you attempt to handle them or lace them into your shoes.
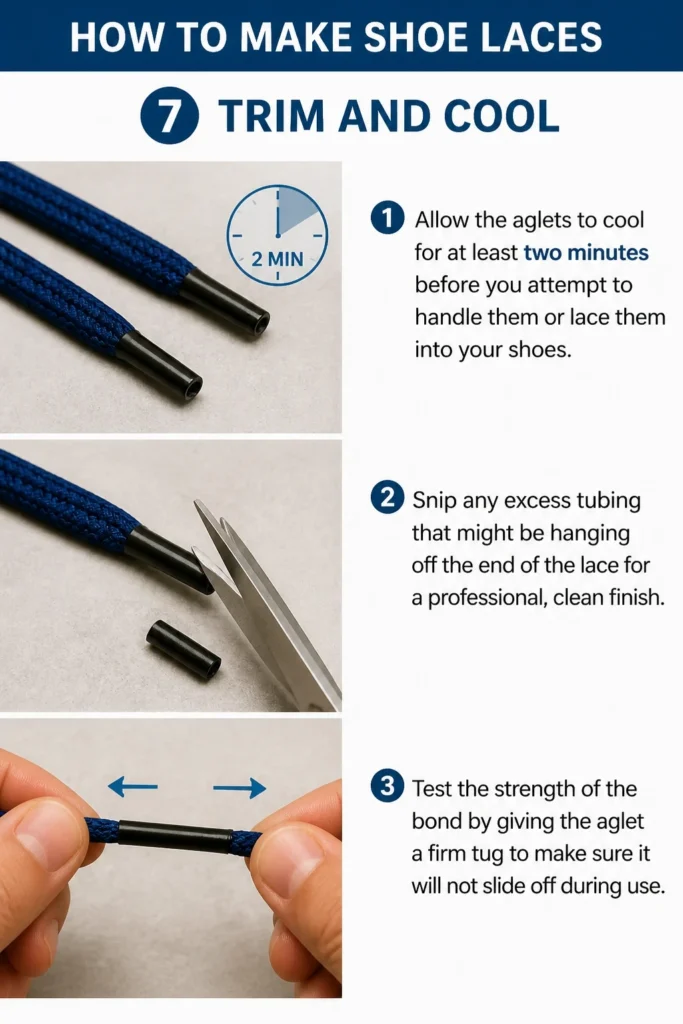
Snip any excess tubing that might be hanging off the end of the lace for a professional, clean finish.
Test the strength of the bond by giving the aglet a firm tug to make sure it will not slide off during use.
Step 8: Lace and Adjust
Thread your new custom laces through the bottom eyelets of your shoes, ensuring the lengths are even on both sides.
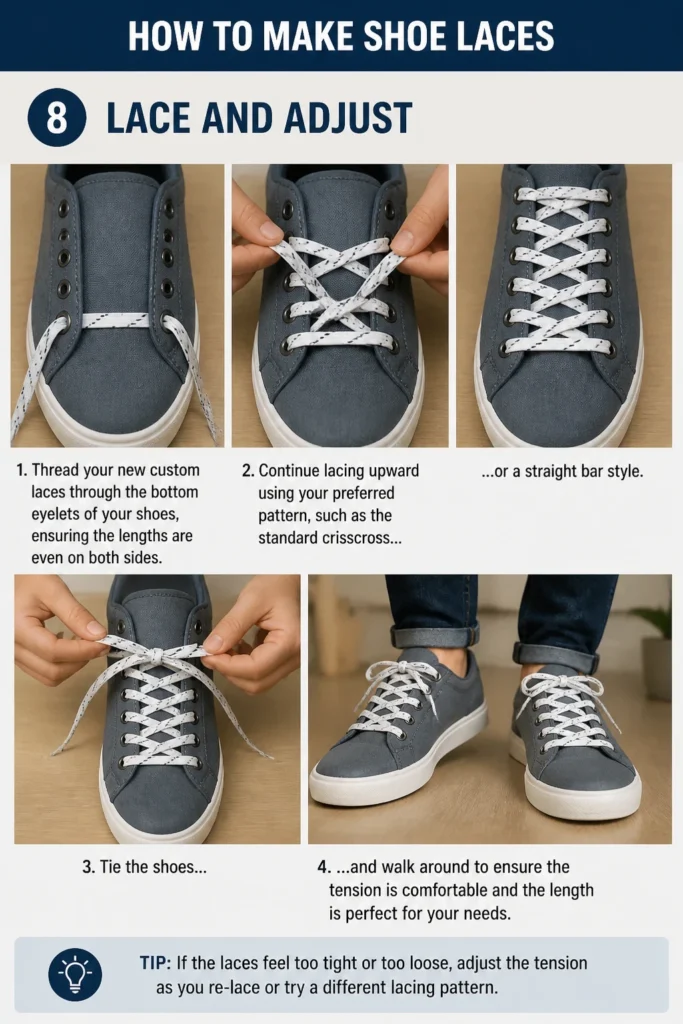
Continue lacing upward using your preferred pattern, such as the standard crisscross or a straight bar style.
Tie the shoes and walk around to ensure the tension is comfortable and the length is perfect for your needs.
Common Mistakes to Avoid
Cutting the Laces Too Short
Many people forget that the lacing process consumes a significant amount of length as the cord weaves back and forth.
If you cut the cord exactly to the length of the old laces without adding a buffer, you might find it difficult to tie a secure bow.
Always give yourself an extra inch or two of slack that can be trimmed later if necessary.
Overheating the Shrink Tubing
Holding the flame too close to the heat shrink tubing will cause the plastic to bubble, char, or even catch fire.
This results in a brittle aglet that will crack and fall off after only a few uses.
Use a gentle, indirect heat source and take your time to ensure a smooth and durable finish.
Using the Wrong Diameter Tubing
If the heat shrink tubing is too large, it will not compress enough to grip the cord tightly.
This leads to the aglet sliding off the moment you try to pull the lace through a tight eyelet.
Measure the thickness of your cord and choose tubing that is only slightly larger than the cord itself.
Troubleshooting
The Aglet is Too Thick for the Eyelet
If your finished lace tip will not pass through the shoe hole, the tubing or the cord underneath is likely too bulky.
You can try to compress the warm tubing with a pair of pliers immediately after heating to flatten the profile.
If that fails, you may need to use a thinner cord or a higher ratio heat shrink tubing that compresses more significantly.
The Cord is Fraying Inside the Tubing
This usually happens when the end of the cord was not properly sealed before the tubing was applied.
The loose fibers create a lumpy texture and prevent the tubing from making full contact with the core of the lace.
Remove the failed aglet, re-melt the tip of the cord into a solid point, and apply a fresh piece of tubing.
Uneven Lace Lengths
It is common to realize one lace is longer than the other after you have already finished the aglets.
Do not panic or throw the laces away, as this is easily fixed by trimming the longer side.
Cut off the aglet on the long lace, trim the cord to the correct size, and apply a new piece of heat shrink tubing.
Key Takeaways
- Always measure your existing laces or count eyelets to determine the correct starting length for your project.
- Synthetic materials like paracord require heat sealing to prevent the core from sliding out of the outer sheath.
- Heat shrink tubing is the most effective DIY method for creating durable and professional-looking aglets.
- Maintain a safe distance between your heat source and the materials to prevent scorching or weakening the fibers.
- Test the fit and finish of your laces by threading them through the eyelets before considering the project complete.
Frequently Asked Questions
Can I use regular tape instead of heat shrink tubing?
You can use clear adhesive tape in an emergency, but it is not a long-term solution for quality laces.
Tape will eventually lose its stickiness, especially when exposed to moisture or the friction of the eyelets.
Heat shrink tubing provides a permanent mechanical bond that will last as long as the laces themselves.
What is the best cord for athletic running shoes?
Polyester cord is generally preferred for athletic shoes because it has a slight amount of stretch and does not absorb much water.
This allows the shoe to expand slightly as your feet swell during a run while keeping the laces lightweight.
Avoid using heavy leather or thick paracord for high-performance athletics as they can be too rigid and heavy.
How do I make laces for dress shoes?
Dress shoes require a much thinner, waxed cotton cord to maintain a sophisticated and formal appearance.
You should use very small diameter heat shrink tubing, often 1/16 inch or 3/32 inch, to keep the aglets slim.
Ensure the color of the tubing matches the cord exactly so the tips do not stand out against the leather of the shoe.
How long do homemade shoe laces typically last?
If you use high-quality paracord, your homemade laces could easily outlast the soles of the shoes they are in.
Cotton laces will eventually wear down due to friction, just like factory-made versions, but they are cheap to replace.
The lifespan depends entirely on the quality of your aglet seal and the environment where you wear the shoes.
Our Top Recommended Finds
- 550 Type III Paracord: This is the gold standard for DIY laces because it is available in hundreds of colors and is virtually unbreakable.
- 3:1 Ratio Heat Shrink Tubing Kit: A kit with various sizes ensures you have the right diameter for everything from thin dress laces to thick boot cords.
- Heavy Duty Fabric Shears: A sharp pair of scissors is essential for getting the clean, square cuts required for a professional aglet.
Elevate Your Footwear Today
Now that you know how to create custom laces, you can refresh any pair of shoes in your closet for just a few dollars.
You might want to explore different lacing patterns next to further customize the look and feel of your favorite boots.
Grab some cordage and a lighter this afternoon and give your oldest pair of sneakers a brand new personality.