How To Make Bath Bombshell
I have spent years perfecting the art of the fizzy, luxurious bath experience in my own kitchen.
After hundreds of trials and many batches that ended up as a crumbly mess, I finally discovered the precise balance of chemistry and craft needed for a professional result.
This guide shares those hard-earned secrets so you can create high-quality bath bombshells that rival any expensive boutique brand.
Quick Overview
Creating your own bath bombshells is a rewarding project that combines basic chemistry with creative artistry. You will learn how to balance acids and bases to create a product that fizzes perfectly while moisturizing your skin.
- Time needed: 45 minutes of active preparation plus 24 hours of drying time
- Difficulty: Intermediate
- What you’ll need: Baking soda, citric acid, cornstarch, Epsom salt, carrier oils, essential oils, and spherical molds
Step 1: Organize Your Workspace And Supplies
Set up a clean, dry area where you can work without interruptions or high humidity. Moisture in the air is the enemy of a successful bath bombshell, as it can trigger the chemical reaction before you are ready.
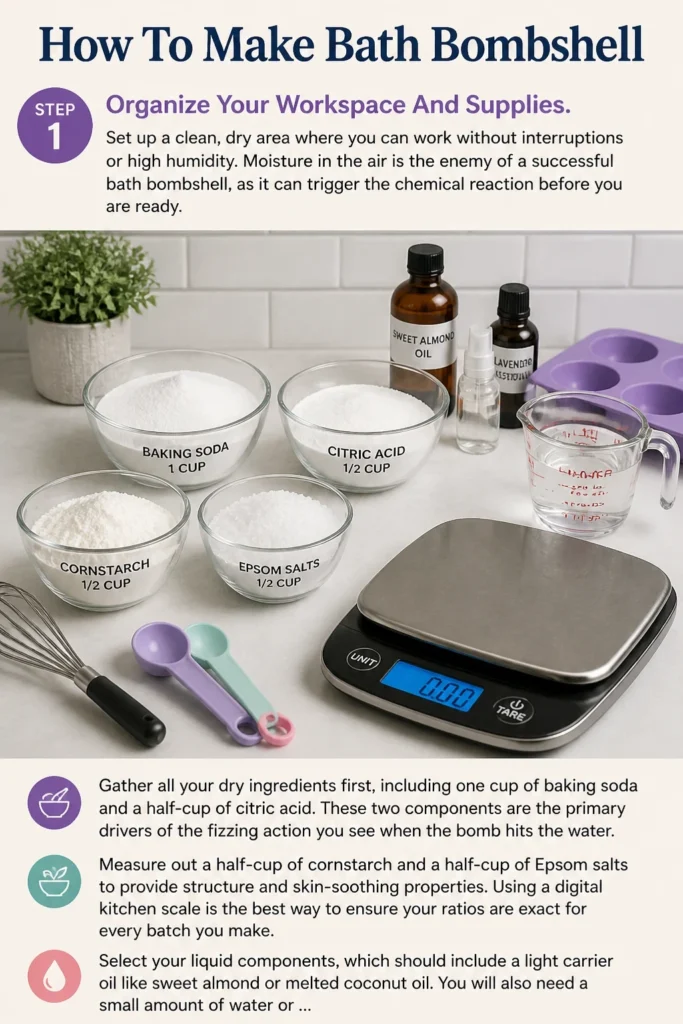
Gather all your dry ingredients first, including one cup of baking soda and a half-cup of citric acid. These two components are the primary drivers of the fizzing action you see when the bomb hits the water.
Measure out a half-cup of cornstarch and a half-cup of Epsom salts to provide structure and skin-soothing properties. Using a digital kitchen scale is the best way to ensure your ratios are exact for every batch you make.
Select your liquid components, which should include a light carrier oil like sweet almond or melted coconut oil. You will also need a small amount of water or witch hazel in a spray bottle to help the mixture hold its shape.
Pro Tip: Using witch hazel instead of plain water reduces the risk of the mixture fizzing prematurely because it evaporates much faster.
Step 2: Sift The Dry Ingredients For Smoothness
Place a large mixing bowl on your counter and set a fine-mesh sieve over the top. It is vital to remove any lumps from your baking soda and cornstarch to ensure a smooth, professional finish on your bombshells.
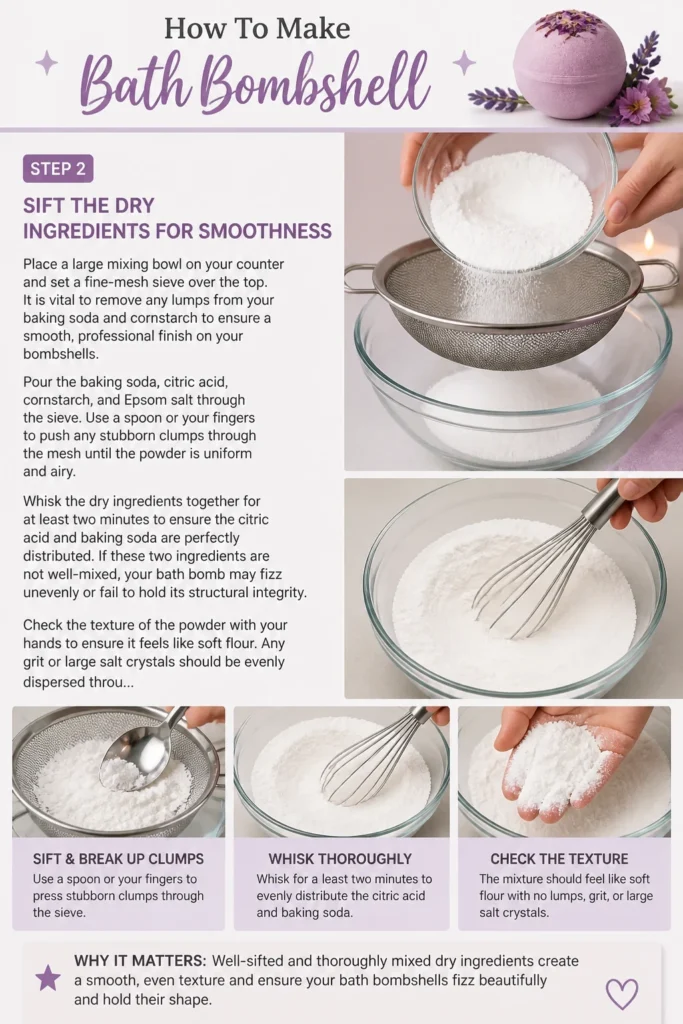
Pour the baking soda, citric acid, cornstarch, and Epsom salt through the sieve. Use a spoon or your fingers to push any stubborn clumps through the mesh until the powder is uniform and airy.
Whisk the dry ingredients together for at least two minutes to ensure the citric acid and baking soda are perfectly distributed. If these two ingredients are not well-mixed, your bath bomb may fizz unevenly or fail to hold its structural integrity.
Check the texture of the powder with your hands to ensure it feels like soft flour. Any grit or large salt crystals should be evenly dispersed throughout the volume of the bowl.
Step 3: Prepare Your Scent And Color Blends
Combine your liquid ingredients in a separate, smaller glass jar or bowl. This includes two tablespoons of your chosen carrier oil and about 20 to 30 drops of essential oils or skin-safe fragrance oils.
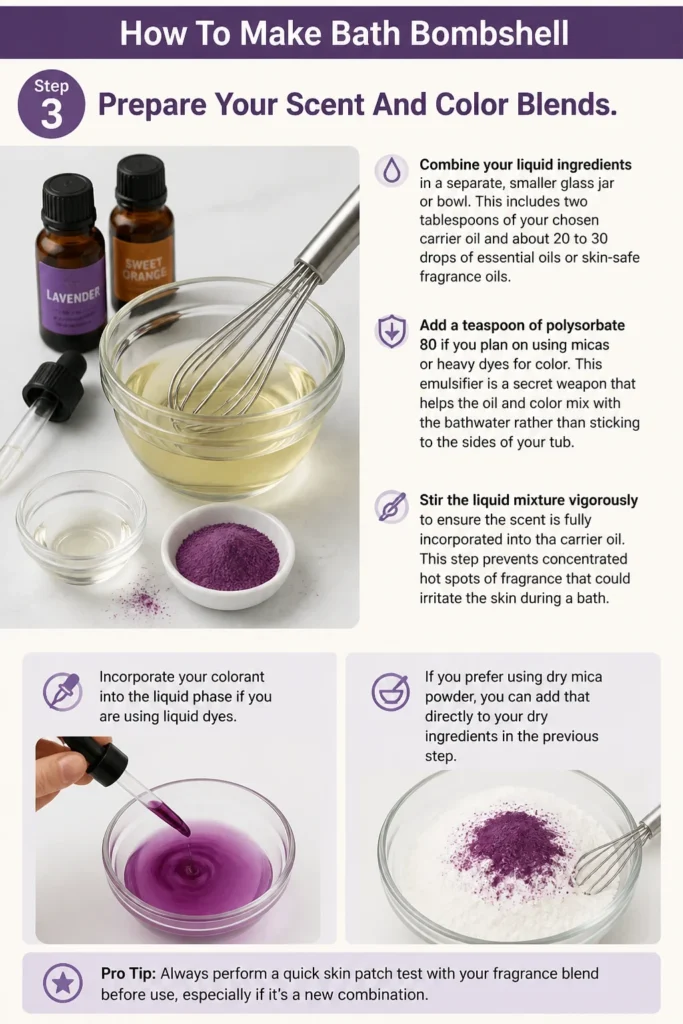
Add a teaspoon of polysorbate 80 if you plan on using micas or heavy dyes for color. This emulsifier is a secret weapon that helps the oil and color mix with the bathwater rather than sticking to the sides of your tub.
Stir the liquid mixture vigorously to ensure the scent is fully incorporated into the carrier oil. This step prevents concentrated “hot spots” of fragrance that could irritate the skin during a bath.
Incorporate your colorant into the liquid phase if you are using liquid dyes. If you prefer using dry mica powder, you can add that directly to your dry ingredients in the previous step for a shimmering effect.
Pro Tip: Always use high-quality, skin-safe micas rather than food coloring to avoid temporary staining on your skin or the bathtub surface.
Step 4: Merge The Wet And Dry Components
Begin adding the liquid mixture to the dry powder very slowly, literally one drop at a time. This is the most critical phase of the entire process because adding liquid too fast will trigger the citric acid reaction.
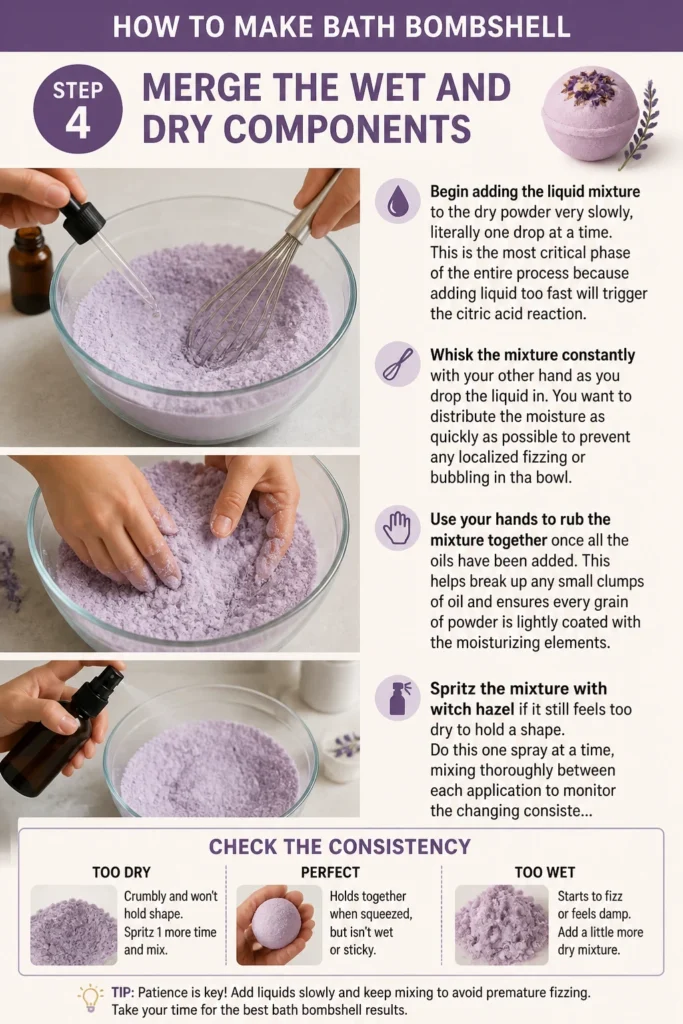
Whisk the mixture constantly with your other hand as you drop the liquid in. You want to distribute the moisture as quickly as possible to prevent any localized fizzing or bubbling in the bowl.
Use your hands to rub the mixture together once all the oils have been added. This helps break up any small clumps of oil and ensures every grain of powder is lightly coated with the moisturizing elements.
Spritz the mixture with witch hazel if it still feels too dry to hold a shape. Do this one spray at a time, mixing thoroughly between each application to monitor the changing consistency.
Step 5: Test For The Perfect Consistency
Squeeze a handful of the mixture tightly in your palm to check the texture. It should feel like damp sand that holds its shape firmly when you release your grip, similar to how you would test sand for a sandcastle.
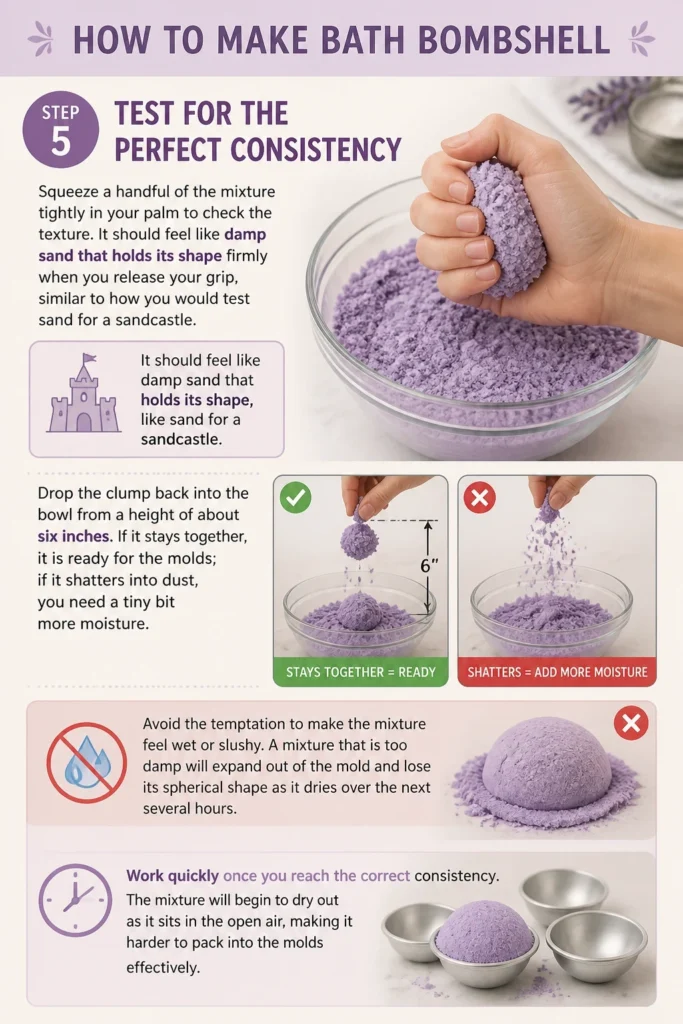
Drop the clump back into the bowl from a height of about six inches. If it stays together, it is ready for the molds; if it shatters into dust, you need a tiny bit more moisture.
Avoid the temptation to make the mixture feel wet or slushy. A mixture that is too damp will expand out of the mold and lose its spherical shape as it dries over the next several hours.
Work quickly once you reach the correct consistency. The mixture will begin to dry out as it sits in the open air, making it harder to pack into the molds effectively.
Step 6: Pack The Shell Molds Correctly
Overfill both halves of your bath bomb mold with the mixture, piling it up loosely in the center. Do not pack the mixture down into the halves yet, as you need the loose powder to act as a glue between the two sides.
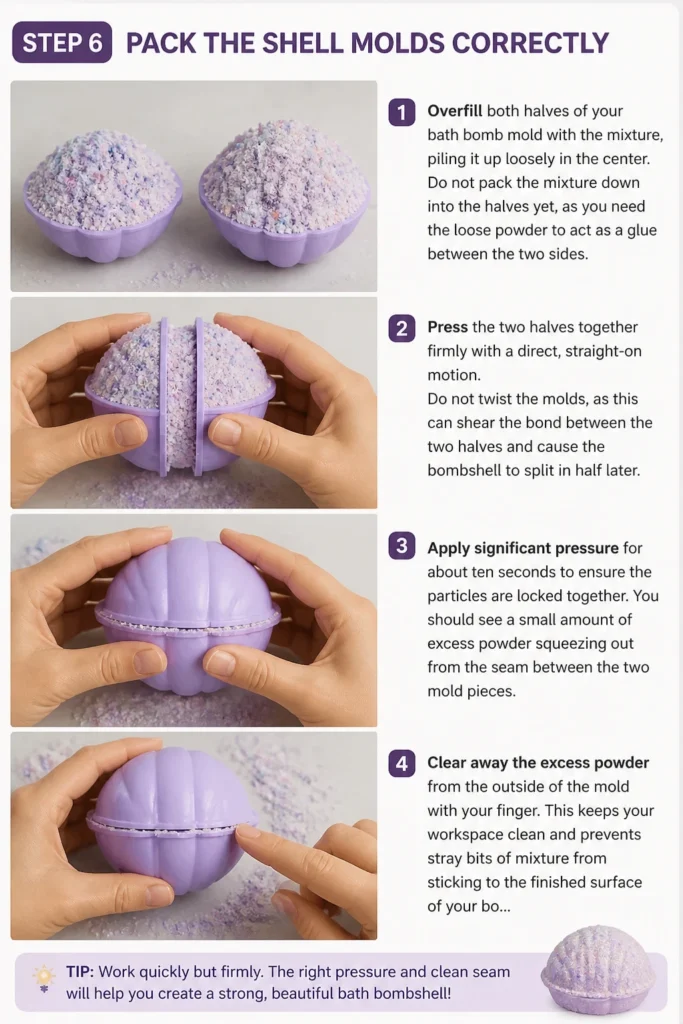
Press the two halves together firmly with a direct, straight-on motion. Do not twist the molds, as this can shear the bond between the two halves and cause the bombshell to split in half later.
Apply significant pressure for about ten seconds to ensure the particles are locked together. You should see a small amount of excess powder squeezing out from the seam between the two mold pieces.
Clear away the excess powder from the outside of the mold with your finger. This keeps your workspace clean and prevents stray bits of mixture from sticking to the finished surface of your bombshell.
Pro Tip: If the halves won’t stick together, add a tiny pinch of dry mixture to the center of each half and try pressing them again immediately.
Step 7: Unmold And Cure The Finished Product
Tap the outside of the mold gently with a spoon or your fingernail to loosen the bombshell from the plastic or metal casing. This vibration helps break the vacuum seal that often forms inside the mold.
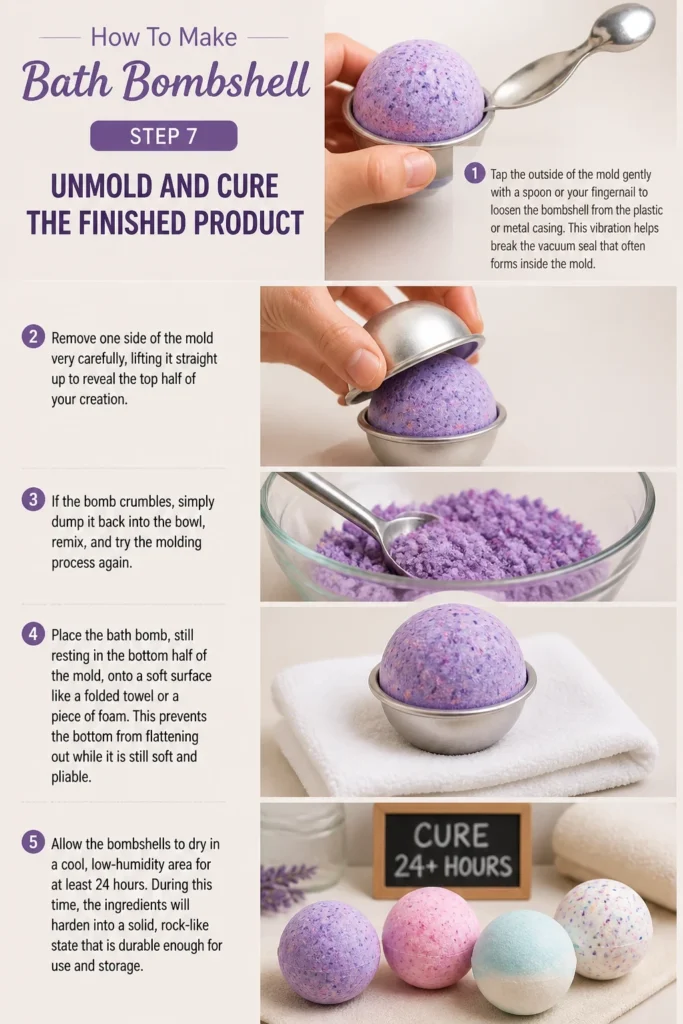
Remove one side of the mold very carefully, lifting it straight up to reveal the top half of your creation. If the bomb crumbles, simply dump it back into the bowl, remix, and try the molding process again.
Place the bath bomb, still resting in the bottom half of the mold, onto a soft surface like a folded towel or a piece of foam. This prevents the bottom from flattening out while it is still soft and pliable.
Allow the bombshells to dry in a cool, low-humidity area for at least 24 hours. During this time, the ingredients will harden into a solid, rock-like state that is durable enough for packaging and handling.
Common Mistakes to Avoid
Using Too Much Water
Adding too much liquid is the most frequent error beginners make when crafting these items. If you see the mixture start to foam or expand in the bowl, you have activated the reaction prematurely, which will result in a flat, non-fizzy bath bomb.
The solution is to use a fine-mist spray bottle and only apply one spray at a time. Patience during the mixing phase ensures that the chemical energy is saved for the bathtub rather than wasted in your mixing bowl.
Packing The Molds Too Loosely
If you do not apply enough pressure when joining the two halves of the mold, the bombshell will likely fall apart as soon as it dries. A loose pack results in a fragile structure that cannot withstand being moved or stored.
You must use enough force to compact the “sand” into a solid mass. Think of it as creating a sedimentary rock; the pressure is what binds the individual grains into a singular, sturdy object.
Ignoring Humidity Levels
Attempting to make bath bombshells on a rainy or very humid day can lead to disastrous results. The citric acid reacts to the moisture in the air, causing the bombs to “grow” or develop a bumpy, wart-like texture as they dry.
If you live in a humid climate, run a dehumidifier in your workspace or wait for a dry day to start your project. You can also try adding a bit more cornstarch to the recipe to help absorb excess ambient moisture.
Troubleshooting
The Bath Bomb Is Cracking
Cracks usually appear because the mixture was too dry when it was molded or because it dried out too quickly in a drafty area. If you see a crack forming shortly after unmolding, you can sometimes smooth it over with a damp finger, but it is usually better to regrind the mixture and start over.
To prevent this in the future, ensure your “damp sand” consistency is perfect. You can also try covering your drying bombs with a light piece of plastic wrap to slow down the evaporation process slightly.
The Bombshell Is Soft Or Squishy
If your finished product feels soft to the touch after 24 hours, it likely contains too much oil or not enough dry structural ingredients. This often happens if the ratio of liquid to powder is skewed or if the Epsom salts have absorbed too much moisture.
You can try placing the soft bombs in an airtight container with a few silica gel packets to draw out the excess moisture. In future batches, slightly increase the amount of cornstarch to provide a firmer internal skeleton for the bomb.
Key Takeaways
- Always sift your dry ingredients to prevent lumps and ensure a smooth, professional appearance.
- Maintain a “damp sand” consistency to ensure the bomb holds its shape without reacting prematurely.
- Use an emulsifier like polysorbate 80 if you are using oils and colors to prevent tub stains and oil rings.
- Avoid twisting the molds when joining them; use firm, direct pressure instead.
- Allow a full 24 hours of drying time in a low-humidity environment before handling or packaging.
- Store finished bombshells in airtight containers to protect them from moisture in the bathroom air.
Frequently Asked Questions
How long do homemade bath bombshells last?
When stored in a cool, dry place and wrapped tightly, these creations can last for about six months. Over time, the citric acid will lose its potency, and the essential oils will begin to fade, leading to a less impressive fizz and scent.
Can I use food coloring to dye my bath bombs?
While food coloring is technically safe, it is not recommended because it can stain both your skin and your bathtub. It also tends to be water-based, which can trigger the fizzing reaction while you are still trying to mix the ingredients. Professional micas or lake dyes are much better options for vibrant, non-staining color.
Why did my bath bomb sink to the bottom of the tub?
A bath bomb sinks when it is too dense or lacks the internal air pockets needed for buoyancy. To make a “floater,” try packing the mixture a little less tightly in the center while keeping the edges firm, or increase the amount of cornstarch in your recipe to lighten the overall mass.
Are essential oils safe for everyone in the bath?
Most essential oils are safe when properly diluted in a carrier oil, but some can be irritating to sensitive skin or should be avoided by pregnant individuals. Always research the specific oil you plan to use and stick to recommended usage rates to ensure a safe and relaxing experience for everyone.
Our Top Recommended Finds
- Stainless Steel Molds: These are much more durable than plastic versions and allow for a smoother release of the finished bombshell.
- Fine Mist Glass Spray Bottles: These provide a controlled application of witch hazel, which is essential for preventing accidental fizzing during the mixing stage.
- Digital Kitchen Scale: Precision is the key to consistency, and a scale allows you to measure ingredients by weight rather than volume for perfect results every time.
Expanding Your Bath Craft Skills
Now that you have mastered the basic bombshell, you can start experimenting with advanced techniques like embedding hidden colors inside the center. You might also try adding dried botanicals like lavender buds or rose petals to the bottom of the mold for a beautiful, spa-like aesthetic.
The world of DIY bath products is vast, and these skills can easily translate into making shower steamers or bath salts. Take the first step today by gathering your ingredients and mixing your very first batch of custom scents.