How To Finish A Stitch
You’ve poured time and creativity into your needlework project.
The final stitches are in place, and now comes the critical last step: securing your work.
From countless embroidery pieces to mending my children’s clothes, I’ve learned that a well-finished stitch is the difference between a lasting treasure and a project that unravels too soon.
Quick Overview
This guide will teach you reliable methods to securely finish your thread, ensuring your hard work remains intact and beautiful for years to come. You’ll master techniques for neat, durable thread ends.
- Time needed: 5-15 minutes per finish
- Difficulty: Beginner
- What you’ll need: Your project, needle, thread, sharp scissors
Step-by-Step Instructions
Step 1: Prepare Your Thread and Project
Begin by making sure your working thread has enough length to comfortably maneuver. A tail of about 4-6 inches is ideal for most finishing techniques.
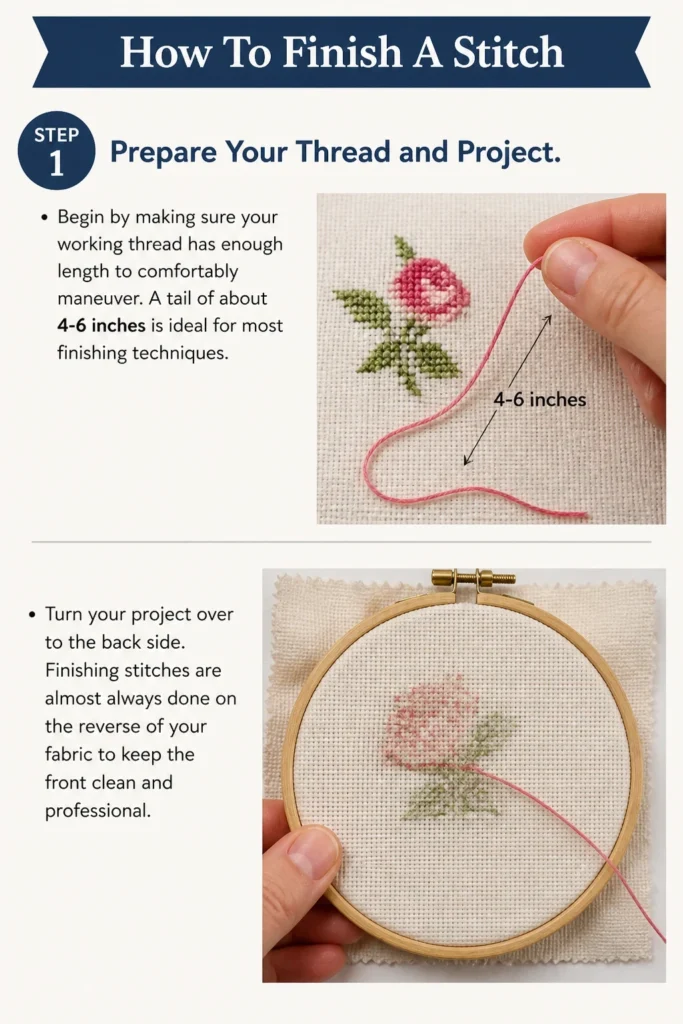
Turn your project over to the back side. Finishing stitches are almost always done on the reverse of your fabric to keep the front clean and professional.
Step 2: Weave Through Existing Stitches
This is the most common and effective method for securing thread in hand embroidery, cross-stitch, and similar needlework. It creates friction, holding your thread in place without a bulky knot.
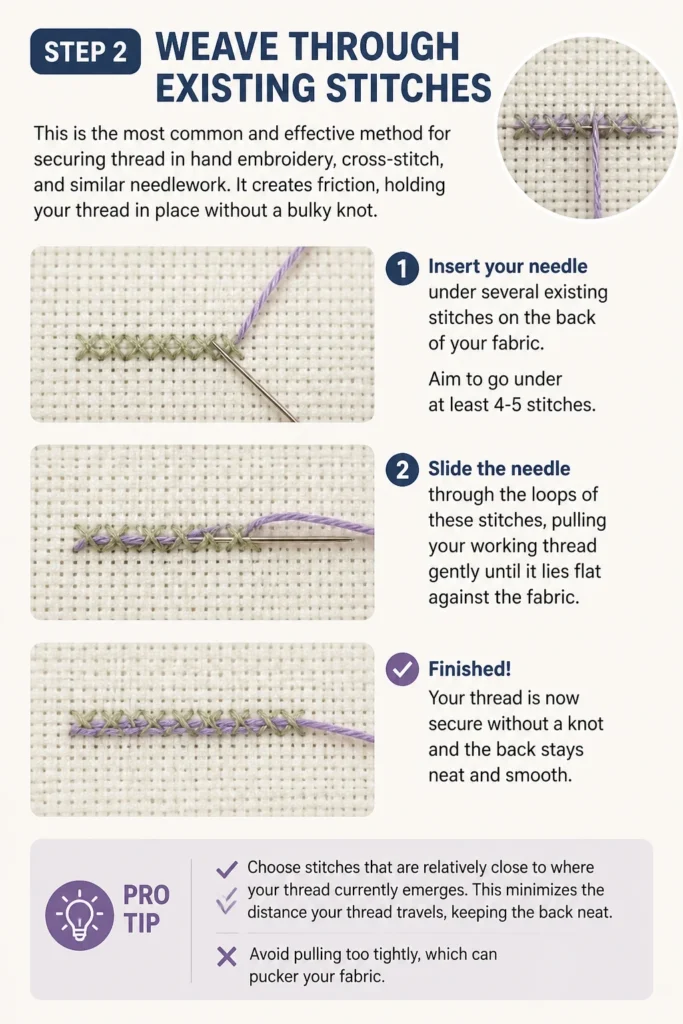
Insert your needle under several existing stitches on the back of your fabric. Aim to go under at least 4-5 stitches.
Slide the needle through the loops of these stitches, pulling your working thread gently until it lies flat against the fabric.
Pro Tip: Choose stitches that are relatively close to where your thread currently emerges. This minimizes the distance your thread travels, keeping the back neat. Avoid pulling too tightly, which can pucker your fabric.
Step 3: Create a Loop Back for Extra Security
For an even more secure finish, especially with slippery threads or projects that will endure heavy use, weaving in two directions adds significant hold.
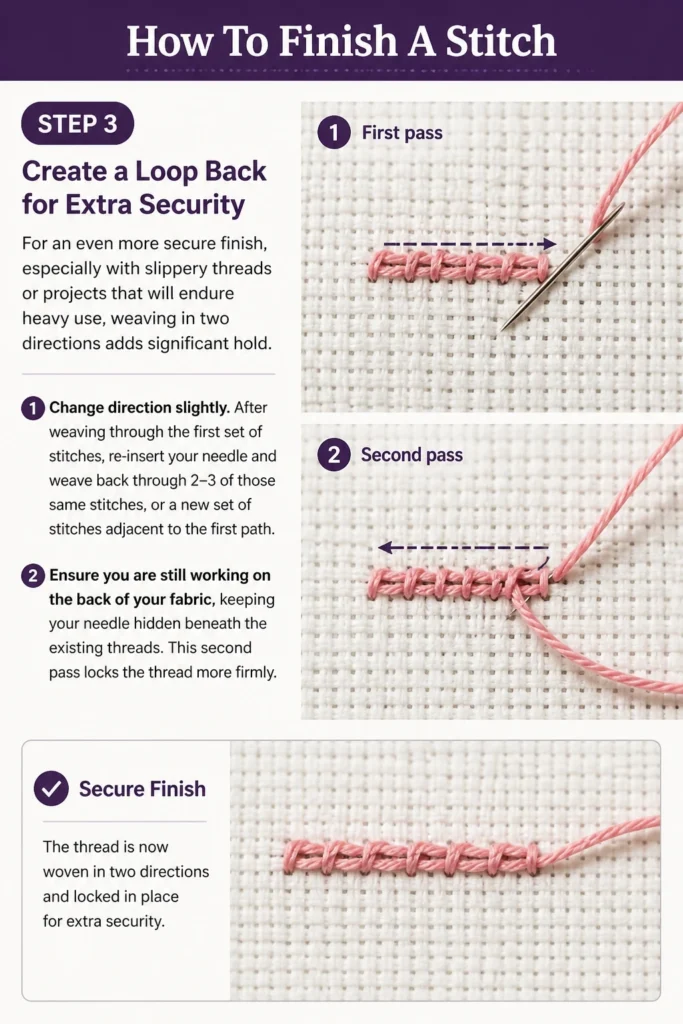
Change direction slightly. After weaving through the first set of stitches, re-insert your needle and weave back through 2-3 of those same stitches, or a new set of stitches adjacent to the first path.
Ensure you are still working on the back of your fabric, keeping your needle hidden beneath the existing threads. This second pass locks the thread more firmly.
Step 4: Form a Tiny, Secure Knot (Optional but Recommended)
While weaving alone is often sufficient, adding a small knot provides an extra layer of security, particularly for thread ends that might experience stress.
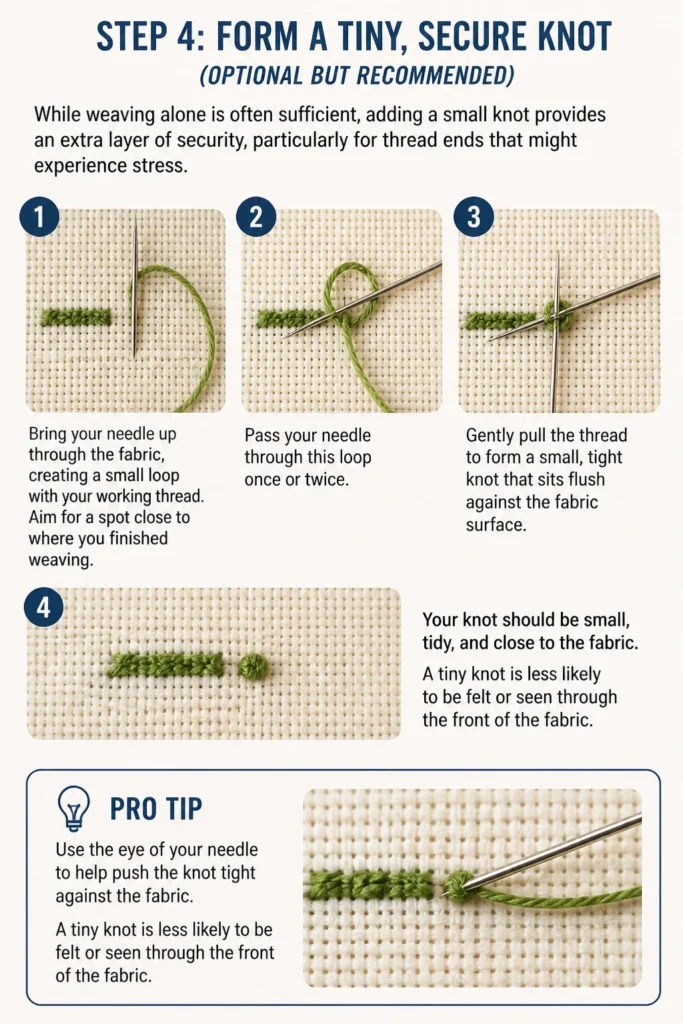
Bring your needle up through the fabric, creating a small loop with your working thread. Aim for a spot close to where you finished weaving.
Pass your needle through this loop once or twice. Gently pull the thread to form a small, tight knot that sits flush against the fabric surface.
Pro Tip: Use the eye of your needle to help push the knot tight against the fabric. A tiny knot is less likely to be felt or seen through the front of the fabric.
Step 5: Bury the Knot for a Clean Finish
To make your knot virtually invisible and prevent it from snagging, you can “bury” it within the fabric layers.
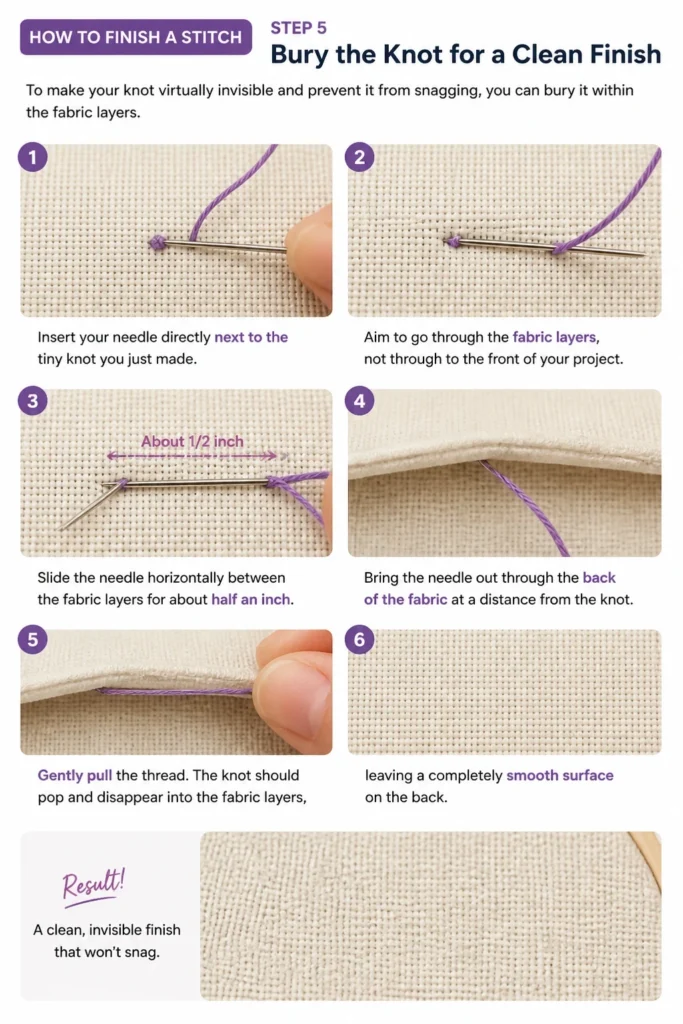
Insert your needle directly next to the tiny knot you just made. Aim to go through the fabric layers, not through to the front of your project.
Slide the needle horizontally between the fabric layers for about half an inch. Bring the needle out through the back of the fabric at a distance from the knot.
Gently pull the thread. The knot should pop and disappear into the fabric layers, leaving a completely smooth surface on the back.
Step 6: Trim Your Thread
With your thread securely woven and potentially knotted and buried, it’s time to trim the excess. This step requires precision to prevent unraveling.
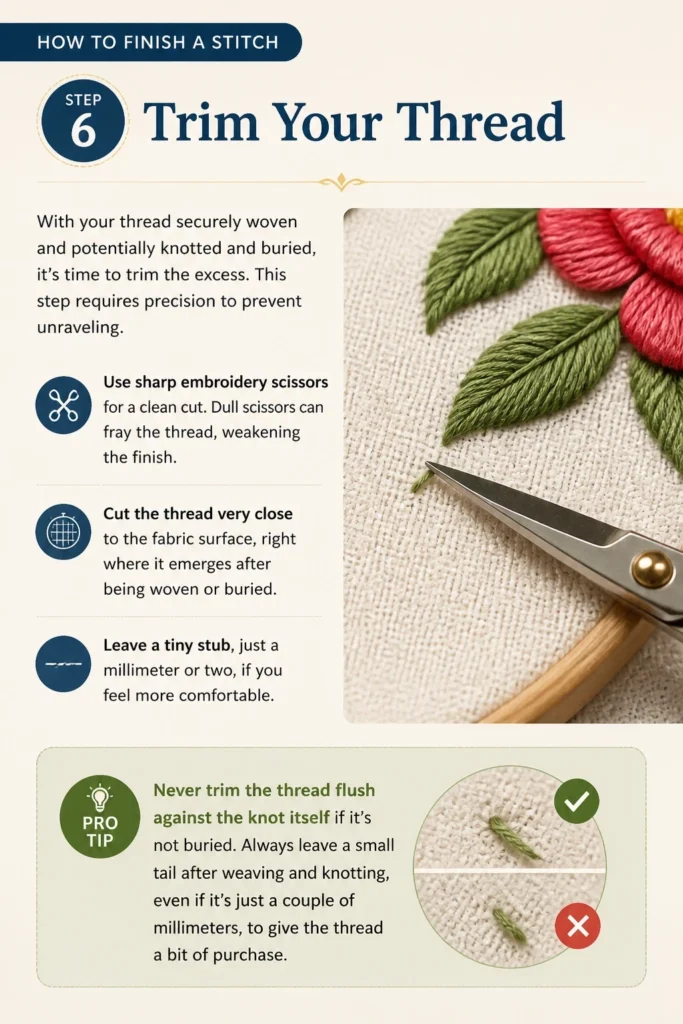
Use sharp embroidery scissors for a clean cut. Dull scissors can fray the thread, weakening the finish.
Cut the thread very close to the fabric surface, right where it emerges after being woven or buried. Leave a tiny stub, just a millimeter or two, if you feel more comfortable.
Pro Tip: Never trim the thread flush against the knot itself if it’s not buried. Always leave a small tail after weaving and knotting, even if it’s just a couple of millimeters, to give the thread a bit of purchase.
Step 7: Check Your Work
The final step is to inspect your finish. A quick check ensures durability and neatness.
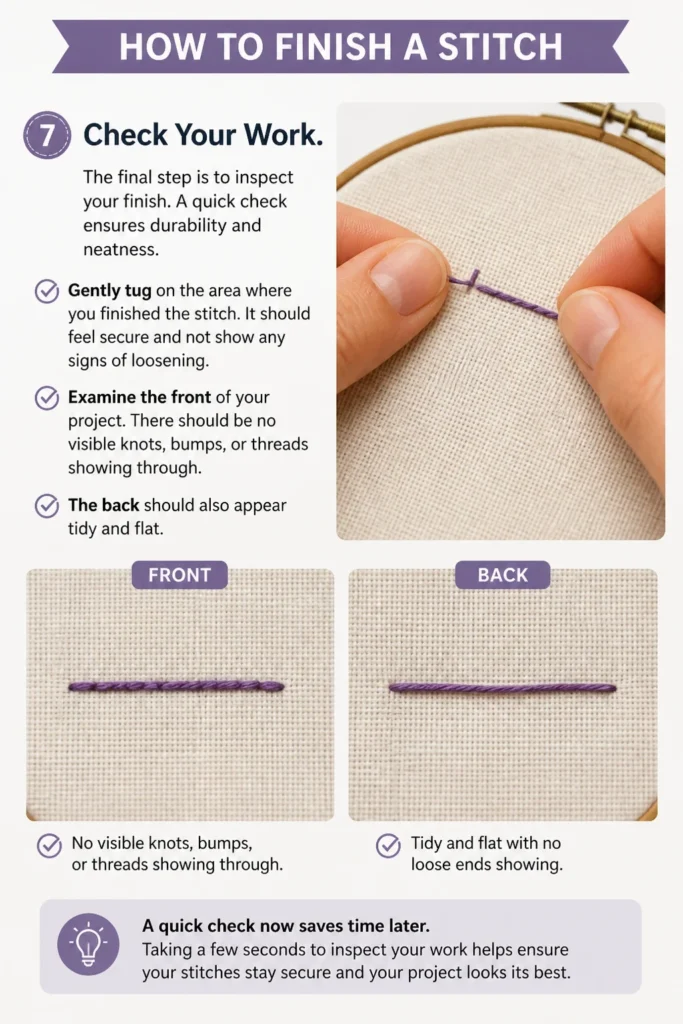
Gently tug on the area where you finished the stitch. It should feel secure and not show any signs of loosening.
Examine the front of your project. There should be no visible knots, bumps, or threads showing through. The back should also appear tidy and flat.
Common Mistakes to Avoid
Trimming Thread Too Close
Cutting your thread right at the fabric surface without proper securing is a common pitfall. This leaves no allowance for the thread to grip, leading to unraveling with time or washing. Always ensure you have woven the thread through existing stitches or tied a secure, buried knot before making your final cut.
Not Enough Weaving
Simply weaving through one or two stitches on the back of your work often isn’t enough to create sufficient friction. The thread can easily slip out, especially after handling or washing. Aim to weave through at least 4-5 stitches, and preferably in two different directions, to ensure a robust hold.
Knots That Are Too Large or Visible
While knots add security, a large or poorly placed knot can create a noticeable lump on the front of your fabric or be easily snagged. Strive for tiny, tight knots that sit flat against the fabric. Practice burying these knots within the fabric layers for a truly professional and invisible finish.
Pulling Thread Too Tightly
When securing your thread, it’s natural to want a tight finish. However, pulling the thread too tautly during weaving or knotting can cause the fabric to pucker or distort. This creates an uneven surface and can make your project look unprofessional. Maintain gentle tension, just enough to keep the thread flat against the fabric without pulling the material itself.
Troubleshooting
Thread Keeps Unraveling
If your finished stitches are coming undone, the most likely cause is insufficient securing. You might not have woven the thread through enough existing stitches. Try weaving through a longer path of stitches, ensuring you reverse direction at least once for added friction. Adding a small, tight knot that is then buried can also significantly improve security.
Knot is Visible Through the Fabric
A visible knot suggests it wasn’t properly hidden or was too large to begin with. Ensure your knots are as small and flat as possible. When burying the knot, make sure your needle goes deep enough into the fabric layers. Pull gently but firmly to make the knot “pop” inside the fabric, completely disappearing from view on both sides.
Fabric Puckering After Finishing
Fabric puckering indicates that you are pulling your thread too tightly during the finishing process. This can happen when weaving or when tightening a knot. The key is to use gentle, even tension. The thread should lie flat against the fabric, but not pull on the fabric fibers themselves. Practice maintaining a relaxed grip on your thread and needle.
Key Takeaways
- Always finish your thread on the back of your work for a clean appearance.
- Weaving through multiple existing stitches creates essential friction for security.
- Reversing the weaving direction adds significant strength to your finish.
- Small, tight knots offer extra security and should be buried for invisibility.
- Use sharp scissors to trim excess thread very close to the fabric.
- Gentle, even tension is crucial to prevent fabric puckering and ensure a neat finish.
Frequently Asked Questions
How long should the tail be after finishing?
After you have securely woven and potentially knotted your thread, trim it very close to the fabric. Ideally, leave a tiny stub of 1-2 millimeters. This small amount of thread provides a bit of extra security without being noticeable or prone to snagging.
Can I use fabric glue to finish a stitch?
While fabric glue can secure thread, it’s generally not recommended for most needlework projects. Glue can stiffen the fabric, become brittle over time, or leave a visible residue. Traditional weaving and knotting methods provide a more durable, flexible, and aesthetically pleasing finish that integrates seamlessly with your work.
Does the type of fabric affect how I finish a stitch?
Yes, the fabric type can influence your finishing technique. Loosely woven fabrics might require weaving through more stitches or using a slightly larger, yet still buried, knot for extra security. Tightly woven fabrics offer more resistance, making it easier to bury knots and secure threads within their layers. Always adapt your tension to the fabric’s characteristics.
What if I don’t have enough stitches to weave through?
If you’re working on a very sparse area or have very few stitches, you might need to get creative. Consider taking a few small, almost invisible stitches directly into the fabric itself, creating a small grid to weave through. Alternatively, make a very secure, tiny knot and bury it deeply within the fabric layers, ensuring it’s completely hidden.
Our Top Recommended Finds
- Sharp Embroidery Scissors: Essential for clean, precise cuts that prevent fraying.
- Assorted Hand Needles: Having a variety of sizes ensures you always have the right needle for different threads and fabric thicknesses.
- Thimble: Protects your finger and helps push the needle through dense fabric when burying knots.
Mastering Your Craft, One Finish at a Time
Finishing a stitch might seem like a small detail, but it’s a testament to your skill and patience. A secure, invisible finish elevates your work from merely complete to truly professional.
Take pride in these final steps. They ensure your beautiful creations stand the test of time, becoming cherished pieces rather than unraveling memories.
Practice these techniques on your next project. You’ll soon find that a perfect finish becomes second nature, freeing you to focus on the joy of creation.