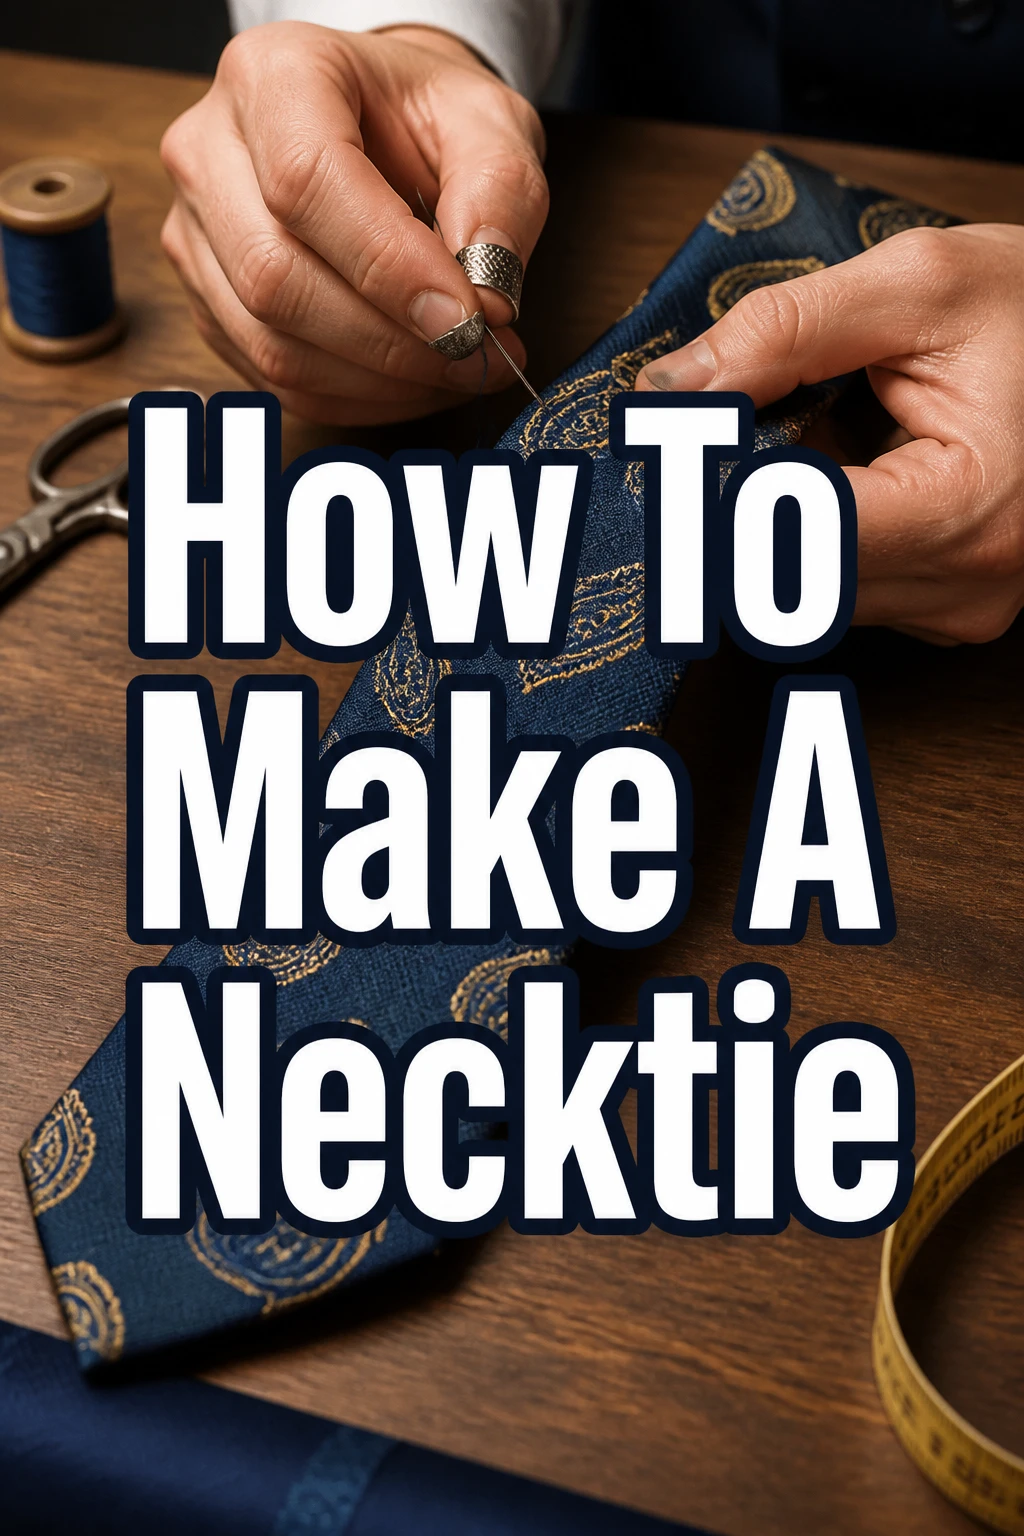
How To Make A Necktie
I remember the first time I tried to make a necktie, it felt like a mountain of fabric and stitches.
Years later, after countless patterns and prototypes, I’ve refined the process into something truly achievable for anyone.
This guide distills that hands-on experience, offering you a clear path to crafting your own stylish neckwear.
Quick Overview
You’re about to embark on a creative journey, transforming simple fabric into a sophisticated accessory. This guide will walk you through every step, from selecting your materials to the final stitch, ensuring you craft a tie that’s both beautiful and professional.
You’ll learn how to cut fabric on the bias, properly interline for structure, sew precise seams, and finish your tie with elegant hand stitches. By the end, you’ll have a unique, handmade necktie ready to wear or gift.
- Time needed: 4-6 hours
- Difficulty: Intermediate
- What you’ll need: Outer fabric, lining fabric, fusible interlining, matching thread, sewing machine, iron, sharp fabric scissors, tailor’s chalk, necktie pattern, pins, hand-sewing needle.
Step-by-Step Instructions
Step 1: Gather Your Materials and Pattern
Collect all necessary fabrics for your necktie project. This includes your chosen outer fabric, a complementary lining fabric, and a suitable fusible interlining.
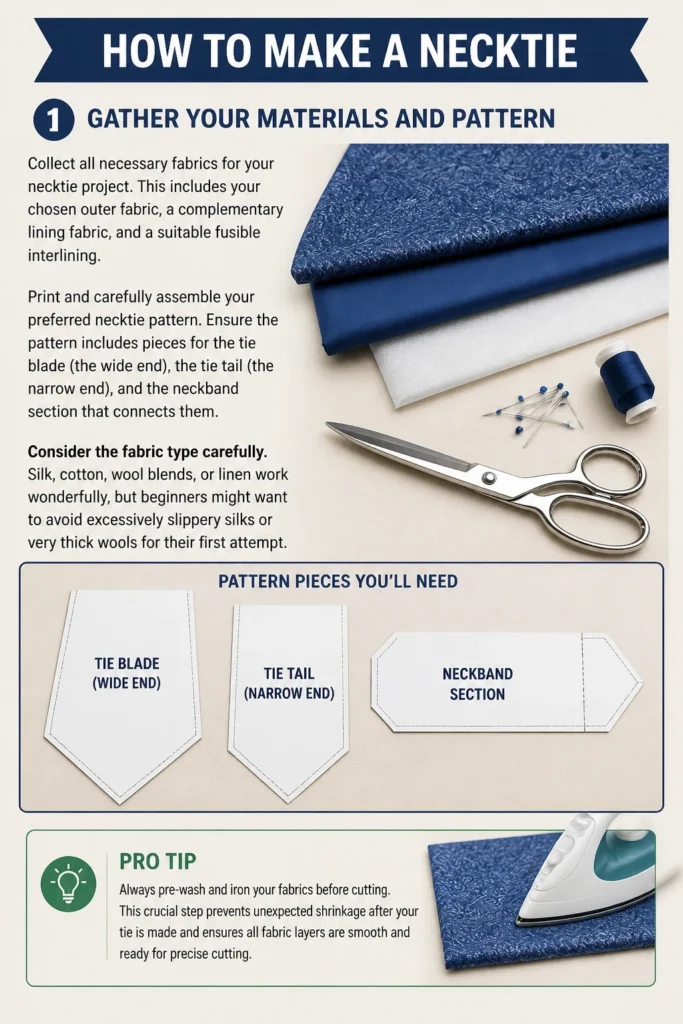
Print and carefully assemble your preferred necktie pattern. Ensure the pattern includes pieces for the tie blade (the wide end), the tie tail (the narrow end), and the neckband section that connects them.
Consider the fabric type carefully. Silk, cotton, wool blends, or linen work wonderfully, but beginners might want to avoid excessively slippery silks or very thick wools for their first attempt.
Pro Tip: Always pre-wash and iron your fabrics before cutting. This crucial step prevents unexpected shrinkage after your tie is made and ensures all fabric layers are smooth and ready for precise cutting.
Step 2: Cut Your Fabric Pieces
Lay your outer fabric flat on a large surface, ensuring it is perfectly aligned with the bias grain. This means positioning your pattern pieces at a 45-degree angle to the fabric’s selvage edge.
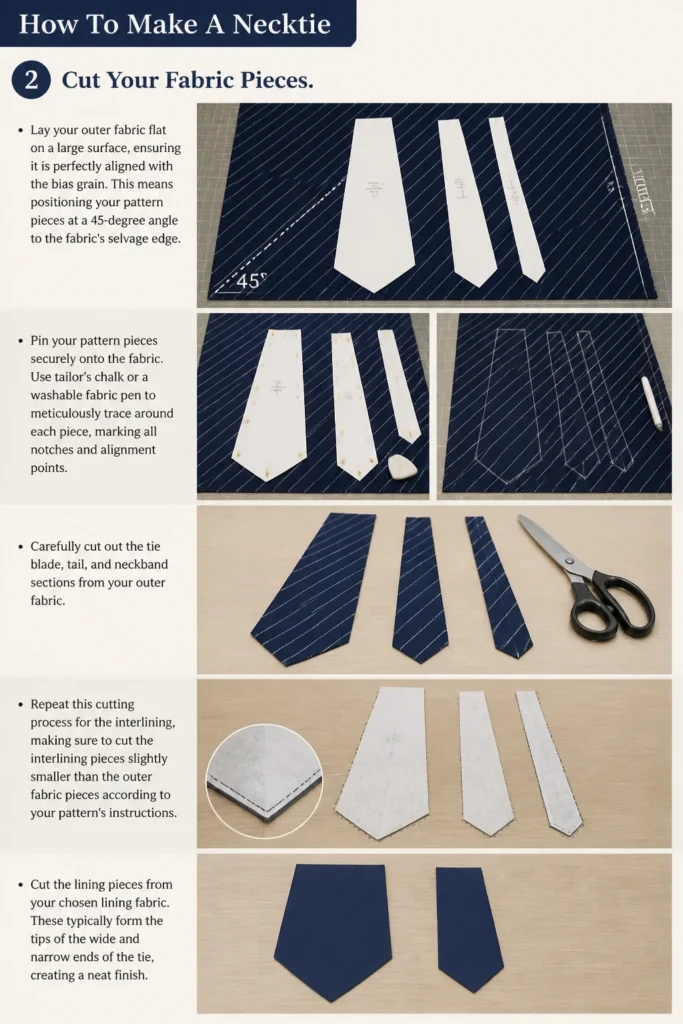
Pin your pattern pieces securely onto the fabric. Use tailor’s chalk or a washable fabric pen to meticulously trace around each piece, marking all notches and alignment points.
Carefully cut out the tie blade, tail, and neckband sections from your outer fabric. Repeat this cutting process for the interlining, making sure to cut the interlining pieces slightly smaller than the outer fabric pieces according to your pattern’s instructions.
Cut the lining pieces from your chosen lining fabric. These typically form the tips of the wide and narrow ends of the tie, creating a neat finish.
Step 3: Prepare the Interlining
Fuse the interlining pieces to the wrong side of your outer fabric tie blade and tail sections. Follow the manufacturer’s instructions for your specific fusible interfacing, using the correct heat and steam settings.
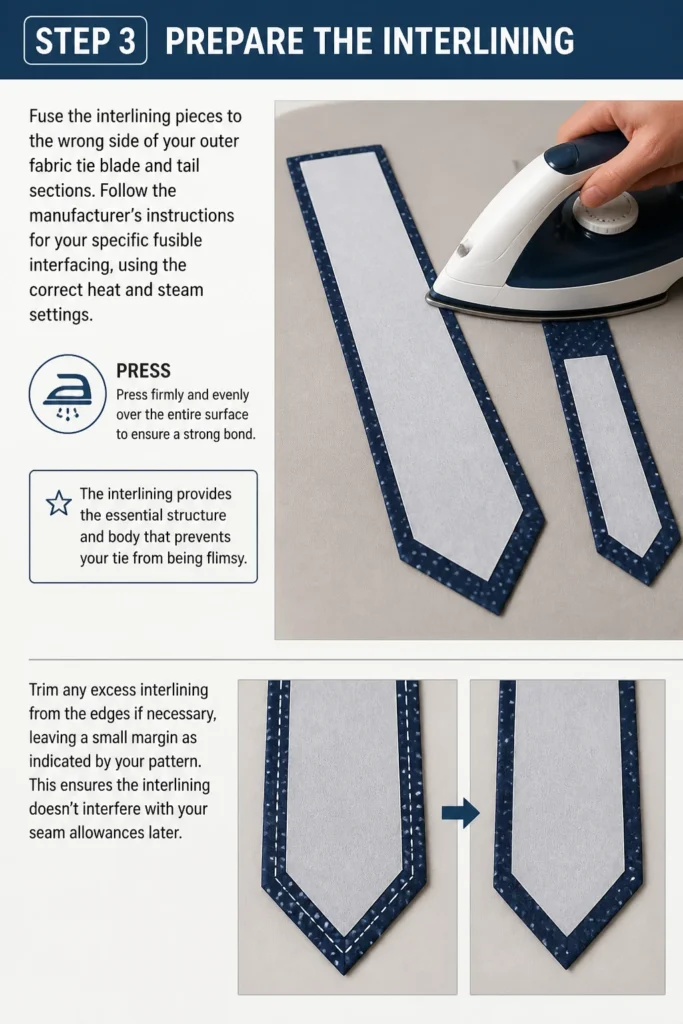
Press firmly and evenly over the entire surface to ensure a strong bond. The interlining provides the essential structure and body that prevents your tie from being flimsy.
Trim any excess interlining from the edges if necessary, leaving a small margin as indicated by your pattern. This ensures the interlining doesn’t interfere with your seam allowances later.
Step 4: Assemble the Tie Body
Join the main tie pieces together to form the full length of the tie. Place the tie blade and tail sections right sides together, carefully aligning the angled edges where they connect to the neckband piece.
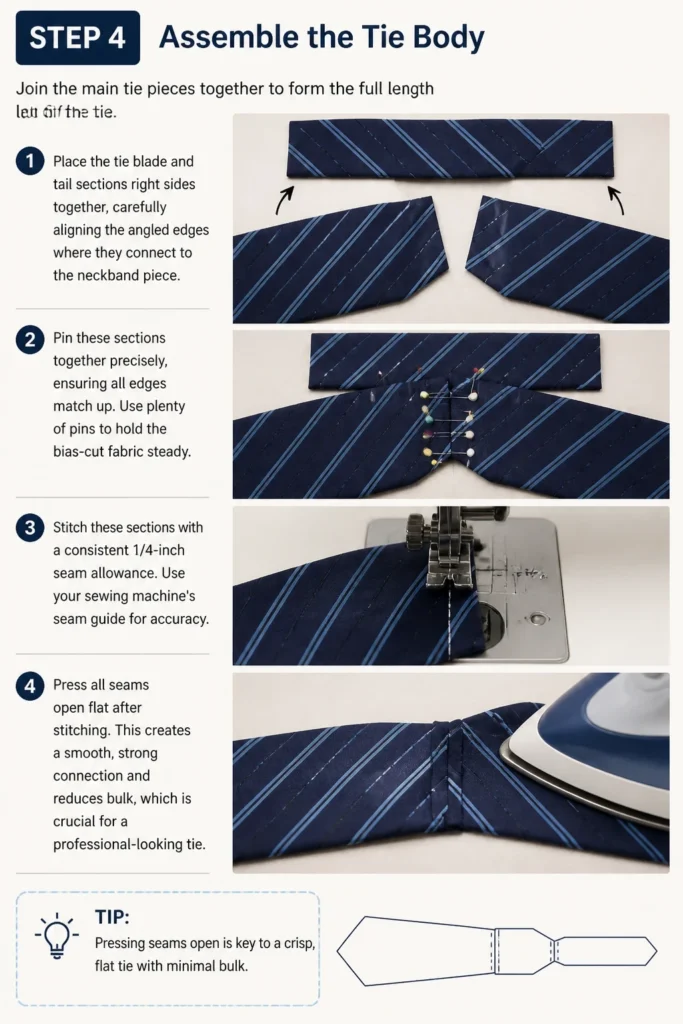
Pin these sections together precisely, ensuring all edges match up. Use plenty of pins to hold the bias-cut fabric steady.
Stitch these sections with a consistent 1/4-inch seam allowance. Use your sewing machine’s seam guide for accuracy.
Press all seams open flat after stitching. This creates a smooth, strong connection and reduces bulk, which is crucial for a professional-looking tie.
Step 5: Attach the Lining Pieces
Fold over the raw edges of the tie’s wide and narrow ends (the blade and tail). Press these folds firmly, creating a crisp edge.
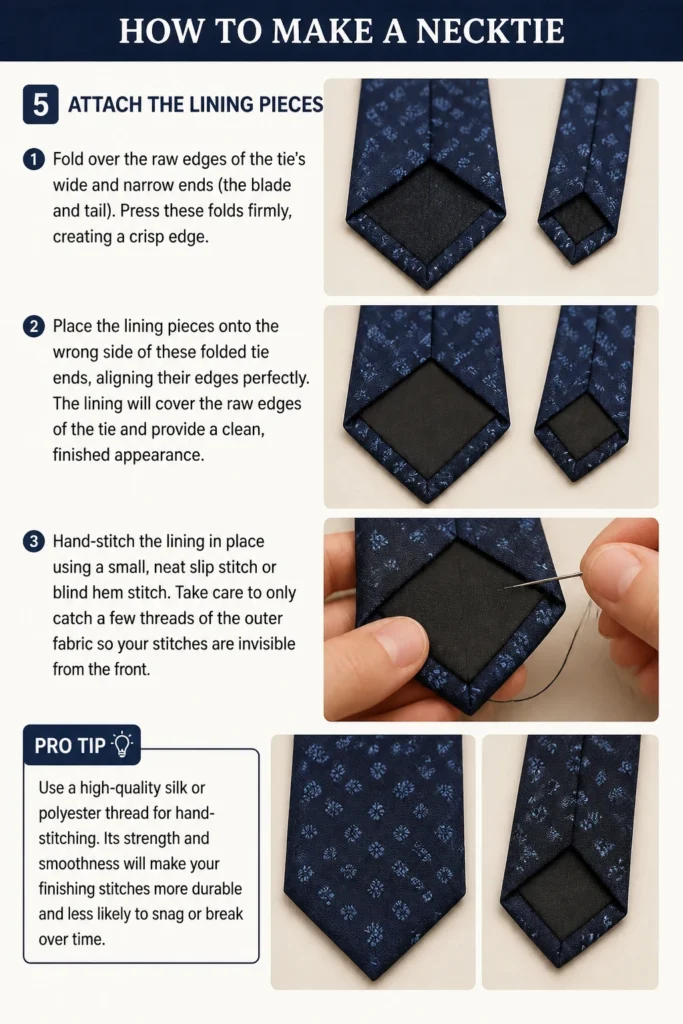
Place the lining pieces onto the wrong side of these folded tie ends, aligning their edges perfectly. The lining will cover the raw edges of the tie and provide a clean, finished appearance.
Hand-stitch the lining in place using a small, neat slip stitch or blind hem stitch. Take care to only catch a few threads of the outer fabric so your stitches are invisible from the front.
Pro Tip: Use a high-quality silk or polyester thread for hand-stitching. Its strength and smoothness will make your finishing stitches more durable and less likely to snag or break over time.
Step 6: Fold and Press the Tie Edges
Lay the tie flat with the wrong side facing up. The interlining should now be securely fused to the back of the outer fabric.
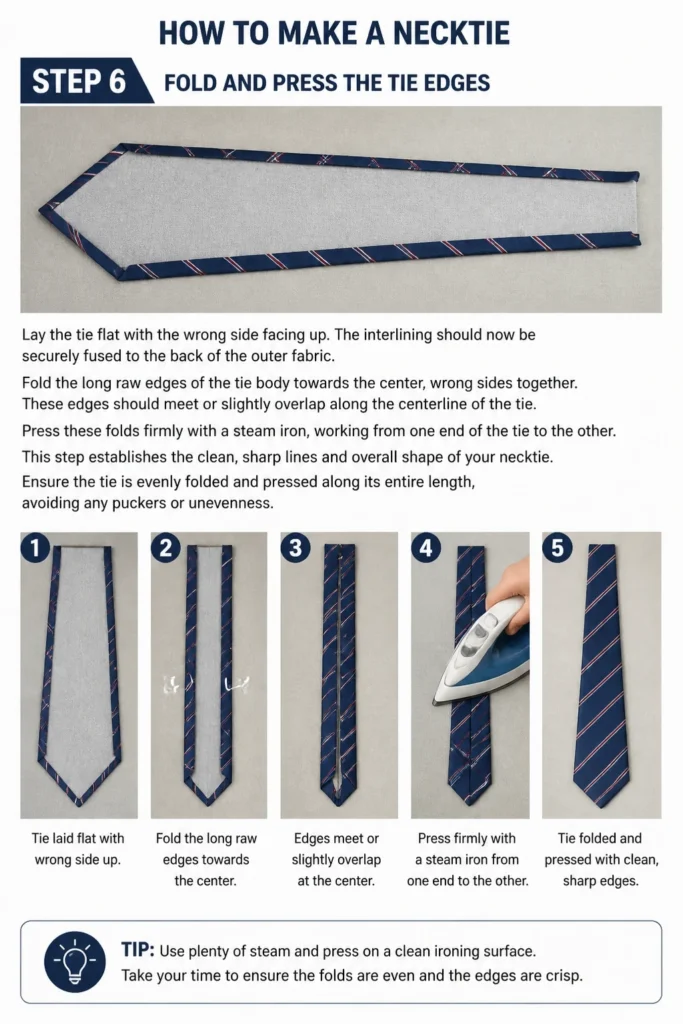
Fold the long raw edges of the tie body towards the center, wrong sides together. These edges should meet or slightly overlap along the centerline of the tie.
Press these folds firmly with a steam iron, working from one end of the tie to the other. This step establishes the clean, sharp lines and overall shape of your necktie.
Ensure the tie is evenly folded and pressed along its entire length, avoiding any puckers or unevenness.
Step 7: Stitch the Tie Closed
Hand-stitch the folded edges together along the entire length of the back of the tie. Use a loose slip stitch or a whip stitch for this step.
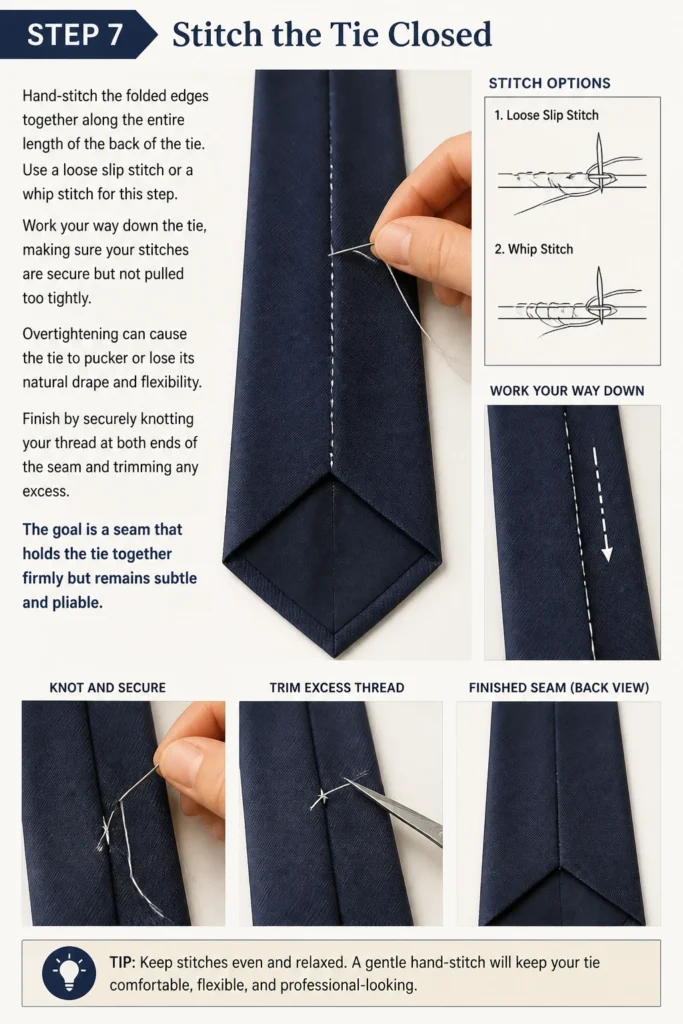
Work your way down the tie, making sure your stitches are secure but not pulled too tightly. Overtightening can cause the tie to pucker or lose its natural drape and flexibility.
Finish by securely knotting your thread at both ends of the seam and trimming any excess. The goal is a seam that holds the tie together firmly but remains subtle and pliable.
Step 8: Create the Keeper Loop
Cut a small rectangular piece of your outer fabric, typically about 2 inches wide by 4 inches long. This will form the loop that holds the narrow end of the tie.
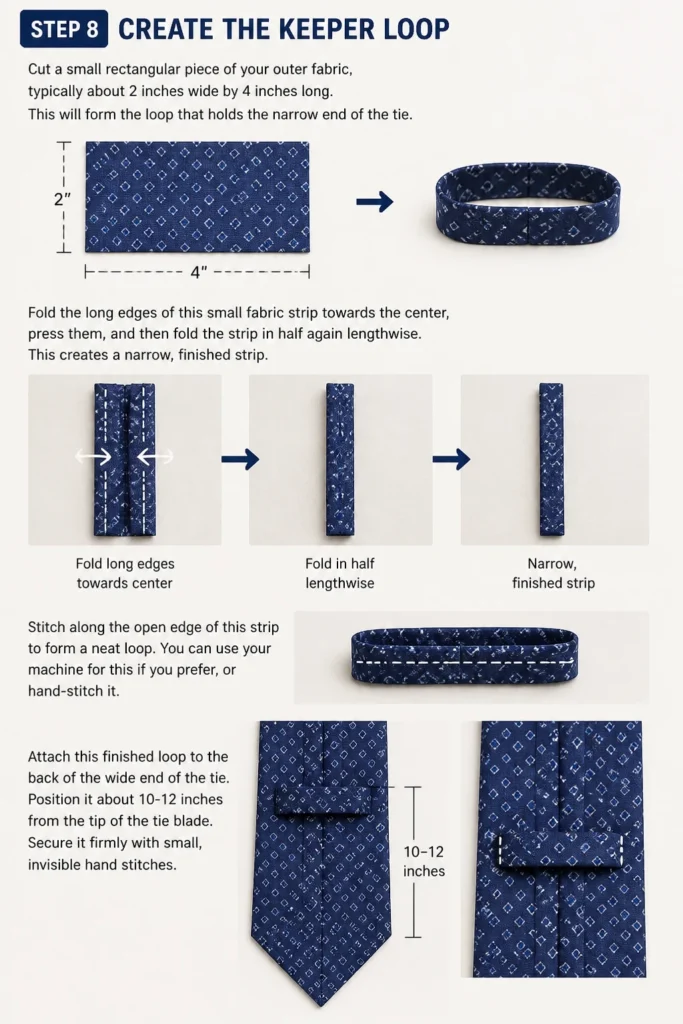
Fold the long edges of this small fabric strip towards the center, press them, and then fold the strip in half again lengthwise. This creates a narrow, finished strip.
Stitch along the open edge of this strip to form a neat loop. You can use your machine for this if you prefer, or hand-stitch it.
Attach this finished loop to the back of the wide end of the tie. Position it about 10-12 inches from the tip of the tie blade. Secure it firmly with small, invisible hand stitches.
Common Mistakes to Avoid
Cutting Off-Grain
Cutting fabric against the bias is a frequent mistake for beginners. This error leads to a tie that twists awkwardly, drapes poorly, and wrinkles excessively when worn. Always take extra time to ensure your pattern pieces are aligned at a true 45-degree angle to the fabric’s selvage for optimal tie performance and appearance.
Skipping Interlining
Omitting the interlining will result in a flimsy, lifeless tie that lacks any substantial body or shape. The interlining is absolutely crucial for giving the necktie its characteristic structure, crispness, and a professional look. Always invest in a good quality fusible interfacing that is appropriate for neckties.
Uneven Seam Allowances
Inconsistent seam allowances, particularly when joining the main tie pieces, can create a lopsided or wavy tie. Practice stitching straight lines on scrap fabric and always use a seam guide on your sewing machine to maintain a precise 1/4-inch allowance. Accuracy in this step significantly impacts the finished tie’s symmetry and quality.
Over-Tight Hand Stitching
When hand-stitching the tie closed or attaching the lining, pulling your stitches too tightly can cause the fabric to pucker or create unwanted tension. Aim for secure but relaxed stitches that allow the fabric to lie flat and maintain its natural, fluid drape. Gentle tension is key for a smooth finish.
Troubleshooting
Tie Looks Twisted or Warped
This issue most often suggests the fabric was not cut perfectly on the bias, or that the seams were not pressed correctly during construction. To remedy this, carefully unpick the main seams of the tie. Re-align your fabric on the bias if possible, and then press all seams open meticulously as you re-stitch them with precision.
Tie Feels Too Stiff or Too Limp
The stiffness or limpness of your tie is directly related to the interlining used. If the tie feels too stiff, you might have selected an interfacing that is too heavy for your fabric or fused it incorrectly. If it feels too limp, the interlining might be too light or was perhaps skipped entirely. For future projects, experiment with different weights of fusible interfacing to achieve your desired tie feel.
Visible Stitches on the Front
Visible stitches on the front of your tie typically occur when attaching the lining or closing the back seam. This means your slip stitches or blind hem stitches are catching too much fabric from the outer layer. To avoid this, practice your hand-stitching technique on scrap fabric. Aim for very small, shallow stitches that only pick up a few threads of the outer fabric, making them truly invisible.
Key Takeaways
- Always cut your tie fabric on the bias (45-degree angle) for proper drape, flexibility, and wrinkle resistance.
- Utilize interlining to provide essential structure, body, and a crisp, professional feel to your necktie.
- Press seams open and flat at each stage of construction for a clean, professional, and bulk-free finish.
- Practice hand-stitching techniques for neat, invisible finishes on the lining attachment and the final back seam.
- Pay attention to consistent seam allowances throughout the process to ensure a symmetrical and well-shaped tie.
- Don’t rush the creation process; patience and precision at each step lead to a higher quality, beautifully handmade accessory.
Frequently Asked Questions
What kind of fabric is best for a necktie?
Traditional choices for neckties include silk, wool, and linen, valued for their luxurious feel, excellent drape, and durability. Cotton and various blends can also work well, especially for more casual ties. For your initial project, avoid fabrics that are excessively thick, overly stretchy, or prone to significant fraying, as these can be challenging to work with.
Can I make a tie without a sewing machine?
While a sewing machine significantly speeds up the process and helps maintain consistent seams, it is entirely possible to hand-stitch a necktie. This approach will require considerably more time and demand very precise hand-sewing skills, but the final result can be equally beautiful, unique, and truly bespoke.
How long should a finished necktie be?
The standard length for a finished necktie typically ranges between 57 and 59 inches (145-150 cm). However, this can be adjusted based on personal preference and the wearer’s height. When tied correctly, the tip of the tie’s blade should ideally just touch the top of the wearer’s belt buckle.
What’s the purpose of cutting on the bias?
Cutting fabric on the bias means orienting the pattern pieces at a 45-degree angle to the fabric’s selvage. This technique allows the fabric to stretch slightly and drape beautifully, preventing the tie from twisting, wrinkling, or feeling stiff. It imparts the tie with its characteristic flexibility and elegant fall, essential for a well-made accessory.
Our Top Recommended Finds
- High-Quality Silk Fabric: Choose a smooth, tightly woven silk twill or satin for a classic, luxurious finish that feels wonderful to the touch and drapes elegantly.
- Lightweight Fusible Interfacing: Essential for giving your tie structure without adding unnecessary bulk. Look for a non-woven, medium-weight option specifically designed for apparel.
- Fabric Shears: A sharp, comfortable pair of dedicated fabric scissors makes cutting on the bias much easier and more precise, helping to reduce fraying and ensure clean edges.
Your Signature Style, Stitched by Hand
Making your own necktie is a truly rewarding journey, transforming simple fabric into a distinctive statement piece. It’s more than just a garment; it’s a reflection of your unique style and dedicated craftsmanship.
Now that you have all the steps, gather your materials and let your creativity flow. Imagine the profound satisfaction of wearing or gifting a tie made entirely with your own hands.
Perhaps your next project could be a matching pocket square, a custom bow tie, or even experimenting with different tie widths and styles. Start stitching your personal legacy today and wear your creativity with pride.