How To Make Mail Paper
There’s a special joy in receiving a handwritten letter, especially one penned on unique paper.
Crafting your own mail paper adds an incomparable personal touch, transforming a simple note into a cherished keepsake.
I’ve spent countless hours experimenting with pulp and presses, and I’m excited to share the hands-on secrets to making paper that truly stands out.
Quick Overview
This guide will walk you through creating beautiful, custom paper perfect for letters, invitations, or unique stationery. You will learn to transform everyday materials into something extraordinary and entirely your own.
- Time needed: 2-4 hours (plus drying time of 24-48 hours)
- Difficulty: Beginner
- What you’ll need: Scrap paper, blender, mould and deckle, basin, towels, sponges.
Step-by-Step Instructions
Step 1: Gather Your Materials
Before you begin, collect all necessary items. Having everything ready prevents interruptions and makes the process smoother.
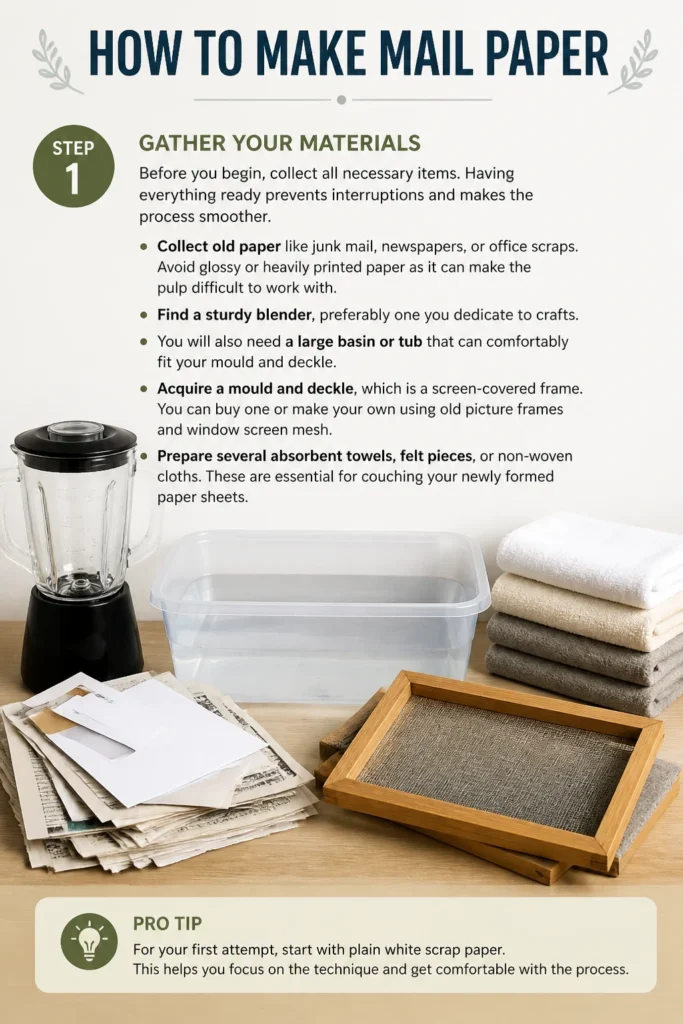
Collect old paper like junk mail, newspapers, or office scraps. Avoid glossy or heavily printed paper as it can make the pulp difficult to work with.
Find a sturdy blender, preferably one you dedicate to crafts. You will also need a large basin or tub that can comfortably fit your mould and deckle.
Acquire a mould and deckle, which is a screen-covered frame. You can buy one or make your own using old picture frames and window screen mesh.
Prepare several absorbent towels, felt pieces, or non-woven cloths. These are essential for couching your newly formed paper sheets.
Pro Tip: For your first attempt, start with plain white scrap paper. This helps you focus on the technique without worrying about color consistency.
Step 2: Prepare the Paper Pulp
The quality of your pulp directly impacts the texture and strength of your finished paper. Take your time with this step.
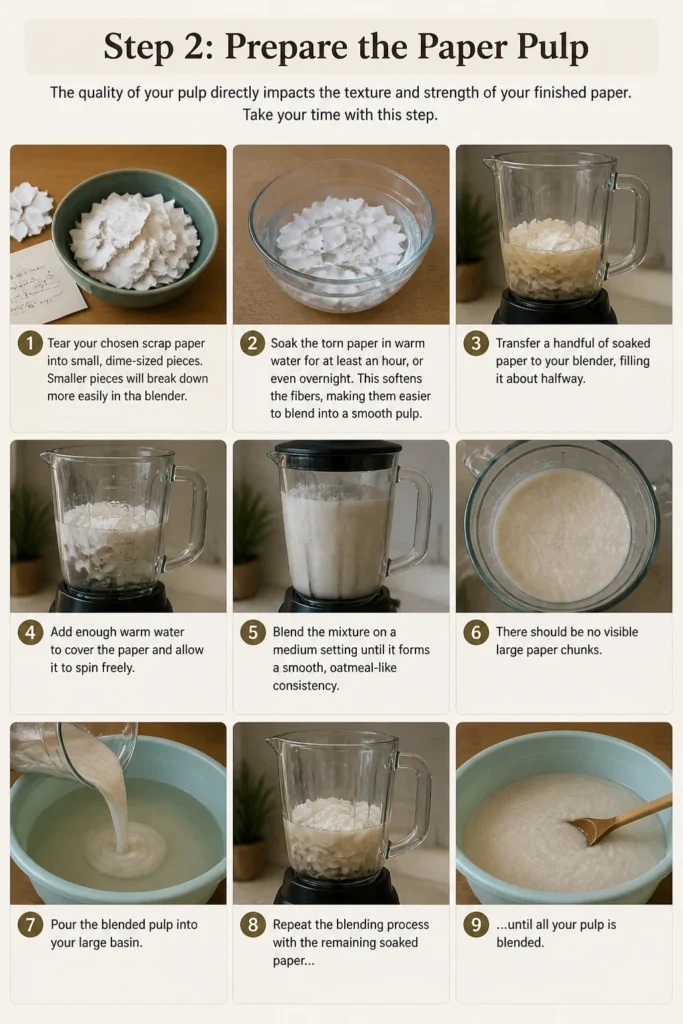
Tear your chosen scrap paper into small, dime-sized pieces. Smaller pieces will break down more easily in the blender.
Soak the torn paper in warm water for at least an hour, or even overnight. This softens the fibers, making them easier to blend into a smooth pulp.
Transfer a handful of soaked paper to your blender, filling it about halfway. Add enough warm water to cover the paper and allow it to spin freely.
Blend the mixture on a medium setting until it forms a smooth, oatmeal-like consistency. There should be no visible large paper chunks.
Pour the blended pulp into your large basin. Repeat the blending process with the remaining soaked paper until all your pulp is ready.
Add more water to the basin until the pulp mixture is thin enough for your mould and deckle to move through it easily. The consistency should be like a thin soup.
Step 3: Set Up Your Workspace
A well-organized workspace makes the paper-making process enjoyable and efficient. Protect your surfaces from water.
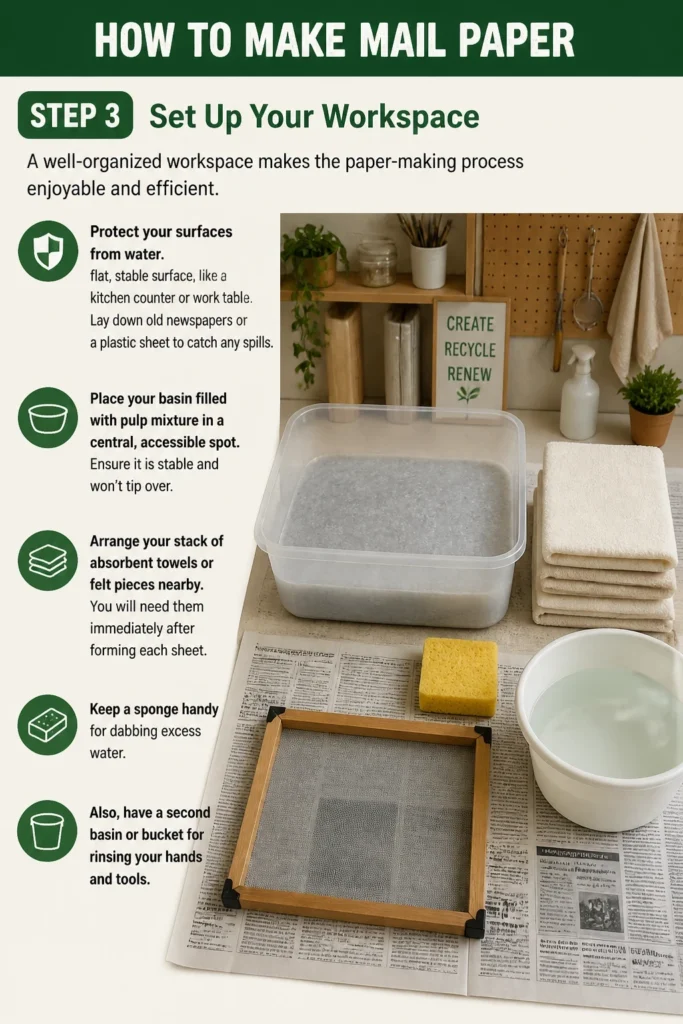
Choose a flat, stable surface, like a kitchen counter or work table. Lay down old newspapers or a plastic sheet to catch any spills.
Place your basin filled with pulp mixture in a central, accessible spot. Ensure it is stable and won’t tip over.
Arrange your stack of absorbent towels or felt pieces nearby. You will need them immediately after forming each sheet.
Keep a sponge handy for dabbing excess water. Also, have a second basin or bucket for rinsing your hands and tools.
Step 4: Form the Paper Sheet
This is where the magic happens, transforming pulp into a solid sheet of paper. Practice will make you more precise.
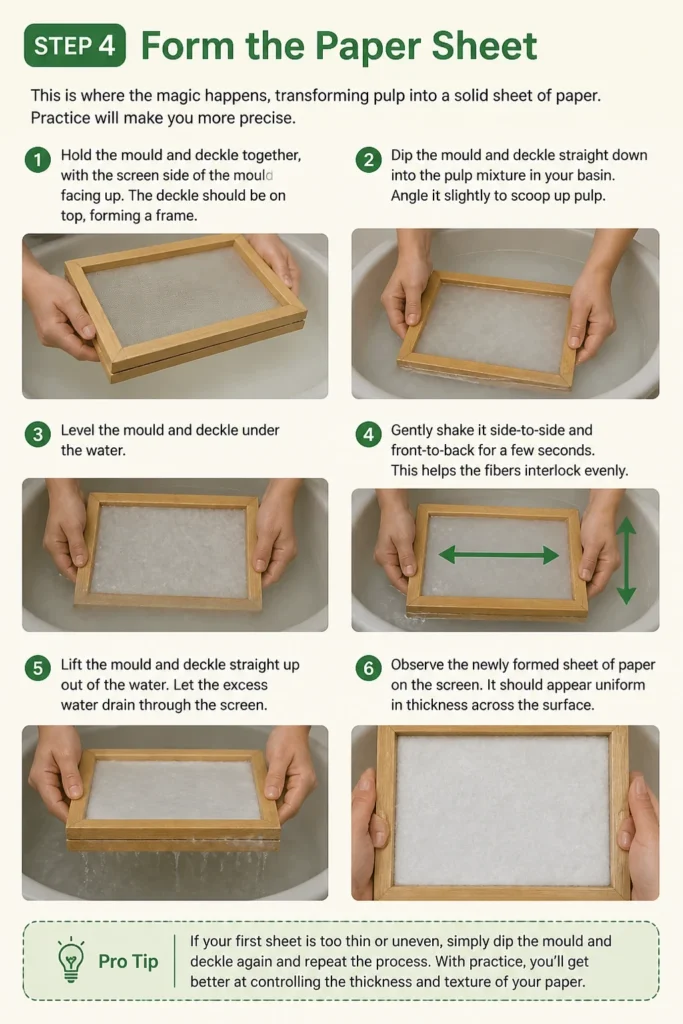
Hold the mould and deckle together, with the screen side of the mould facing up. The deckle should be on top, forming a frame.
Dip the mould and deckle straight down into the pulp mixture in your basin. Angle it slightly to scoop up pulp.
Level the mould and deckle under the water. Gently shake it side-to-side and front-to-back for a few seconds. This helps the fibers interlock evenly.
Lift the mould and deckle straight up out of the water. Let the excess water drain through the screen.
Observe the newly formed sheet of paper on the screen. It should appear uniform in thickness across the surface.
Pro Tip: If your first sheet is too thin or uneven, simply dip the mould and deckle back into the basin. The pulp will reintegrate, and you can try again.
Step 5: Couch the Paper
Couching is the process of transferring the wet paper sheet from the screen to an absorbent surface. This requires a gentle touch.
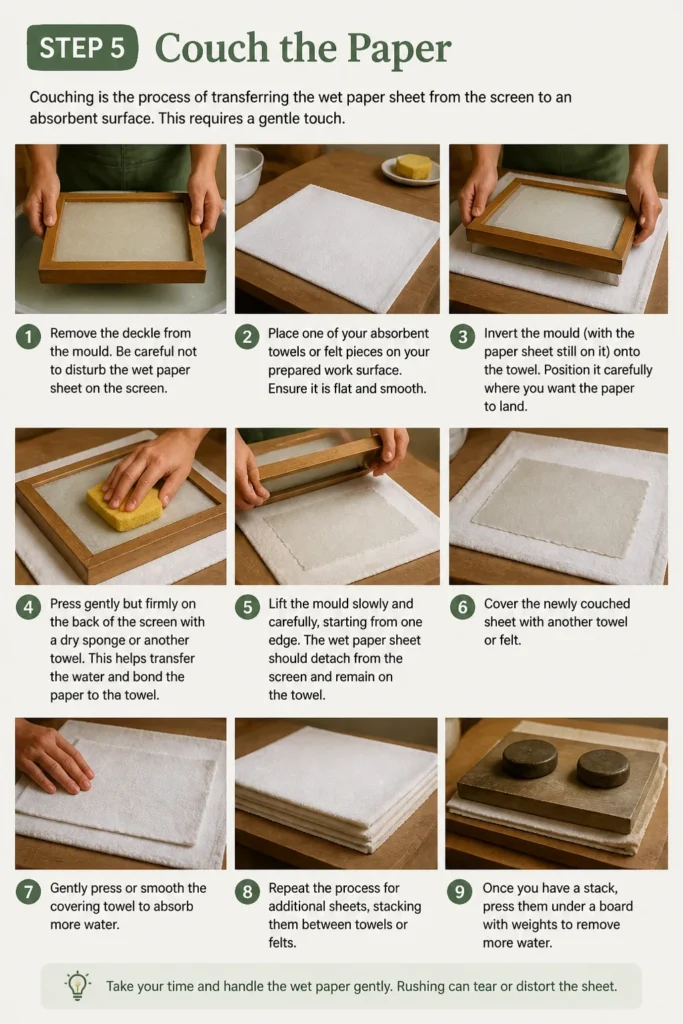
Remove the deckle from the mould. Be careful not to disturb the wet paper sheet on the screen.
Place one of your absorbent towels or felt pieces on your prepared work surface. Ensure it is flat and smooth.
Invert the mould (with the paper sheet still on it) onto the towel. Position it carefully where you want the paper to land.
Press gently but firmly on the back of the screen with a dry sponge or another towel. This helps transfer the water and bond the paper to the towel.
Lift the mould slowly and carefully, starting from one edge. The wet paper sheet should detach from the screen and remain on the towel.
Cover the newly couched sheet with another towel or felt piece. This prepares it for pressing and protects it.
Step 6: Press the Paper
Pressing removes a significant amount of water, speeding up drying and making the paper stronger. You can use various methods.
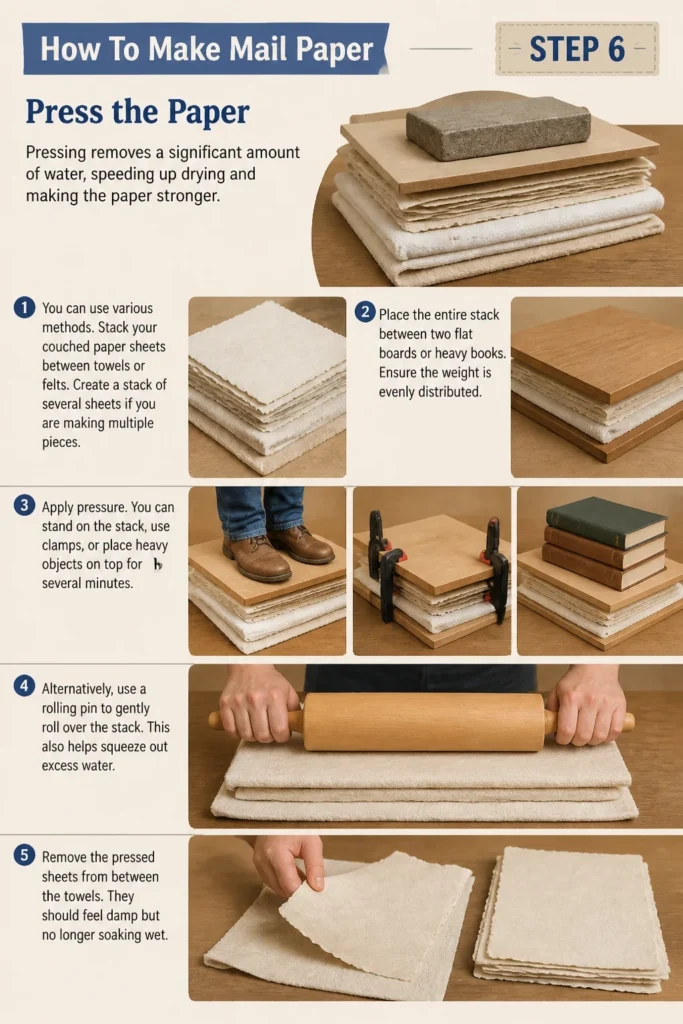
Stack your couched paper sheets between towels or felts. Create a stack of several sheets if you are making multiple pieces.
Place the entire stack between two flat boards or heavy books. Ensure the weight is evenly distributed.
Apply pressure. You can stand on the stack, use clamps, or place heavy objects on top for several minutes.
Alternatively, use a rolling pin to gently roll over the stack. This also helps squeeze out excess water.
Remove the pressed sheets from between the towels. They should feel damp but no longer soaking wet.
Step 7: Dry the Paper
Proper drying is crucial for preventing wrinkles and ensuring a flat, usable sheet. Patience is key in this stage.
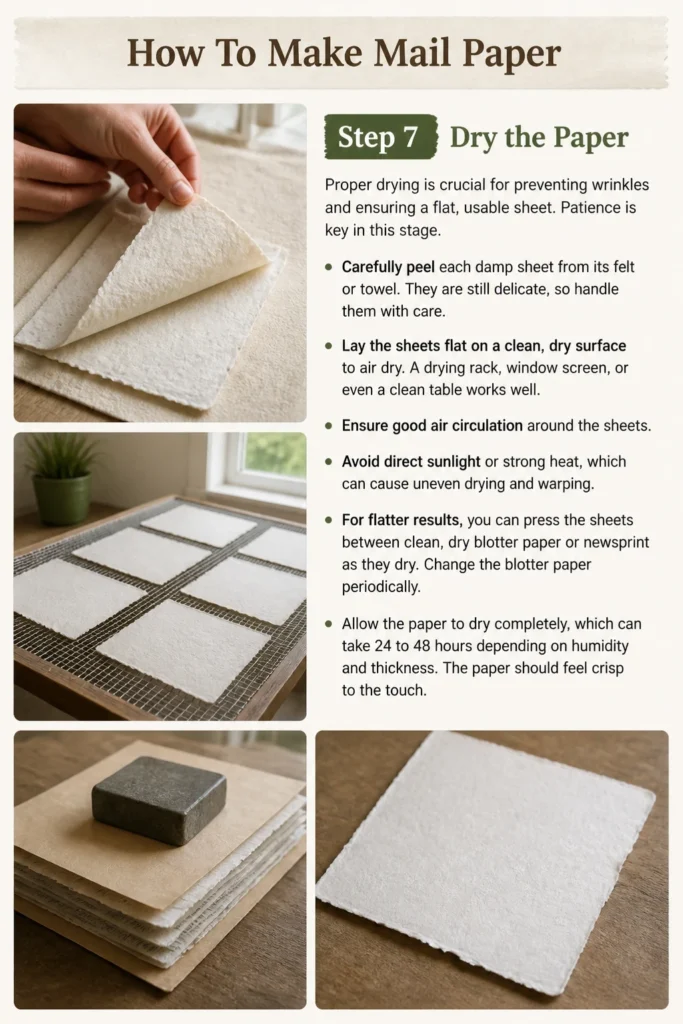
Carefully peel each damp sheet from its felt or towel. They are still delicate, so handle them with care.
Lay the sheets flat on a clean, dry surface to air dry. A drying rack, window screen, or even a clean table works well.
Ensure good air circulation around the sheets. Avoid direct sunlight or strong heat, which can cause uneven drying and warping.
For flatter results, you can press the sheets between clean, dry blotter paper or newsprint as they dry. Change the blotter paper periodically.
Allow the paper to dry completely, which can take 24 to 48 hours depending on humidity and thickness. The paper should feel crisp to the touch.
Step 8: Flatten and Finish
Once dry, your handmade paper might have a slight curl or uneven edges. This step refines it for use.
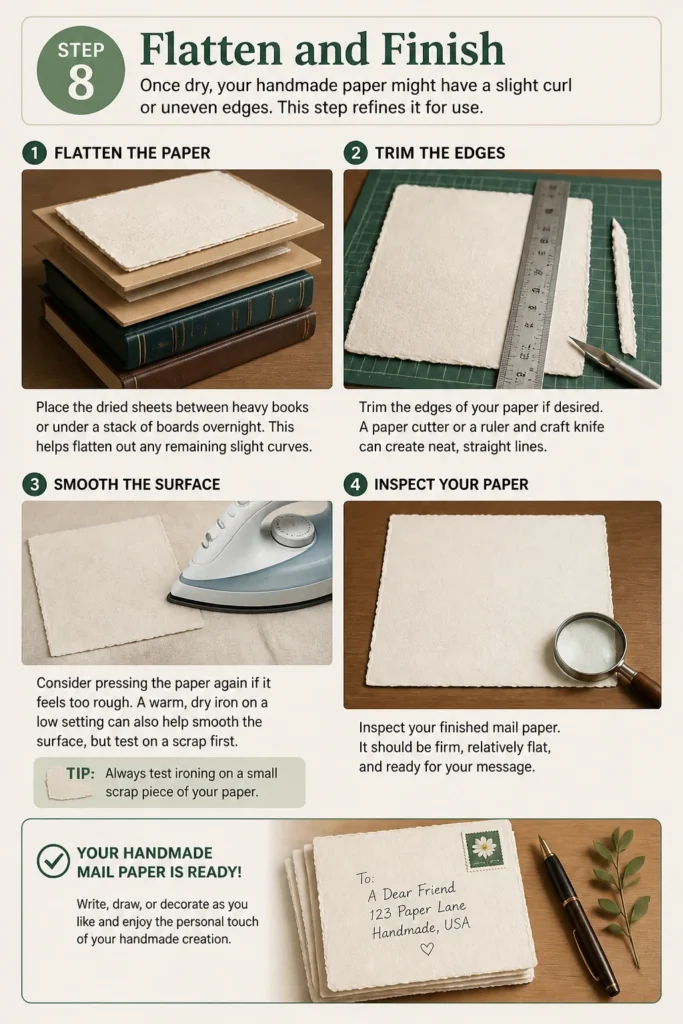
Place the dried sheets between heavy books or under a stack of boards overnight. This helps flatten out any remaining slight curves.
Trim the edges of your paper if desired. A paper cutter or a ruler and craft knife can create neat, straight lines.
Consider pressing the paper again if it feels too rough. A warm, dry iron on a low setting can also help smooth the surface, but test on a scrap first.
Inspect your finished mail paper. It should be firm, relatively flat, and ready for your message.
Step 9: Customize Your Mail Paper
Making mail paper is a chance to infuse your personality into every sheet. Experiment with different additions.
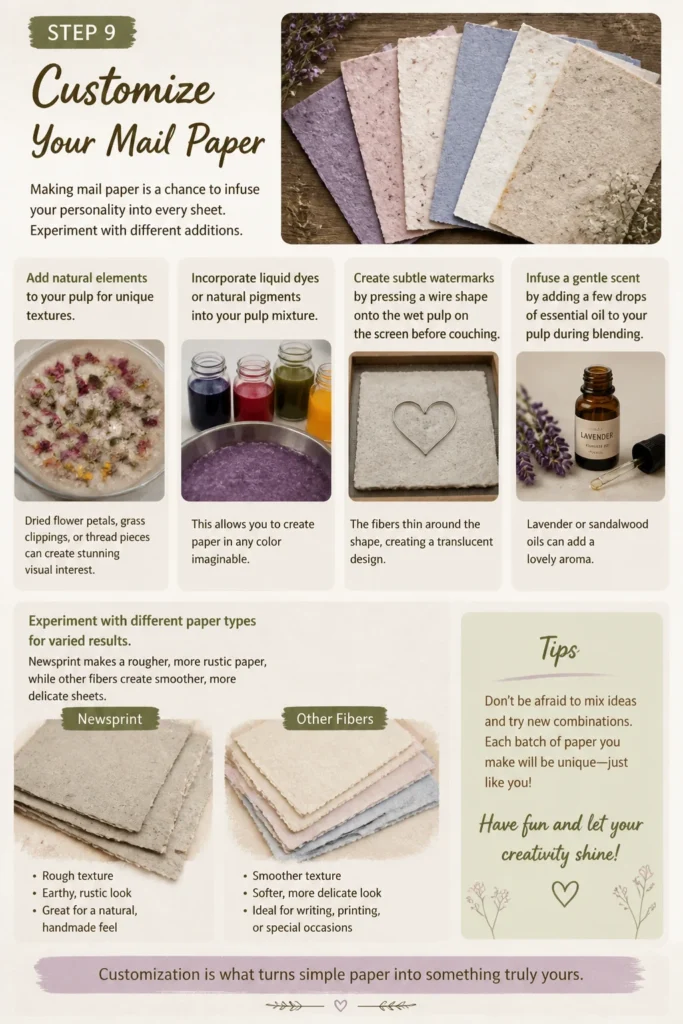
Add natural elements to your pulp for unique textures. Dried flower petals, grass clippings, or thread pieces can create stunning visual interest.
Incorporate liquid dyes or natural pigments into your pulp mixture. This allows you to create paper in any color imaginable.
Create subtle watermarks by pressing a wire shape onto the wet pulp on the screen before couching. The fibers thin around the shape, creating a translucent design.
Infuse a gentle scent by adding a few drops of essential oil to your pulp during blending. Lavender or sandalwood oils can add a lovely aroma.
Experiment with different paper types for varied results. Newsprint makes a rougher, more rustic paper, while office paper yields a smoother finish.
Common Mistakes to Avoid
Inadequate Pulp Preparation
Not blending your pulp enough leaves large chunks of paper. This results in an uneven, lumpy sheet that is difficult to write on and lacks consistent strength. Ensure your pulp is thoroughly blended to a uniform consistency before forming sheets.
Uneven Fiber Distribution
Skipping the gentle shaking motion when the mould and deckle are in the water can lead to fibers settling unevenly. This creates thin spots and thick spots in your paper, making it prone to tearing. Always gently agitate the mould and deckle to distribute fibers evenly.
Poor Couching Technique
Rushing the couching step or not applying enough pressure can cause the paper to stick to the screen or tear upon transfer. Be patient and apply firm, even pressure with a sponge or towel before slowly lifting the mould. This ensures a clean transfer.
Improper Drying
Drying paper too quickly with direct heat, or allowing it to dry without pressing, often results in warped or curled sheets. Always air dry your paper slowly and consider pressing it between flat surfaces as it dries. This helps maintain its shape and flatness.
Troubleshooting
Paper is Too Thin or Tears Easily
This usually means your pulp mixture was too diluted, or you didn’t scoop enough pulp onto the screen. Add more blended pulp to your basin to increase the fiber concentration. When forming the sheet, ensure you scoop a substantial amount of pulp.
Paper Has a Rough or Fuzzy Surface
A rough texture can be due to insufficient pressing or not enough blending of the pulp. Ensure your pulp is very smooth before forming sheets. After couching, press the paper firmly to compact the fibers. You can also lightly iron dry paper on a low setting for smoothness.
Paper Develops Mold While Drying
Mold indicates that the paper stayed wet for too long in a humid environment without adequate air circulation. Ensure your drying area is well-ventilated. If you live in a very humid climate, consider using a dehumidifier in the drying room. Change pressing blotters frequently.
Key Takeaways
- Gathering all materials beforehand streamlines the paper-making process.
- Properly blending scrap paper into a smooth pulp is fundamental for quality sheets.
- Gently shaking the mould and deckle helps distribute fibers evenly for consistent paper thickness.
- Couching requires a gentle yet firm touch to transfer the wet sheet without damage.
- Pressing removes excess water, which is vital for stronger paper and faster drying.
- Patience during drying prevents warping and ensures flat, usable mail paper.
- Customizing your pulp with inclusions, dyes, or scents makes your mail paper truly unique.
Frequently Asked Questions
What kind of paper is best to recycle for mail paper?
Non-glossy papers like office paper, printer paper, junk mail (without heavy ink), and newspaper work very well. Avoid anything with plastic coatings, heavy inks, or adhesives, as these can contaminate your pulp and create unwanted textures.
Can I add color to my homemade paper?
Absolutely. You can add liquid dyes, natural pigments, or even food coloring directly to your pulp mixture in the blender or basin. Start with small amounts and add more until you achieve your desired shade. Remember that the color will lighten slightly when dry.
How can I make my paper smoother for writing?
To achieve a smoother surface, blend your pulp very thoroughly. After pressing, you can lightly iron the dry paper on a low setting with a protective cloth over it. Adding a small amount of starch to your pulp can also help create a smoother finish and reduce fuzziness.
How should I store my handmade mail paper?
Once completely dry, store your handmade paper flat in a cool, dry place. Placing it between heavy books or in a portfolio will help keep it flat and prevent curling. Protect it from dust and humidity to maintain its quality over time.
Our Top Recommended Finds
- Basic Paper Making Kit: These kits often include a mould and deckle, instructions, and sometimes even pulp. They are perfect for beginners to get started quickly.
- Dedicated Craft Blender: Using a separate blender for paper making keeps your kitchen blender free from pulp residue and dedicated to food prep.
- Absorbent Felt Squares: High-quality felt pieces are more durable and absorbent than towels for couching, leading to cleaner paper transfers.
Craft Your Connection
You now hold the knowledge to create something truly special and personal. Making your own mail paper is a rewarding craft that connects you to an age-old tradition.
Imagine the delight of someone receiving a letter from you, written on paper you crafted with your own hands. It adds a layer of thoughtfulness that digital communication simply cannot replicate.
Don’t stop here. Explore different textures, colors, and inclusions. Try making paper from different plant fibers or even incorporating seeds for plantable paper.
Take the first step today. Gather some old paper and begin your journey into the wonderful world of handmade mail paper. Your future letters will thank you.