How To Fold Paper Snowflakes
I remember sitting at my grandmother’s kitchen table every December with a stack of white printer paper and a pair of heavy kitchen shears.
She taught me that the secret to a perfect snowflake isn’t in the complexity of the cuts, but in the precision of the folds.
I have spent decades refining this craft to create intricate, six-pointed designs that look like professional decorations.
Quick Overview
This guide will teach you how to transform a standard sheet of paper into a symmetrical six-pointed snowflake.
- Time needed: 10-15 minutes per snowflake
- Difficulty: Beginner
- What you’ll need: Square paper, sharp scissors, a pencil, and a flat surface.
Step 1: Prepare Your Square Paper
Start with a perfectly square piece of paper to ensure your snowflake is symmetrical.
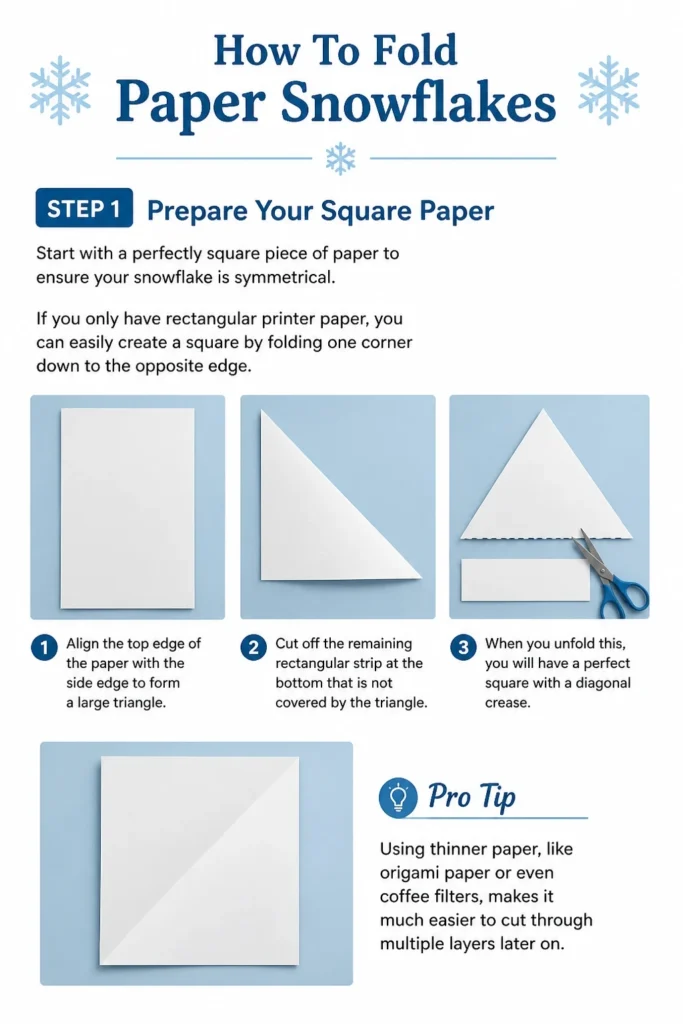
If you only have rectangular printer paper, you can easily create a square by folding one corner down to the opposite edge.
Align the top edge of the paper with the side edge to form a large triangle.
Cut off the remaining rectangular strip at the bottom that is not covered by the triangle.
When you unfold this, you will have a perfect square with a diagonal crease.
Pro Tip: Using thinner paper, like origami paper or even coffee filters, makes it much easier to cut through multiple layers later on.
Step 2: Fold the First Diagonal
Take your square piece of paper and fold it in half diagonally to form a large triangle.
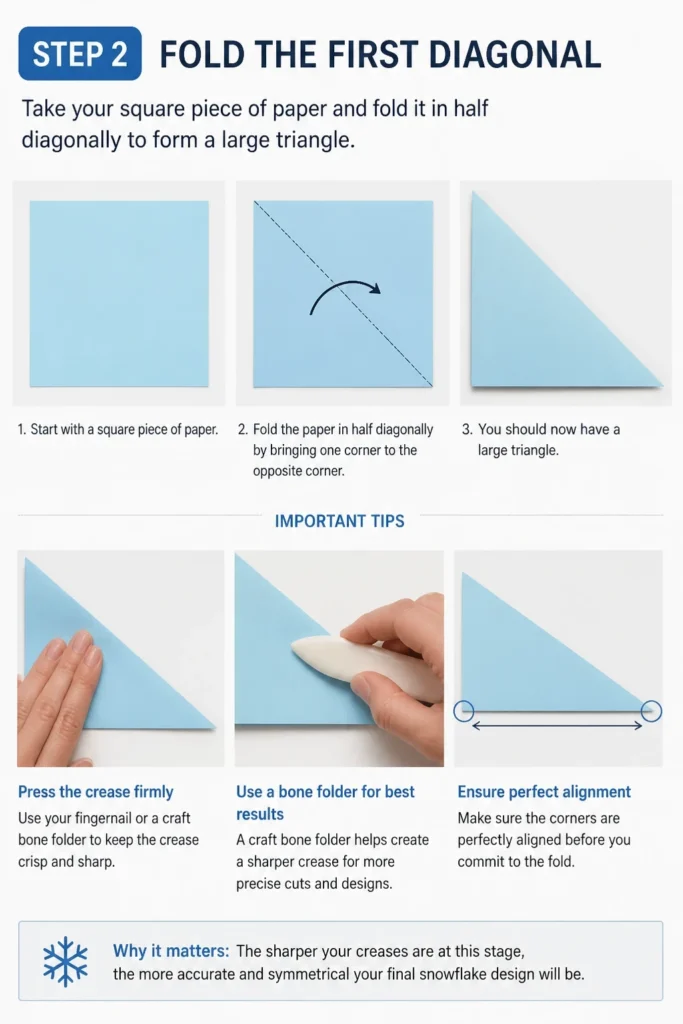
If you used the method in Step 1 to create your square, you likely already have this fold in place.
Press the crease firmly with your fingernail or a craft bone folder to keep it crisp.
The sharper your creases are at this stage, the more accurate your final design will be.
Ensure the corners are perfectly aligned before you commit to the fold.
Step 3: Fold the Triangle in Half Again
Fold the large triangle in half by bringing the two bottom corners together.
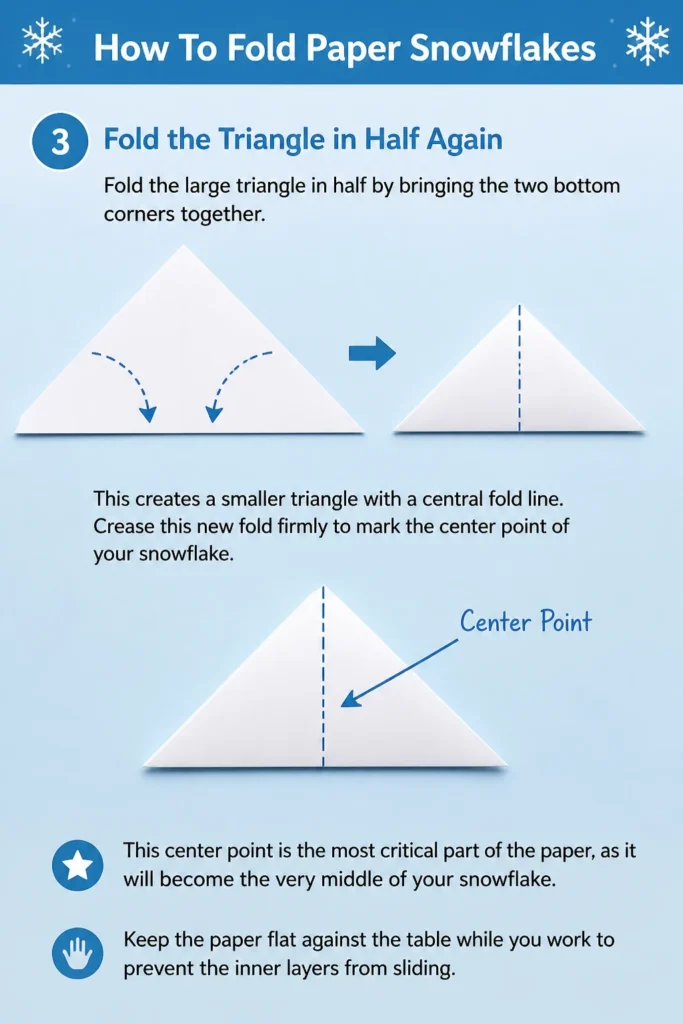
This creates a smaller triangle with a central fold line.
Crease this new fold firmly to mark the center point of your snowflake.
This center point is the most critical part of the paper, as it will become the very middle of your snowflake.
Keep the paper flat against the table while you work to prevent the inner layers from sliding.
Step 4: Divide the Triangle into Thirds
Position your triangle so the point (the center of the square) is facing down toward you.
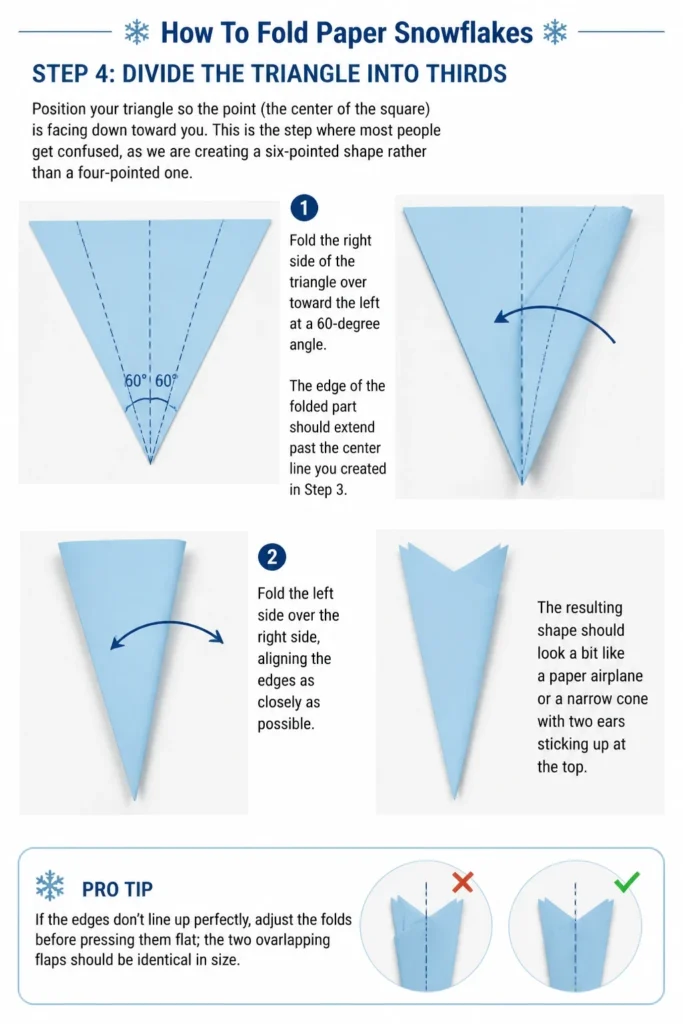
This is the step where most people get confused, as we are creating a six-pointed shape rather than a four-pointed one.
Fold the right side of the triangle over toward the left at a 60-degree angle.
The edge of the folded part should extend past the center line you created in Step 3.
Fold the left side over the right side, aligning the edges as closely as possible.
The resulting shape should look a bit like a paper airplane or a narrow cone with two “ears” sticking up at the top.
Pro Tip: If the edges don’t line up perfectly, adjust the folds before pressing them flat; the two overlapping flaps should be identical in size.
Step 5: Trim the Excess Paper
Look at the top of your folded paper where the uneven “ears” are sticking out.
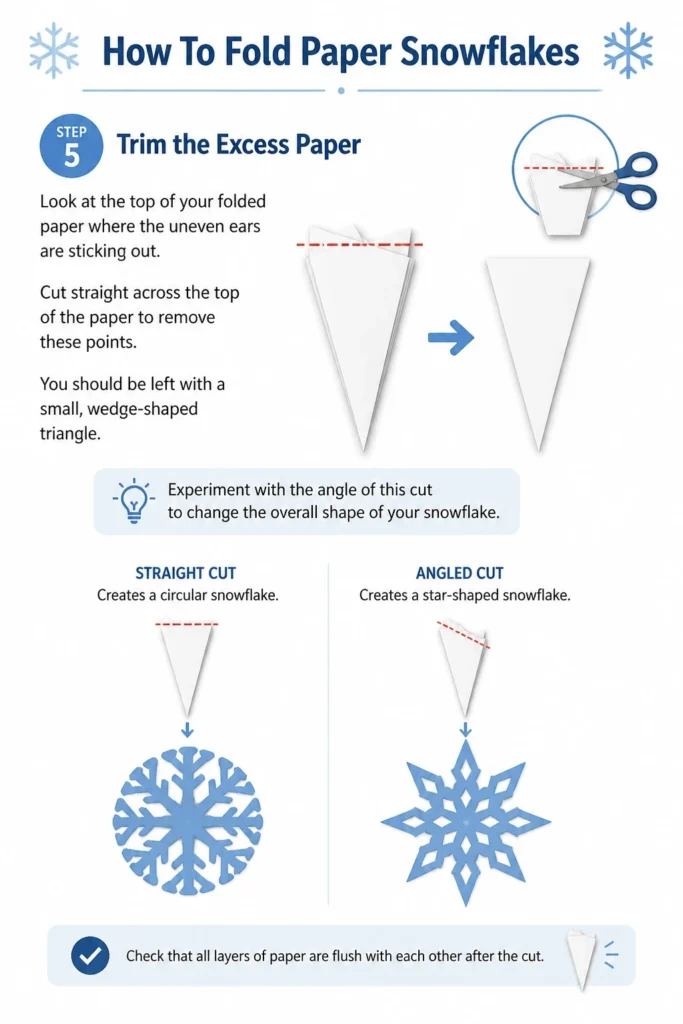
Cut straight across the top of the paper to remove these points.
You should be left with a small, wedge-shaped triangle.
Experiment with the angle of this cut to change the overall shape of your snowflake.
A straight cut creates a circular snowflake, while an angled cut creates a star-shaped snowflake.
Check that all layers of paper are flush with each other after the cut.
Step 6: Sketch Your Design
Use a pencil to lightly draw the shapes you want to cut out of the sides of the wedge.
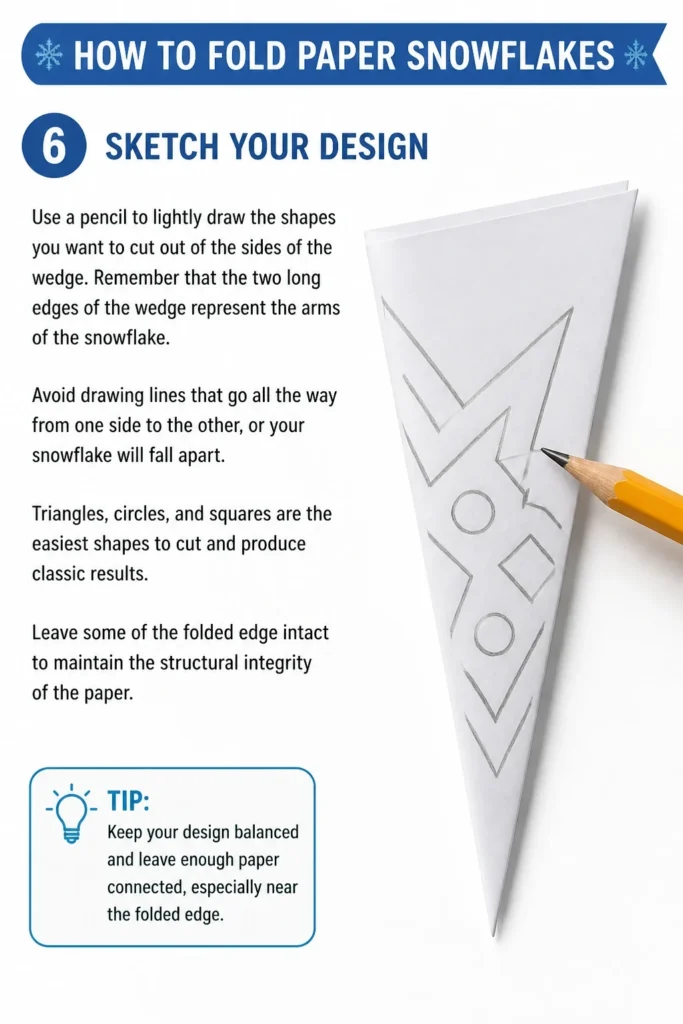
Remember that the two long edges of the wedge represent the “arms” of the snowflake.
Avoid drawing lines that go all the way from one side to the other, or your snowflake will fall apart.
Triangles, circles, and squares are the easiest shapes to cut and produce classic results.
Leave some of the folded edge intact to maintain the structural integrity of the paper.
Step 7: Cut Out the Patterns
Grip the paper wedge firmly so the layers do not shift while you are cutting.
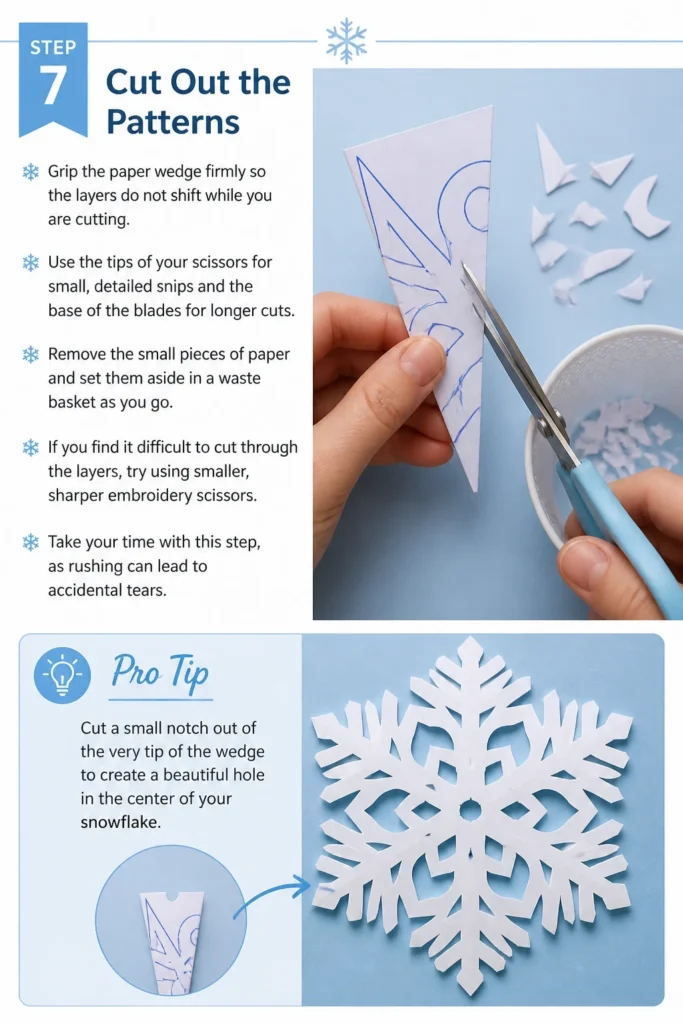
Use the tips of your scissors for small, detailed snips and the base of the blades for longer cuts.
Remove the small pieces of paper and set them aside in a waste basket as you go.
If you find it difficult to cut through the layers, try using smaller, sharper embroidery scissors.
Take your time with this step, as rushing can lead to accidental tears.
Pro Tip: Cut a small notch out of the very tip of the wedge to create a beautiful hole in the center of your snowflake.
Step 8: The Final Reveal
Begin to unfold the paper very slowly and carefully.
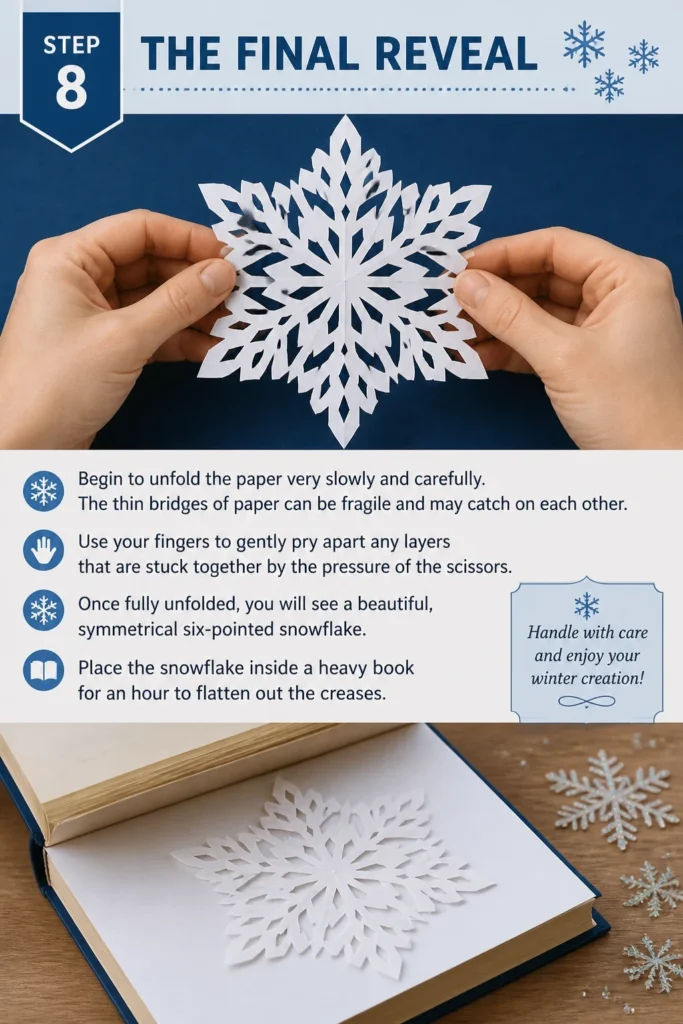
The thin bridges of paper can be fragile and may catch on each other.
Use your fingers to gently pry apart any layers that are stuck together by the pressure of the scissors.
Once fully unfolded, you will see a beautiful, symmetrical six-pointed snowflake.
Place the snowflake inside a heavy book for an hour to flatten out the creases.
Common Mistakes to Avoid
Cutting Through the Spine
One of the most frequent errors is cutting entirely across the folded edges. If you cut from one side all the way to the other, the snowflake will separate into multiple pieces. Always ensure that you leave portions of both folded sides untouched to keep the design connected.
Using Paper That Is Too Thick
Standard construction paper or heavy cardstock is very difficult to fold into the required layers for a six-pointed snowflake. By the time you reach the final fold, the paper becomes too thick for most scissors to penetrate accurately. Stick to lightweight materials like wrapping paper, tissue paper, or standard 20lb bond printer paper.
Uneven Folding in Step 4
If the 60-degree folds are not equal, your snowflake will be lopsided. One side may have wider arms than the other, or the points may not be evenly spaced. Take a moment to adjust the overlapping flaps until they are perfectly symmetrical before you make the final creases.
Troubleshooting
The Snowflake is Tearing During Unfolding
This usually happens if the cuts are too close together or if the paper is damp. To fix this, ensure your hands are dry and use a toothpick to gently lift the edges of the paper. If a tear does occur, a tiny piece of clear tape on the backside can usually repair it without being visible.
The Scissors Are Chewing the Paper
If the edges of your cuts look jagged or “chewed,” your scissors are likely too dull or the paper is too thick. Try reducing the number of folds or switching to a sharper pair of craft scissors. You can also try cutting fewer layers at once by using a larger starting square of thinner paper.
The Pattern Looks Too Simple
If your finished snowflake looks like a plain circle with a few holes, you probably didn’t remove enough paper from the edges. Next time, try cutting deeper into the wedge and varying the shapes. Removing at least 50 percent of the paper usually results in the most delicate and professional-looking designs.
Key Takeaways
- Always start with a perfect square to ensure the geometry of the snowflake remains consistent.
- The 60-degree “thirds” fold is what differentiates a realistic six-pointed snowflake from a square four-pointed one.
- Sharp, fine-tipped scissors are essential for creating intricate details and clean edges.
- Leave enough of the folded “spine” intact to prevent the snowflake from falling apart.
- Flattening the finished product in a book provides a much more polished and professional look for display.
- Thinner paper is generally better for complex designs because it is easier to cut through multiple layers.
Frequently Asked Questions
What is the best type of paper for snowflakes?
Lightweight white printer paper is the standard choice, but coffee filters are actually the secret weapon of pro crafters. They are already circular, very thin, and easy to fold. They also absorb watercolors beautifully if you want to add a splash of blue or purple to your designs.
How do I make my snowflakes look more realistic?
Real snowflakes always have six points, so mastering the “thirds” fold is the most important step. Beyond that, focus on making long, thin cuts that mimic the crystalline structure of ice. Avoid large, blocky shapes and try to create “branches” on the arms of your snowflake.
Can I use a craft knife instead of scissors?
You can use a craft knife if you are working on a self-healing cutting mat. This allows for much more intricate interior cuts that scissors cannot reach. However, be extremely careful as the many layers of paper can cause the blade to slip or catch.
How can I display my paper snowflakes?
The best way to display them is by taping them to a window using a tiny piece of clear double-sided tape. The light shining through the cutouts highlights the pattern beautifully. You can also string them together with fishing line to create a winter garland or hang them from a chandelier.
Our Top Recommended Finds
- Detail Craft Scissors: Look for scissors with a fine, pointed tip and a comfortable grip to handle repetitive cutting.
- Origami Paper: This paper is pre-cut into perfect squares and is thin enough to fold multiple times without becoming bulky.
- Self-Healing Cutting Mat: If you decide to use a craft knife for advanced patterns, a good mat will protect your table and keep your blade sharp.
Elevate Your Winter Decorating Skills
Now that you have mastered the basic six-pointed fold, you can start experimenting with different themes.
Try cutting tiny heart shapes into the edges for a Valentine’s twist or sharp, jagged lightning bolts for a modern look.
You might even consider using metallic or iridescent paper to catch the light in your home during the holidays.
Grab a fresh sheet of paper right now and see how much detail you can add to your next design.