
How To Build An Igloo
Few experiences compare to spending a night in a structure you built entirely from snow. I still remember the first time I managed to complete one, feeling immense pride and warmth in my snowy creation. This guide shares the practical steps and insights I’ve gathered, ensuring you can trust its advice for your own successful build.

Quick Overview
Building an igloo is a rewarding winter project that connects you with ancient arctic engineering. You’ll construct a surprisingly strong and insulated shelter using only compacted snow and a few basic tools. This guide covers everything from site selection to the final ventilation.
- Time needed: 4-8 hours (depending on snow conditions and team size)
- Difficulty: Intermediate
- What you’ll need: Snow shovel, snow saw (or strong hand saw), measuring string, sturdy stick, warm waterproof clothing, gloves, and suitable compacted snow.
Step-by-Step Instructions
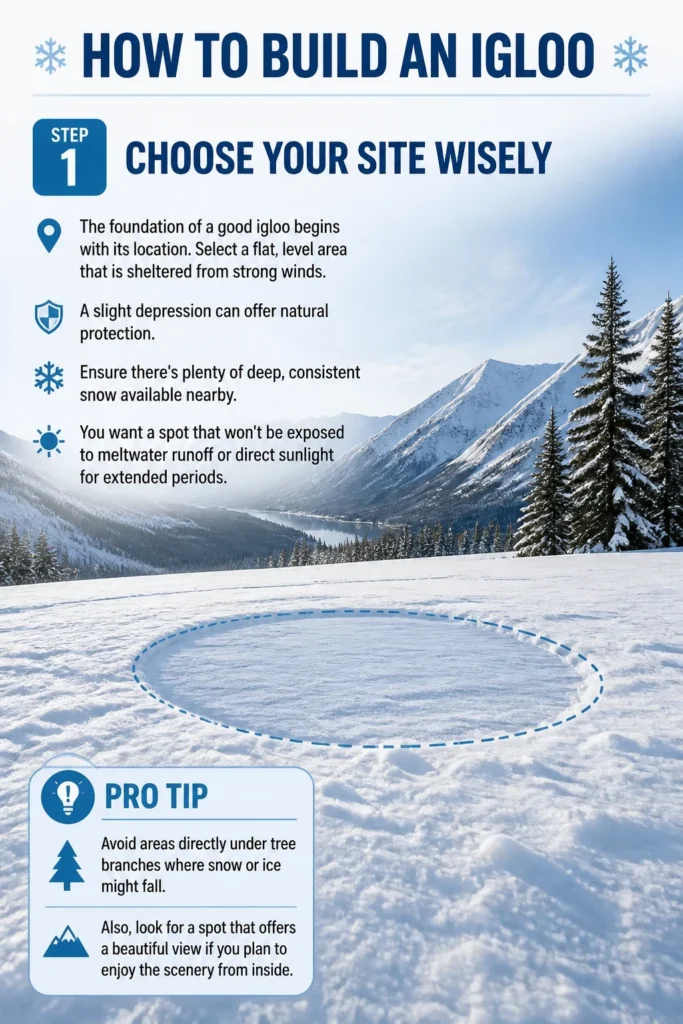
Step 1: Choose Your Site Wisely
The foundation of a good igloo begins with its location. Select a flat, level area that is sheltered from strong winds. A slight depression can offer natural protection.
Ensure there’s plenty of deep, consistent snow available nearby. You want a spot that won’t be exposed to meltwater runoff or direct sunlight for extended periods.
Pro Tip: Avoid areas directly under tree branches where snow or ice might fall. Also, look for a spot that offers a beautiful view if you plan to enjoy the scenery from inside.
Step 2: Gather and Test Your Snow
The quality of your snow is paramount for a strong igloo. You need snow that is dense and cohesive, ideally settled and compacted by wind or a recent thaw-freeze cycle. Fresh, powdery snow will not work.
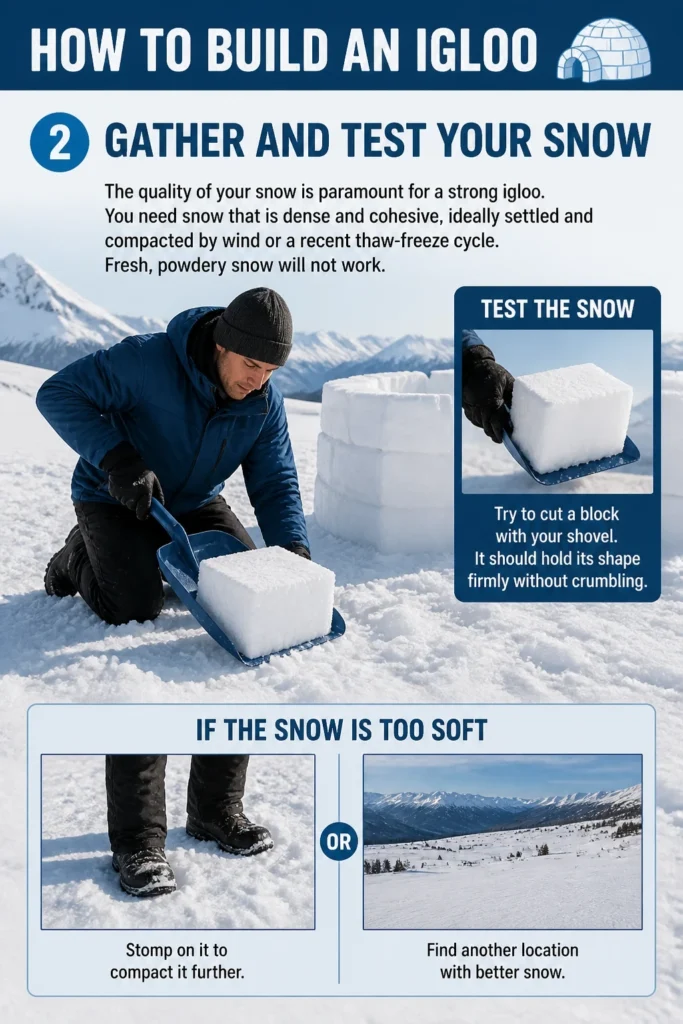
Test the snow by trying to cut a block with your shovel. It should hold its shape firmly without crumbling. If it’s too soft, stomp on it to compact it further, or find another location.
Step 3: Draw Your Circular Base
An igloo’s strength comes from its perfect dome shape, starting with a precise circle. Stick a sturdy pole or ski into the ground where you want the center of your igloo to be. Tie a string to the pole.
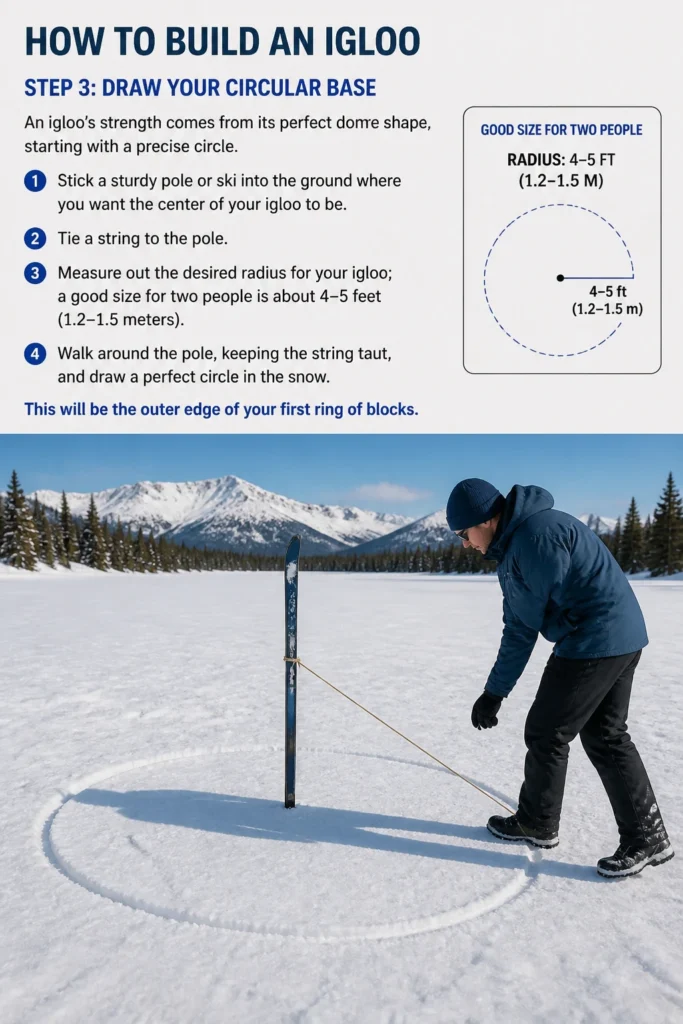
Measure out the desired radius for your igloo; a good size for two people is about 4-5 feet (1.2-1.5 meters). Walk around the pole, keeping the string taut, and draw a perfect circle in the snow. This will be the outer edge of your first ring of blocks.
Step 4: Cut and Lay the First Ring
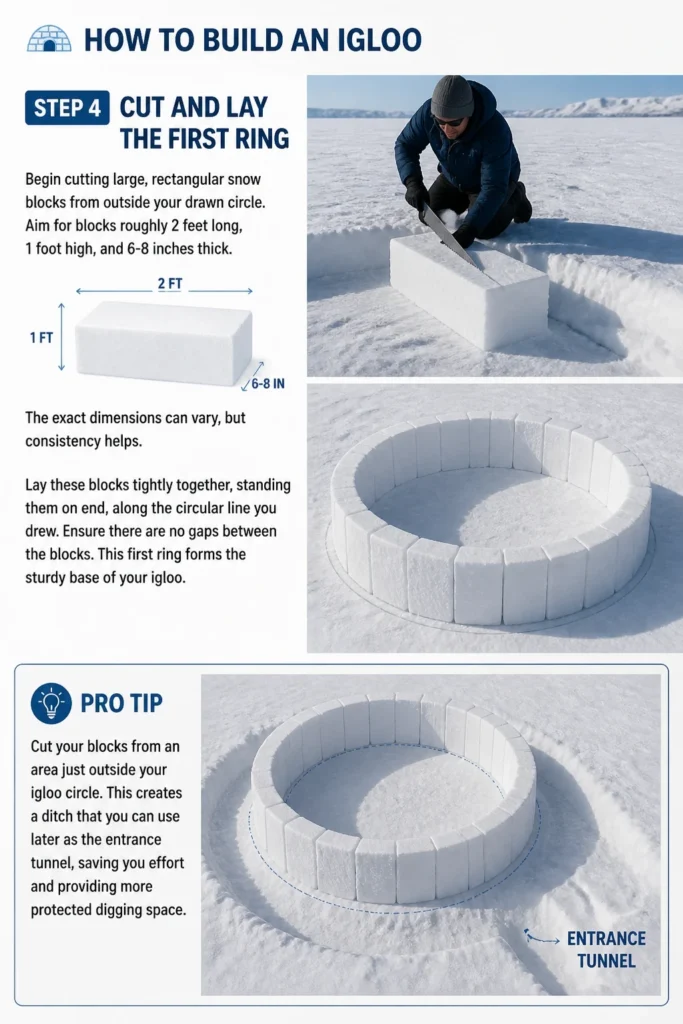
Begin cutting large, rectangular snow blocks from outside your drawn circle. Aim for blocks roughly 2 feet long, 1 foot high, and 6-8 inches thick. The exact dimensions can vary, but consistency helps.
Lay these blocks tightly together, standing them on end, along the circular line you drew. Ensure there are no gaps between the blocks. This first ring forms the sturdy base of your igloo.
Pro Tip: Cut your blocks from an area just outside your igloo circle. This creates a ditch that you can use later as the entrance tunnel, saving you effort and providing more protected digging space.
Step 5: Begin the Upward Spiral
Once the first ring is complete, you need to create a slight upward slope for the next layer. Shave a gentle ramp into the top edge of the first ring, starting from the point where you want your entrance and spiraling upwards. This creates the continuous, upward-sloping path for your subsequent blocks.
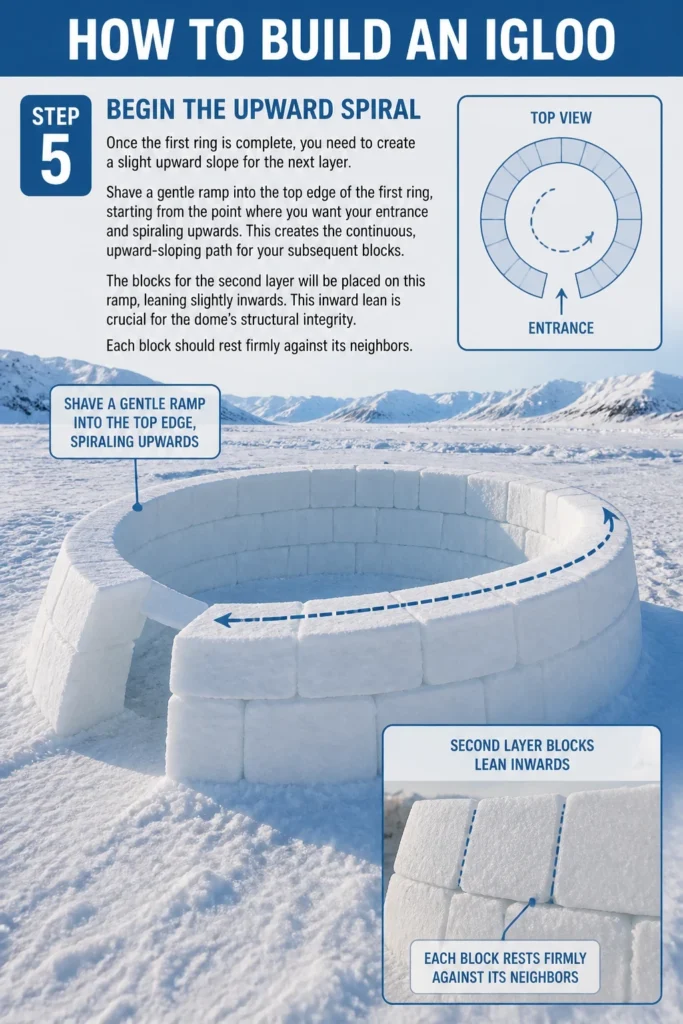
The blocks for the second layer will be placed on this ramp, leaning slightly inwards. This inward lean is crucial for the dome’s structural integrity. Each block should rest firmly against its neighbors.
Step 6: Build Upwards and Inwards
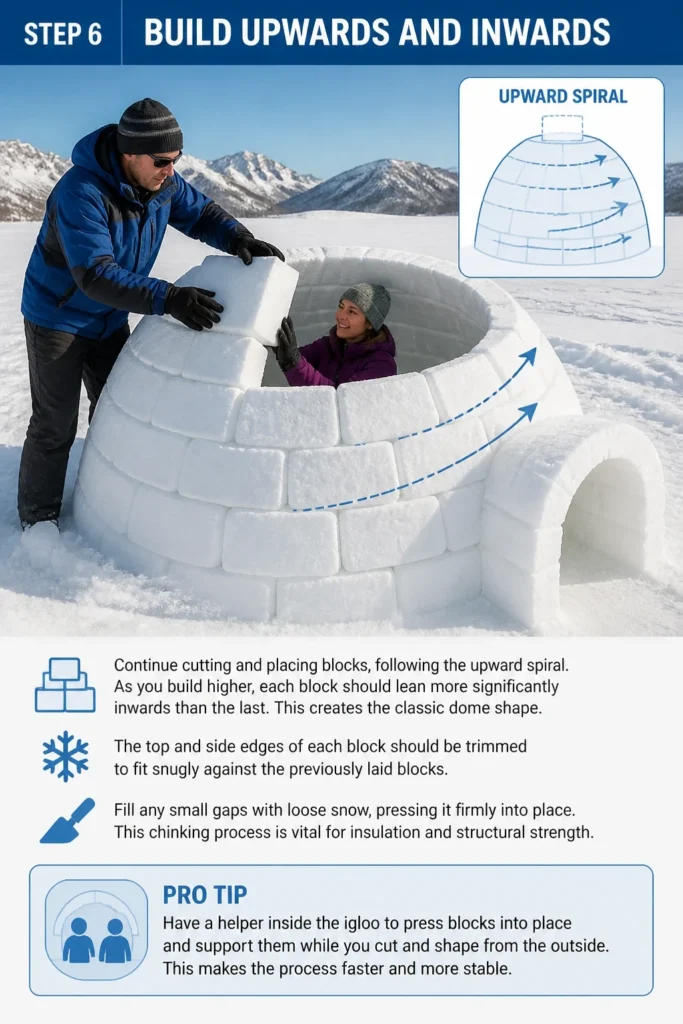
Continue cutting and placing blocks, following the upward spiral. As you build higher, each block should lean more significantly inwards than the last. This creates the classic dome shape.
The top and side edges of each block should be trimmed to fit snugly against the previously laid blocks. Fill any small gaps with loose snow, pressing it firmly into place. This “chinking” process is vital for insulation and structural strength.
Pro Tip: Have a helper inside the igloo to press blocks into place and support them while you cut and shape from the outside. This makes the process faster and more stable.
Step 7: Close the Dome and Cut the Entrance
As you near the top, the opening will become smaller. You’ll cut a key block, often wedge-shaped, to fit perfectly into the final opening, sealing the dome. This is a critical moment; ensure it’s a tight fit.
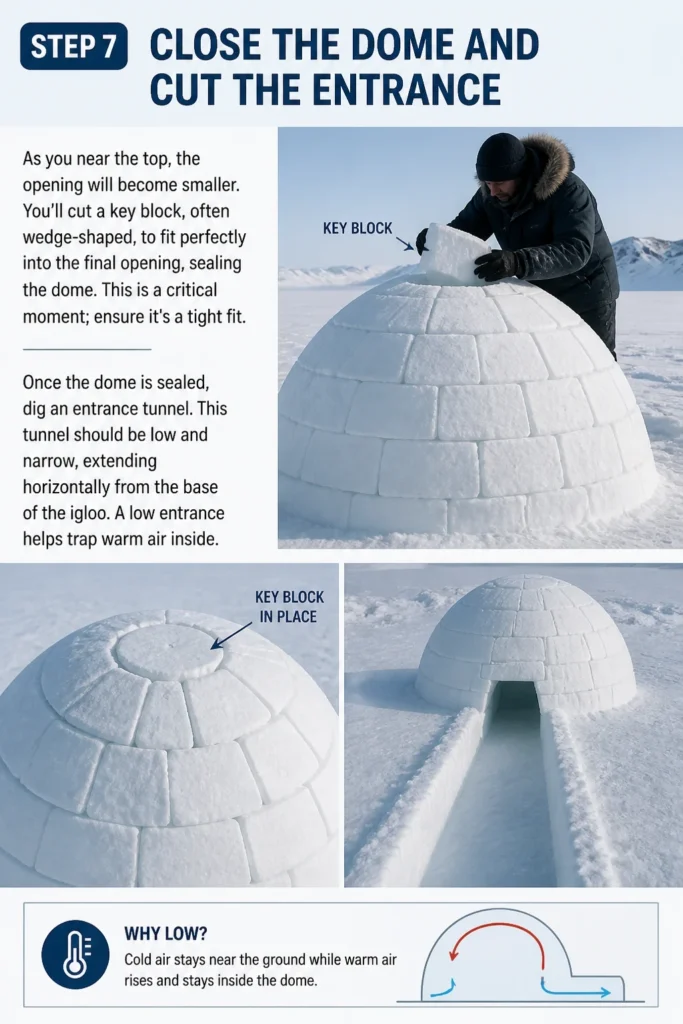
Once the dome is sealed, dig an entrance tunnel. This tunnel should be low and narrow, extending horizontally from the base of the igloo. A low entrance helps trap warm air inside.
Step 8: Ventilate and Refine
With the dome sealed and the entrance dug, create a small ventilation hole at the very top of the igloo. This prevents carbon monoxide buildup if you use a candle or stove and allows stale air to escape. A small, fist-sized hole is usually sufficient.
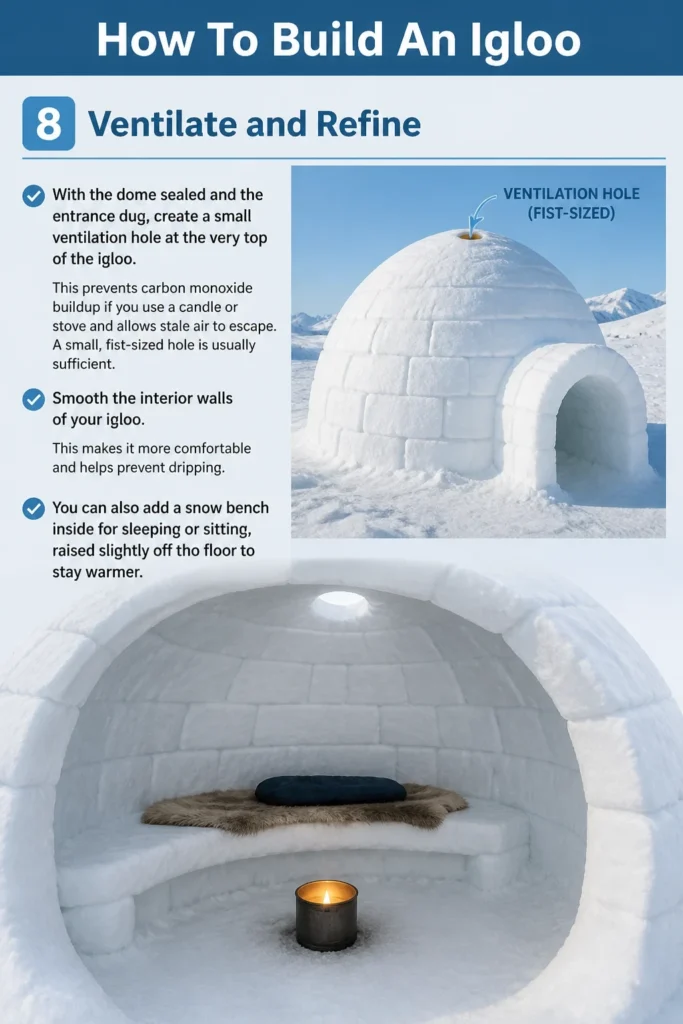
Smooth the interior walls of your igloo. This makes it more comfortable and helps prevent dripping. You can also add a snow bench inside for sleeping or sitting, raised slightly off the floor to stay warmer.
Common Mistakes to Avoid
Using the Wrong Snow
Many first-time builders attempt to use fresh, fluffy snow. This type of snow lacks the density and cohesion needed to form stable blocks. It will crumble and your igloo will collapse. Always seek out dense, compacted snow that holds its shape when cut.
Not Leveling the Base
Starting on an uneven surface makes it incredibly difficult to maintain a consistent circular base and an even spiral. An uneven base can lead to structural weaknesses and an unstable dome. Take the time to clear and level your chosen site thoroughly before drawing your circle.
Building Too Vertically
The strength of an igloo comes from its inward-sloping dome. If you build the walls too vertically in the initial layers, the structure will lack the necessary compression to support itself as it grows taller. Each successive block must lean further inwards than the one below it.
Forgetting Ventilation
While an igloo is designed to be warm, proper ventilation is crucial for safety and comfort. Without a small hole at the top, carbon monoxide can build up if you use any heat source, and the air will become stale and damp. Always create a vent.
Troubleshooting
Igloo Collapses During Build
This is often due to using inadequate snow, building too vertically, or not trimming blocks to fit snugly. If a section collapses, don’t despair. Re-evaluate your snow quality, ensure your blocks are leaning inwards more, and take extra care to chink all gaps with loose snow. A helper inside to brace blocks can prevent this.
Interior Feels Too Small/Cramped
If your igloo feels too small, it’s likely you started with too small a radius. For comfortable sleeping for two, aim for a base diameter of at least 8-10 feet (2.4-3 meters). Next time, increase your initial circle size to allow for more interior space and a higher ceiling.
Snow Blocks Don’t Stick
This typically means your snow is too cold, too dry, or too powdery. For blocks to bond, the snow needs some moisture content to allow for sintering (the bonding of snow crystals). If it’s extremely cold and dry, try sprinkling a tiny amount of water between blocks to help them freeze together, but this is a last resort. Better to find better snow.
Key Takeaways
- Good quality, compacted snow is the most crucial element for a successful igloo.
- A perfectly drawn circular base is the foundation of a strong, stable dome.
- Each block must lean progressively inwards, creating a continuous upward spiral.
- Fill all gaps between blocks with loose snow to enhance insulation and strength.
- Always include a small ventilation hole at the top for safety and fresh air.
- Patience and careful block trimming are more important than speed.
Frequently Asked Questions
How warm is an igloo inside?
An igloo can be surprisingly warm, often staying around 0C (32F) even when outside temperatures are far below freezing. Your body heat, combined with the insulating properties of compacted snow, creates a comfortable microclimate. With a small candle or stove, temperatures can rise significantly higher.
Can I build an igloo with any snow?
No, you cannot. You need specific snow conditions: dense, cohesive snow that has settled and compacted. Fresh, light powder snow will not hold its shape. Wind-packed or old, granular snow is ideal.
How long does an igloo last?
A well-built igloo can last for weeks or even months, depending on the weather conditions. Freezing temperatures will preserve it, while extended periods of above-freezing temperatures or heavy rain will cause it to melt and collapse.
Is it safe to sleep in an igloo?
Yes, sleeping in a properly built and ventilated igloo is generally safe and often quite comfortable. Ensure you have adequate sleeping bags and insulation from the snow floor. Always maintain a small ventilation hole to prevent carbon monoxide buildup if using any heat source.
Our Top Recommended Finds
- Ergonomic Snow Shovel: A sturdy, D-handle shovel makes moving and compacting snow much easier on your back.
- Specialized Snow Saw: Designed for cutting precise snow blocks, these saws are invaluable for efficiency and clean cuts.
- Waterproof Winter Clothing: Layered, waterproof, and insulated clothing is essential for staying warm and dry during the building process.
Your Winter Wonderland Awaits
Building an igloo is more than just constructing a shelter; it’s an exercise in patience, problem-solving, and connecting with the natural world. Imagine the satisfaction of stepping into your own hand-built snow dome, protected from the elements. This ancient skill offers a unique perspective on winter. So, gather your tools, brave the chill, and start planning your very own snow sanctuary today.