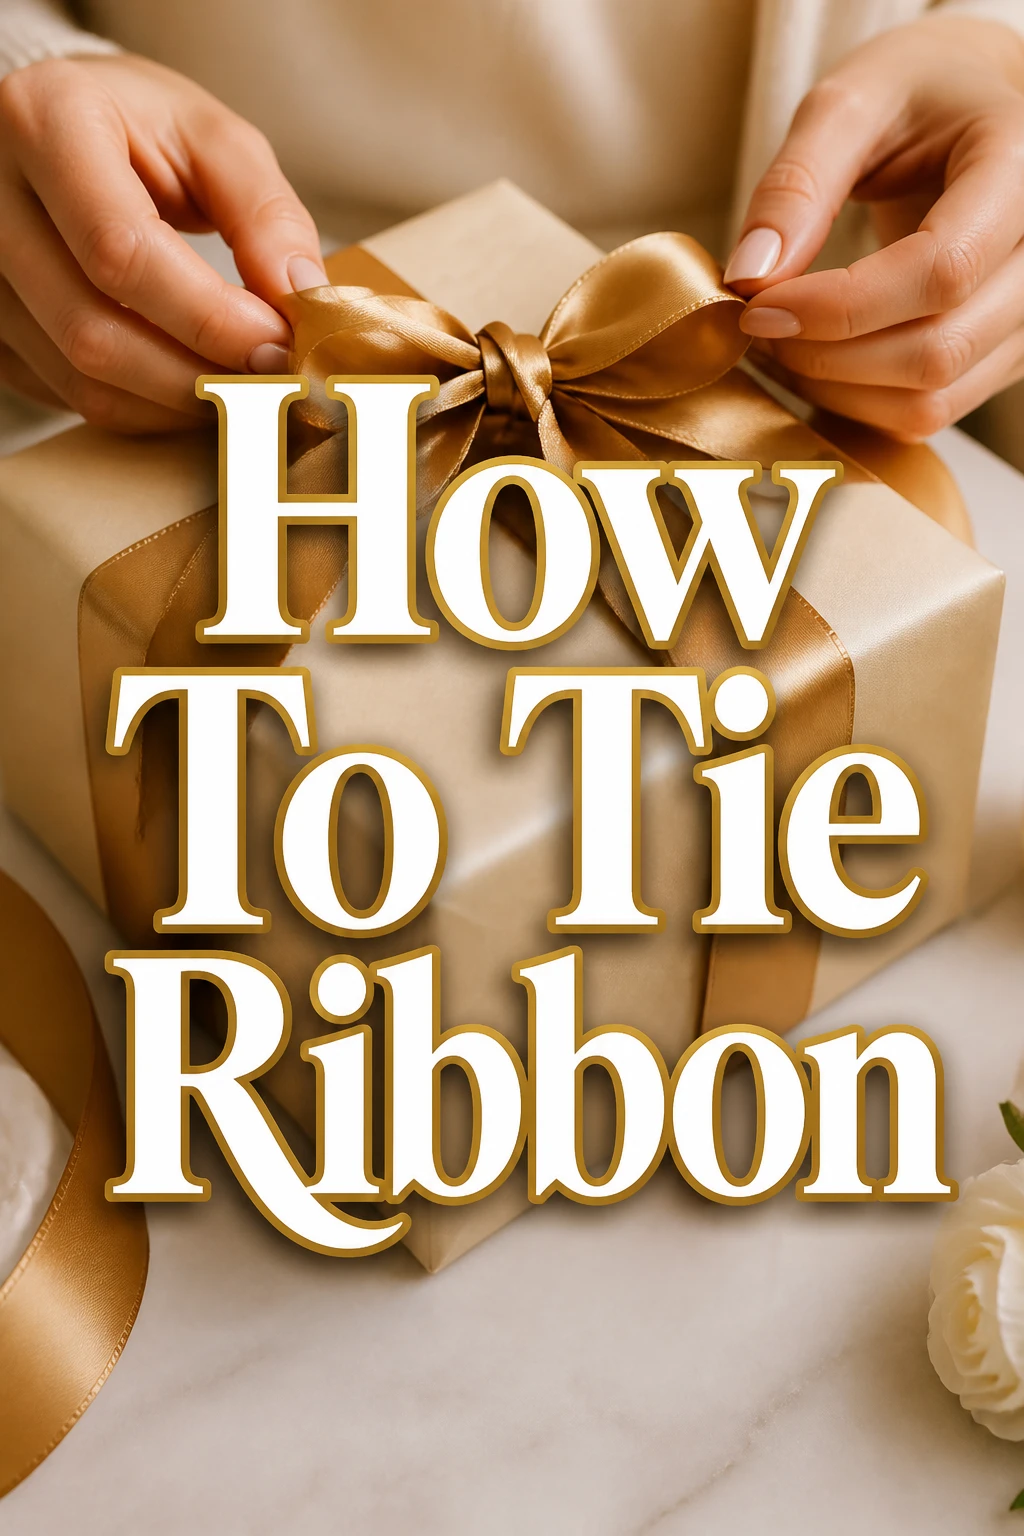
How To Tie Ribbon
I remember the first time I tried to tie a perfect bow; it looked more like a tangled mess than an elegant flourish. After years of wrapping gifts, decorating events, and adding that special touch to countless projects, I’ve learned the secrets to a beautiful ribbon knot. This guide shares that hands-on experience, helping you master the art of ribbon tying with ease and confidence.
Quick Overview
Tying a ribbon can elevate any item, transforming it from simple to stunning. This guide will walk you through creating a classic, symmetrical bow that looks professional every time. You will learn the foundational technique that can be adapted for various purposes.
- Time needed: 5-15 minutes (depending on practice)
- Difficulty: Beginner
- What you’ll need: Ribbon, sharp scissors (optional)
Step-by-Step Instructions
Step 1: Choose Your Ribbon
The first crucial step is to select the right ribbon for your project. Ribbons come in a vast array of materials, widths, and textures. For beginners, a medium-width satin or grosgrain ribbon is often easiest to work with.
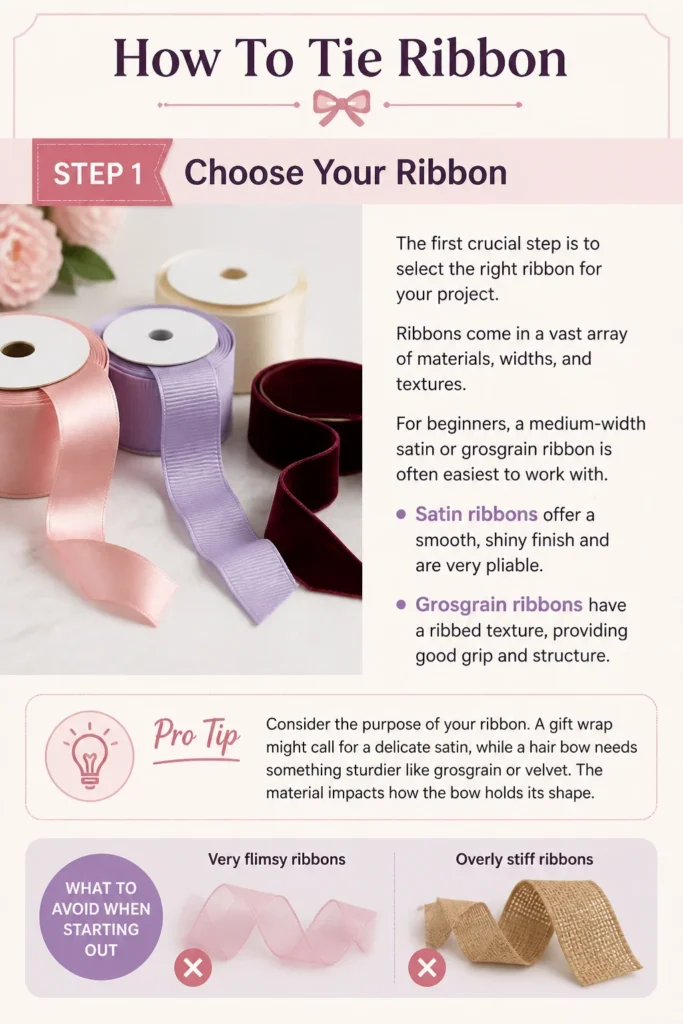
Satin ribbons offer a smooth, shiny finish and are very pliable. Grosgrain ribbons have a ribbed texture, providing good grip and structure. Avoid very flimsy or overly stiff ribbons when starting out, as they can be challenging to manipulate.
Pro Tip: Consider the purpose of your ribbon. A gift wrap might call for a delicate satin, while a hair bow needs something sturdier like grosgrain or velvet. The material impacts how the bow holds its shape.
Step 2: Prepare the Ribbon Length
Next, measure and cut an appropriate length of ribbon. A common rule of thumb for a standard bow is to take the circumference of the item you’re tying the ribbon around, then add about 18-24 inches. This extra length accounts for the loops and tails.
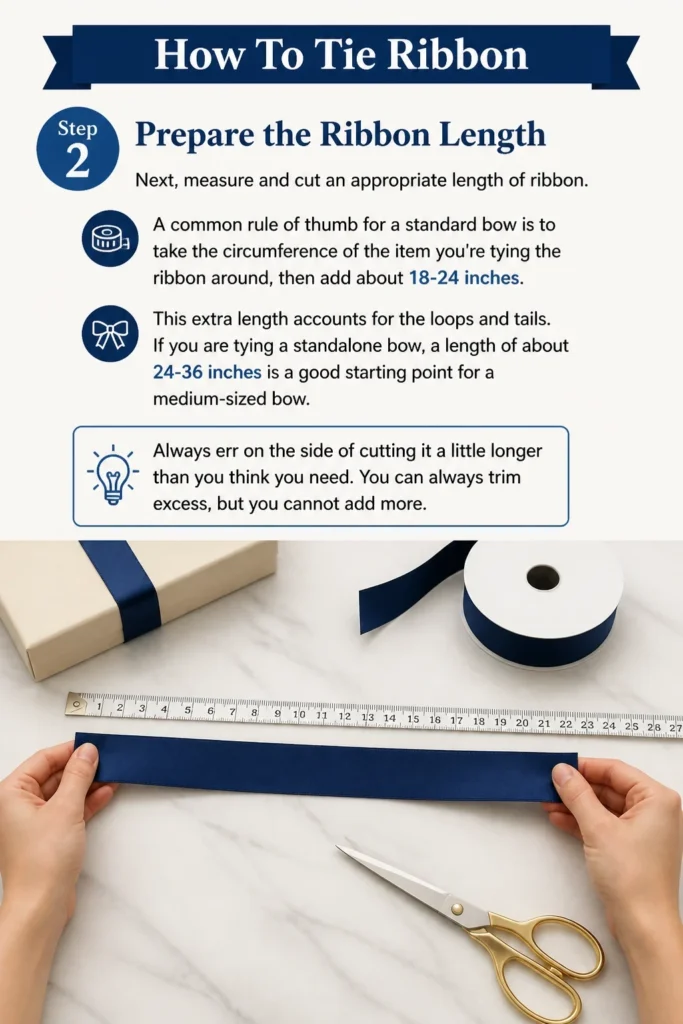
If you are tying a standalone bow, a length of about 24-36 inches is a good starting point for a medium-sized bow. Always err on the side of cutting it a little longer than you think you need. You can always trim excess, but you cannot add more.
Step 3: Form the First Loop
Now, create your first loop. Hold one end of the ribbon in your non-dominant hand. Bring the ribbon around the item (if applicable) or simply hold it in the air.
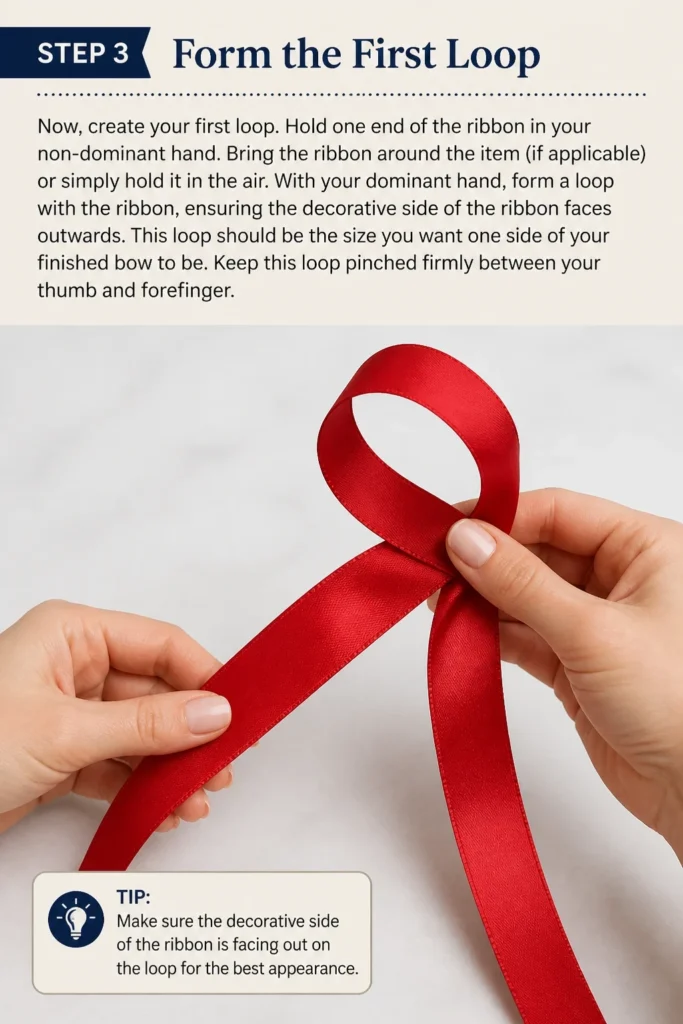
With your dominant hand, form a loop with the ribbon, ensuring the decorative side of the ribbon faces outwards. This loop should be the size you want one side of your finished bow to be. Keep this loop pinched firmly between your thumb and forefinger.
Step 4: Create the Second Loop
With the first loop securely held, form the second loop. Take the remaining long end of the ribbon and bring it over the top of your thumb and forefinger, creating a second loop on the opposite side. This loop should ideally be the same size as the first one.
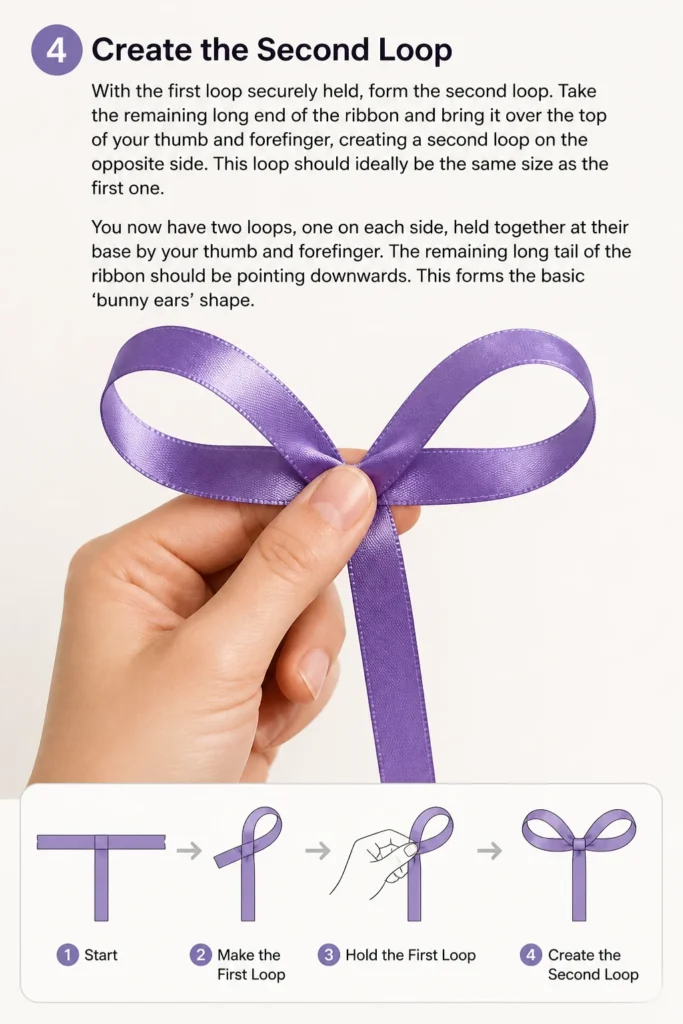
You now have two loops, one on each side, held together at their base by your thumb and forefinger. The remaining long tail of the ribbon should be pointing downwards. This forms the basic ‘bunny ears’ shape.
Step 5: Cross and Tuck
This is where the knot begins to form. Cross the right loop over the left loop, bringing it through the center opening you’ve created. Imagine you’re tying your shoelaces.
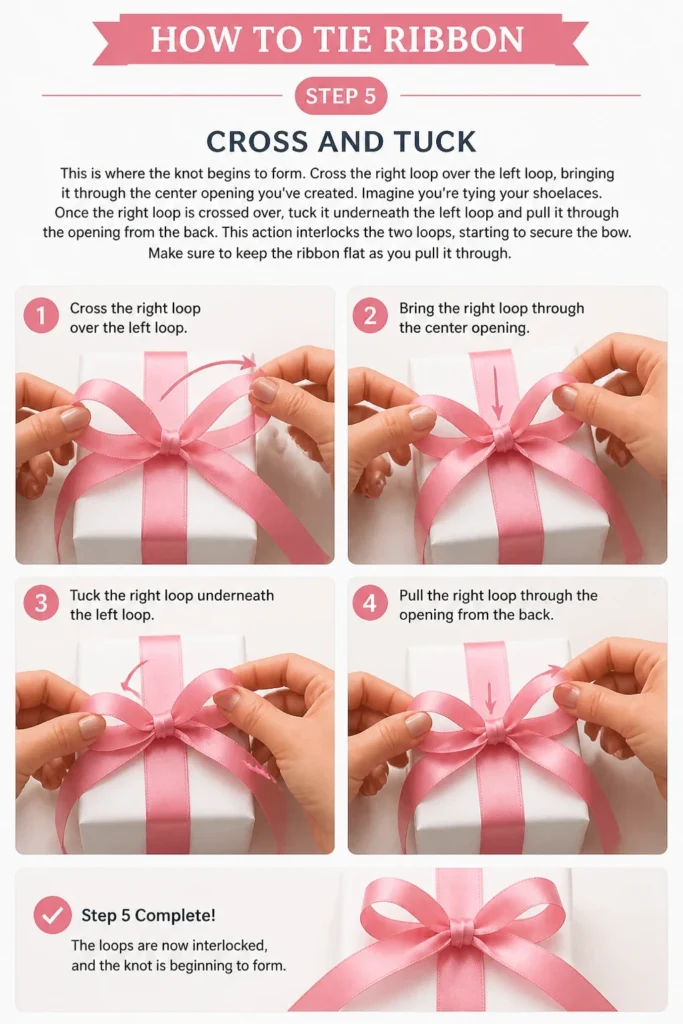
Once the right loop is crossed over, tuck it underneath the left loop and pull it through the opening from the back. This action interlocks the two loops, starting to secure the bow. Make sure to keep the ribbon flat as you pull it through.
Step 6: Pull Tight and Adjust
Gently pull both loops outwards simultaneously to tighten the knot. Do this slowly and with even pressure to prevent the bow from becoming lopsided. As you pull, the knot will snug up in the center.
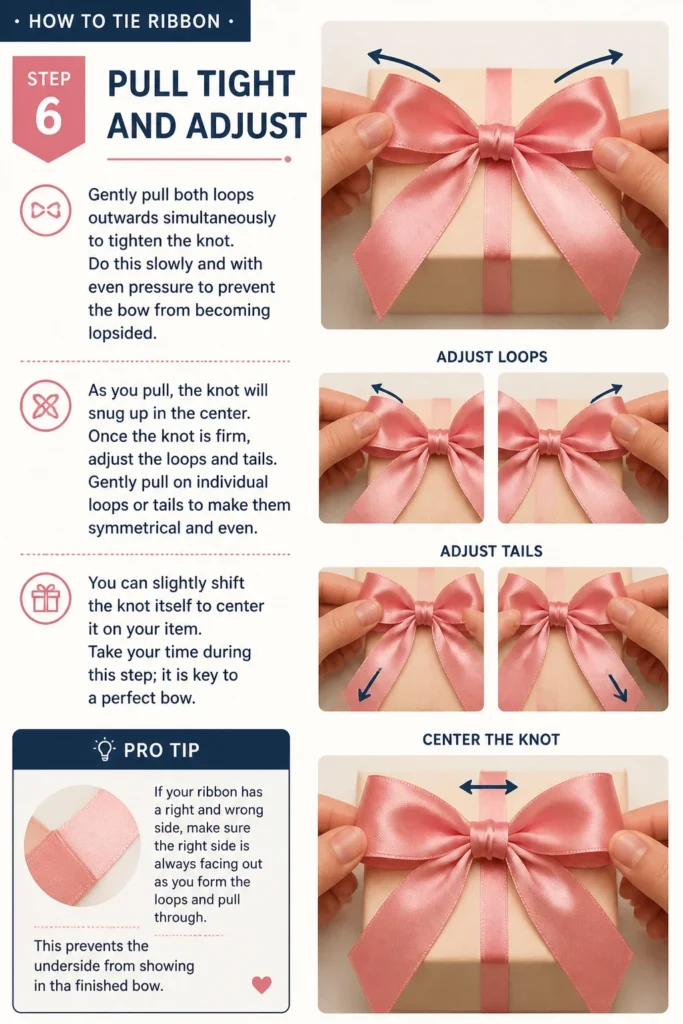
Once the knot is firm, adjust the loops and tails. Gently pull on individual loops or tails to make them symmetrical and even. You can slightly shift the knot itself to center it on your item. Take your time during this step; it is key to a perfect bow.
Pro Tip: If your ribbon has a “right” and “wrong” side, make sure the right side is always facing out as you form the loops and pull through. This prevents the underside from showing in the finished bow.
Step 7: Trim and Finish
Finally, trim the tails of your ribbon to the desired length. Use sharp scissors for a clean cut. You can cut them straight across, at an angle, or create a V-shape (dovetail) for a more decorative finish.
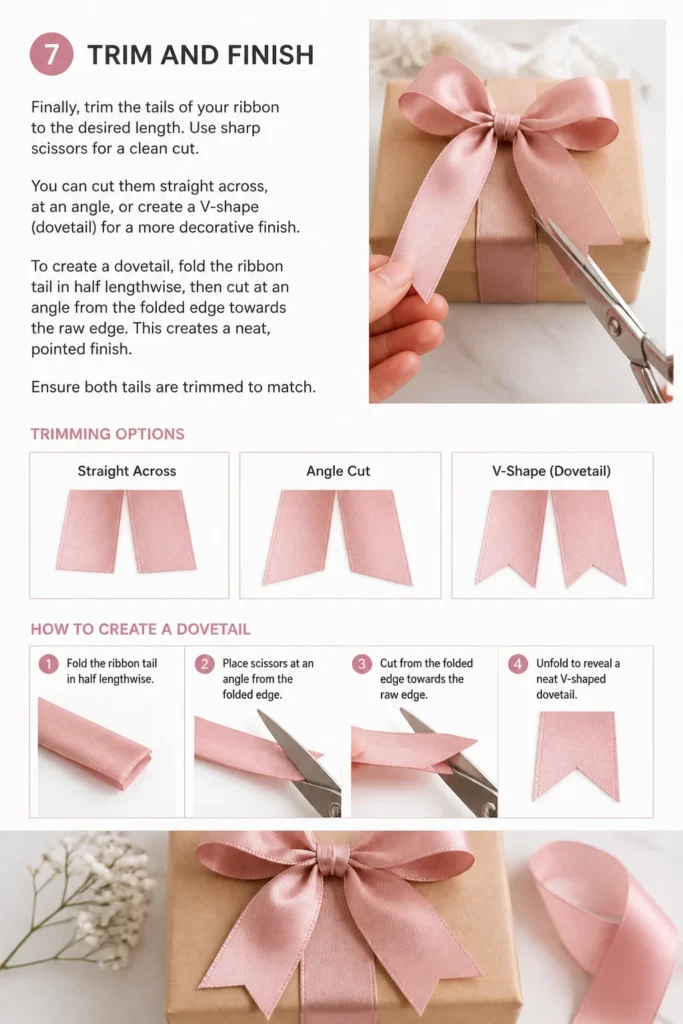
To create a dovetail, fold the ribbon tail in half lengthwise, then cut at an angle from the folded edge towards the raw edge. This creates a neat, pointed finish. Ensure both tails are trimmed to match.
Common Mistakes to Avoid
Uneven Loops
One of the most common issues is ending up with loops that are different sizes. This happens when you don’t form both loops symmetrically in Step 4 or when you pull one loop tighter than the other in Step 6. Always try to match the size of your first loop when creating the second, and apply even tension when tightening.
Too Loose a Knot
A loose knot will result in a floppy, shapeless bow that easily comes undone. This typically occurs because the loops were not pulled tight enough in Step 6. Ensure you pull firmly and steadily on both loops at the same time until the knot feels secure and the bow holds its shape.
Wrong Ribbon Choice
Using a ribbon that is too wide, too narrow, too stiff, or too slippery can make the process difficult. For instance, very wide ribbon can look bulky, while very narrow ribbon might not hold a distinct shape. Choose a ribbon appropriate for the scale of your project and your skill level.
Frayed Ends
Frayed ends can make an otherwise perfect bow look messy. This often happens with lower quality ribbons or when using dull scissors. Always use sharp scissors for clean cuts. For ribbons prone to fraying, you can lightly seal the ends with a clear craft glue or a quick pass of a flame (with caution) for synthetic ribbons.
Troubleshooting
Ribbon Slips Apart
If your ribbon keeps slipping apart, it’s likely due to insufficient tension in the initial knot or the type of ribbon. Ensure you are pulling the loops firmly enough in Step 6. Some very slick ribbons, like certain satins, can be prone to slipping. Try doubling the ribbon for more grip or using a small dab of hot glue on the underside of the knot to secure it once tied (if appropriate for your project).
Bow Looks Lopsided
A lopsided bow usually means the loops were not formed evenly or the knot was tightened unevenly. Go back to Step 4 and ensure your loops are identical in size before crossing them. When tightening in Step 6, pull both loops with equal pressure. You can gently manipulate the loops and tails even after tightening to achieve symmetry.
Ribbon Won’t Hold Shape
If your bow looks flat or doesn’t stand up, the ribbon material might be too soft or you haven’t tied it tightly enough. Some ribbons, especially very thin or soft ones, inherently have less structure. Consider using a wired ribbon for projects where you need a very defined, perky shape. For non-wired ribbons, ensure the knot is very snug to give the bow its best chance at holding form.
Key Takeaways
- Choosing the right ribbon material and width is crucial for a successful bow.
- Always cut your ribbon a little longer than you think you’ll need; you can always trim it.
- Form both loops to be symmetrical before you begin to cross them.
- Pull both loops simultaneously and with even tension to tighten the knot.
- Adjust the loops and tails gently after tightening to achieve perfect symmetry.
- Sharp scissors are essential for clean, professional-looking ribbon tails.
Frequently Asked Questions
What’s the best ribbon for beginners?
Grosgrain ribbon is often recommended for beginners. Its ribbed texture provides excellent grip, making it easier to hold and tie without slipping. Satin ribbon is also a good choice, but can be a bit more slippery.
How do I make a bow stay perky?
For a perky bow, a wired ribbon is your best friend. The wire inside allows you to shape and mold the loops to stand up beautifully. If using non-wired ribbon, ensure you tie the knot very tightly and consider using a stiffer material like grosgrain or velvet.
Can I tie ribbon without scissors?
While possible, it’s not ideal for a clean finish. You can tear some fabric ribbons, but this often results in frayed and uneven edges. For the best results and a professional look, sharp scissors are highly recommended for trimming.
How do I prevent fraying?
The best way to prevent fraying is to use sharp scissors for a clean cut. For synthetic ribbons, you can briefly run the cut edge over a flame (carefully!) to melt and seal the fibers. For natural fibers, a small dab of clear fabric glue or fray check applied to the cut edge works well.
Our Top Recommended Finds
- Good Quality Satin Ribbon: A versatile choice for gifts and decor, offering a smooth finish and a touch of elegance. Its flexibility makes it easy to work with once you get the hang of it.
- Sharp Fabric Scissors: Essential for clean, crisp cuts that prevent fraying and give your bows a professional look. A dedicated pair for ribbon ensures they stay sharp.
- Ribbon Storage Organizer: Keeps your ribbon spools neat, tidy, and easily accessible. This prevents tangles and makes it simple to find the perfect ribbon for your next project.
Your Ribbon Journey Begins Now
Mastering the art of tying ribbon is a delightful skill that enhances so many aspects of life, from gift-giving to crafting. With practice, precision, and the right tools, you’ll soon be creating beautiful bows effortlessly. Don’t be discouraged by initial attempts; every beautiful bow starts with a learning curve.
Now that you have the steps, gather your materials and give it a try. Experiment with different ribbon types and sizes to see how they behave. Soon, you’ll be adding that perfect decorative touch to everything you create.