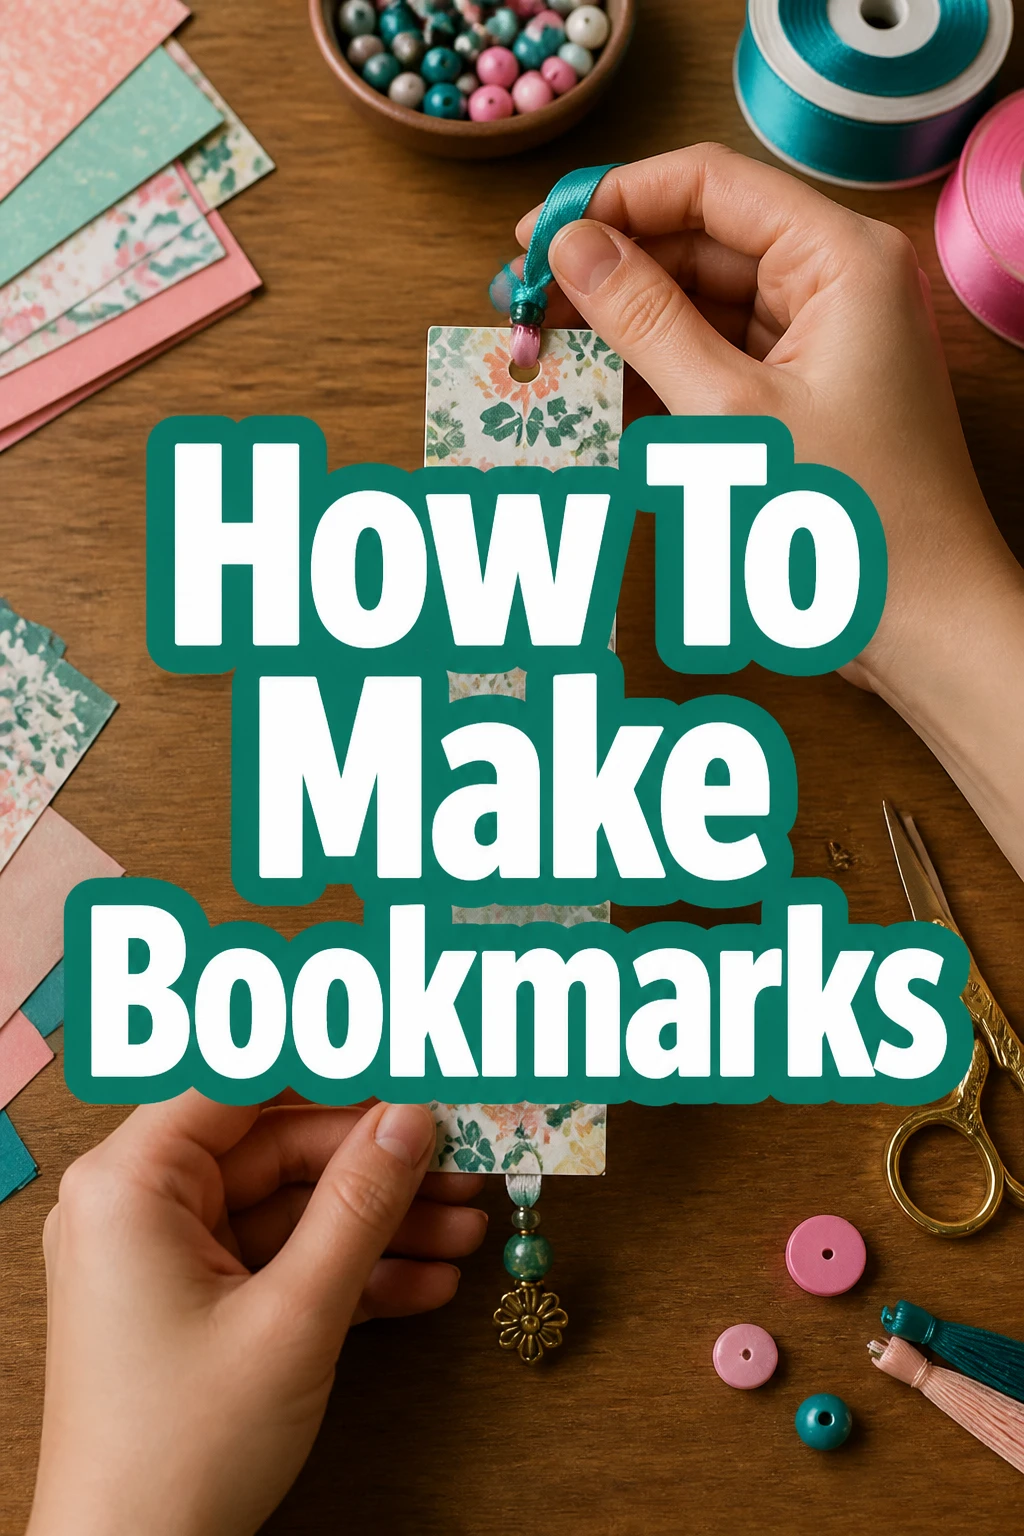
How To Make Bookmarks
There’s a special kind of magic in holding a bookmark you’ve made yourself. It’s not just a placeholder; it’s a tiny piece of art, a personal touch in the pages of your favorite stories. Having crafted countless custom bookmarks over the years, I’ve learned the secrets to making them durable, beautiful, and truly personal.
This guide will walk you through the entire process, from choosing your materials to adding those final, professional touches. You’ll create bookmarks that are not only functional but also wonderful gifts or cherished personal treasures.
Quick Overview
You’re about to embark on a fun, creative journey to make your very own bookmarks. This project is perfect for adding a personal flair to your reading or for creating thoughtful handmade gifts. You’ll finish with unique, sturdy bookmarks ready to mark your next adventure.
- Time needed: 30 minutes – 1 hour
- Difficulty: Beginner
- What you’ll need: Cardstock, scissors, ruler, various decorative elements, adhesive, optional laminating supplies.
Step-by-Step Instructions
Step 1: Gather Your Materials
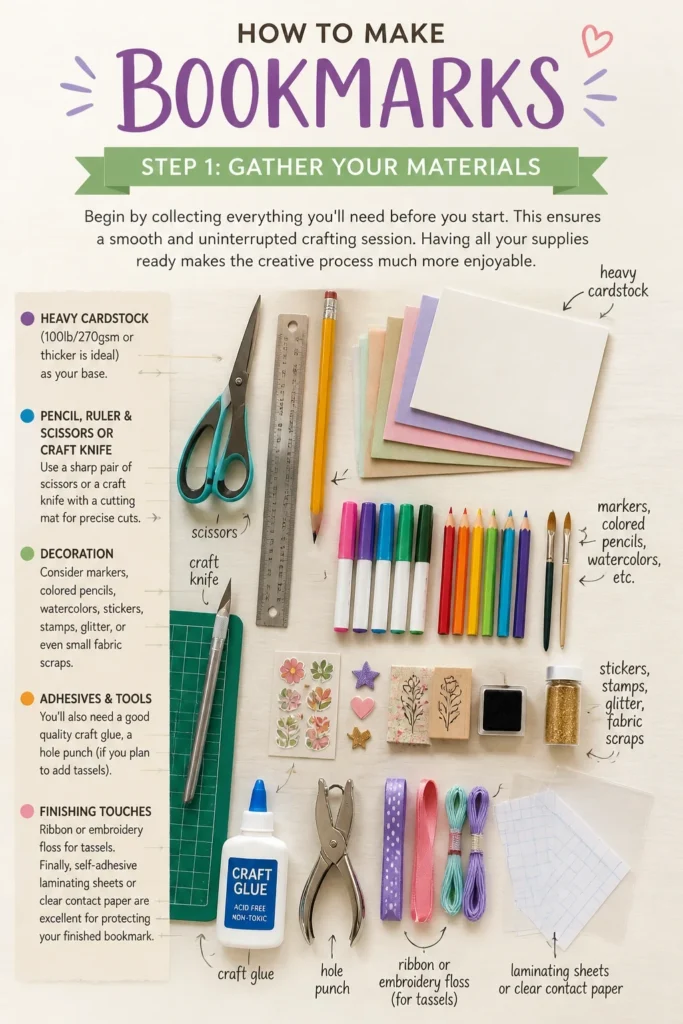
Begin by collecting everything you’ll need before you start. This ensures a smooth and uninterrupted crafting session. Having all your supplies ready makes the creative process much more enjoyable.
You will need heavy cardstock (100lb/270gsm or thicker is ideal) as your base. Grab a pencil, a ruler, and a sharp pair of scissors or a craft knife with a cutting mat for precise cuts. For decoration, consider markers, colored pencils, watercolors, stickers, stamps, glitter, or even small fabric scraps.
You’ll also need a good quality craft glue, a hole punch (if you plan to add tassels), and ribbon or embroidery floss for tassels. Finally, self-adhesive laminating sheets or clear contact paper are excellent for protecting your finished bookmark.
Step 2: Plan Your Design
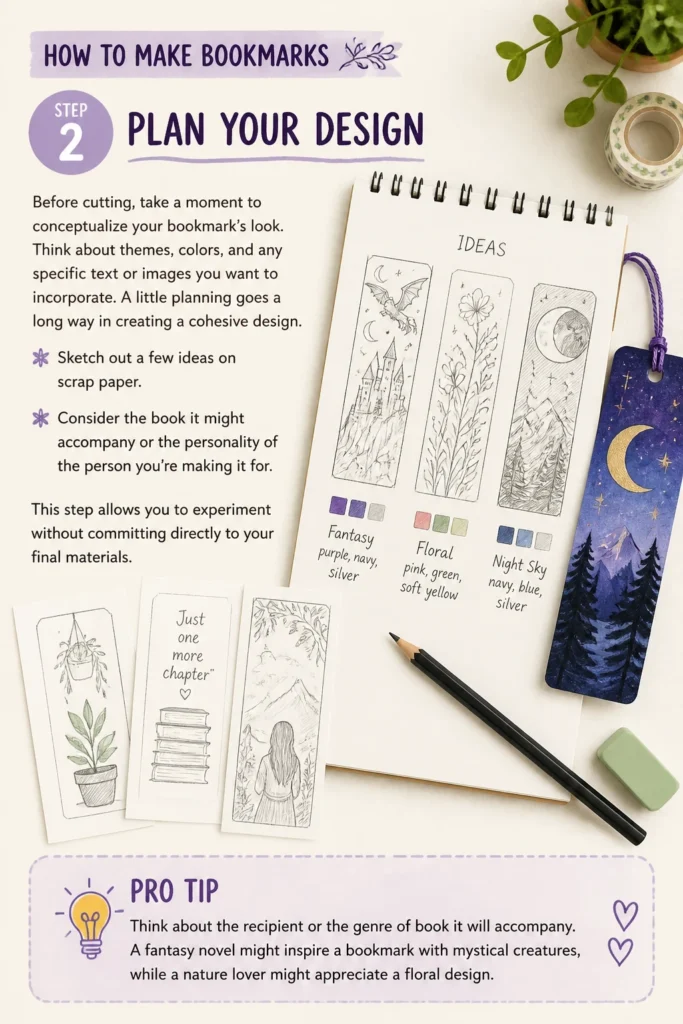
Before cutting, take a moment to conceptualize your bookmark’s look. Think about themes, colors, and any specific text or images you want to incorporate. A little planning goes a long way in creating a cohesive design.
Sketch out a few ideas on scrap paper. Consider the book it might accompany or the personality of the person you’re making it for. This step allows you to experiment without committing directly to your final materials.
Pro Tip: Think about the recipient or the genre of book it will accompany. A fantasy novel might inspire a bookmark with mystical creatures, while a nature lover might appreciate a floral design.
Step 3: Measure and Cut Your Base
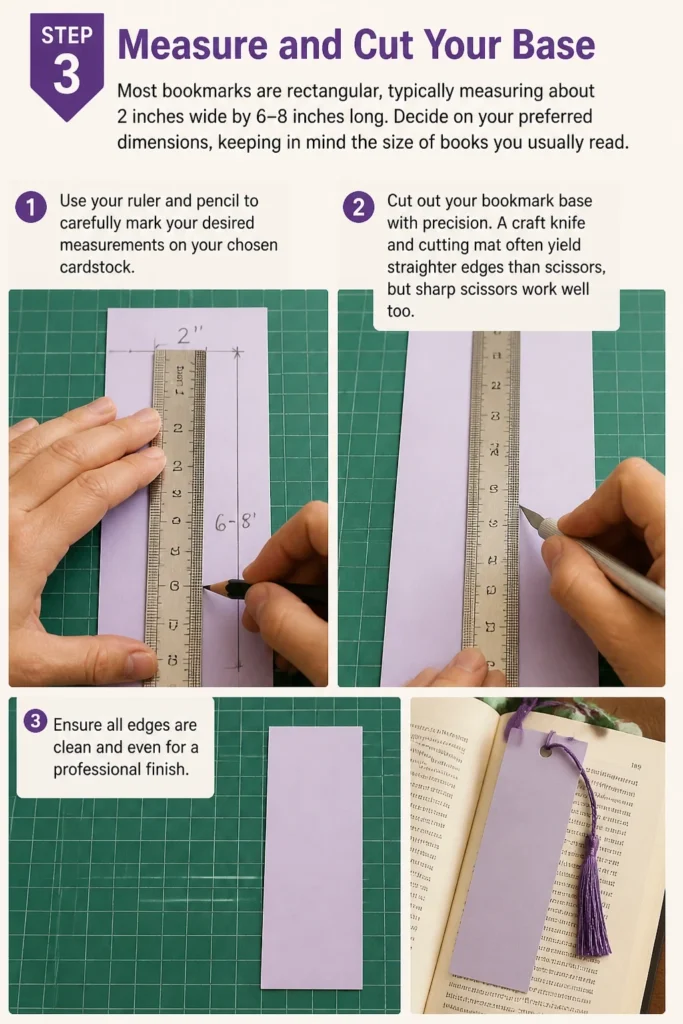
Most bookmarks are rectangular, typically measuring about 2 inches wide by 6-8 inches long. Decide on your preferred dimensions, keeping in mind the size of books you usually read. Use your ruler and pencil to carefully mark these measurements on your chosen cardstock.
Cut out your bookmark base with precision. A craft knife and cutting mat often yield straighter edges than scissors, but sharp scissors work well too. Ensure all edges are clean and even for a professional finish.
Step 4: Decorate Your Bookmark
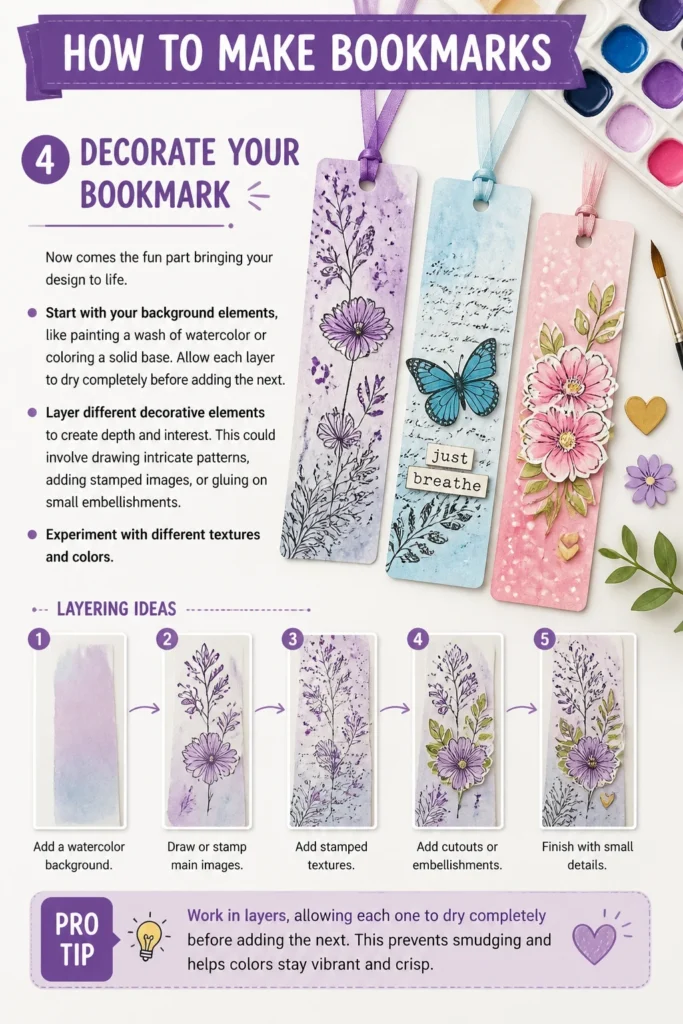
Now comes the fun part: bringing your design to life. Start with your background elements, like painting a wash of watercolor or coloring a solid base. Allow each layer to dry completely before adding the next.
Layer different decorative elements to create depth and interest. This could involve drawing intricate patterns, adding stamped images, or gluing on small embellishments. Experiment with different textures and colors.
Pro Tip: Work in layers, allowing each one to dry completely before adding the next. This prevents smudging and helps colors stay vibrant and crisp.
Step 5: Add Text or Personal Touches
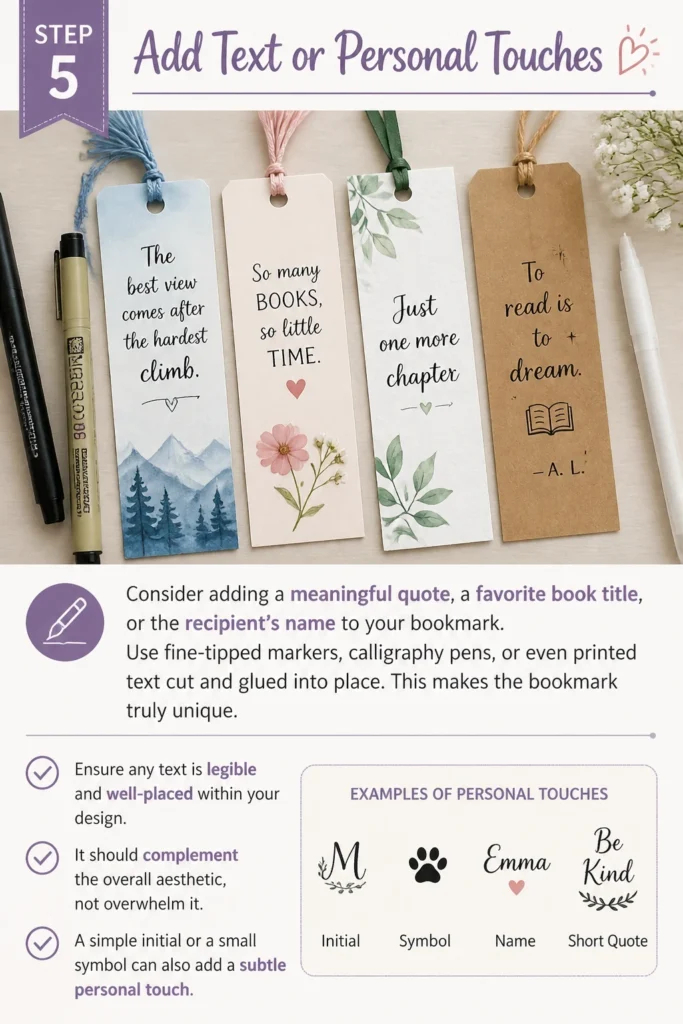
Consider adding a meaningful quote, a favorite book title, or the recipient’s name to your bookmark. Use fine-tipped markers, calligraphy pens, or even printed text cut and glued into place. This makes the bookmark truly unique.
Ensure any text is legible and well-placed within your design. It should complement the overall aesthetic, not overwhelm it. A simple initial or a small symbol can also add a subtle personal touch.
Step 6: Protect Your Creation
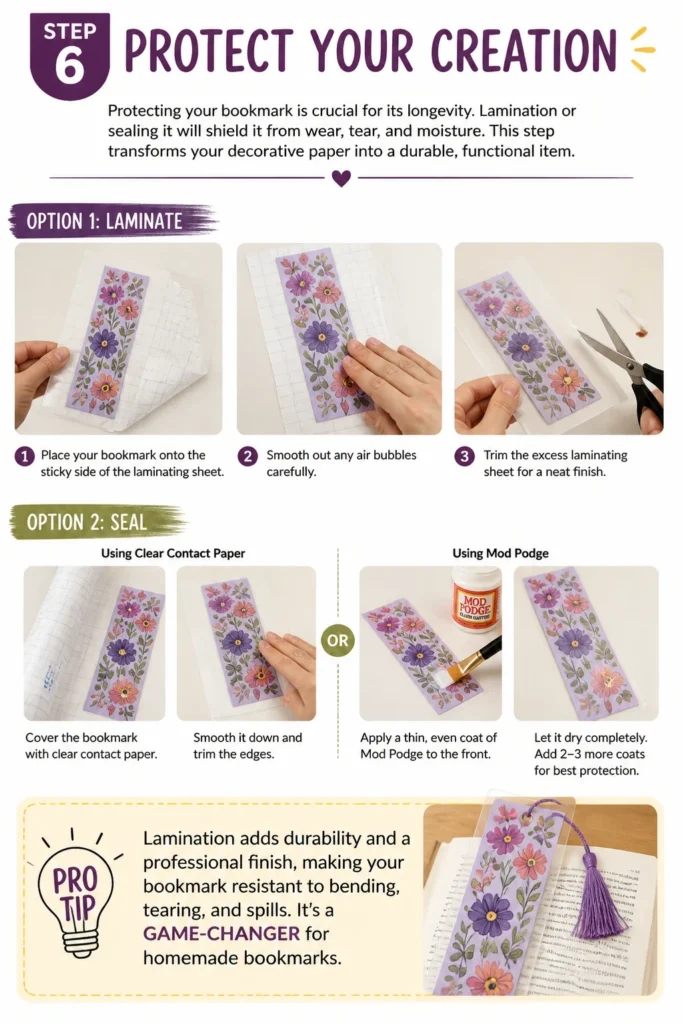
Protecting your bookmark is crucial for its longevity. Lamination or sealing it will shield it from wear, tear, and moisture. This step transforms your decorative paper into a durable, functional item.
Self-adhesive laminating sheets are easy to use and don’t require a machine. Carefully place your bookmark onto the sticky side, smooth out any air bubbles, and trim the excess. Alternatively, clear contact paper or a few coats of Mod Podge can also provide excellent protection.
Pro Tip: Lamination adds durability and a professional finish, making your bookmark resistant to bending, tearing, and spills. It’s a game-changer for homemade bookmarks.
Step 7: Punch a Hole for a Tassel (Optional)
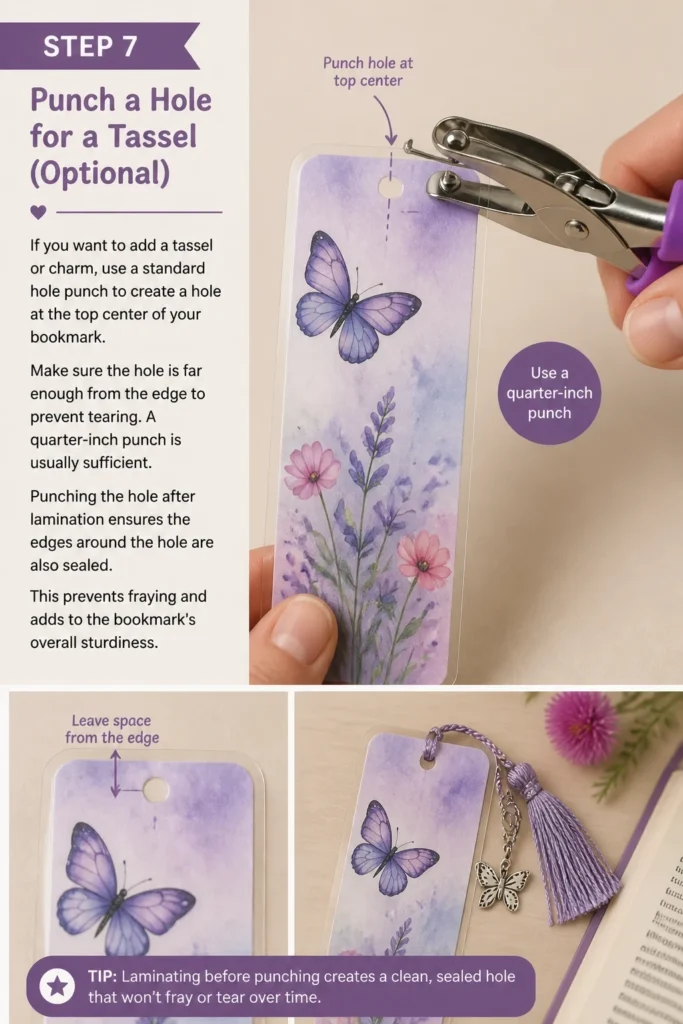
If you want to add a tassel or charm, use a standard hole punch to create a hole at the top center of your bookmark. Make sure the hole is far enough from the edge to prevent tearing. A quarter-inch punch is usually sufficient.
Punching the hole after lamination ensures the edges around the hole are also sealed. This prevents fraying and adds to the bookmark’s overall sturdiness.
Step 8: Attach a Tassel or Charm (Optional)
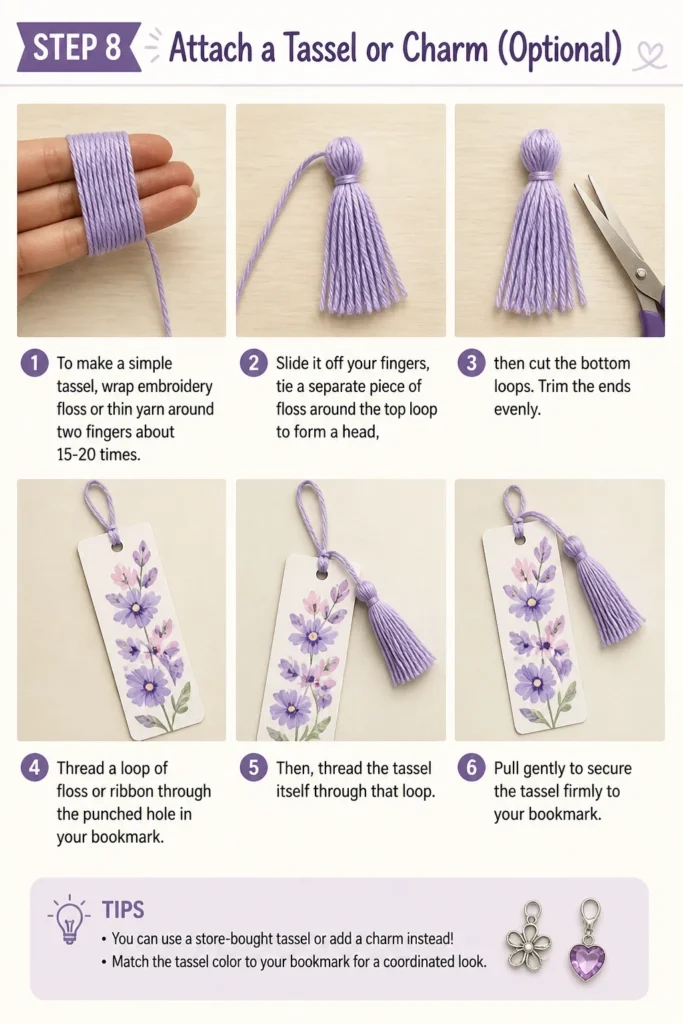
To make a simple tassel, wrap embroidery floss or thin yarn around two fingers about 15-20 times. Slide it off your fingers, tie a separate piece of floss around the top loop to form a head, then cut the bottom loops. Trim the ends evenly.
Thread a loop of floss or ribbon through the punched hole in your bookmark. Then, thread the tassel itself through that loop. Pull gently to secure the tassel firmly to your bookmark.
Step 9: Final Inspection and Trim
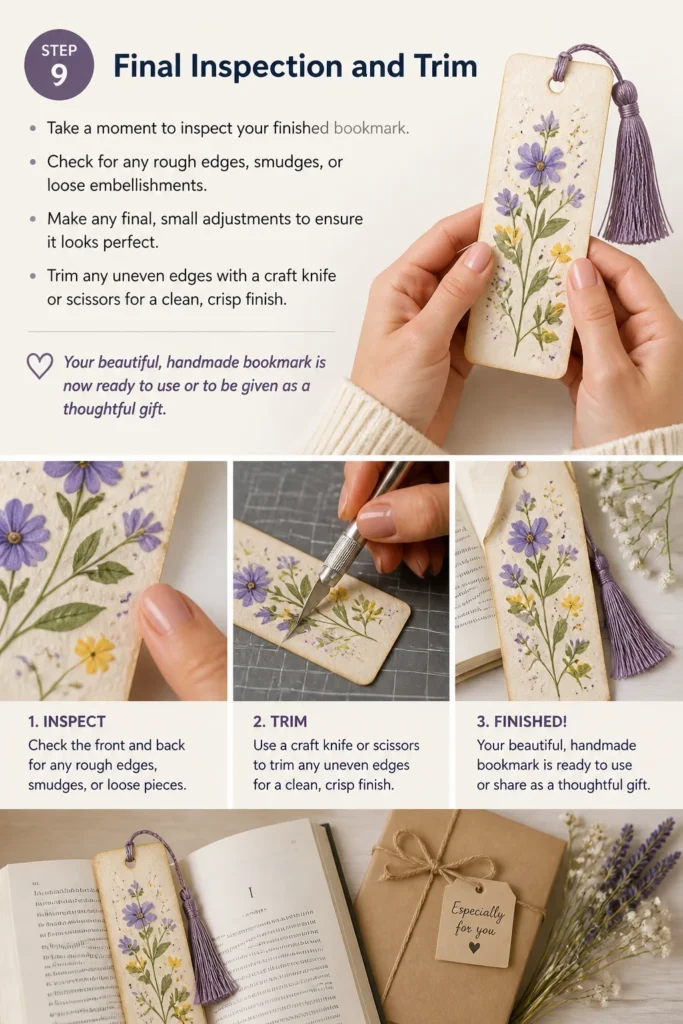
Take a moment to inspect your finished bookmark. Check for any rough edges, smudges, or loose embellishments. Make any final, small adjustments to ensure it looks perfect.
Trim any uneven edges with a craft knife or scissors for a clean, crisp finish. Your beautiful, handmade bookmark is now ready to use or to be given as a thoughtful gift.
Common Mistakes to Avoid
Using Flimsy Paper
A common pitfall is using paper that is too thin, like standard printer paper. Flimsy paper bookmarks will quickly bend, crease, and tear with regular use, rendering your beautiful creation useless. Always opt for heavy cardstock or even watercolor paper, which offers the necessary stiffness and durability. This ensures your bookmark can withstand repeated handling and will last much longer.
Over-Decorating
While creativity is encouraged, sometimes less is more. Overloading your bookmark with too many stickers, glitter, or bulky embellishments can make it too thick, heavy, or visually cluttered. A bookmark that’s too bulky can damage book spines or fall out easily. Strive for balance and allow your key design elements to shine without overwhelming the entire piece.
Skipping Protection
Neglecting to protect your decorated bookmark is a mistake that leads to premature wear and tear. Unprotected paper is vulnerable to smudges, moisture, and general handling. Always laminate your bookmark or seal it with a clear protective coating. This crucial step safeguards your artwork, making the bookmark far more durable and professional-looking.
Rushing Drying Times
Patience is a virtue in crafting, especially when working with wet mediums like paint or glue. Rushing to the next step before a layer is completely dry often results in smudges, bleeding colors, or poorly adhered embellishments. Always allow adequate drying time between each decorative layer and before applying any protective coating. This ensures clean lines and a professional finish.
Troubleshooting
Bookmark Bends Easily
If your finished bookmark feels too flimsy and bends with little effort, your base material might be too thin. The best solution is to use a heavier weight cardstock, at least 100lb (270gsm) or more. You can also reinforce an existing bookmark by gluing it to another piece of cardstock of the same size, effectively doubling its thickness. Laminating the bookmark also significantly increases its rigidity and resistance to bending.
Decorations Smudge or Bleed
Smudging or bleeding often happens when mediums aren’t dry or when incompatible materials are used. Ensure you allow ample drying time for paints, markers, and glues before touching or adding new layers. If colors bleed, consider using different types of markers (e.g., permanent instead of water-based) or testing your chosen mediums on a scrap piece of your cardstock first. A fixative spray can also help set certain dry media before lamination.
Edges Look Rough After Cutting
Rough or jagged edges can detract from the overall professional appearance of your bookmark. This issue often stems from using dull scissors or a blunt craft knife. To fix this, carefully re-trim the edges with a very sharp pair of scissors or a fresh blade in your craft knife. For a perfectly smooth finish, you can also gently sand the edges with fine-grit sandpaper, then wipe away any dust before protecting the bookmark.
Key Takeaways
- Choose a Sturdy Base: Always start with heavy cardstock (100lb/270gsm or thicker) to ensure your bookmark is durable and long-lasting.
- Allow Layers to Dry: Patience is key; let each decorative layer of paint, ink, or glue dry completely to prevent smudges and ensure crisp designs.
- Protect Your Creation: Laminate or seal your bookmark with clear contact paper or Mod Podge for essential protection against wear, tear, and moisture.
- Personalize Thoughtfully: Add quotes, names, or unique designs to make your bookmark truly special, whether for yourself or as a gift.
- Embrace Experimentation: Don’t be afraid to try different materials, techniques, and embellishments to discover your unique crafting style.
Frequently Asked Questions
What’s the best paper for bookmarks?
The best paper for bookmarks is heavy cardstock, typically 100lb (270gsm) or thicker. Watercolor paper also works wonderfully, especially if you plan to use wet mediums, as it is designed to withstand moisture without warping. The key is to choose a paper that is stiff enough to hold its shape and withstand regular handling.
How can I make my bookmarks waterproof?
To make your bookmarks waterproof, the most effective method is lamination. You can use a laminating machine or self-adhesive laminating sheets, which are very easy to apply. Another option is to coat your bookmark with several layers of a waterproof sealant like Mod Podge Outdoor, allowing each layer to dry completely between applications.
Can kids make these bookmarks?
Absolutely! Making bookmarks is a fantastic craft for children of all ages. For younger children, provide pre-cut cardstock and simpler decorating materials like crayons, stickers, and glitter glue. Older children can handle scissors, more intricate designs, and even learn about lamination with supervision. It’s a wonderful way to encourage creativity and fine motor skills.
How long do homemade bookmarks last?
With proper care and protection, a homemade bookmark can last for many years, even decades. The crucial factor is the protection step – a laminated or sealed bookmark will endure far longer than an unprotected one. Storing them carefully when not in use also contributes significantly to their longevity.
Our Top Recommended Finds
- Heavy Duty Cardstock Assortment: A pack of varied colors and weights of cardstock provides a sturdy foundation for countless bookmark designs.
- Self-Adhesive Laminating Sheets: These sheets offer an easy, machine-free way to protect your bookmarks, making them durable and water-resistant.
- Craft Knife and Cutting Mat Set: For precise, clean cuts and intricate detailing, a good quality craft knife with a self-healing mat is an invaluable tool.
Ready to Mark Your Next Read?
You now have all the knowledge and steps to create beautiful, personalized bookmarks. This simple craft is incredibly rewarding, offering a creative outlet and a practical item you’ll use every day. Don’t let your creativity stop here; consider adapting these techniques for custom gift tags, greeting cards, or even small art prints.
Grab your supplies, clear a space, and let your imagination take flight. The perfect bookmark for your next literary adventure is just a few steps away. Start crafting today and add a unique touch to every page you turn.