How To Make Paper Planes
There’s a special kind of magic in watching a simple sheet of paper transform into something that soars through the air.
I remember countless afternoons spent folding, launching, and tweaking designs, eager to see my creations fly further than ever before.
This guide distills years of hands-on experience into a clear, easy-to-follow process, ensuring your first flight is a success.
Quick Overview
You’re about to craft a classic paper airplane, renowned for its stable flight and satisfying glide. This project is perfect for anyone looking for a quick, engaging activity that promises a rewarding outcome.
- Time needed: 5-10 minutes
- Difficulty: Beginner
- What you’ll need: A single sheet of standard printer paper (A4 or Letter size)
Step-by-Step Instructions
Step 1: Prepare Your Paper
Begin with a standard rectangular sheet of paper. Lay it flat on a clean, hard surface in portrait orientation, meaning the longer sides are vertical.
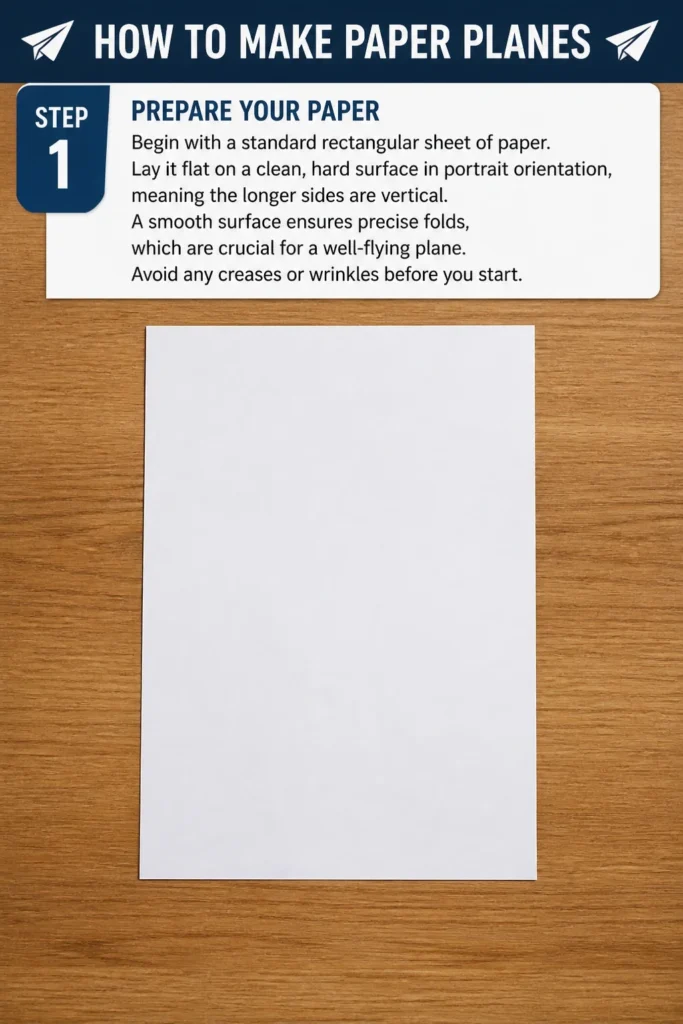
A smooth surface ensures precise folds, which are crucial for a well-flying plane. Avoid any creases or wrinkles before you start.
Step 2: Fold Lengthwise
Fold the paper in half lengthwise. Bring the top edge down to meet the bottom edge perfectly.
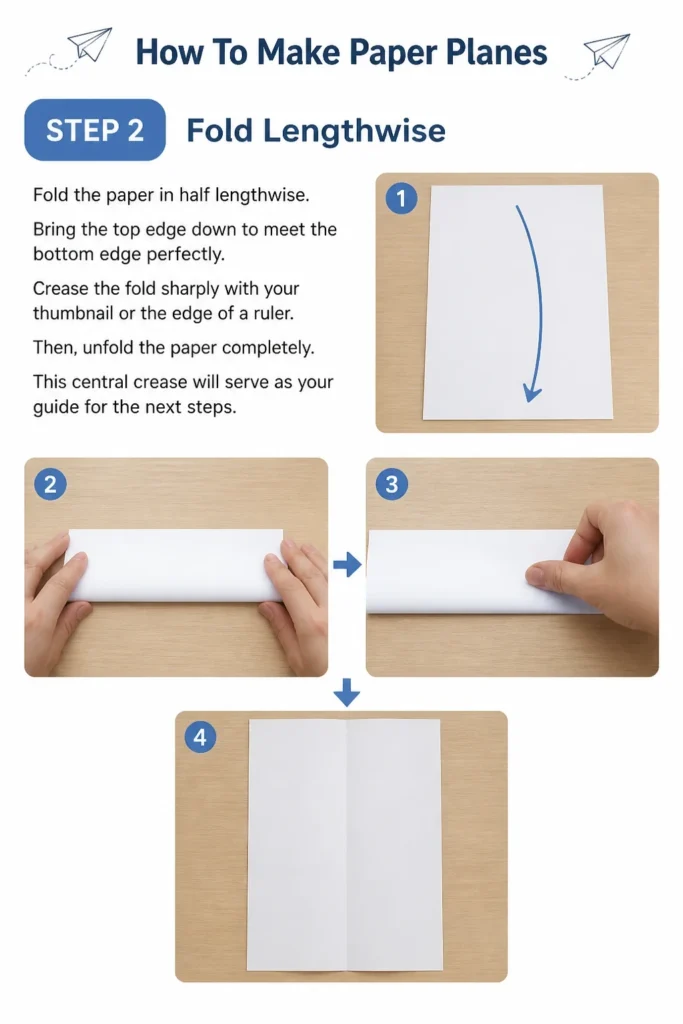
Crease the fold sharply with your thumbnail or the edge of a ruler. Then, unfold the paper completely. This central crease will serve as your guide for the next steps.
Step 3: Create the Nose Cone (First Fold)
Take the top-right corner of the paper and fold it down so its edge aligns precisely with the central crease you just made. The corner should meet the crease at the top of the paper.
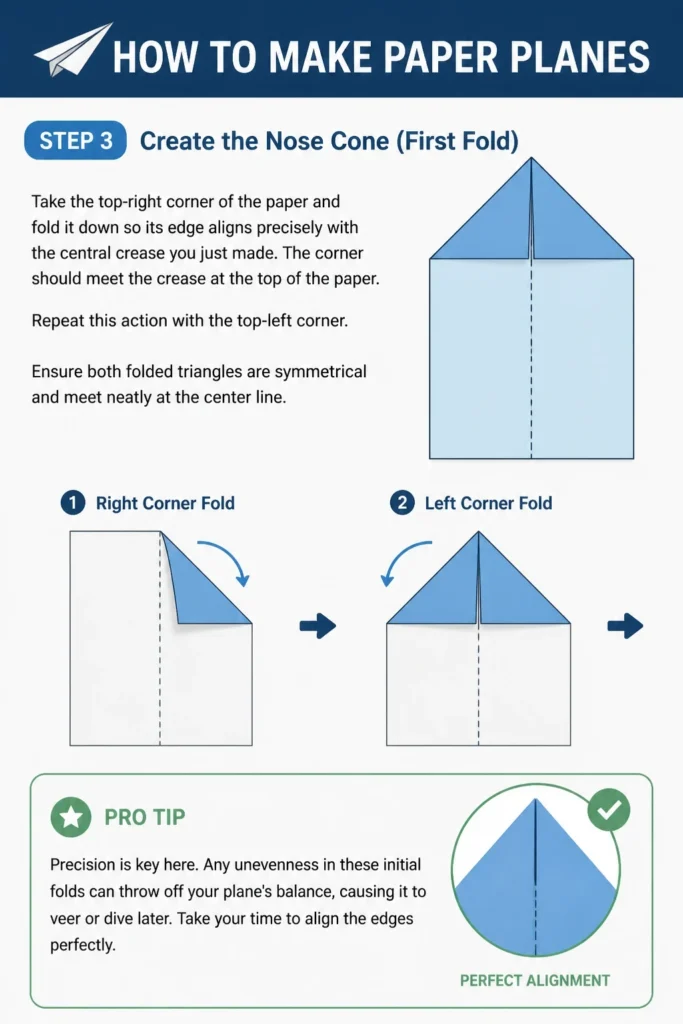
Repeat this action with the top-left corner. Ensure both folded triangles are symmetrical and meet neatly at the center line.
Pro Tip: Precision is key here. Any unevenness in these initial folds can throw off your plane’s balance, causing it to veer or dive later. Take your time to align the edges perfectly.
Step 4: Fold Down the Pointed Section
Fold the entire pointed top section you just created downwards. The tip of this section should align with the bottom edge of the two folded triangles you made in Step 3.
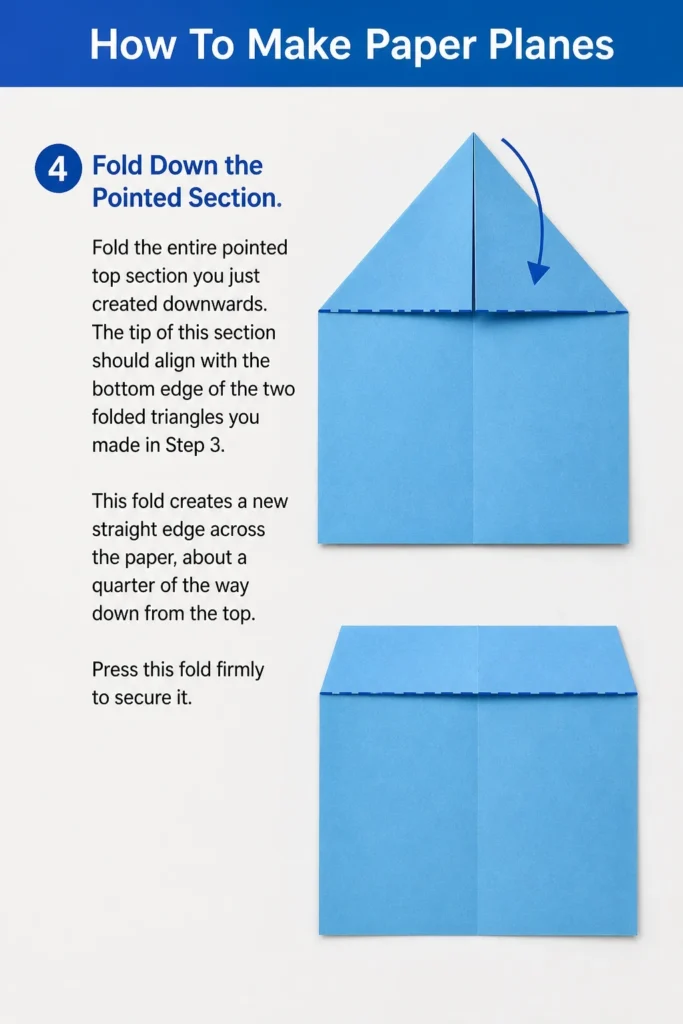
This fold creates a new straight edge across the paper, about a quarter of the way down from the top. Press this fold firmly to secure it.
Step 5: Form the Inner Wings
Fold the top-right corner of the newly folded section inwards, aligning its edge with the central crease once more. This fold will create a smaller triangle.
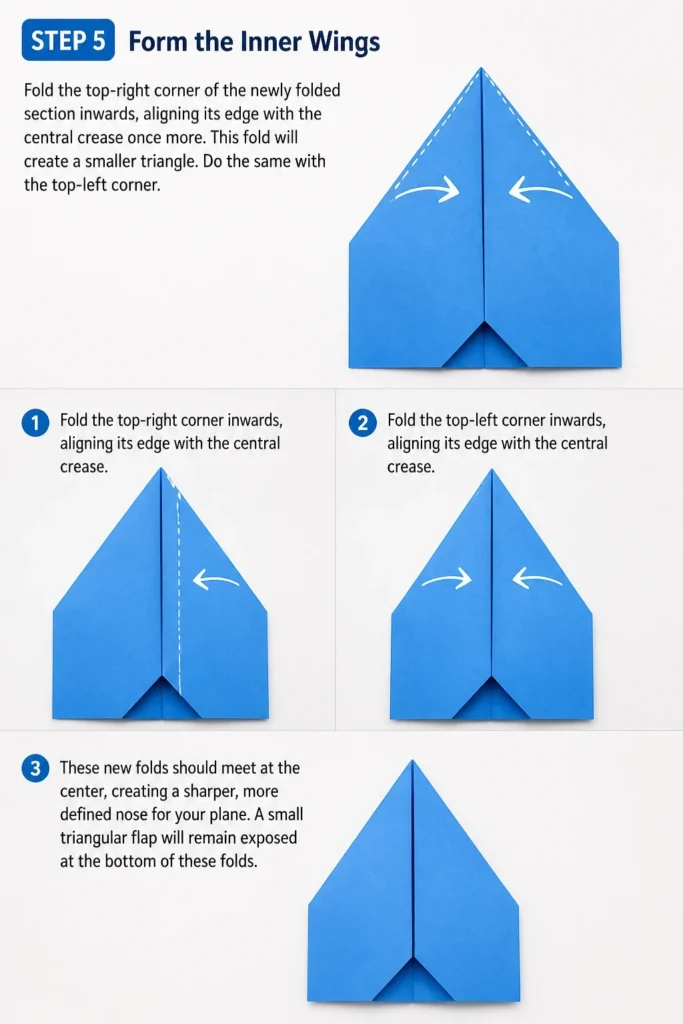
Do the same with the top-left corner. These new folds should meet at the center, creating a sharper, more defined nose for your plane. A small triangular flap will remain exposed at the bottom of these folds.
Step 6: Secure the Nose
Fold that small triangular flap you just created upwards, over the two inner wing folds. This action locks the previous folds in place, giving the nose of your plane extra stability and a cleaner finish.
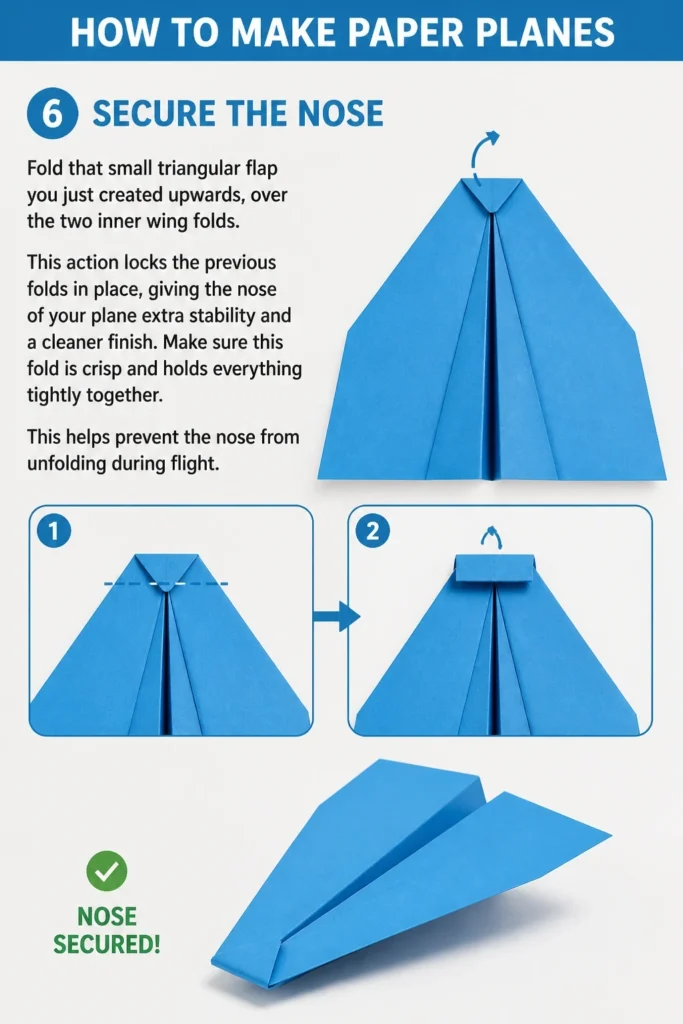
Make sure this fold is crisp and holds everything tightly together. This helps prevent the nose from unfolding during flight.
Step 7: Fold the Plane in Half
Turn the plane over so the folded-down sections are facing away from you. Now, fold the entire plane in half along the original central crease.
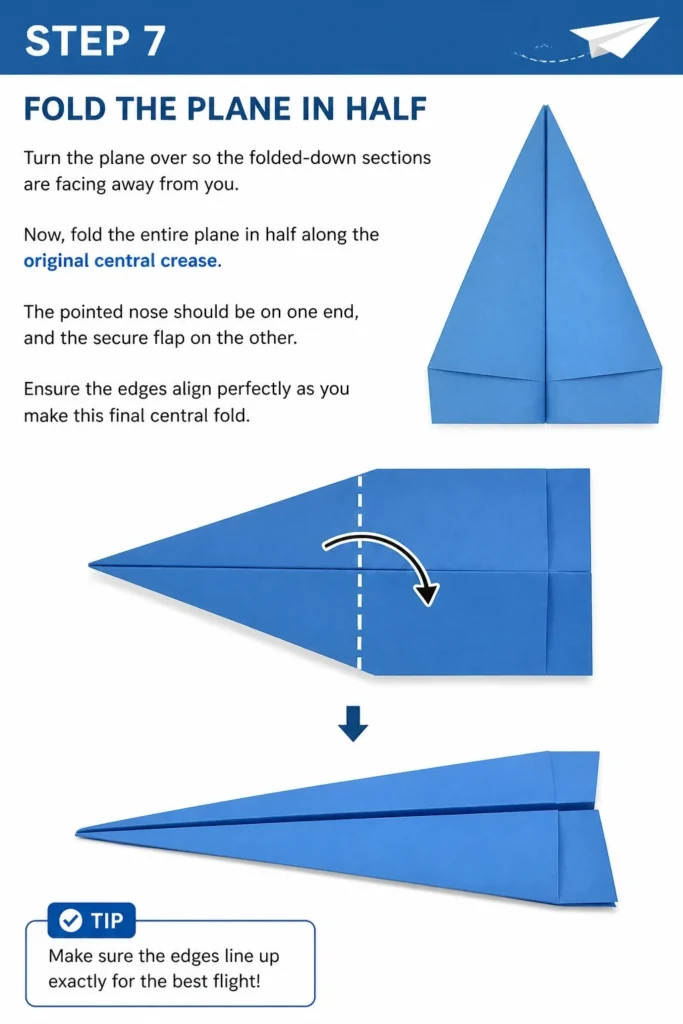
The pointed nose should be on one end, and the secure flap on the other. Ensure the edges align perfectly as you make this final central fold.
Step 8: Create the Wings
Fold down one side of the plane to create the first wing. The fold should run from the nose to the tail, about an inch or two from the top edge of the body.
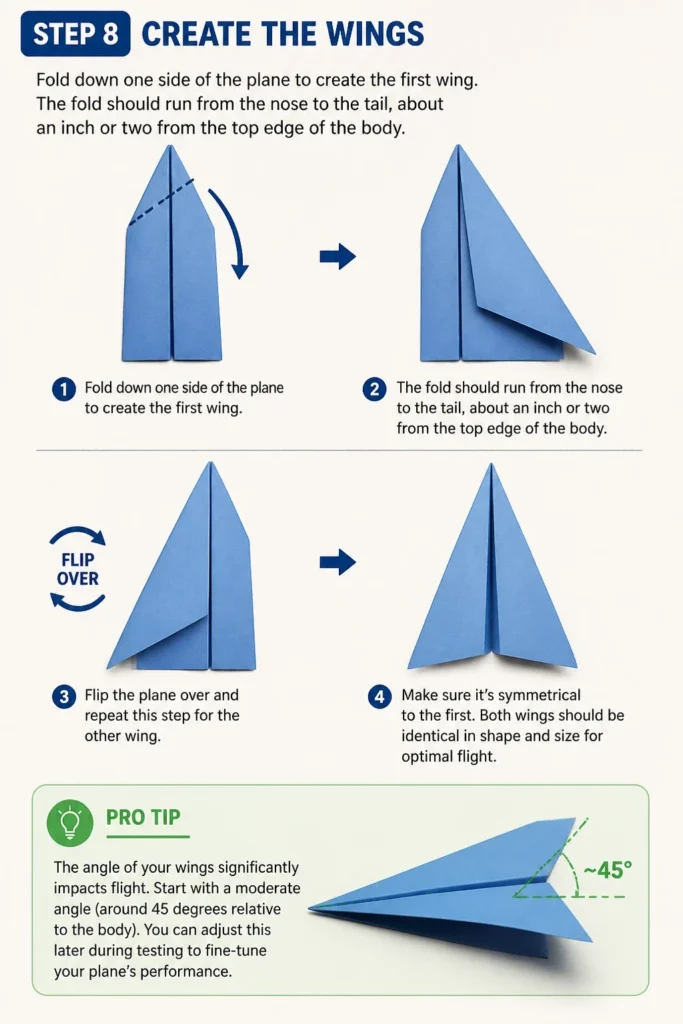
Flip the plane over and repeat this step for the other wing, making sure it’s symmetrical to the first. Both wings should be identical in shape and size for optimal flight.
Pro Tip: The angle of your wings significantly impacts flight. Start with a moderate angle (around 45 degrees relative to the body). You can adjust this later during testing to fine-tune your plane’s performance.
Step 9: Refine and Prepare for Launch
Gently unfold the wings so they are perpendicular to the body of the plane. You can also add small upward folds (winglets) to the very ends of the wings for extra stability, though this is optional.
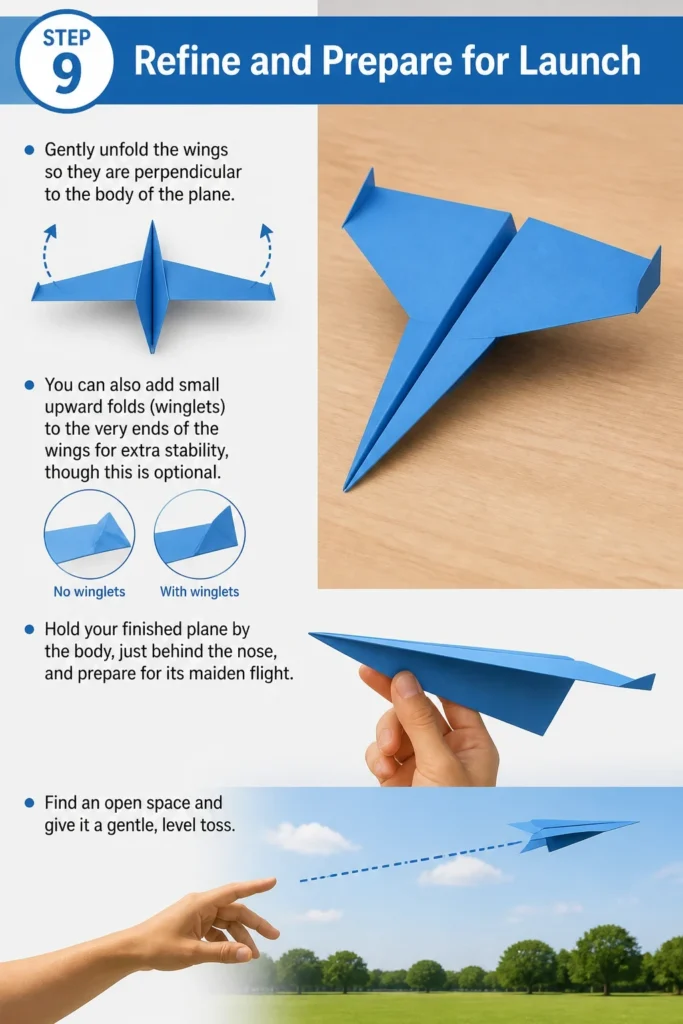
Hold your finished plane by the body, just behind the nose, and prepare for its maiden flight. Find an open space and give it a gentle, level toss.
Common Mistakes to Avoid
Uneven Folds
Many beginners rush through the folding process, leading to misaligned edges and asymmetrical wings. An uneven plane will inevitably fly erratically, favoring one side and often spinning or diving.
Always take your time to align edges and corners perfectly. Use a hard surface and press down firmly on each crease to ensure it’s sharp and true. Precision in every fold builds a balanced aircraft.
Using the Wrong Paper
While standard printer paper is a great starting point, using paper that is too thin or too thick can hinder performance. Very thin paper lacks the rigidity to hold its shape, making the plane flimsy.
Paper that is too thick, like cardstock, makes sharp folds difficult and adds excessive weight, requiring more force to fly. Stick to regular 20-24 lb printer paper for the best balance of weight and structural integrity.
Rushing the Process
The excitement of seeing your plane fly can lead to hurrying through the steps. This often results in weak creases, poorly aligned sections, and overlooked details that are critical for flight.
Treat each fold as an important part of the overall design. A few extra seconds spent on each step will pay off with a plane that flies smoothly and predictably.
Not Testing and Tweaking
Folding a plane is only half the fun; the other half is making it fly well. A common mistake is assuming the first flight will be perfect and giving up if it isn’t.
Paper planes almost always need minor adjustments. Observe how your plane flies, identify issues like diving or spinning, and then make small, incremental changes to the wings or tail. This iterative process is how you achieve optimal flight.
Troubleshooting
Plane Dives Immediately
If your paper plane consistently dives straight down after launch, it likely has too much weight in the nose or the wings aren’t generating enough lift. Check that your nose folds are secure but not overly bulky.
Try slightly increasing the angle of your wings, so they are slightly more angled upwards from the body. You can also add a tiny upward bend to the very back edge of the wings, which acts as an elevator to lift the nose.
Plane Stalls or Flips
A plane that stalls, meaning it flies up briefly and then drops, or flips over, often indicates too much lift at the back or insufficient weight in the nose. This can also happen if the wings are angled too sharply upwards.
Flatten the wings slightly, reducing their upward angle. Ensure the nose is firmly folded and secure. Sometimes, adding a tiny piece of tape to the very tip of the nose can provide just enough extra weight to stabilize it.
Plane Veers Off to One Side
If your plane constantly turns left or right, it’s almost certainly due to asymmetrical folding. One wing is likely slightly different from the other in shape, size, or angle.
Carefully inspect both wings and the body for any discrepancies. Gently adjust the offending wing to match its counterpart. Ensure all folds are crisp and even on both sides of the plane for balanced flight.
Key Takeaways
- Precision in folding is paramount for a well-balanced paper plane.
- Use standard printer paper for the best combination of weight and rigidity.
- Take your time with each step; rushing leads to errors.
- Always test your plane and be prepared to make minor adjustments.
- Symmetrical wings and a secure nose are crucial for stable flight.
- Experimentation with wing angles and small tweaks enhances performance.
Frequently Asked Questions
What is the best type of paper for making paper planes?
Standard 20-24 lb printer paper (A4 or Letter size) is ideal. It offers the perfect balance of weight, rigidity, and ease of folding. Avoid very thin paper like tissue paper or very thick paper like cardstock, as they can negatively impact flight performance.
How can I make my paper plane fly further?
Achieving greater distance often comes down to aerodynamics and launch technique. Ensure your plane is perfectly symmetrical with sharp, clean folds. Experiment with the wing angle; a slightly flatter wing might glide further. Launch with a smooth, level throw, avoiding an upward angle which can cause a stall.
Are there different types of paper plane designs?
Absolutely! This guide covers a classic dart design, but there are countless variations. Some designs focus on speed, others on gliding, and some even on complex aerobatics. Once you’ve mastered this basic model, you can explore designs like the “Delta Wing” or “Glider” for different flight characteristics.
How do I make my paper plane fly straight?
Straight flight is primarily a result of perfect symmetry. Check that both wings are identical in size, shape, and angle. Ensure the nose is centered and not pulling to one side. Small, almost imperceptible adjustments to the trailing edge of the wings can also help correct a persistent veer.
Our Top Recommended Finds
- Standard Printer Paper: Essential for countless flights, readily available, and perfect for practice.
- Metal Ruler: Great for achieving perfectly straight, crisp folds and accurate measurements, especially for advanced designs.
- Paper Plane Design Book/Kit: For those ready to explore beyond the basics, these often include pre-printed designs and instructions for various models.
Ready for Takeoff?
You’ve now got all the knowledge and steps needed to craft your very own paper plane. The satisfaction of seeing your creation take flight is truly unique, a simple joy that never gets old.
Don’t stop at just one! Experiment with slightly different wing angles, launch techniques, or even try a heavier paper for a new challenge.
The sky is literally the limit for your paper aviation adventures. Go ahead, fold that first plane, and let your imagination soar!