How To Make Paper Rocket
There’s a unique thrill in watching something you’ve built launch skyward, even if it’s just a few feet.
I remember my first paper rocket, a simple tube that defied gravity with surprising grace.
This guide draws on years of tinkering and successful launches, making sure you get it right from the start.
Quick Overview
You’re about to create your very own paper rocket, a fantastic project that combines craft with basic physics.
This guide will walk you through each step, ensuring your rocket is ready for its maiden flight.
- Time needed: 45-90 minutes
- Difficulty: Beginner
- What you’ll need: Paper, tape, scissors, a pencil or dowel, and a launch system (straw or PVC pipe)
Step-by-Step Instructions
Step 1: Gather Your Materials
Before you begin building, make sure all your supplies are within reach.
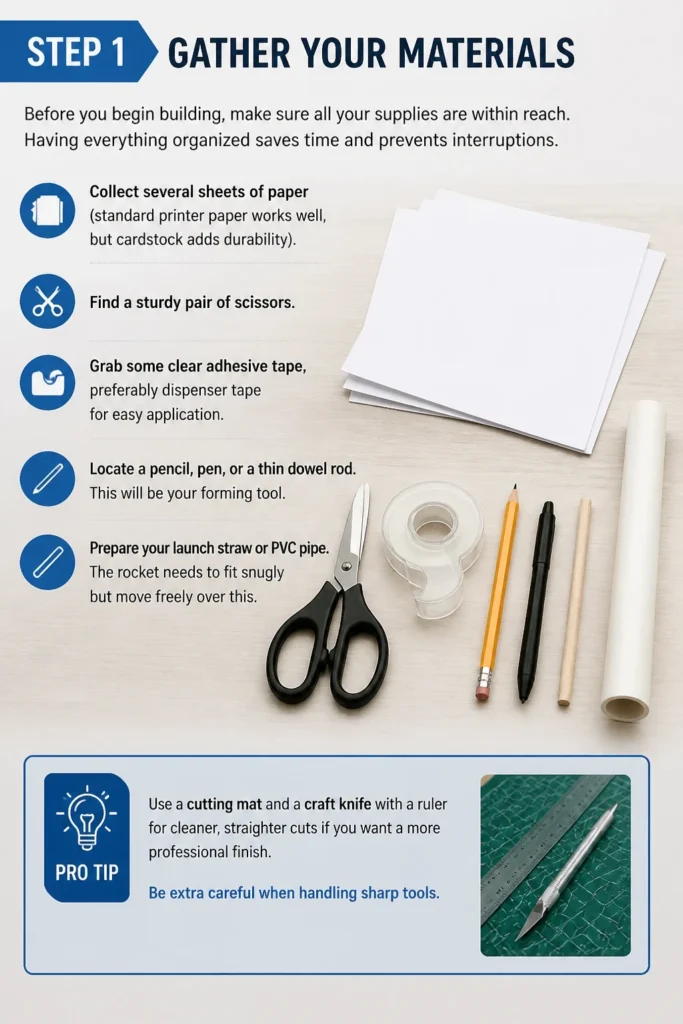
Having everything organized saves time and prevents interruptions.
- Collect several sheets of paper (standard printer paper works well, but cardstock adds durability).
- Find a sturdy pair of scissors.
- Grab some clear adhesive tape, preferably dispenser tape for easy application.
- Locate a pencil, pen, or a thin dowel rod. This will be your forming tool.
- Prepare your launch straw or PVC pipe. The rocket needs to fit snugly but move freely over this.
Pro Tip: Use a cutting mat and a craft knife with a ruler for cleaner, straighter cuts if you want a more professional finish. Be extra careful when handling sharp tools.
Step 2: Create the Rocket Body Tube
The body tube is the main structural component of your rocket.
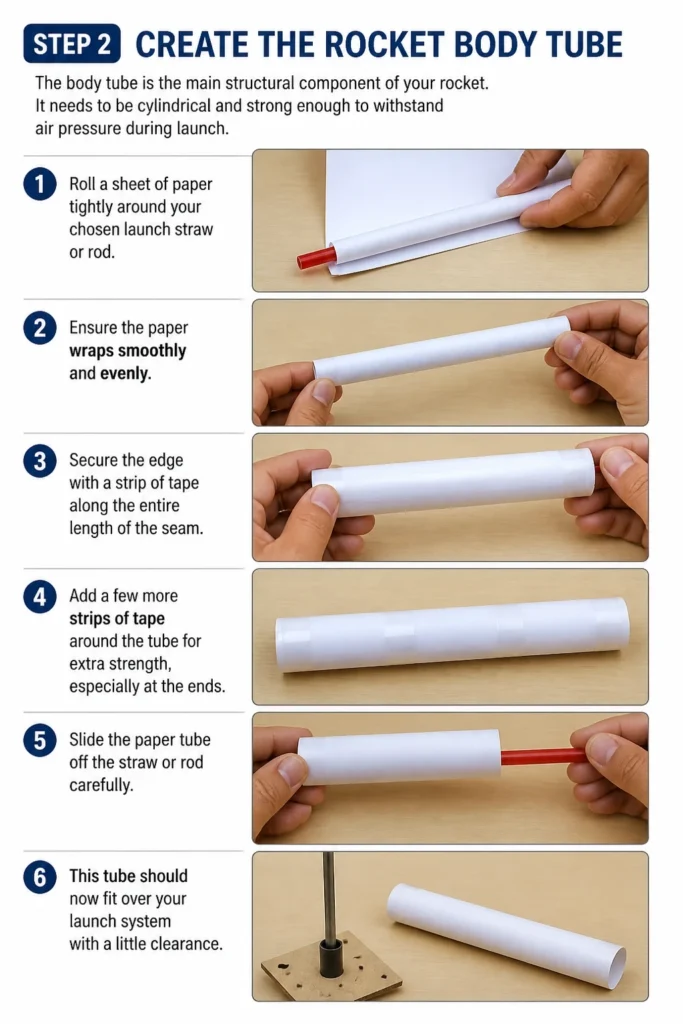
It needs to be cylindrical and strong enough to withstand air pressure during launch.
- Roll a sheet of paper tightly around your chosen launch straw or rod. Ensure the paper wraps smoothly and evenly.
- Secure the edge with a strip of tape along the entire length of the seam.
- Add a few more strips of tape around the tube for extra strength, especially at the ends.
- Slide the paper tube off the straw or rod carefully. This tube should now fit over your launch system with a little clearance.
Step 3: Form the Nose Cone
The nose cone helps your rocket cut through the air efficiently, reducing drag.
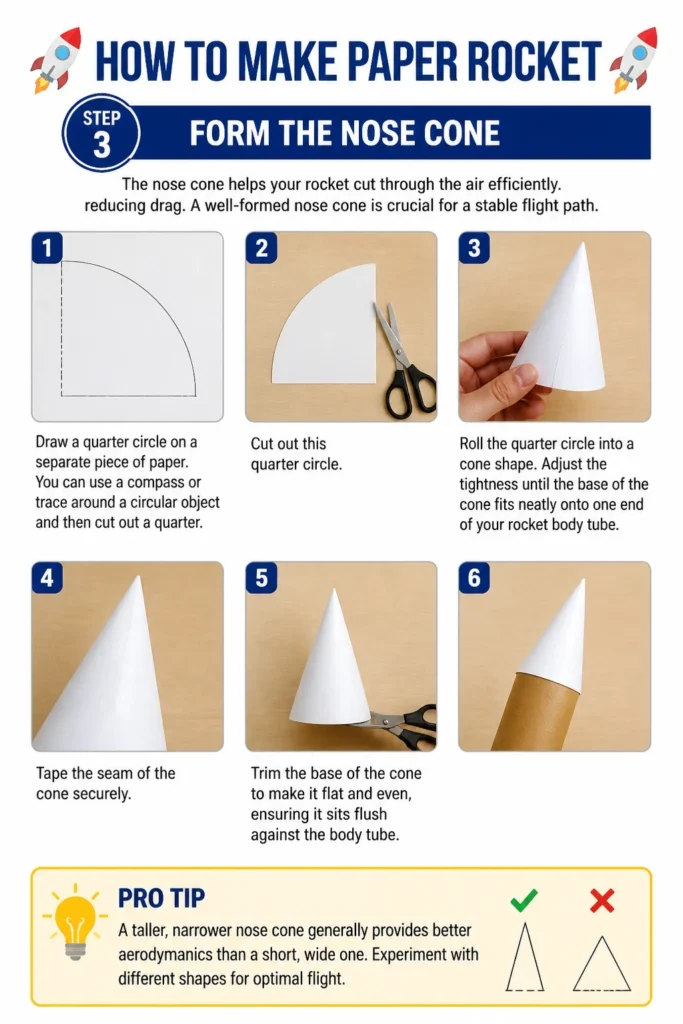
A well-formed nose cone is crucial for a stable flight path.
- Draw a quarter circle on a separate piece of paper. You can use a compass or trace around a circular object and then cut out a quarter.
- Cut out this quarter circle.
- Roll the quarter circle into a cone shape. Adjust the tightness until the base of the cone fits neatly onto one end of your rocket body tube.
- Tape the seam of the cone securely.
- Trim the base of the cone to make it flat and even, ensuring it sits flush against the body tube.
Pro Tip: A taller, narrower nose cone generally provides better aerodynamics than a short, wide one. Experiment with different shapes for optimal flight.
Step 4: Attach the Nose Cone
Proper attachment of the nose cone ensures it stays in place during launch and flight.
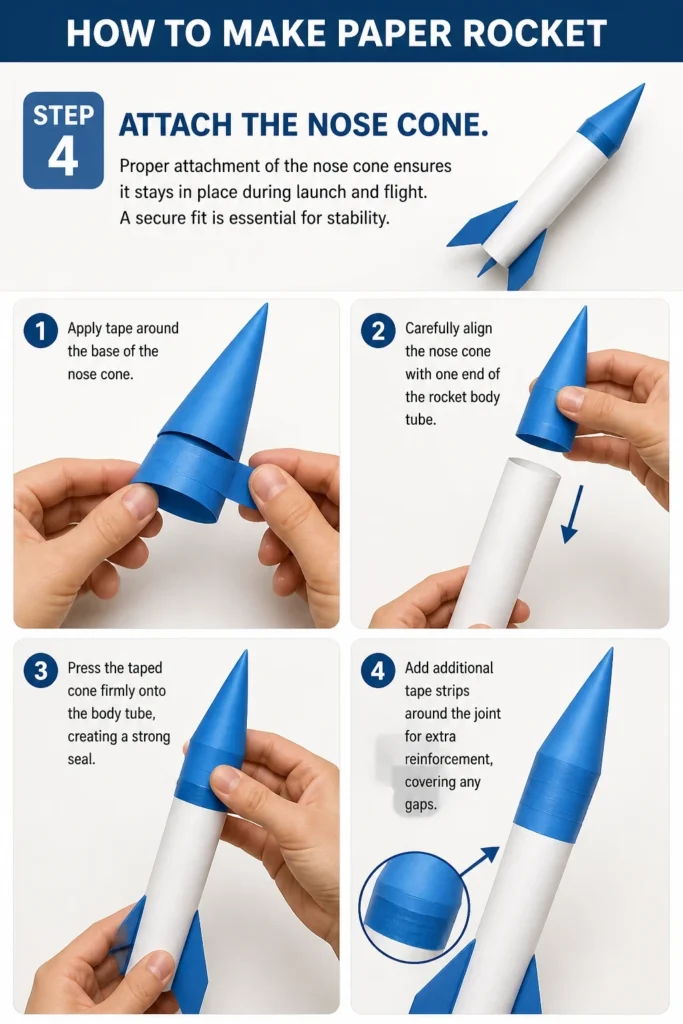
A secure fit is essential for stability.
- Apply tape around the base of the nose cone.
- Carefully align the nose cone with one end of the rocket body tube.
- Press the taped cone firmly onto the body tube, creating a strong seal.
- Add additional tape strips around the joint for extra reinforcement, covering any gaps.
Step 5: Design and Cut the Fins
Fins provide stability, preventing your rocket from tumbling end over end.
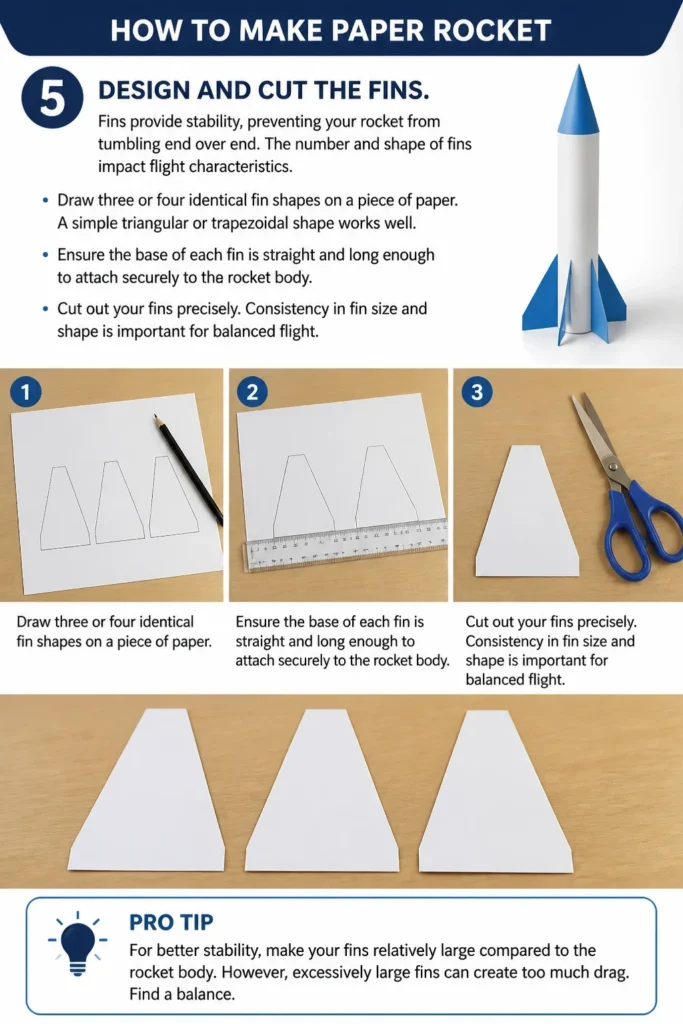
The number and shape of fins impact flight characteristics.
- Draw three or four identical fin shapes on a piece of paper. A simple triangular or trapezoidal shape works well.
- Ensure the base of each fin is straight and long enough to attach securely to the rocket body.
- Cut out your fins precisely. Consistency in fin size and shape is important for balanced flight.
Pro Tip: For better stability, make your fins relatively large compared to the rocket body. However, excessively large fins can create too much drag. Find a balance.
Step 6: Attach the Fins
Attaching the fins correctly is critical for stable flight.
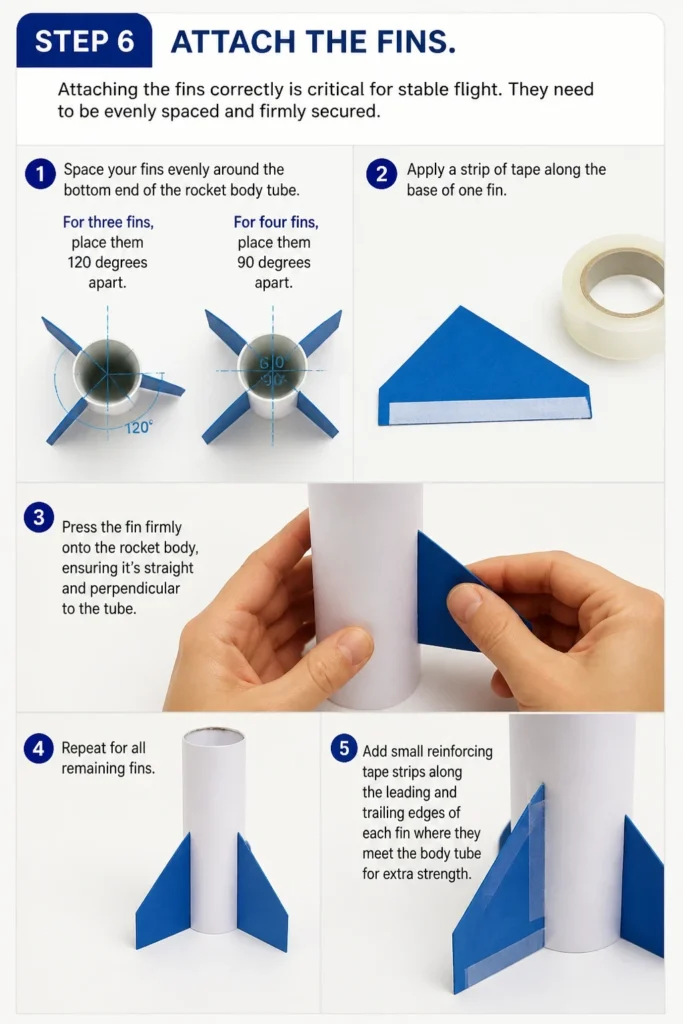
They need to be evenly spaced and firmly secured.
- Space your fins evenly around the bottom end of the rocket body tube. For three fins, place them 120 degrees apart. For four, 90 degrees apart.
- Apply a strip of tape along the base of one fin.
- Press the fin firmly onto the rocket body, ensuring it’s straight and perpendicular to the tube.
- Repeat for all remaining fins.
- Add small reinforcing tape strips along the leading and trailing edges of each fin where they meet the body tube for extra strength.
Step 7: Check for Balance and Stability
A well-balanced rocket flies straight and true.
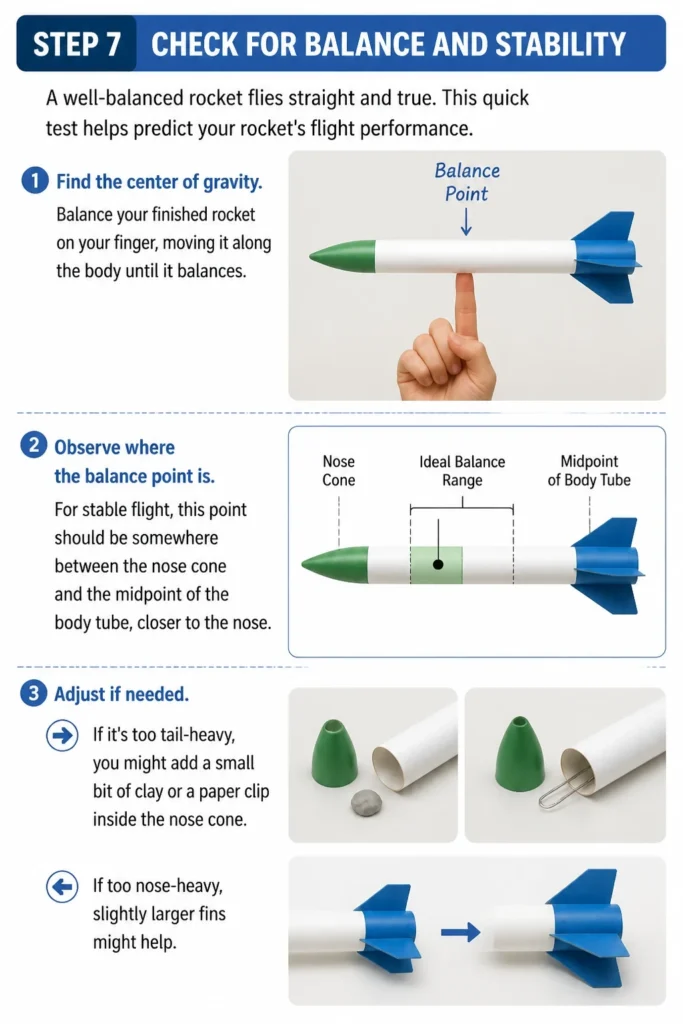
This quick test helps predict your rocket’s flight performance.
- Find the center of gravity. Balance your finished rocket on your finger, moving it along the body until it balances.
- Observe where the balance point is. For stable flight, this point should be somewhere between the nose cone and the midpoint of the body tube, closer to the nose.
- Adjust if needed. If it’s too tail-heavy, you might add a small bit of clay or a paper clip inside the nose cone. If too nose-heavy, slightly larger fins might help.
Step 8: Prepare Your Launch System
Your paper rocket needs a way to get airborne.
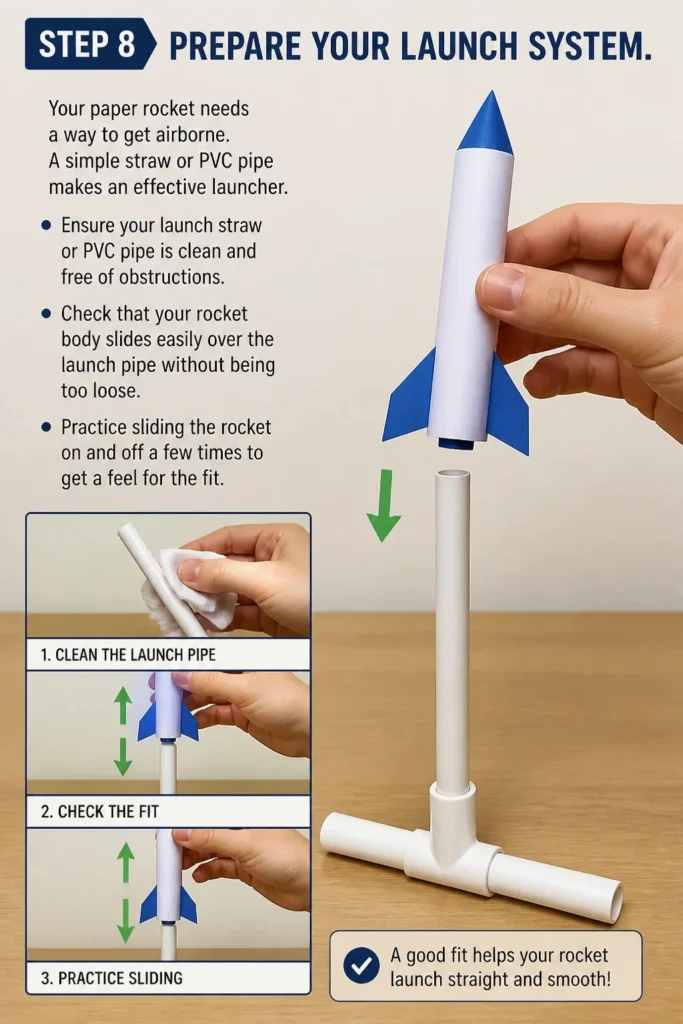
A simple straw or PVC pipe makes an effective launcher.
- Ensure your launch straw or PVC pipe is clean and free of obstructions.
- Check that your rocket body slides easily over the launch pipe without being too loose.
- Practice sliding the rocket on and off a few times to get a feel for the fit.
Step 9: Launch Your Rocket!
It’s time for the moment of truth!
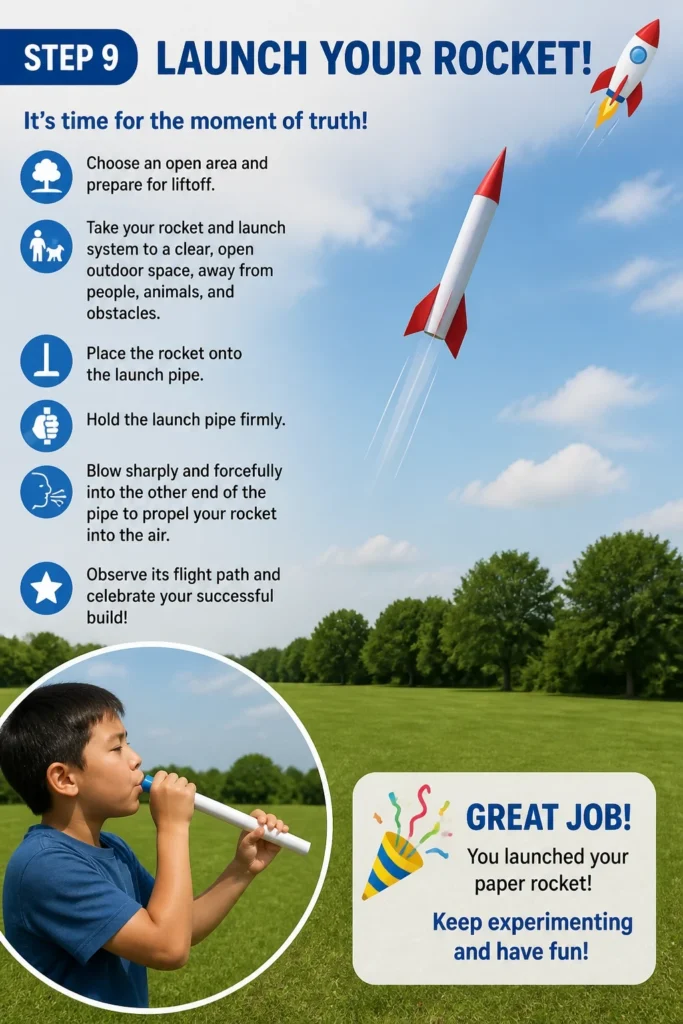
Choose an open area and prepare for liftoff.
- Take your rocket and launch system to a clear, open outdoor space, away from people, animals, and obstacles.
- Place the rocket onto the launch pipe.
- Hold the launch pipe firmly.
- Blow sharply and forcefully into the other end of the pipe to propel your rocket into the air.
- Observe its flight path and celebrate your successful build!
Common Mistakes to Avoid
Using Too Much Tape
While tape adds strength, excessive amounts can significantly increase the rocket’s weight.
This extra weight makes it harder for the rocket to achieve good altitude and speed.
Use tape strategically, focusing on seams and joints for reinforcement rather than covering large areas.
Uneven Fins or Attachment
If your fins are not identical in shape and size, or if they are attached unevenly, your rocket will not fly straight.
It will likely spin or veer off course, leading to a disappointing flight.
Take your time to measure and cut fins precisely, and ensure they are spaced equally around the rocket body.
Loose Nose Cone or Body Tube Seam
Any gaps or loose connections in the nose cone or body tube seam can cause air leaks and structural failure during launch.
This dramatically reduces the efficiency and stability of your rocket.
Make sure all seams are tightly sealed with tape, creating a smooth, airtight connection.
Incorrect Launch Pipe Fit
The rocket needs to fit just right over your launch pipe. If it’s too tight, it won’t launch smoothly.
If it’s too loose, air will escape around the sides, reducing the force of your launch.
Choose a pipe that allows a snug but free-moving fit for optimal thrust.
Troubleshooting
Rocket Tumbles or Spins Immediately After Launch
This usually indicates a lack of stability, often due to improperly designed or attached fins, or an incorrect center of gravity.
Check that your fins are symmetrical, evenly spaced, and firmly attached. Ensure the rocket is slightly nose-heavy; add a small weight (like a paper clip) inside the nose cone if it feels tail-heavy.
Rocket Doesn’t Launch Far or High
Low performance often points to air leaks or excessive weight.
Inspect all seams on the body tube and nose cone for any gaps and seal them completely with tape. Also, consider if you used too much tape or heavy paper, which adds unnecessary weight. Ensure the fit on the launch pipe is snug, not loose.
Rocket Veers Off Course
A rocket that consistently flies in one direction instead of straight up might have asymmetrical fins or a slightly bent body tube.
Carefully examine your fins to ensure they are identical and perfectly aligned. Roll the body tube on a flat surface to check for any bends and gently straighten it if necessary.
Key Takeaways
- Precision in cutting and assembly directly impacts your rocket’s flight performance.
- A securely taped body tube and nose cone are crucial for aerodynamic efficiency.
- Fins provide stability; ensure they are identical, evenly spaced, and firmly attached.
- The center of gravity should be slightly forward of the middle for stable flight.
- A snug fit between the rocket and the launch pipe is essential for effective thrust.
- Experiment with different designs to understand how changes affect flight.
Frequently Asked Questions
What kind of paper is best for making paper rockets?
Standard printer paper (20-24 lb bond) works very well as it’s light and easy to roll. For extra durability and slightly better performance, you can use lightweight cardstock, but it might be harder to roll tightly.
How can I make my paper rocket fly higher?
To achieve greater height, focus on reducing weight, improving aerodynamics (a sleek nose cone and smooth body), and ensuring a powerful, airtight launch. Practice a strong, quick breath into the launch tube.
Can I reuse my paper rocket?
Absolutely! Most paper rockets are designed for multiple flights. After a launch, check for any damage to the fins or nose cone and repair them with tape as needed. With careful use, your rocket can fly many times.
Is it safe to launch paper rockets indoors?
It’s generally safer and more effective to launch paper rockets outdoors in an open area. While you can launch them indoors, ensure there’s plenty of clear space to avoid hitting objects or people, and be mindful of potential damage to walls or ceilings.
Our Top Recommended Finds
- Clear Dispenser Tape: Essential for quick, clean, and strong seams without fumbling with rolls.
- Assorted Cardstock Pack: Offers various colors and slightly thicker paper for durable, personalized rocket designs.
- PVC Pipe (1/2 inch diameter): A sturdy and reliable option for a launch tube, offering consistent performance over standard straws.
Embark on Your Next Aerial Adventure
You’ve just built a fantastic paper rocket, a testament to simple engineering and creative fun.
Watching it soar is just the beginning of understanding the forces of flight.
Now, why not try different fin shapes, experiment with a multi-stage rocket design, or even build a target for your landings?
Grab another sheet of paper and launch into your next project today!