How To Draft Trouser Pattern
There’s a unique satisfaction in wearing trousers that fit perfectly, contouring to your body without a single pinch or sag.
I remember years of adjusting store-bought patterns, always falling short of that ideal fit, until I learned the power of drafting my own.
This guide shares the precise, practical method I’ve refined over countless projects, empowering you to create a foundation for trousers that truly flatter.
Quick Overview
This guide will walk you through creating a bespoke basic trouser pattern, tailored exactly to your body measurements. You’ll finish with a foundational block pattern, ready for styling variations.
- Time needed: 3-5 hours (for a first draft, allowing for careful measurement and precision)
- Difficulty: Intermediate
- What you’ll need: Measuring tape, large pattern paper (or butcher paper), long ruler, L-square ruler, French curve, pencil, eraser, calculator, clear notes of your body measurements.
Step-by-Step Instructions
Step 1: Gather Your Tools and Measurements
Before any lines are drawn, ensure you have all necessary tools laid out and your body measurements accurately recorded. Precision here is paramount for a well-fitting pattern.
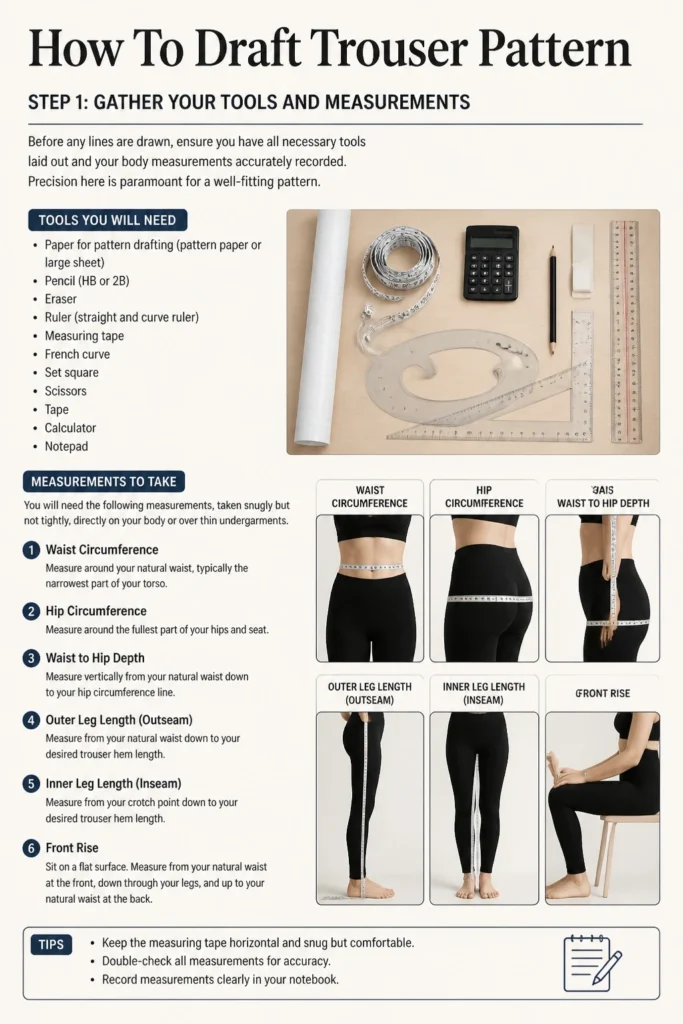
You will need the following measurements, taken snugly but not tightly, directly on your body or over thin undergarments:
- Waist Circumference: Measure around your natural waist, typically the narrowest part of your torso.
- Hip Circumference: Measure around the fullest part of your hips and seat.
- Waist to Hip Depth: Measure vertically from your natural waist down to your hip circumference line.
- Outer Leg Length (Outseam): Measure from your natural waist down to your desired trouser hem length.
- Inner Leg Length (Inseam): Measure from your crotch point down to your desired trouser hem length.
- Front Rise: Sit on a flat chair. Measure from your natural waist down to the chair seat, along your side body.
- Back Rise: Measure from your natural waist down to the chair seat, along your center back.
- Thigh Circumference: Measure around the fullest part of one thigh, just below the crotch.
- Knee Circumference: Measure around your knee at its widest point.
- Ankle/Hem Circumference: Measure around your ankle or where you want the trouser hem to sit.
Pro Tip: Have a friend help you take measurements, especially for the back rise and inseam. This ensures accuracy and prevents awkward stretching or bending that can distort readings. Double-check all measurements before starting.
Step 2: Prepare Your Drafting Paper
Lay out your large pattern paper smoothly on a flat surface. Use an L-square ruler to draw a precise vertical line and a horizontal line at the top, forming a perfect right angle.
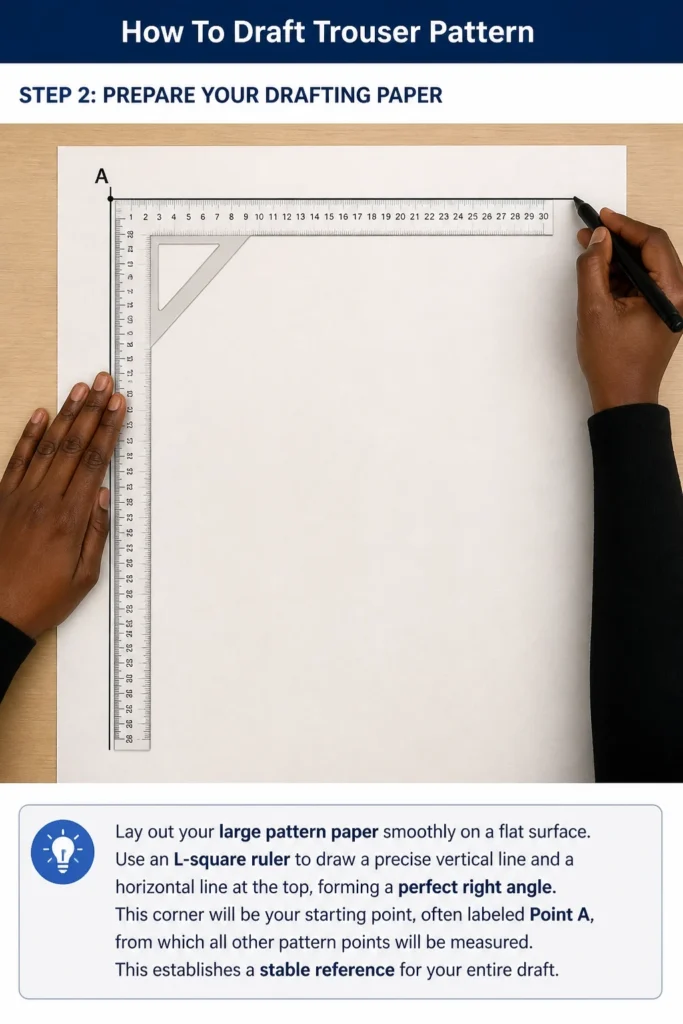
This corner will be your starting point, often labeled Point A, from which all other pattern points will be measured. This establishes a stable reference for your entire draft.
Step 3: Draft the Front Trouser Block – Waist and Hip
Begin by establishing the top edge of your front trouser pattern. This line will represent your natural waist.
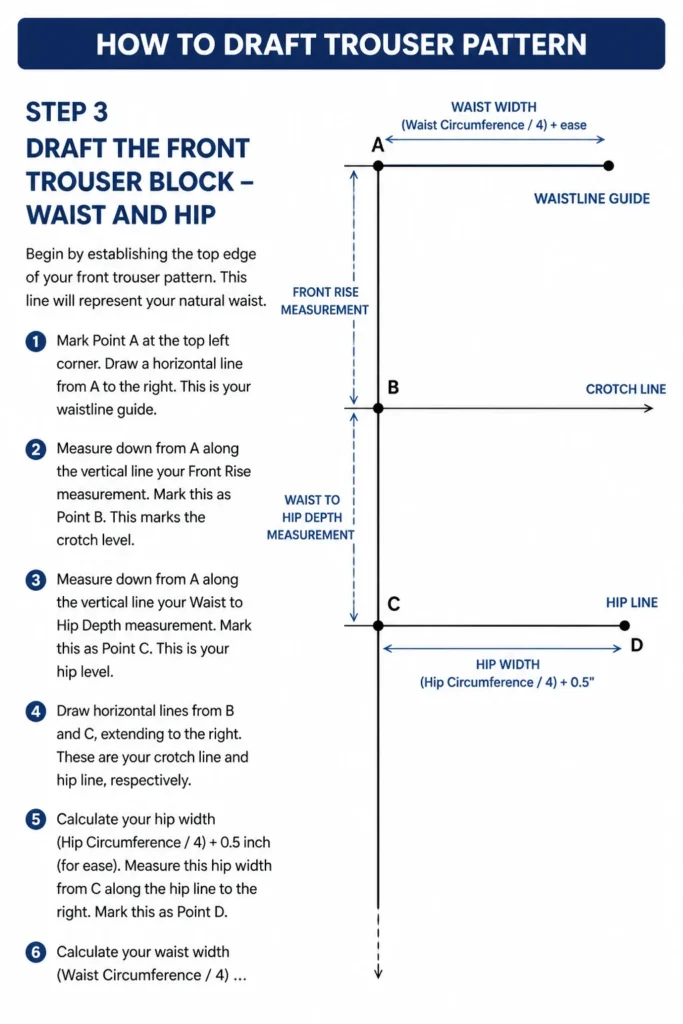
- Mark Point A at the top left corner.
- Draw a horizontal line from A to the right. This is your waistline guide.
- Measure down from A along the vertical line your Front Rise measurement. Mark this as Point B. This marks the crotch level.
- Measure down from A along the vertical line your Waist to Hip Depth measurement. Mark this as Point C. This is your hip level.
- Draw horizontal lines from B and C, extending to the right. These are your crotch line and hip line, respectively.
- Calculate your hip width: (Hip Circumference / 4) + 0.5 inch (for ease).
- Measure this hip width from C along the hip line to the right. Mark this as Point D.
- Calculate your waist width: (Waist Circumference / 4) + 0.5 inch (for ease) + 1 inch (for a dart).
- Measure this waist width from A along the waistline to the right. Mark this as Point E.
- Draw a gentle curve from E down to D, forming the front outseam from waist to hip.
Step 4: Define the Front Crotch and Inseam
This step creates the crucial crotch curve and establishes the inner leg line. Accuracy here is vital for comfort.
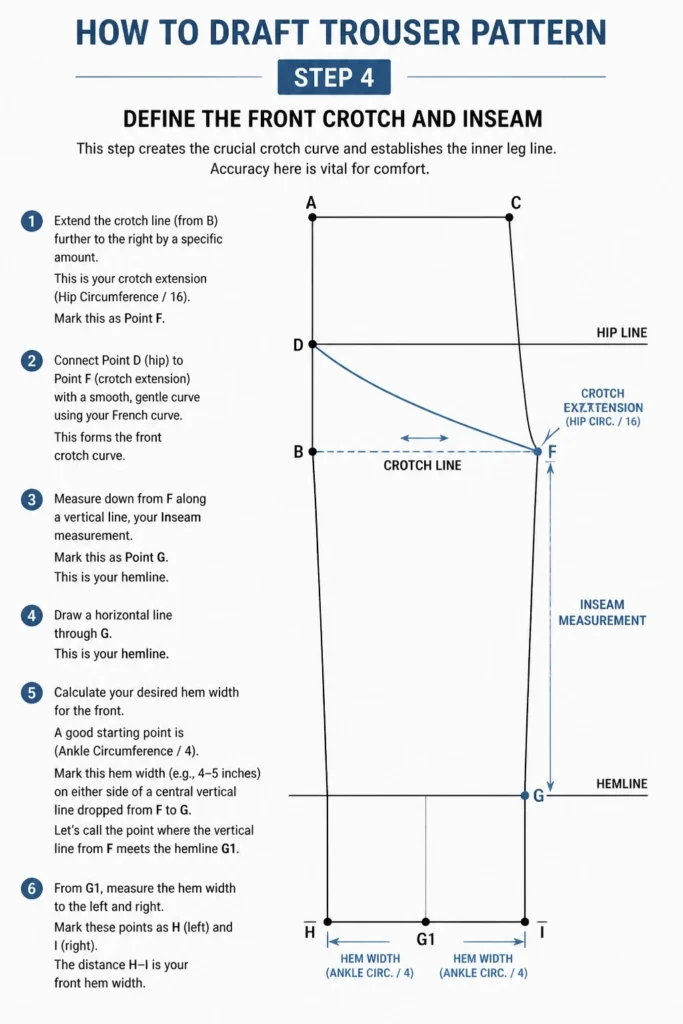
- Extend the crotch line (from B) further to the right by a specific amount. This is your crotch extension: (Hip Circumference / 16). Mark this as Point F.
- Connect Point D (hip) to Point F (crotch extension) with a smooth, gentle curve using your French curve. This forms the front crotch curve.
- Measure down from F along a vertical line, your Inseam measurement. Mark this as Point G. This is your hemline.
- Draw a horizontal line through G. This is your hemline.
- Calculate your desired hem width for the front. A good starting point is (Ankle Circumference / 4).
- Mark this hem width (e.g., 4-5 inches) on either side of a central vertical line dropped from F to G. Let’s call the point where the vertical line from F meets the hem G1, and mark G2 and G3 on either side.
- Draw a straight line from F down to G2, forming the front inseam.
Step 5: Develop the Front Outseam and Hem
Complete the shaping of the front leg and the hem. This connects the hip to the final leg shape.
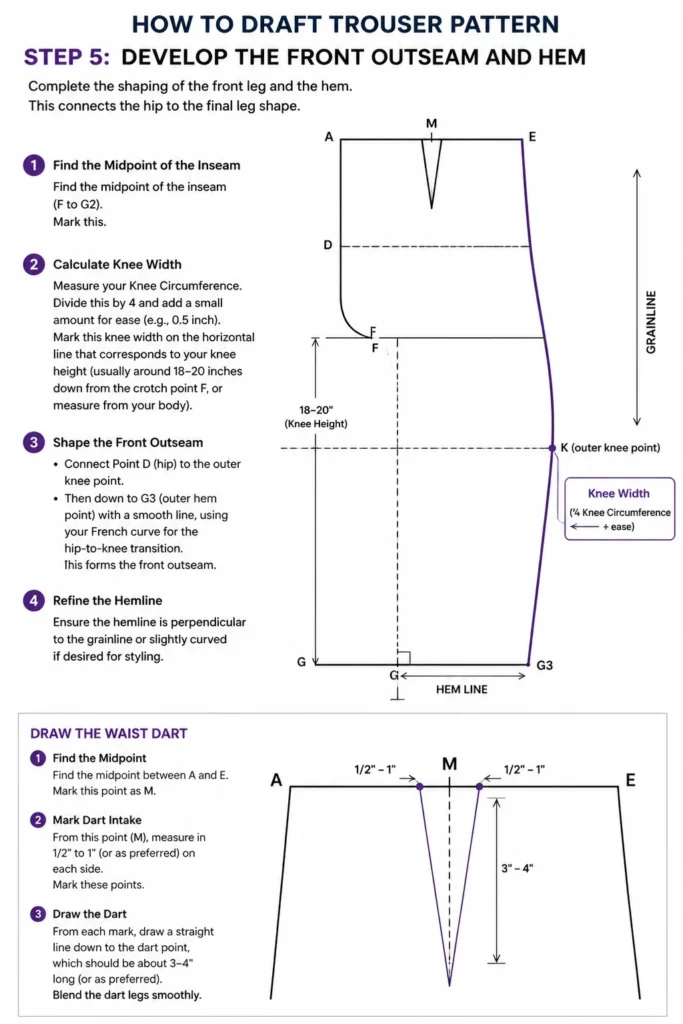
- Find the midpoint of the inseam (F to G2). Mark this.
- Measure your Knee Circumference. Divide this by 4 and add a small amount for ease (e.g., 0.5 inch).
- Mark this knee width on the horizontal line that corresponds to your knee height (usually around 18-20 inches down from the crotch point F, or measure from your body).
- Connect Point D (hip) to the outer knee point, then down to G3 (outer hem point) with a smooth line, using your French curve for the hip-to-knee transition. This forms the front outseam.
- Refine the hemline by ensuring it’s perpendicular to the grainline or slightly curved if desired for styling.
- Draw the waist dart: Find the midpoint between A and E. From this point, measure in 0.5 inch on either side. Draw a dart 3-4 inches long, centered on the midpoint.
Pro Tip: Use a long ruler to connect points that should be straight, and a French curve for smooth, natural body curves. Don’t force the curve; let it flow naturally between your marked points.
Step 6: Draft the Back Trouser Block – Adapting from Front
The back trouser pattern is drafted by tracing and modifying the front pattern. The back needs more room for the seat and a different crotch curve.
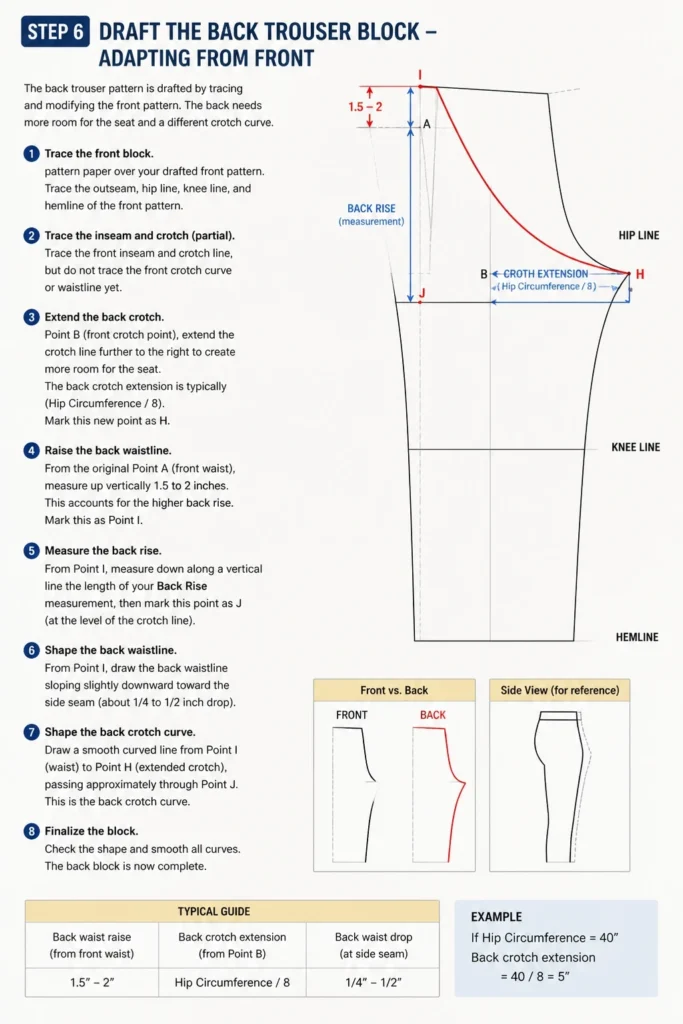
- Lay a new piece of pattern paper over your drafted front pattern.
- Trace the outseam, hip line, knee line, and hemline of the front pattern.
- Trace the front inseam and crotch line, but do not trace the front crotch curve or waistline yet.
- Extend the back crotch line (from the front’s Point B) further to the right. The back crotch extension is typically larger than the front, often (Hip Circumference / 8). Mark this new point as H.
- Raise the back waistline: From the original Point A (front waist), measure up vertically 1.5 to 2 inches. This accounts for the higher back rise. Mark this as Point I.
- Measure your Back Rise measurement from Point I, down to the crotch level. This should align with your drafted crotch line. Adjust I if needed.
Step 7: Refine Back Crotch and Outseam
Now, shape the back for the seat and connect the new back waist. This is where the back differs significantly for a good fit.
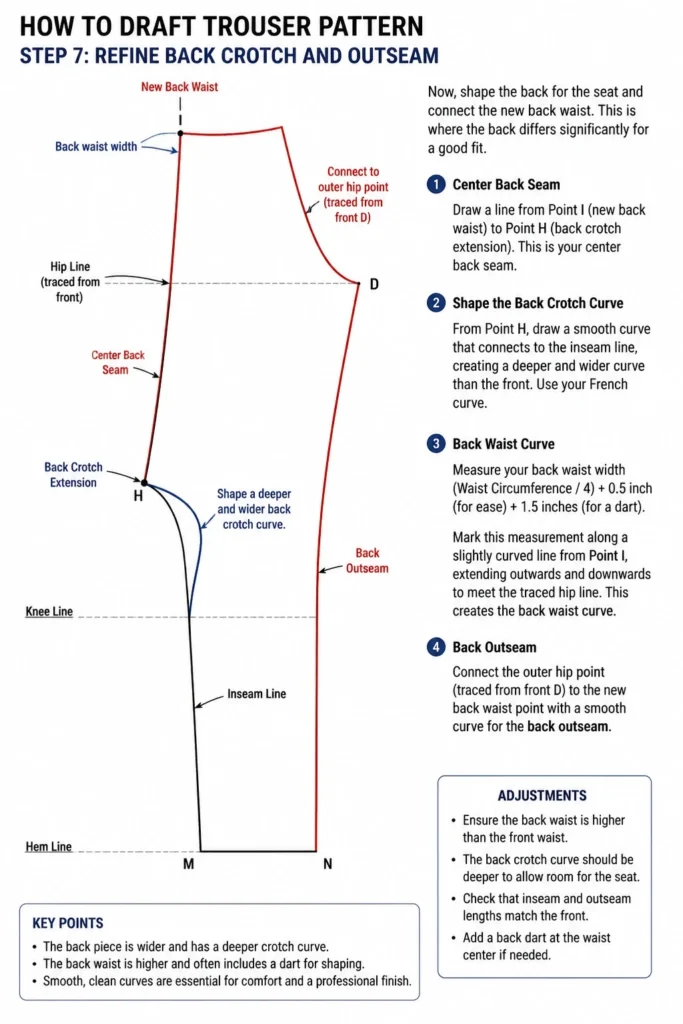
- Draw a line from Point I (new back waist) to Point H (back crotch extension). This is your center back seam.
- Shape the back crotch curve: From Point H, draw a smooth curve that connects to the inseam line, creating a deeper and wider curve than the front. Use your French curve.
- Measure your back waist width: (Waist Circumference / 4) + 0.5 inch (for ease) + 1.5 inches (for a dart).
- Mark this measurement along a slightly curved line from Point I, extending outwards and downwards to meet the traced hip line. This creates the back waist curve.
- Connect the outer hip point (traced from front D) to the new back waist point with a smooth curve for the back outseam.
- Adjust the back inseam: For a better fit, the back inseam is often slightly straighter than the front. Connect the back crotch curve to the hemline.
- Draw the back waist dart: Find the midpoint of the back waist curve. From this point, measure in 0.75 inch on either side. Draw a dart 4-5 inches long, centered on the midpoint.
Step 8: Add Seam Allowances and Mark Details
Your basic block is now drafted. Next, you must add seam allowances and mark essential pattern details for garment construction.
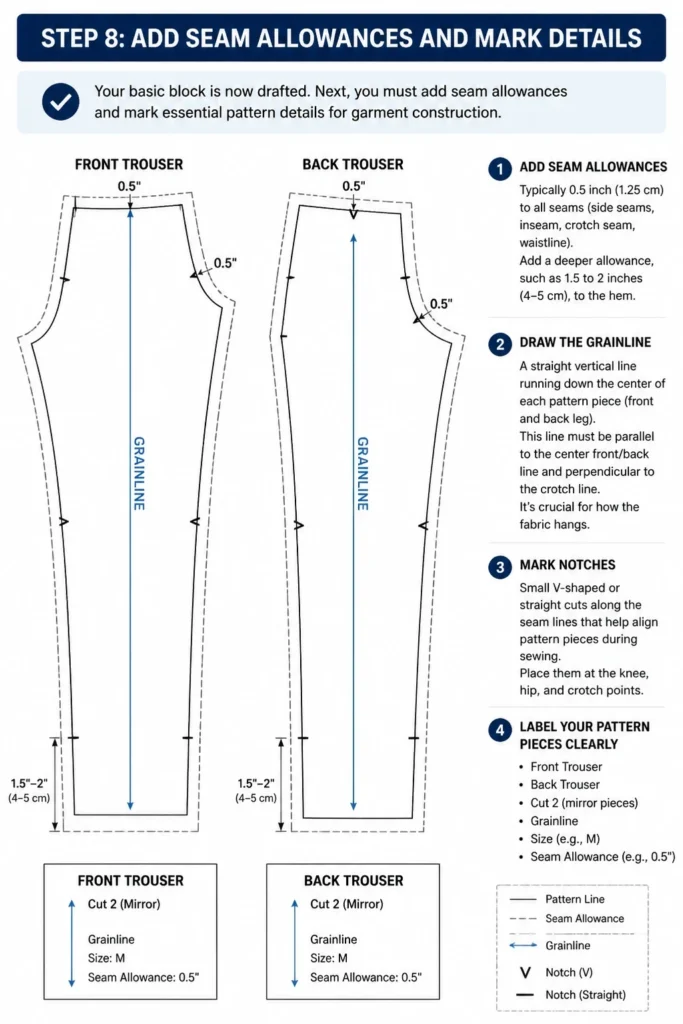
- Add seam allowances: Typically 0.5 inch (1.25 cm) to all seams (side seams, inseam, crotch seam, waistline). Add a deeper allowance, such as 1.5 to 2 inches (4-5 cm), to the hem.
- Draw the grainline: A straight vertical line running down the center of each pattern piece (front and back leg). This line must be parallel to the center front/back line and perpendicular to the crotch line. It’s crucial for how the fabric hangs.
- Mark notches: Small V-shaped or straight cuts along the seam lines that help align pattern pieces during sewing. Place them at the knee, hip, and crotch points.
- Label your pattern pieces clearly: “Front Trouser,” “Back Trouser,” “Cut 2,” “Grainline,” and your name/date.
Step 9: Check and True Your Pattern
Before cutting fabric, perform a final check to ensure all curves are smooth and seams will align correctly. This step prevents many fitting issues.
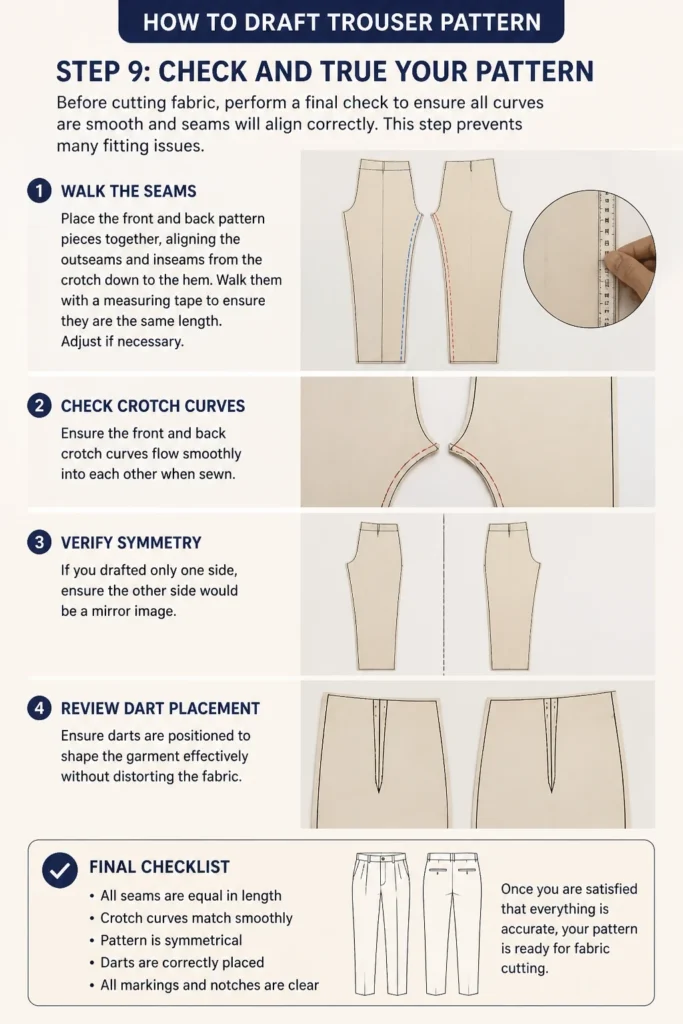
- Walk the seams: Place the front and back pattern pieces together, aligning the outseams and inseams from the crotch down to the hem. “Walk” them with a measuring tape to ensure they are the same length. Adjust if necessary.
- Check crotch curves: Ensure the front and back crotch curves flow smoothly into each other when sewn.
- Verify symmetry: If you drafted only one side, ensure the other side would be a mirror image.
- Review dart placement: Ensure darts are positioned to shape the garment effectively without distorting the fabric.
Common Mistakes to Avoid
Ignoring Grainline
Many beginners overlook the importance of the grainline. Cutting fabric off-grain can cause trousers to twist on the leg, hang unevenly, or stretch out of shape quickly. Always align your pattern’s grainline perfectly parallel to the fabric’s selvedge or fold.
Inaccurate Measurements
The entire foundation of a custom pattern rests on precise body measurements. A half-inch error in hip circumference or rise can lead to significant fitting problems like pulling, bagging, or tightness. Double-check all measurements, and don’t hesitate to retake them if anything feels off.
Skipping Muslin/Toile
While tempting to jump straight to your final fabric, creating a test garment (muslin or toile) from inexpensive fabric is invaluable. This allows you to identify and fix fitting issues on your body before cutting into your good material, saving time and money in the long run.
Forgetting Seam Allowances
Drafting a pattern block only gives you the cutting lines for the garment itself. If you forget to add seam allowances around all edges, your finished garment will be too small. Always add consistent seam allowances, typically 0.5 to 1 inch, depending on your sewing preference.
Troubleshooting
Wrinkles Under the Seat
If you notice horizontal wrinkles forming under the seat area, it often indicates too much fabric length in the back rise, or that the back crotch curve is too deep. Try reducing the back rise length slightly or redrawing the crotch curve to be less concave.
Front Crotch Pulling
When the front crotch area feels tight or pulls uncomfortably, it usually means the front rise is too short or the crotch extension is not long enough. Increase the front rise measurement slightly, or extend the front crotch curve out a bit more at the horizontal line.
Legs Twisting
If your trouser legs twist around your calves or shins, the most common culprit is an improperly marked or ignored grainline. Ensure your pattern’s grainline is perfectly parallel to the fabric’s true grain when cutting. It can also be a sign of uneven leg shaping, so check your inseam and outseam balance.
Key Takeaways
- Accurate body measurements are the absolute cornerstone of a well-fitting trouser pattern.
- The front and back trouser patterns require distinct shaping, especially around the crotch and waist, to accommodate body differences.
- Adding seam allowances and marking grainlines are critical steps that prepare your pattern for successful garment construction.
- Always true your pattern by walking the seams to ensure all pieces will align perfectly during sewing.
- A test garment (muslin) is an essential part of the pattern drafting process to refine fit before committing to final fabric.
- Practice and patience are key; your first draft might not be perfect, but it’s a solid learning experience.
Frequently Asked Questions
Can I use this basic block for any trouser style?
Yes, absolutely. This drafted pattern is your foundational “block.” From this, you can pivot to create various styles—tapered legs, wide legs, adding pleats, darts, or pockets. It provides the perfect starting point for any design modification.
How do I add pockets to this pattern?
Once your basic block is perfected, you can draft pocket bags and facings directly onto it or as separate pieces. Common methods include slash pockets, side seam pockets, or patch pockets. You would simply cut away the fabric where the pocket opening is and integrate the pocket pieces.
What exactly is a ‘block pattern’?
A block pattern, also known as a sloper, is a basic, close-fitting pattern without any design features, seam allowances, or styling. It’s a fundamental tool tailored to your specific body measurements, serving as the blueprint from which all other designs are developed.
Do I need a French curve?
While not strictly mandatory, a French curve ruler is highly recommended. It helps create smooth, natural-looking curves for areas like the crotch, hip, and waistline, which are difficult to draw freehand. It contributes significantly to a professional-looking and well-fitting pattern.
Our Top Recommended Finds
- Large Pattern Drafting Paper Roll: Provides ample space for full-size patterns and allows for adjustments without running out of room.
- Flexible Fabric Measuring Tape: Essential for accurate body measurements, conforming easily to curves.
- Acrylic L-Square and French Curve Set: Offers precise straight lines and smooth, ergonomic curves for professional pattern shaping.
Your Journey to Tailored Perfection Begins
You’ve now completed the detailed steps to draft your very own custom trouser pattern. This isn’t just a piece of paper; it’s a blueprint for garments that truly fit, a foundation for endless creative possibilities.
Take this newfound skill and begin experimenting. Cut a muslin, test the fit, and make adjustments. Each pair you create will refine your understanding and technique.
Embrace the process of creation and the satisfaction of wearing something truly made for you. Your wardrobe, and your confidence, will thank you for it.