How To Sew A Pants
Learning to sew a garment from scratch can feel incredibly rewarding. I remember the thrill of completing my first pair of pants, a project that taught me patience and precision. This guide will walk you through each essential step, empowering you to create your own custom-fit trousers.
You’ll discover how to transform flat fabric into a wearable, stylish pair of pants. By following these instructions, you’ll gain valuable skills and confidence in your sewing journey. Trust me, if I can do it, you can too.
Quick Overview
Embarking on this project means you’ll soon have a custom-made pair of pants, perfectly tailored to your specifications. This comprehensive guide breaks down the process into manageable stages.
- Time needed: 10-15 hours (spread over several sessions)
- Difficulty: Intermediate
- What you’ll need: Sewing machine, fabric, pattern, notions, basic sewing tools
Step-by-Step Instructions
Step 1: Gather Your Materials and Prepare Your Pattern
Before cutting anything, ensure you have all necessary items. A well-prepared workspace makes the entire process smoother.
Select your fabric according to the pattern recommendations. Cotton twill, denim, linen blends, or even wool are great choices for pants.
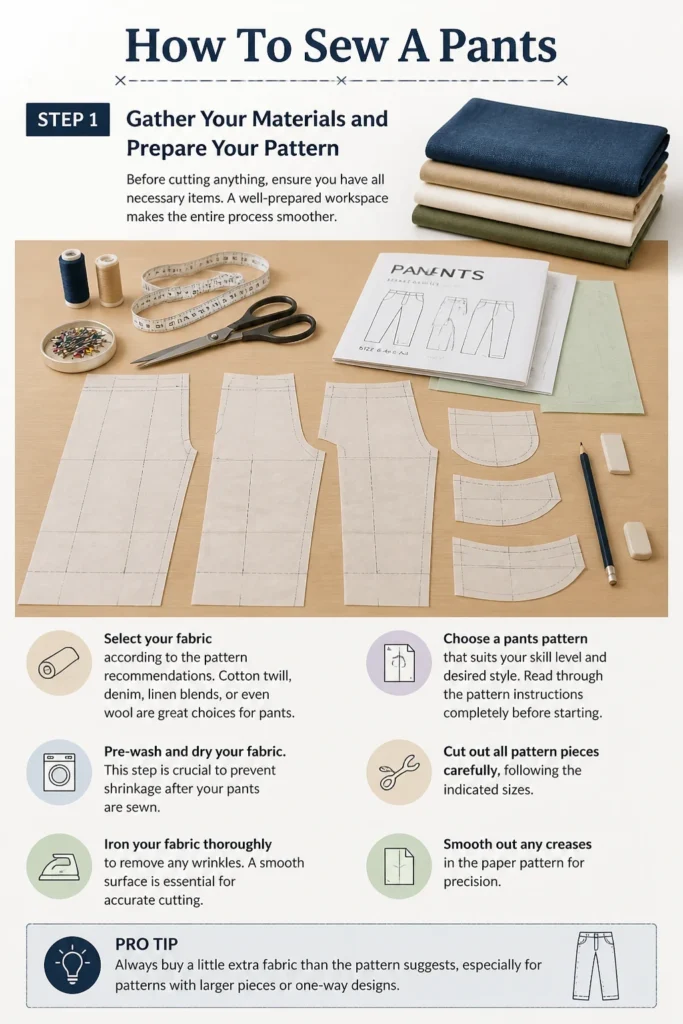
Pre-wash and dry your fabric. This step is crucial to prevent shrinkage after your pants are sewn.
Iron your fabric thoroughly to remove any wrinkles. A smooth surface is essential for accurate cutting.
Choose a pants pattern that suits your skill level and desired style. Read through the pattern instructions completely before starting.
Cut out all pattern pieces carefully, following the indicated sizes. Smooth out any creases in the paper pattern for precision.
Pro Tip: Always buy a little extra fabric than the pattern suggests, especially if you’re working with a directional print or anticipate errors. Having a buffer is always helpful.
Step 2: Lay Out and Cut Your Fabric
Accurate cutting is the foundation of a well-fitting garment. Take your time with this critical step.
Fold your fabric according to the pattern’s lay-out diagram. Ensure the grainline is perfectly straight and aligned.
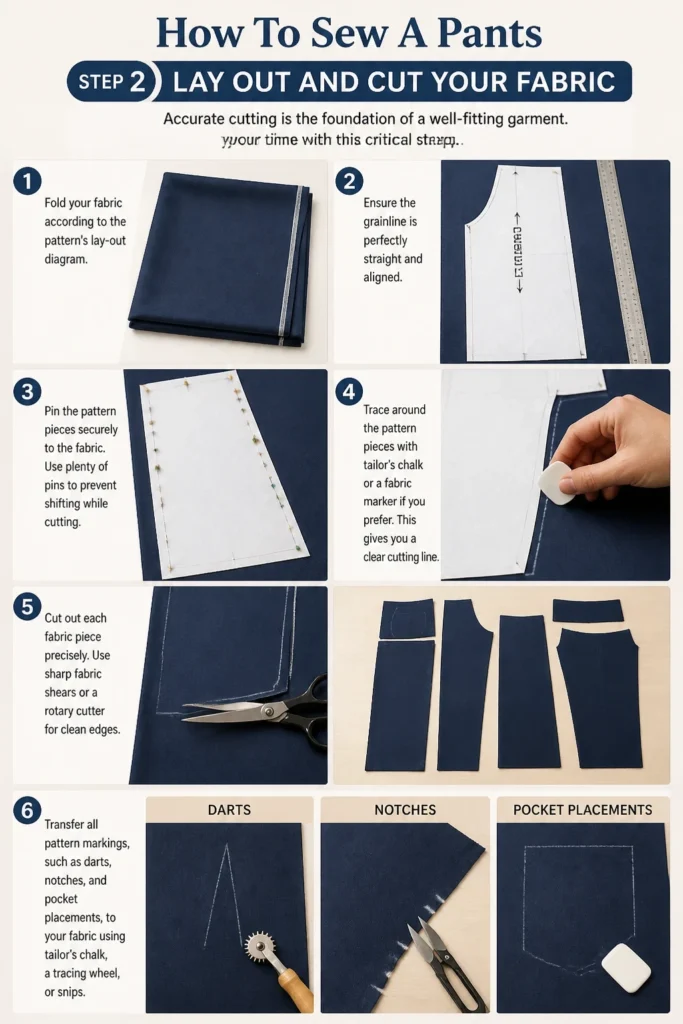
Pin the pattern pieces securely to the fabric. Use plenty of pins to prevent shifting while cutting.
Trace around the pattern pieces with tailor’s chalk or a fabric marker if you prefer. This gives you a clear cutting line.
Cut out each fabric piece precisely. Use sharp fabric shears or a rotary cutter for clean edges.
Transfer all pattern markings, such as darts, notches, and pocket placements, to your fabric using tailor’s chalk, a tracing wheel, or snips.
Step 3: Construct Darts, Pleats, and Pockets
Many pants patterns include darts or pleats for shaping, and pockets for functionality. Address these elements early on.
Fold each dart marking right sides together, aligning the lines perfectly. Pin along the fold.
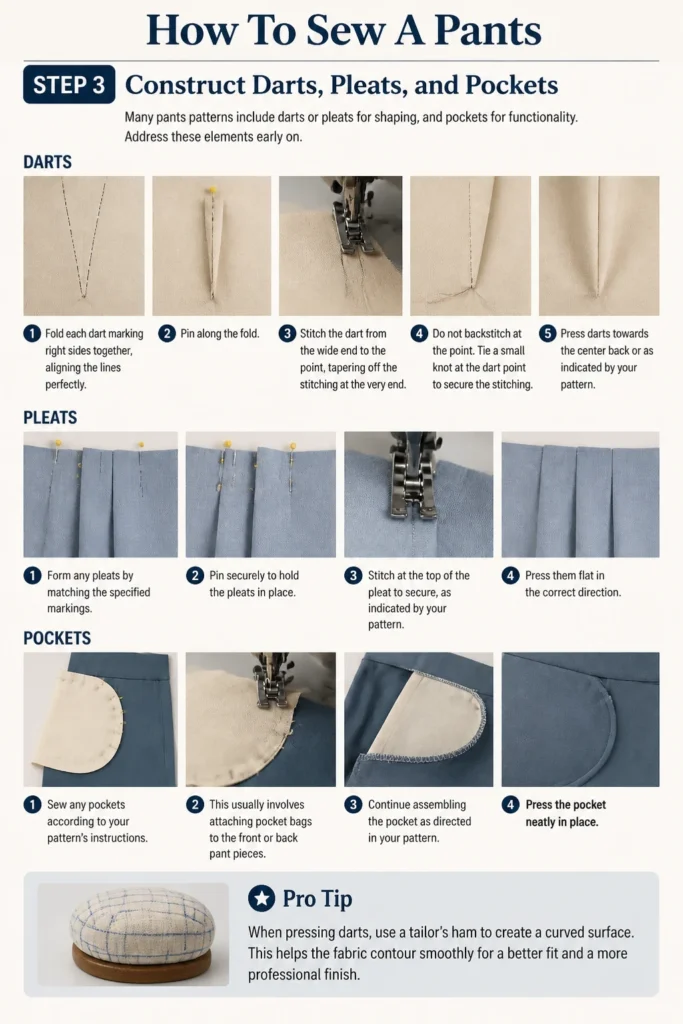
Stitch the dart from the wide end to the point, tapering off the stitching at the very end. Do not backstitch at the point.
Tie a small knot at the dart point to secure the stitching. Press darts towards the center back or as indicated by your pattern.
Form any pleats by matching the specified markings. Press them flat in the correct direction.
Sew any pockets according to your pattern’s instructions. This usually involves attaching pocket bags to the front or back pant pieces.
Pro Tip: When pressing darts, use a tailor’s ham to create a curved surface. This helps the fabric conform to the body’s natural curves.
Step 4: Join Inseams and Outseams
Now you’ll begin to see the pant legs take shape. These seams form the sides and inner legs of your trousers.
Place one front pant leg and one back pant leg right sides together. Align the outseam (side seam) edges.
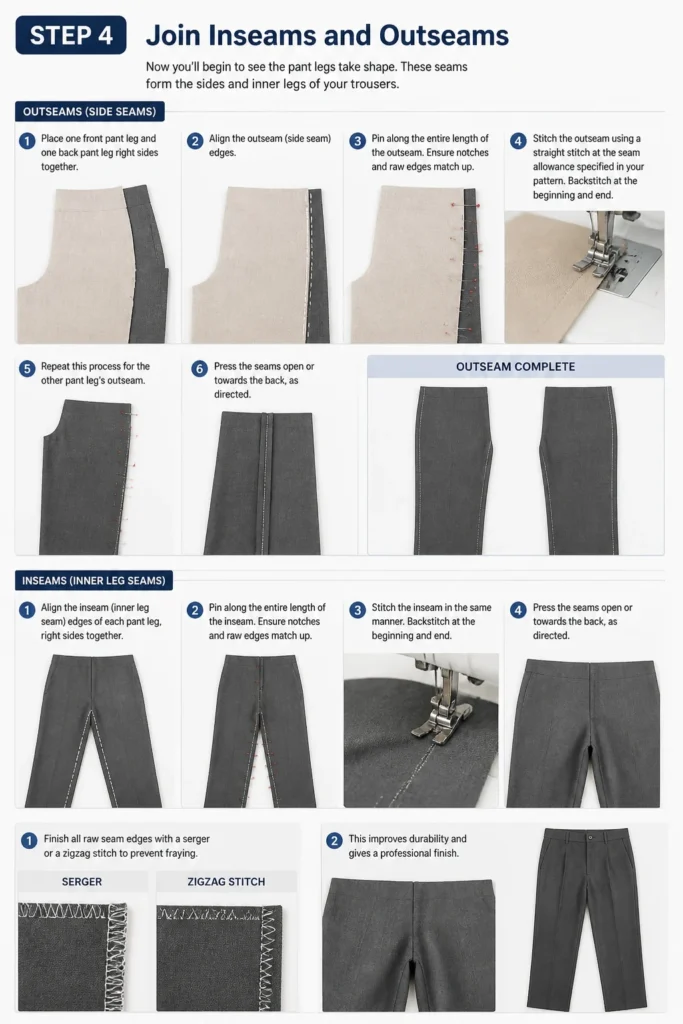
Pin along the entire length of the outseam. Ensure notches and raw edges match up.
Stitch the outseam using a straight stitch at the seam allowance specified in your pattern. Backstitch at the beginning and end.
Repeat this process for the other pant leg’s outseam. Press the seams open or towards the back, as directed.
Align the inseam (inner leg seam) edges of each pant leg, right sides together. Pin and stitch them in the same manner.
Finish all raw seam edges with a serger or a zigzag stitch to prevent fraying. This improves durability and gives a professional finish.
Step 5: Construct the Crotch Seam
This step connects the two pant legs, creating the crucial crotch curve. Precision here is key for a comfortable fit.
Turn one pant leg right side out. Keep the other pant leg wrong side out.
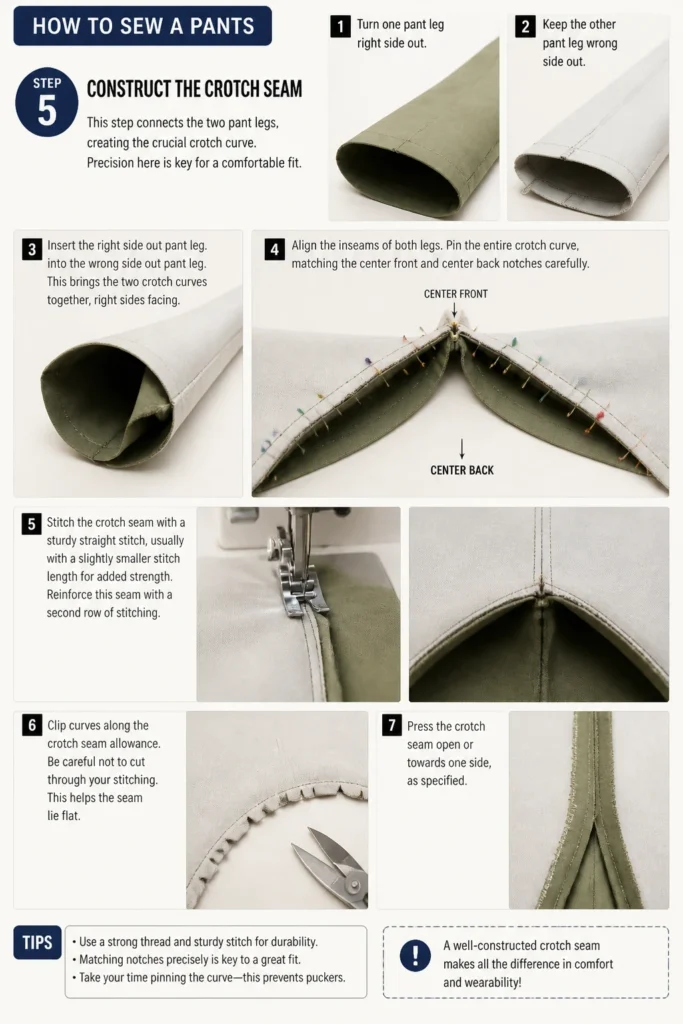
Insert the right side out pant leg into the wrong side out pant leg. This brings the two crotch curves together, right sides facing.
Align the inseams of both legs. Pin the entire crotch curve, matching the center front and center back notches carefully.
Stitch the crotch seam with a sturdy straight stitch, usually with a slightly smaller stitch length for added strength. Reinforce this seam with a second row of stitching.
Clip curves along the crotch seam allowance. Be careful not to cut through your stitching. This helps the seam lie flat.
Press the crotch seam open or towards one side, as specified in your pattern. Finish the raw edges.
Step 6: Install the Zipper or Fly
The fly or zipper closure is often the most challenging part for many sewists. Take your time and follow your pattern’s instructions closely.
Reinforce the fly opening edges with fusible interfacing if your pattern suggests it. This adds stability.
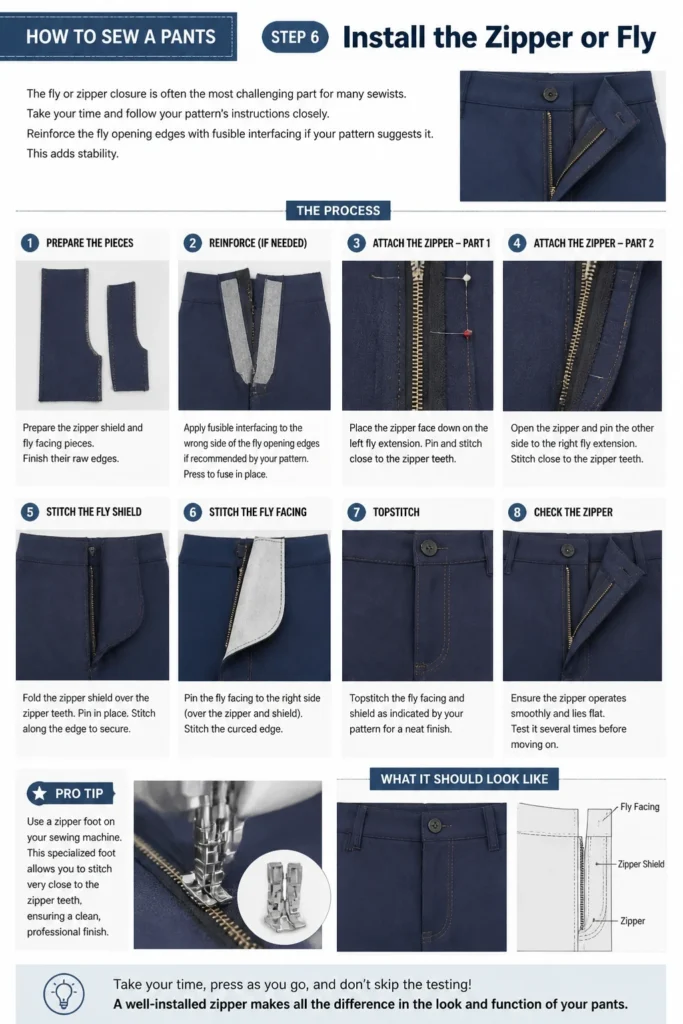
Prepare the zipper shield and fly facing pieces. Finish their raw edges.
Attach the zipper to the designated fly extensions on the front pant pieces. This usually involves several steps of stitching and pressing.
Stitch the fly shield and fly facing into place. Pay close attention to the topstitching details for a neat appearance.
Ensure the zipper operates smoothly and lies flat. Test it several times before moving on.
Pro Tip: Use a zipper foot on your sewing machine. This specialized foot allows you to stitch very close to the zipper teeth, ensuring a clean and professional installation.
Step 7: Attach the Waistband
The waistband provides structure and finishes the top edge of your pants. A well-fitted waistband is essential for comfort.
Prepare your waistband piece. Interface it if recommended by your pattern to give it stability.
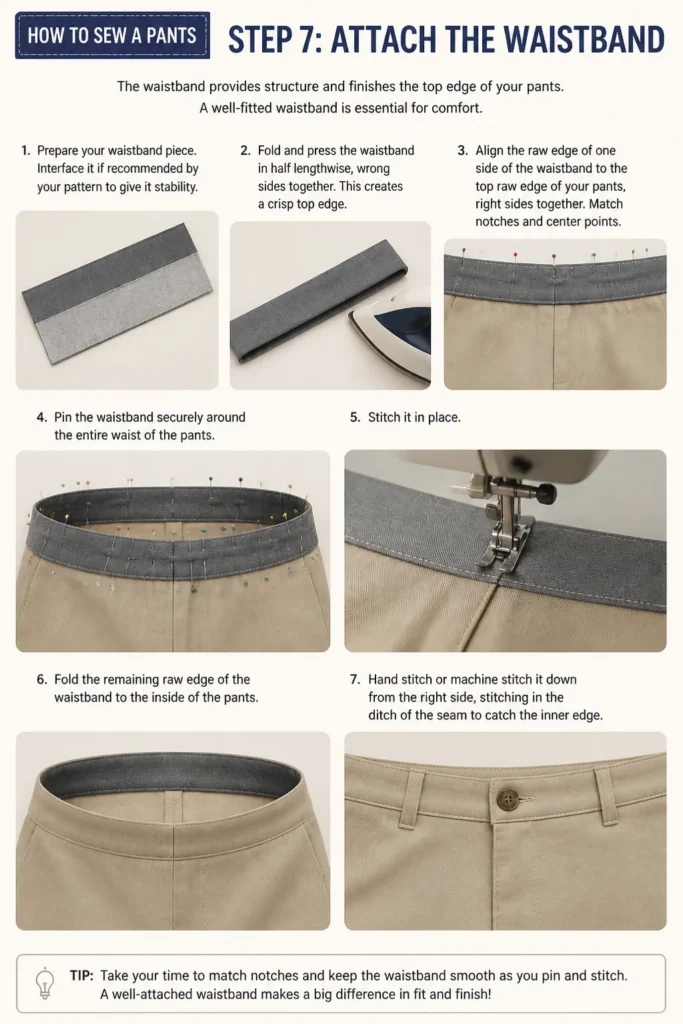
Fold and press the waistband in half lengthwise, wrong sides together. This creates a crisp top edge.
Align the raw edge of one side of the waistband to the top raw edge of your pants, right sides together. Match notches and center points.
Pin the waistband securely around the entire waist of the pants. Stitch it in place.
Fold the remaining raw edge of the waistband to the inside of the pants. Hand stitch or machine stitch it down from the right side, “stitching in the ditch” of the seam to catch the inner edge.
Step 8: Hem the Legs
The hem is the final length adjustment and gives your pants a polished look. Try on your pants before hemming to determine the ideal length.
Try on the pants and mark the desired hem length. Have someone help you if needed to ensure an even line.
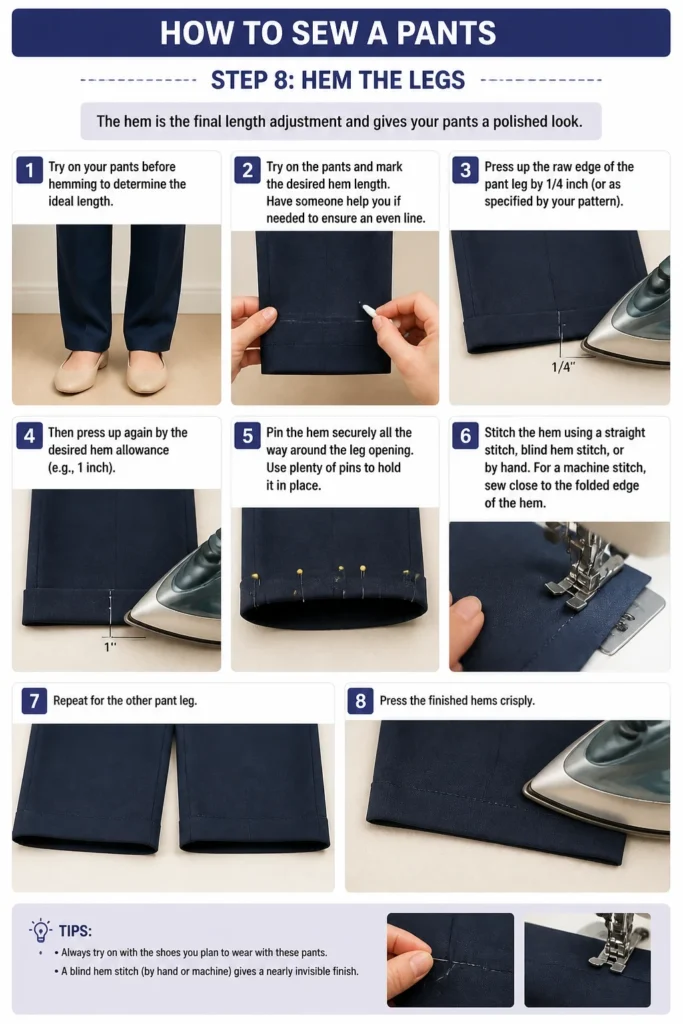
Press up the raw edge of the pant leg by 1/4 inch (or as specified by your pattern). Then press up again by the desired hem allowance (e.g., 1 inch).
Pin the hem securely all the way around the leg opening. Use plenty of pins to hold it in place.
Stitch the hem using a straight stitch, blind hem stitch, or by hand. For a machine stitch, sew close to the folded edge of the hem.
Repeat for the other pant leg. Press the finished hems crisply.
Step 9: Add Finishing Touches
These small details make a big difference in the overall appearance and wearability of your pants.
Sew on any buttons for the waistband closure. Create buttonholes if your pattern calls for them.
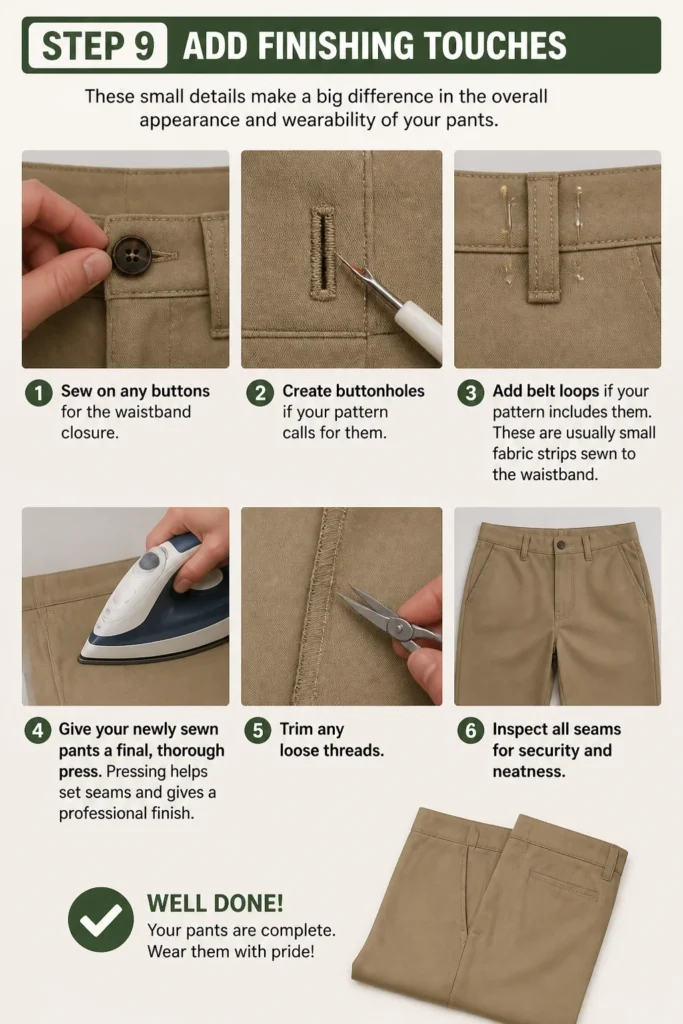
Add belt loops if your pattern includes them. These are usually small fabric strips sewn to the waistband.
Give your newly sewn pants a final, thorough press. Pressing helps set seams and gives a professional finish.
Trim any loose threads. Inspect all seams for security and neatness.
Common Mistakes to Avoid
Skipping Pre-Shrinking Fabric
Many new sewists eagerly jump straight to cutting their fabric. However, skipping the pre-washing and drying step can lead to significant disappointment. Your beautiful new pants might shrink unevenly after their first wash, resulting in an ill-fitting garment. Always treat your fabric as you intend to treat the finished garment before you cut into it.
Inaccurate Cutting
Cutting fabric precisely is paramount. Small inaccuracies in cutting can compound quickly, leading to pattern pieces that don’t match up correctly. This makes sewing difficult and can distort the fit of the pants. Take your time, use sharp shears, and ensure your pattern pieces are aligned with the grainline before cutting.
Ignoring Seam Allowance
Every sewing pattern includes a specified seam allowance. Forgetting to account for this, or stitching outside of it, will significantly alter the garment’s fit. A larger seam allowance than intended will make the pants too small, while a smaller one will make them too large. Always check your pattern for the correct seam allowance and use a seam guide on your machine.
Rushing Zipper Installation
The zipper fly is often seen as the most challenging part of pants construction. Rushing this step can result in a crooked, bulky, or non-functional zipper. This detracts from the overall look and comfort. Follow your pattern’s specific instructions meticulously, use plenty of pins, and don’t hesitate to unpick and re-sew if it’s not perfect.
Troubleshooting
Pants Feel Too Tight
If your finished pants feel uncomfortably snug, especially around the hips or waist, the issue often stems from either incorrect sizing or inconsistent seam allowances. First, check if you cut the correct size according to your measurements. If you did, examine your seams; if they were sewn with a larger seam allowance than specified, the garment will be smaller. You might be able to let out the side seams slightly if you have enough seam allowance remaining.
Zipper Gaps or Waves
A gapping or wavy zipper can be frustrating. This usually happens if the fabric around the zipper isn’t adequately stabilized, or if the zipper tape was stretched during installation. Apply fusible interfacing to the zipper area before installation for added stability. When sewing, avoid pulling or stretching the fabric or the zipper tape. Ensure your topstitching is even and consistent to hold the fabric flat.
Uneven Pant Hems
An uneven hem is quite noticeable and can make your otherwise well-sewn pants look amateurish. This typically occurs if the fabric shifts while marking or if the pants weren’t tried on properly before hemming. Always try on the pants with the shoes you intend to wear. Have a friend help you mark an even hemline while you stand naturally. Use a measuring gauge to ensure your folded hem allowance is consistent all the way around.
Key Takeaways
- Preparation is Key: Pre-wash fabric and accurately cut pattern pieces to ensure a successful outcome.
- Precision Matters: Take your time with every seam, especially darts, crotch, and zipper, for a professional finish.
- Pressing is Your Friend: Pressing seams after each step helps shape the garment and improves its appearance.
- Follow Your Pattern: Adhere closely to your pattern’s instructions, especially for seam allowances and construction order.
- Practice Patience: Sewing complex garments like pants takes time and practice; don’t be afraid to unpick and redo.
- Finish Raw Edges: Serging or zigzagging seam allowances prevents fraying and adds durability.
Frequently Asked Questions
What fabric is best for beginner pants?
For beginners, sturdy woven fabrics like cotton twill, denim, or linen blends are excellent choices. They are easy to cut, press well, and don’t stretch or slip excessively, making them forgiving to work with. Avoid very slippery or stretchy fabrics until you gain more experience.
Can I make pants without a serger?
Absolutely! A serger is a great tool for finishing seams, but it’s not essential. Most home sewing machines have a zigzag stitch setting that effectively finishes raw edges and prevents fraying. You can also use French seams or bound seams for a neat finish, although these methods add more bulk.
How do I choose the right size for my pants pattern?
Always choose your pattern size based on your body measurements, not your ready-to-wear clothing size. Measure your waist and hips accurately. Compare these measurements to the pattern’s size chart. If your measurements fall between sizes, consider blending sizes or choosing the larger size and making adjustments.
What if my pants don’t fit perfectly after sewing?
It’s very common for handmade garments to need adjustments. Try on your pants and identify where the fit is off. Common adjustments include taking in side seams, altering the waistband, or adjusting the crotch curve. Many sewing resources and books offer guidance on common fitting alterations.
Our Top Recommended Finds
- Sharp Fabric Shears: A high-quality pair of shears makes cutting fabric smooth and precise, reducing hand fatigue.
- Tailor’s Ham and Seam Roll: These pressing tools help shape curved seams and press open straight seams without distorting the fabric.
- Good Quality All-Purpose Thread: Using strong, polyester all-purpose thread in a matching color ensures durable seams that won’t easily break.
Your Next Sewing Adventure Awaits
Congratulations on taking the steps to sew your very own pair of pants! This project builds significant skills and confidence. Each stitch you made contributes to a unique, custom garment that reflects your effort and creativity.
Keep practicing your techniques, and don’t be afraid to try new patterns or fabrics. Perhaps your next project will be a pair of tailored shorts, a classic skirt, or even a more complex jacket. The world of sewing is vast and full of possibilities. Grab another pattern, choose your fabric, and start creating something new today.