How To Make Envelope
There’s a special satisfaction in crafting something by hand, especially when it adds a personal touch to your correspondence.
I’ve spent countless hours in my craft room, often turning a simple sheet of paper into a beautiful vessel for a heartfelt letter or a unique gift card.
This guide shares the practical techniques I’ve refined over time, ensuring your handmade envelopes are both charming and functional.
Quick Overview
Making your own envelopes allows for endless customization and can save you a trip to the store. You’ll transform a flat sheet of paper into a functional enclosure with just a few simple folds and cuts.
- Time needed: 10-20 minutes per envelope (once familiar with the process)
- Difficulty: Beginner
- What you’ll need: Paper, ruler, pencil, scissors or craft knife, glue stick or double-sided tape
Step-by-Step Instructions
Step 1: Choose and Prepare Your Paper
The foundation of any great envelope is the paper itself. Select a paper type that suits your needs, whether it’s standard printer paper, decorative scrapbook paper, or a sturdy cardstock.
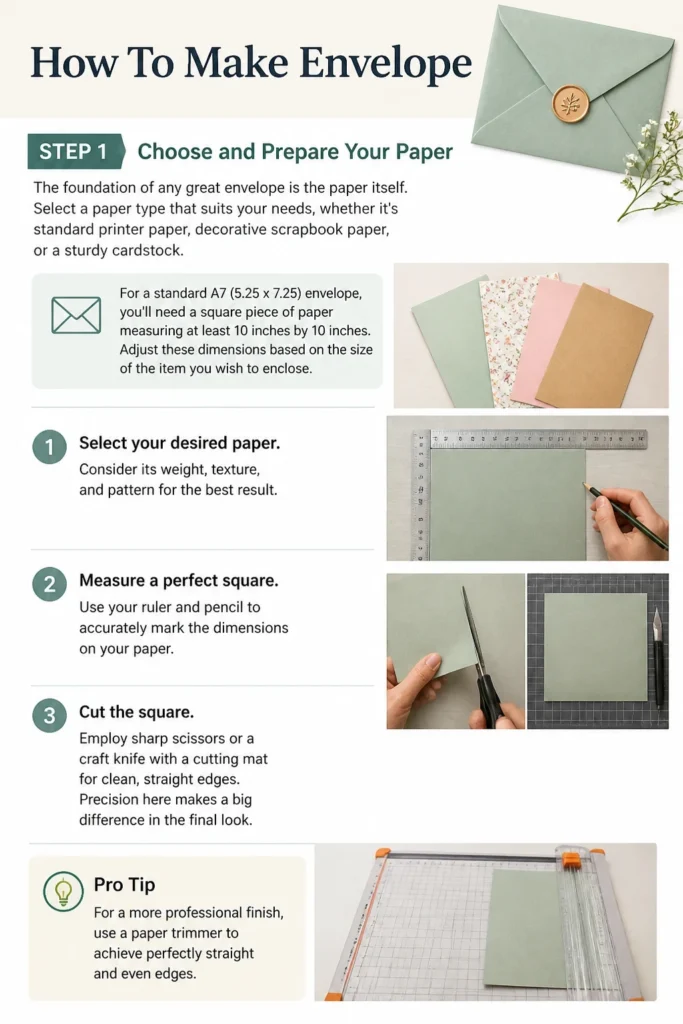
For a standard A7 (5.25″ x 7.25″) envelope, you’ll need a square piece of paper measuring at least 10 inches by 10 inches. Adjust these dimensions based on the size of the item you wish to enclose.
- Select your desired paper. Consider its weight, texture, and pattern for the best result.
- Measure a perfect square. Use your ruler and pencil to accurately mark the dimensions on your paper.
- Cut the square. Employ sharp scissors or a craft knife with a cutting mat for clean, straight edges. Precision here makes a big difference in the final look.
Pro Tip: For a more professional finish, use a paper trimmer to ensure perfectly straight cuts. This tool makes repetitive tasks much faster and more accurate.
Step 2: Find the Center Point
Locating the exact center of your paper is crucial for symmetrical folds. This point will serve as the anchor for all subsequent measurements and folds.
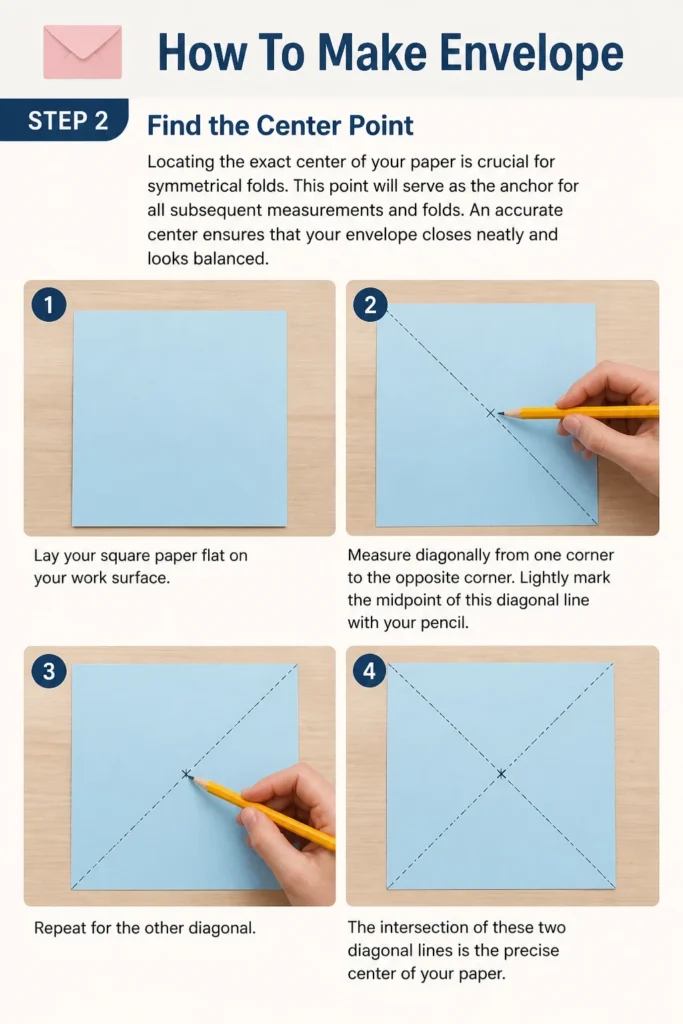
An accurate center ensures that your envelope closes neatly and looks balanced.
- Lay your square paper flat on your work surface.
- Measure diagonally from one corner to the opposite corner. Lightly mark the midpoint of this diagonal line with your pencil.
- Repeat for the other diagonal. The intersection of these two diagonal lines is the precise center of your paper.
Step 3: Mark the Item Placement and Fold Guides
Now, position the item you wish to enclose (like a card or letter) to determine your fold lines. This step ensures your envelope will perfectly fit its contents.
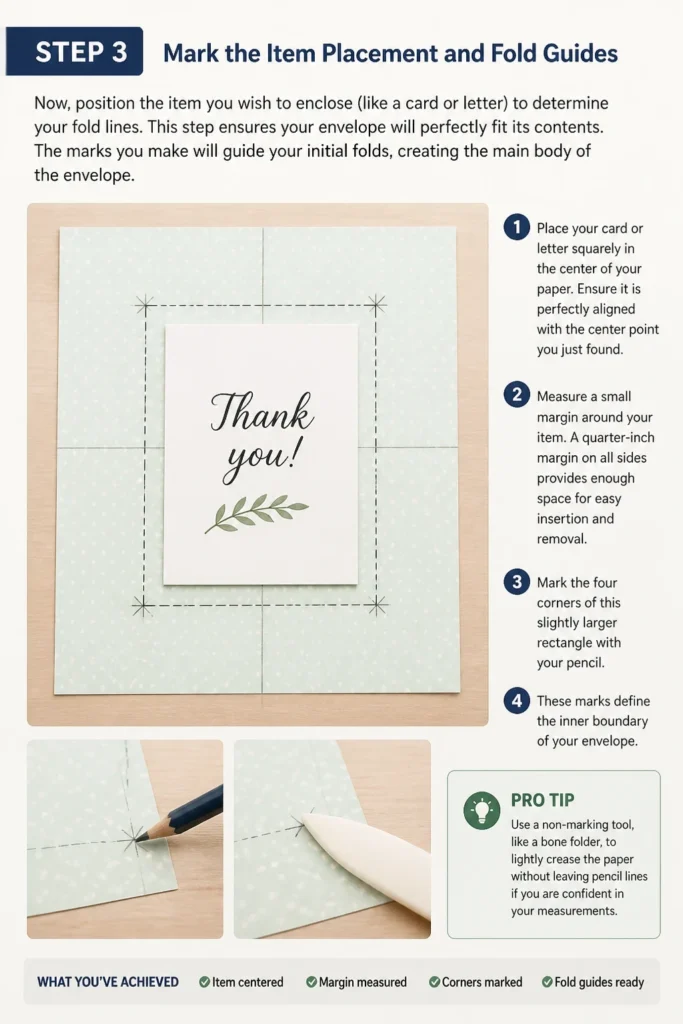
The marks you make will guide your initial folds, creating the main body of the envelope.
- Place your card or letter squarely in the center of your paper. Ensure it is perfectly aligned with the center point you just found.
- Measure a small margin around your item. A quarter-inch margin on all sides provides enough space for easy insertion and removal.
- Mark the four corners of this slightly larger rectangle with your pencil. These marks define the inner boundary of your envelope.
Pro Tip: Use a non-marking tool, like a bone folder, to lightly crease the paper without leaving pencil lines if you are confident in your measurements. This keeps your finished envelope pristine.
Step 4: Create the Side Flaps
The side flaps form the structural sides of your envelope, holding the contents securely. They are the first major folds you will make.
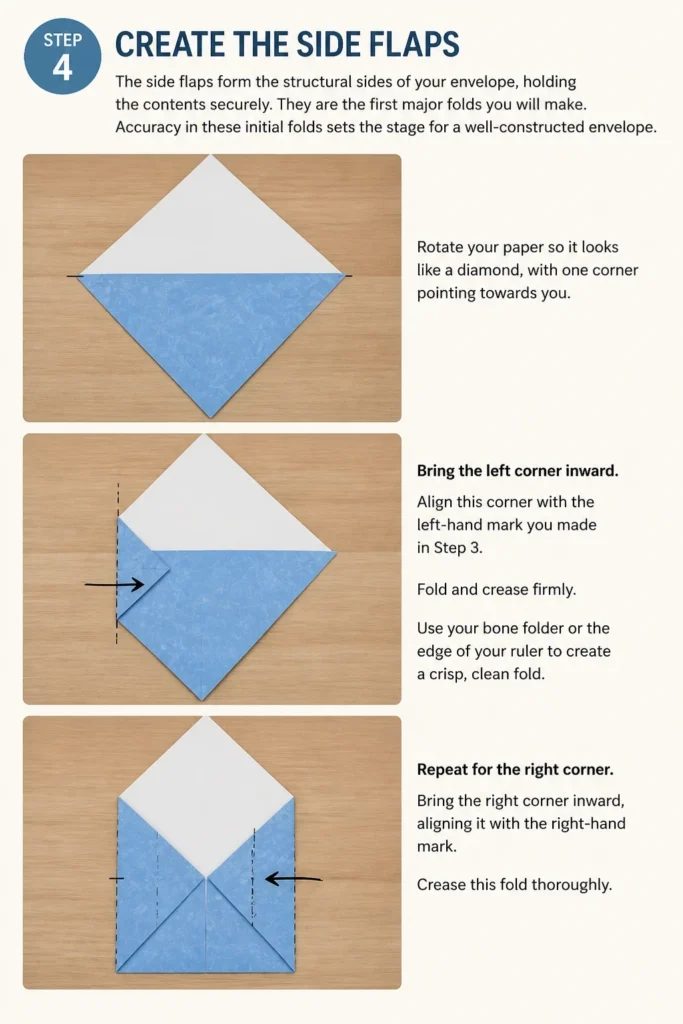
Accuracy in these initial folds sets the stage for a well-constructed envelope.
- Rotate your paper so it looks like a diamond, with one corner pointing towards you.
- Bring the left corner inward. Align this corner with the left-hand mark you made in Step 3.
- Fold and crease firmly. Use your bone folder or the edge of your ruler to create a crisp, clean fold.
- Repeat for the right corner. Bring the right corner inward, aligning it with the right-hand mark. Crease this fold thoroughly.
Step 5: Fold the Bottom Flap
The bottom flap will secure the sides and create the pocket for your contents. This fold requires a bit more care to ensure a strong seal.
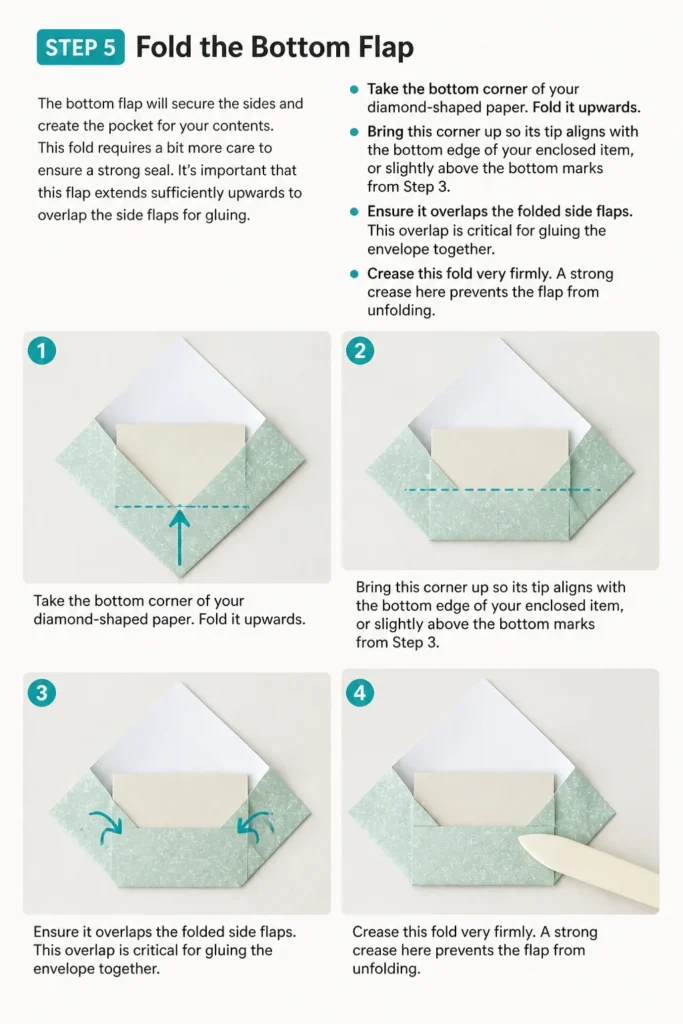
It’s important that this flap extends sufficiently upwards to overlap the side flaps for gluing.
- Take the bottom corner of your diamond-shaped paper.
- Fold it upwards. Bring this corner up so its tip aligns with the bottom edge of your enclosed item, or slightly above the bottom marks from Step 3.
- Ensure it overlaps the folded side flaps. This overlap is critical for gluing the envelope together.
- Crease this fold very firmly. A strong crease here prevents the flap from unfolding.
Step 6: Secure the Envelope Seams
With all the main flaps folded, it’s time to glue them together to form the envelope pocket. Choose your adhesive carefully for a lasting bond.
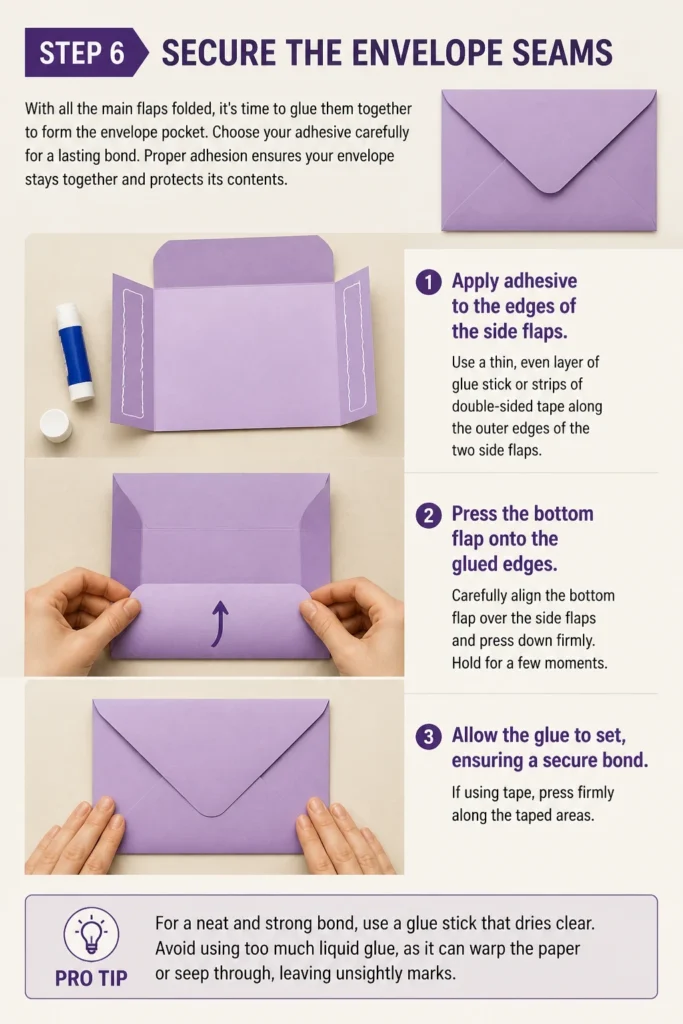
Proper adhesion ensures your envelope stays together and protects its contents.
- Apply adhesive to the edges of the side flaps. Use a thin, even layer of glue stick or strips of double-sided tape along the outer edges of the two side flaps.
- Press the bottom flap onto the glued edges. Carefully align the bottom flap over the side flaps and press down firmly.
- Hold for a few moments. Allow the glue to set, ensuring a secure bond. If using tape, press firmly along the taped areas.
Pro Tip: For a neat and strong bond, use a glue stick that dries clear. Avoid using too much liquid glue, as it can warp the paper or seep through, leaving unsightly marks.
Step 7: Create the Top Flap
The top flap serves as the closure for your envelope. It’s the last fold to make, completing the envelope’s structure.
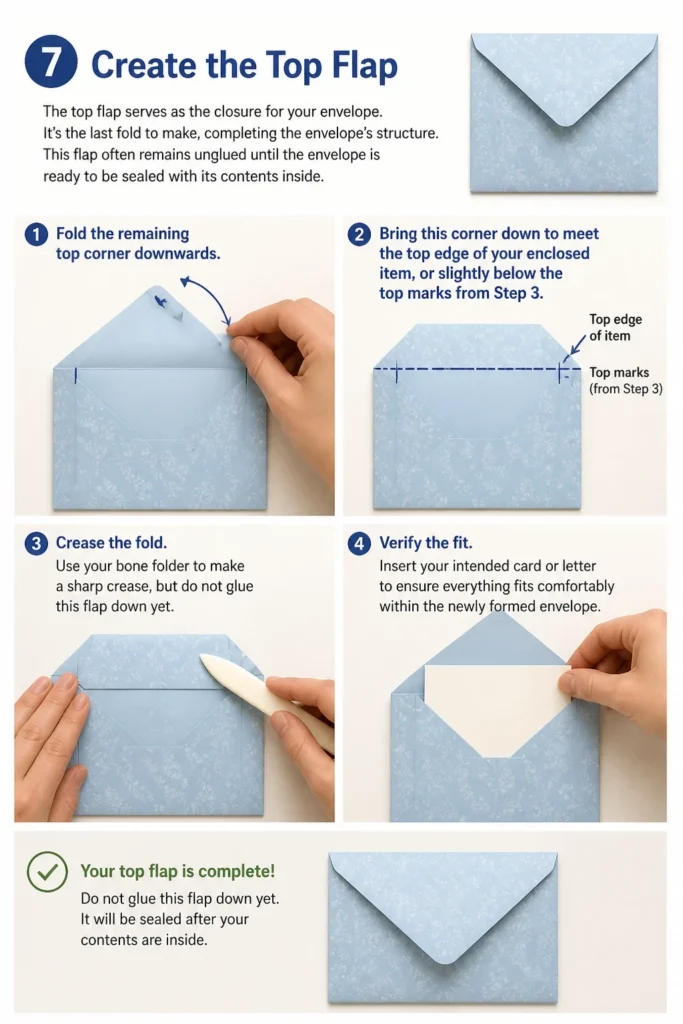
This flap often remains unglued until the envelope is ready to be sealed with its contents inside.
- Fold the remaining top corner downwards. Bring this corner down to meet the top edge of your enclosed item, or slightly below the top marks from Step 3.
- Crease the fold. Use your bone folder to make a sharp crease, but do not glue this flap down yet.
- Verify the fit. Insert your intended card or letter to ensure everything fits comfortably within the newly formed envelope.
Step 8: Final Touches and Sealing
Your handmade envelope is now structurally complete. This final step involves optional decoration and the eventual sealing of your mail.
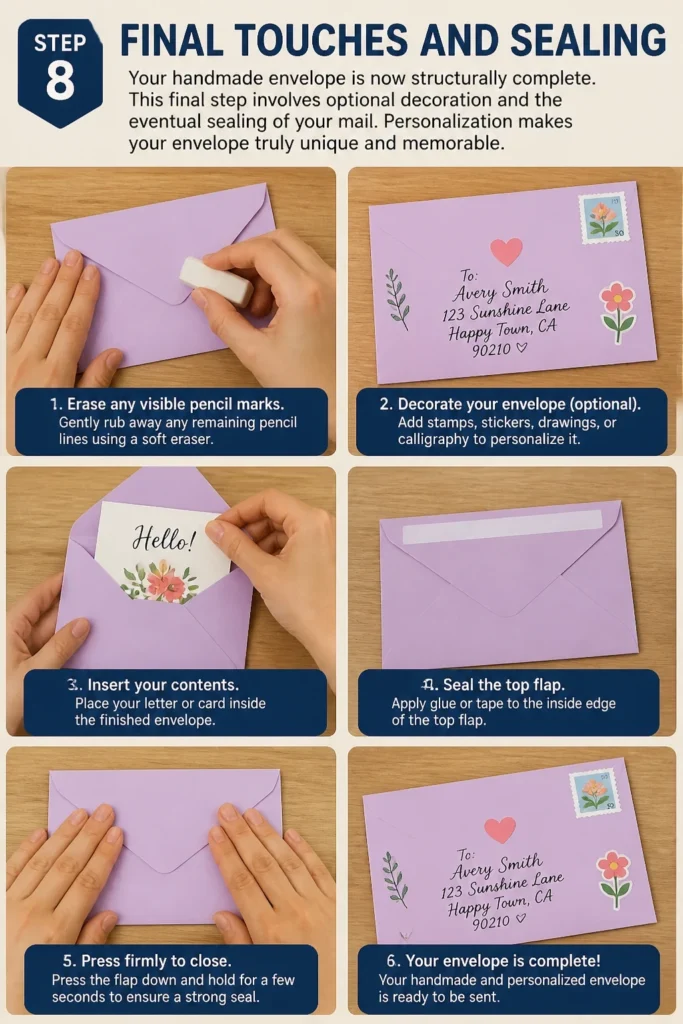
Personalization makes your envelope truly unique and memorable.
- Erase any visible pencil marks. Gently rub away any remaining pencil lines using a soft eraser.
- Decorate your envelope (optional). Add stamps, stickers, drawings, or calligraphy to personalize it.
- Insert your contents. Place your letter or card inside the finished envelope.
- Seal the top flap. Apply glue or tape to the inside edge of the top flap and press firmly to close your envelope.
Common Mistakes to Avoid
Incorrect Paper Size or Type
Using paper that is too small or too flimsy is a common pitfall. If your paper isn’t large enough, your item won’t fit, or the flaps will be too short to seal properly. Flimsy paper tears easily and offers little protection.
Always measure your item first and choose a paper that is significantly larger and of appropriate weight. Cardstock or heavier craft paper works well for durability.
Inaccurate Measurements and Folds
Eyeballing measurements or rushing your folds can lead to a lopsided or poorly sealed envelope. Misaligned flaps won’t meet correctly, creating gaps or an unprofessional appearance.
Take your time with a ruler and pencil for every measurement. Use a bone folder to create crisp, precise creases, ensuring all edges align perfectly before pressing down firmly.
Excessive Glue Application
Applying too much glue is a frequent mistake. This can cause the paper to buckle, warp, or bleed through, ruining the aesthetic. It can also cause the envelope to stick to your work surface or to itself prematurely.
Use a thin, even layer of a quick-drying glue stick or double-sided tape. Only apply adhesive where the flaps overlap, ensuring a clean and secure bond without excess mess.
Forgetting to Erase Pencil Marks
Leaving visible pencil lines on your finished envelope detracts from its handmade charm. These marks can make the envelope look unfinished or amateurish.
Always use a light touch when marking with a pencil. Before the final sealing, gently erase all visible pencil lines with a clean, soft eraser. This simple step elevates the overall presentation.
Troubleshooting
Envelope Doesn’t Close Evenly
If your envelope flaps don’t meet perfectly or close unevenly, it’s usually due to inaccurate initial measurements or crooked folds. The paper might have shifted during creasing.
Carefully re-check your central point and the alignment of your item before making any folds. Ensure each fold is made precisely along the marked lines, using a ruler as a guide if necessary. Sometimes, a slight trim on one edge before folding can correct minor misalignments.
Paper Tears or Wrinkles During Folding
Tears often occur when the paper is too thin for sharp creases or when excessive force is applied. Wrinkles can happen with too much moisture from liquid glue or inconsistent folding pressure.
Use a paper with a suitable weight for folding. When creasing, apply firm but even pressure with a bone folder, rather than dragging it harshly. If using glue, opt for a glue stick to minimize moisture and apply it sparingly.
Contents Don’t Fit Inside
Finding that your card or letter is too snug or won’t fit at all is frustrating. This typically means your initial measurements for the envelope were too small relative to your contents.
Always measure your item first and add an adequate margin (at least 0.25 inches on all sides) when marking your fold lines. If the current envelope is too small, start with a larger piece of paper and re-measure from scratch.
Key Takeaways
- Precision in measuring and cutting is the foundation for a well-made envelope.
- Use a bone folder for crisp, professional-looking creases on all folds.
- Select the right paper type and weight for durability and aesthetic appeal.
- Apply adhesive sparingly and strategically to prevent warping or mess.
- Always erase pencil marks before the final sealing for a clean finish.
- Practice makes perfect; your first few attempts will refine your technique.
Frequently Asked Questions
Can I make an envelope without a template?
Absolutely. This guide provides a method for making envelopes without a specific template, relying on basic measurements and the dimensions of your desired contents. You can create envelopes of any size this way.
What type of paper is best for making envelopes?
Medium-weight paper, around 60-80 lb (100-120 gsm), is ideal. It’s sturdy enough to hold its shape but flexible enough to fold easily without cracking. Decorative scrapbook paper, craft paper, or even repurposed calendar pages work wonderfully.
How can I make my envelopes waterproof?
While handmade paper envelopes won’t be fully waterproof, you can add some water resistance. Spraying the finished envelope lightly with a clear acrylic sealant or using wax paper as an inner lining can provide a degree of protection against minor splashes.
Can I use a regular printer to print designs on my handmade envelopes?
Yes, you can. If your paper is suitable for printing, you can design and print patterns, addresses, or decorative elements before you start folding. Just ensure your printer can handle the paper size and weight you’re using.
Our Top Recommended Finds
- Metal Ruler with Cork Backing: Essential for precise measurements and protects your work surface from slips during cutting.
- Bone Folder: Creates sharp, clean creases without damaging the paper fibers, giving your envelopes a polished look.
- Acid-Free Glue Stick: Provides a strong, clean bond that won’t yellow or damage your paper over time, perfect for archival quality.
Craft Your Connections Today
Making your own envelopes opens up a world of creative possibilities, allowing you to add a deeply personal touch to every message you send.
From custom designs for special occasions to unique sizes for unusual items, the skills you’ve learned here are incredibly versatile.
Gather your materials and begin transforming ordinary paper into extraordinary enclosures. Your next heartfelt letter or handmade card deserves a beautifully crafted home.