How To Make Phone Pen
Tired of smudged screens or imprecise taps on your smartphone or tablet?
I remember struggling with tiny buttons and drawing on my tablet with my finger, often wishing for a better tool.
This guide will show you how to create a functional phone pen using simple items, a trick I’ve used myself to improve accuracy and keep my screen clean.
Quick Overview
You’re about to transform everyday household items into a practical stylus for your touchscreen devices. This project is perfect for anyone looking for a DIY solution for better screen interaction.
- Time needed: 15-30 minutes
- Difficulty: Beginner
- What you’ll need: An old pen, cotton swab, aluminum foil, tape, scissors, a small amount of water.
Step-by-Step Instructions
Step 1: Gather Your Materials
Before you begin, lay out all the necessary items on a clean, flat surface. Having everything organized makes the process smoother and prevents interruptions.
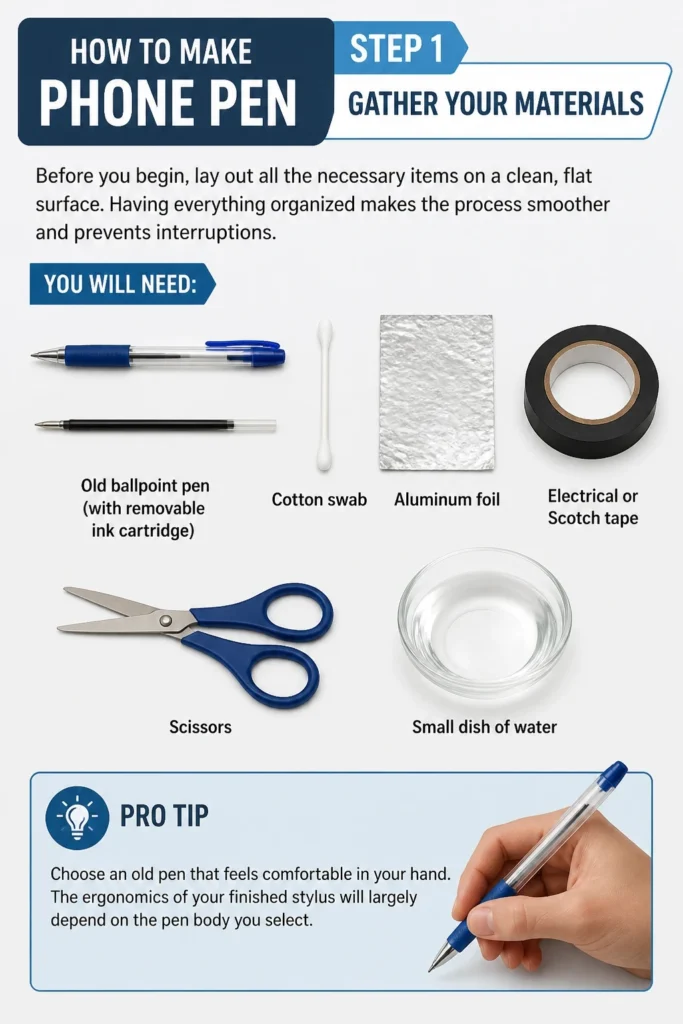
You will need an old ballpoint pen, preferably one with a removable ink cartridge. A standard cotton swab, aluminum foil, and some electrical or Scotch tape are also essential. Finally, grab a pair of scissors and a small dish of water.
Pro Tip: Choose an old pen that feels comfortable in your hand. The ergonomics of your finished stylus will largely depend on the pen body you select.
Step 2: Prepare the Pen Body
First, disassemble your chosen pen. Remove the ink cartridge, spring, and any other internal components until you are left with just the hollow pen barrel.
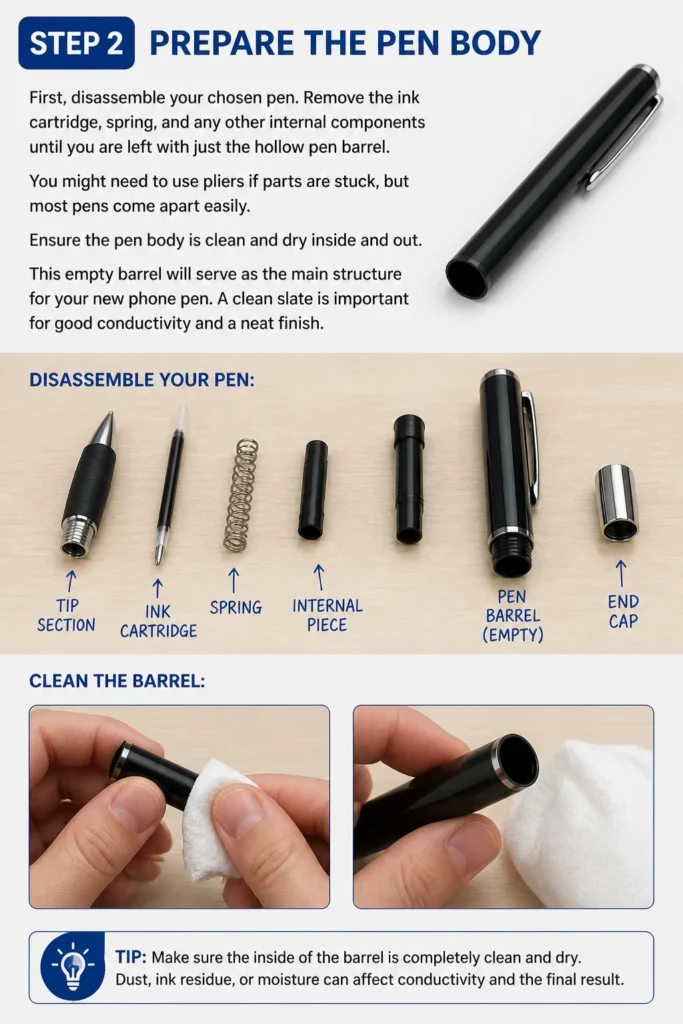
You might need to use pliers if parts are stuck, but most pens come apart easily. Ensure the pen body is clean and dry inside and out.
This empty barrel will serve as the main structure for your new phone pen. A clean slate is important for good conductivity and a neat finish.
Step 3: Craft the Conductive Tip
Take one cotton swab. You will use one end of it to create the soft, screen-friendly tip of your stylus. The cotton needs to be slightly conductive.
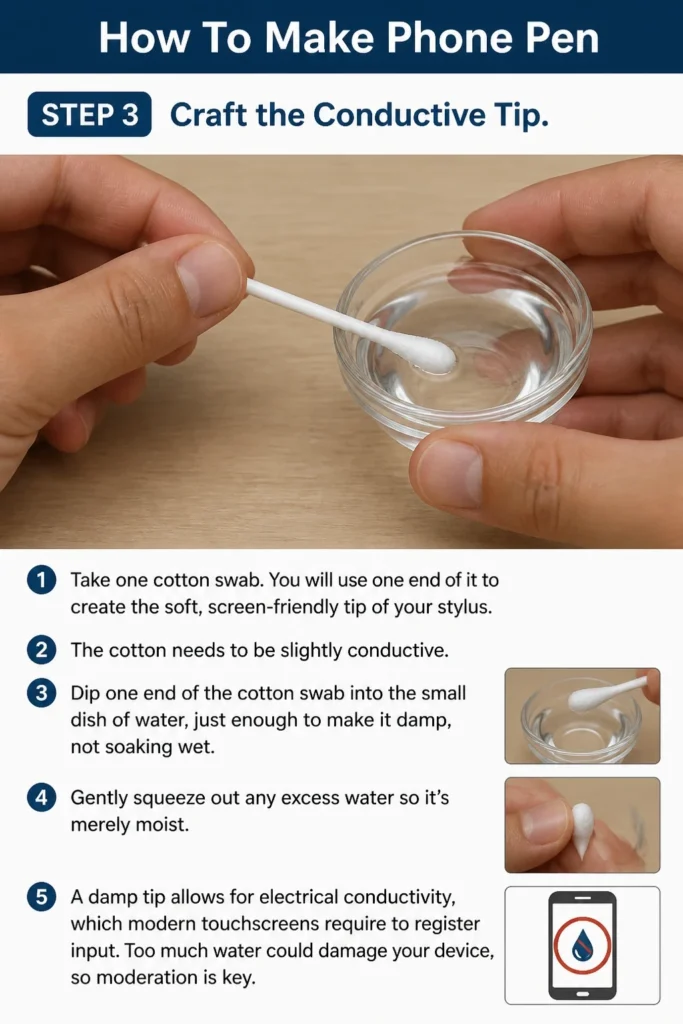
Dip one end of the cotton swab into the small dish of water, just enough to make it damp, not soaking wet. Gently squeeze out any excess water so it’s merely moist.
A damp tip allows for electrical conductivity, which modern touchscreens require to register input. Too much water could damage your device, so moderation is key.
Step 4: Attach the Tip Securely
Insert the damp end of the cotton swab into the opening of the pen barrel where the pen tip originally protruded. Push it in far enough so it’s secure but still leaves about half an inch of the damp cotton exposed.
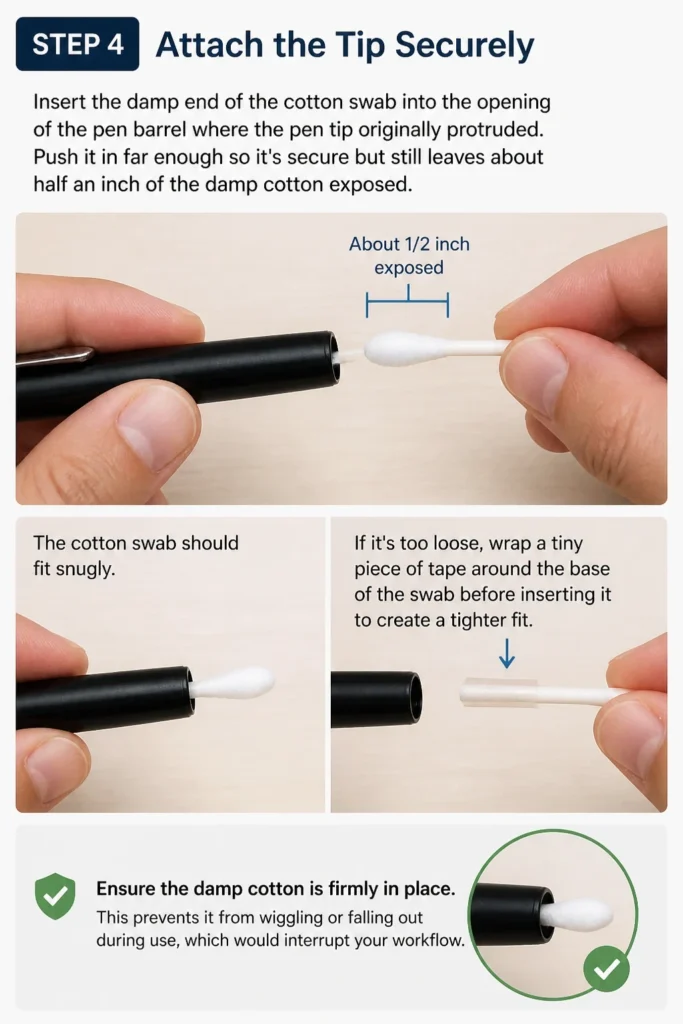
The cotton swab should fit snugly. If it’s too loose, wrap a tiny piece of tape around the base of the swab before inserting it to create a tighter fit.
Ensure the damp cotton is firmly in place. This prevents it from wiggling or falling out during use, which would interrupt your workflow.
Step 5: Ensure Hand Contact and Conductivity
This is a crucial step for your phone pen to work. Tear off a strip of aluminum foil, about 1 inch wide and long enough to wrap around the pen barrel several times.
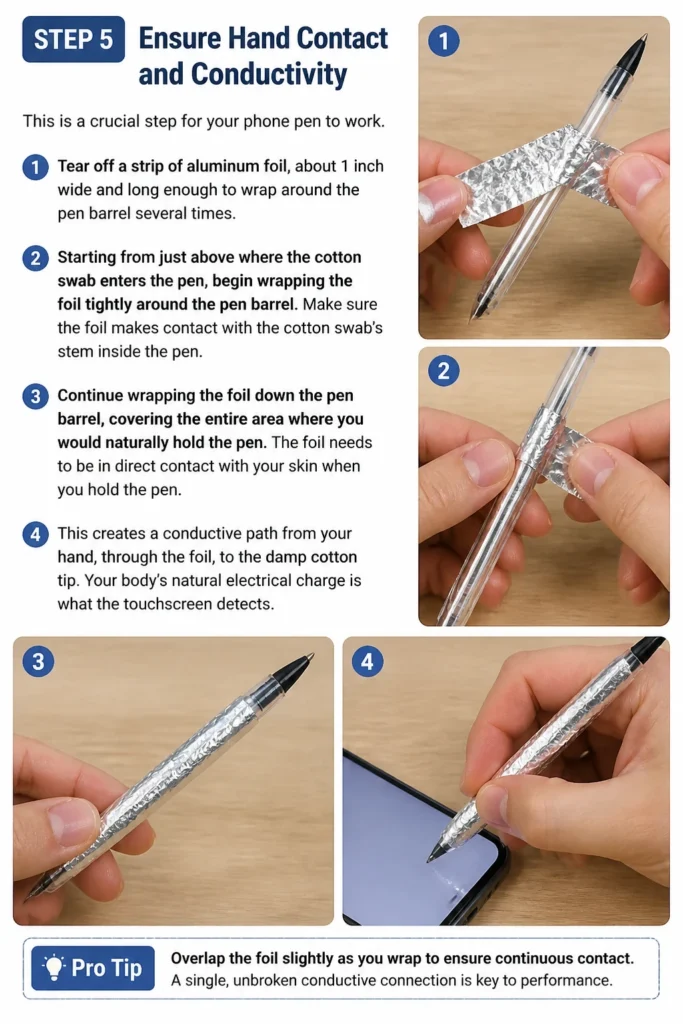
Starting from just above where the cotton swab enters the pen, begin wrapping the foil tightly around the pen barrel. Make sure the foil makes contact with the cotton swab’s stem inside the pen.
Continue wrapping the foil down the pen barrel, covering the entire area where you would naturally hold the pen. The foil needs to be in direct contact with your skin when you hold the pen.
This creates a conductive path from your hand, through the foil, to the damp cotton tip. Your body’s natural electrical charge is what the touchscreen detects.
Pro Tip: Overlap the foil slightly as you wrap to ensure continuous contact. A single, unbroken conductive path is essential for consistent performance.
Step 6: Secure the Foil Wrapping
Once the aluminum foil is wrapped to your satisfaction, use a piece of tape to secure both ends of the foil. Tape the top edge of the foil where it meets the cotton swab, and the bottom edge where your hand will rest.
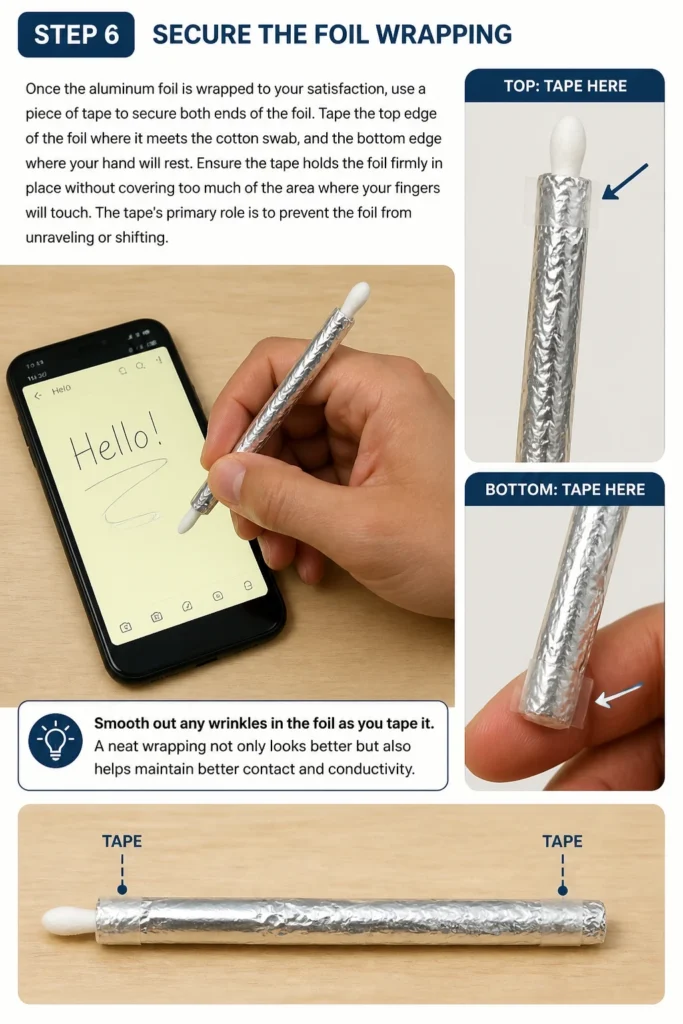
Ensure the tape holds the foil firmly in place without covering too much of the area where your fingers will touch. The tape’s primary role is to prevent the foil from unraveling or shifting.
Smooth out any wrinkles in the foil as you tape it. A neat wrapping not only looks better but also helps maintain better contact and conductivity.
Step 7: Test Your New Pen
Now it’s time to try out your homemade phone pen. Hold the pen as you normally would, ensuring your fingers are in direct contact with the aluminum foil.
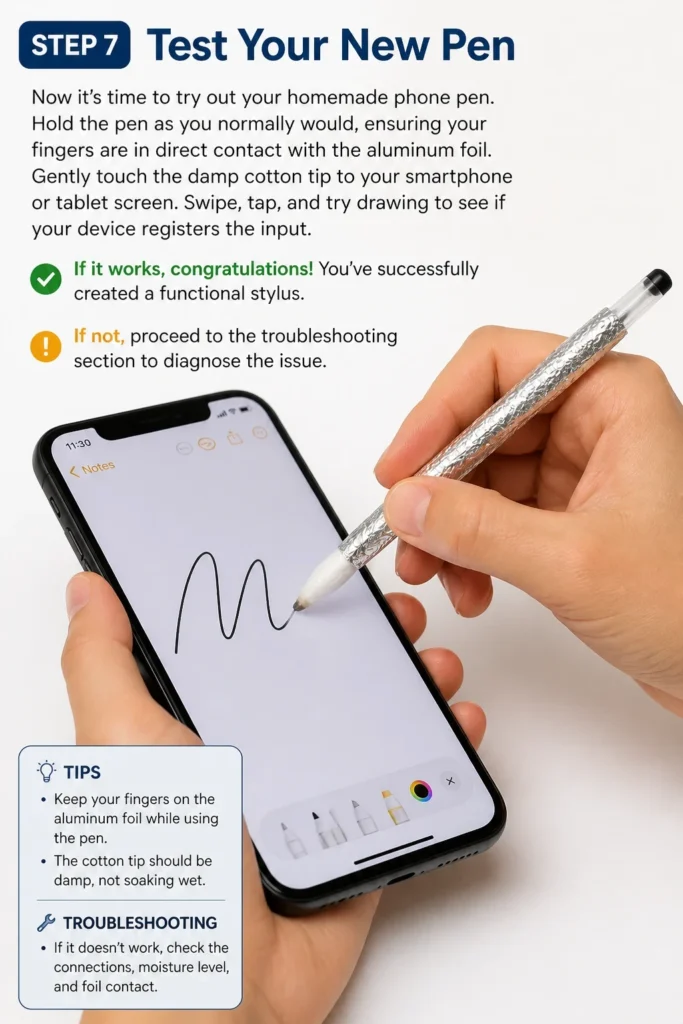
Gently touch the damp cotton tip to your smartphone or tablet screen. Swipe, tap, and try drawing to see if your device registers the input.
If it works, congratulations! You’ve successfully created a functional stylus. If not, proceed to the troubleshooting section to diagnose the issue.
Common Mistakes to Avoid
Not Enough Conductivity
Many users forget that touchscreens respond to the body’s electrical charge. If your phone pen isn’t working, often the issue is a broken conductive path.
Ensure the aluminum foil makes solid contact with both the damp cotton swab stem and your skin. Any gaps will prevent the necessary electrical signal from reaching the screen.
Over-Wetting the Cotton Swab
While the cotton needs to be damp, it should not be dripping wet. Excess water can leave residue on your screen or, worse, potentially seep into your device.
Squeeze out any visible water after dipping the swab. The goal is just enough moisture to facilitate conductivity, not to make it soaking.
Loose Foil Wrapping
If the aluminum foil isn’t wrapped tightly or secured properly, it can shift during use. This leads to intermittent connectivity and frustration.
Wrap the foil snugly and use tape at both ends to keep it firmly in place. A stable wrapping ensures consistent performance and a more durable stylus.
Incorrect Pen Body Choice
Some pens have very narrow openings or unusual shapes that make it difficult to insert the cotton swab or wrap the foil effectively. This can compromise the build.
Opt for a standard, hollow pen barrel. A simple cylindrical shape works best for achieving a secure and conductive setup.
Troubleshooting
Pen Not Responding to Screen
If your device isn’t recognizing the stylus, the most common culprit is a lack of conductivity. Double-check that the aluminum foil is tightly wrapped and makes continuous contact with the damp cotton swab inside the pen.
Also, ensure your fingers are firmly touching the foil when you use the pen. Your body’s electrical charge needs to transfer to the tip. Re-dampen the cotton swab if it has dried out, as this is crucial for the electrical connection.
Pen Leaves Smudges or Water Marks
This indicates that your cotton swab is too wet. While some dampness is necessary, excessive water will transfer to your screen.
Gently squeeze the cotton swab again after wetting it to remove any excess moisture. It should feel damp to the touch, not saturated. You can also try a slightly drier cotton swab to find the right balance.
Foil Keeps Unraveling
If the aluminum foil begins to come loose during use, it means it wasn’t secured properly. The tape might not be strong enough or wasn’t applied effectively.
Re-wrap the foil tightly, overlapping the edges, and use more tape or a stronger type of tape (like electrical tape) to secure both the top and bottom edges firmly. Ensure the tape adheres well to both the foil and the pen barrel.
Key Takeaways
- Always ensure a continuous conductive path from your hand, through the foil, to the damp cotton tip.
- Dampen the cotton swab just enough for conductivity; avoid making it soaking wet.
- Secure the aluminum foil tightly with tape to prevent it from unraveling during use.
- Use a comfortable, hollow pen barrel for the best results and ergonomics.
- Regularly check the dampness of the cotton tip, re-wetting it as needed for optimal performance.
- This DIY pen offers a cost-effective alternative for better touchscreen precision.
Frequently Asked Questions
How long does the damp cotton tip last before drying out?
The dampness of the cotton tip typically lasts for a few hours of intermittent use, depending on humidity and ambient temperature. You can easily re-dampen it by dipping it in water again when it starts to lose effectiveness.
Can I use something other than a cotton swab for the tip?
While a cotton swab is highly recommended for its softness and ability to hold moisture, other conductive, soft materials can potentially work. Some people experiment with conductive fabric or foam, but cotton swabs are the easiest and most readily available option for beginners.
Will this phone pen scratch my screen?
No, when made correctly, a phone pen with a damp cotton swab tip is very gentle on your screen. The soft cotton and moisture prevent any scratching. Always ensure there are no sharp edges from the foil or pen barrel near the tip.
Is it safe to use water near my phone?
Yes, as long as you follow the instructions to only slightly dampen the cotton swab, it is safe. The key is to avoid over-wetting, which could lead to drips. The minimal moisture required for conductivity poses no risk to your device.
Our Top Recommended Finds
- Quality Electrical Tape: For securing the foil firmly and ensuring durability.
- Bulk Pack Cotton Swabs: Handy for making multiple styluses or replacing tips as needed.
- Comfortable Empty Pen Barrels: If you don’t have an old pen, a pack of inexpensive, simple pens can provide excellent bases.
Enhance Your Digital Interaction
You’ve now mastered the simple yet effective art of crafting your own phone pen. This DIY tool offers a practical way to improve your precision on touchscreens, whether for drawing, navigating menus, or simply keeping your screen clean.
Don’t stop here. Consider experimenting with different pen bodies or types of tape to personalize your stylus further. The skills you’ve gained in this project can inspire other creative solutions around your home.
Take the next step today and put your new phone pen to good use. Enjoy the enhanced control and cleaner screen it provides!