How To Make Cake Decorations
Creating beautiful cake decorations transforms a simple dessert into a showstopper. It’s an art form that brings so much joy to both the baker and the recipient. I remember the first time I piped a coherent rose; the satisfaction was immense, and it truly opened up a world of creative possibilities.
This guide will help you discover that same delight, equipping you with the practical steps and insights to decorate your cakes with confidence and flair.
Quick Overview
Decorating a cake allows you to personalize any celebration. You’ll learn fundamental techniques to add stunning visual appeal and professional finishes. This guide covers everything from basic piping to shaping edible elements.
Here’s a quick look at what you’ll accomplish:
- Time needed: 2-4 hours (depending on design complexity and drying times)
- Difficulty: Beginner to Intermediate
- What you’ll need: Buttercream, fondant, piping bags, various tips, food coloring, rolling pin, palette knife, and a few basic cutters.
Step-by-Step Instructions
Step 1: Plan Your Design and Gather Supplies
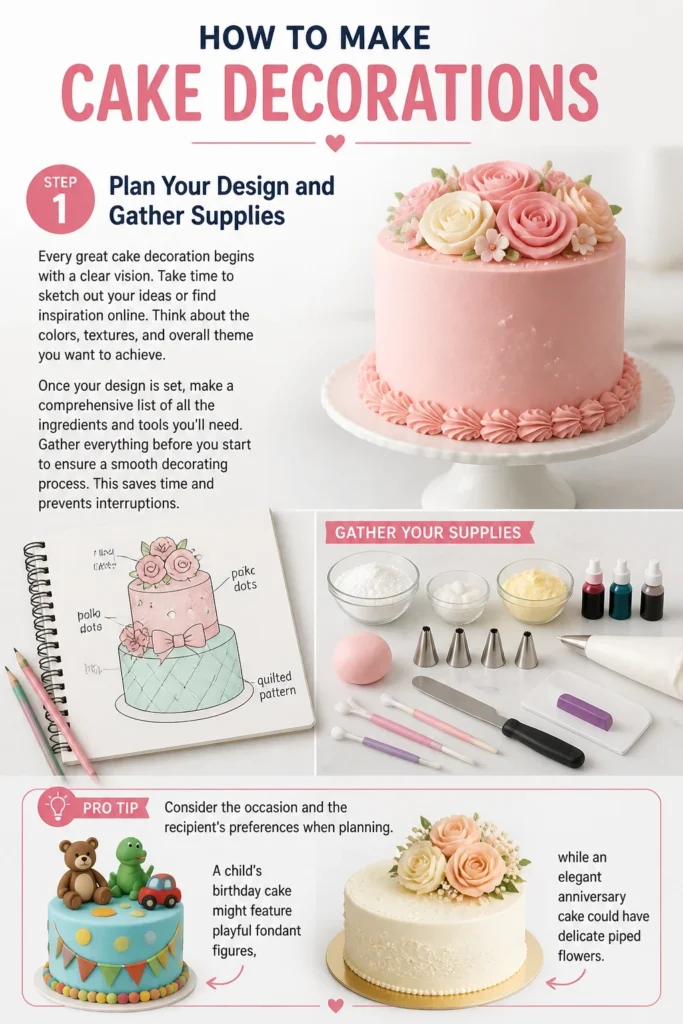
Every great cake decoration begins with a clear vision. Take time to sketch out your ideas or find inspiration online. Think about the colors, textures, and overall theme you want to achieve.
Once your design is set, make a comprehensive list of all the ingredients and tools you’ll need. Gather everything before you start to ensure a smooth decorating process. This saves time and prevents interruptions.
Pro Tip: Consider the occasion and the recipient’s preferences when planning. A child’s birthday cake might feature playful fondant figures, while an elegant anniversary cake could have delicate piped flowers.
Step 2: Prepare Your Cake for Decoration
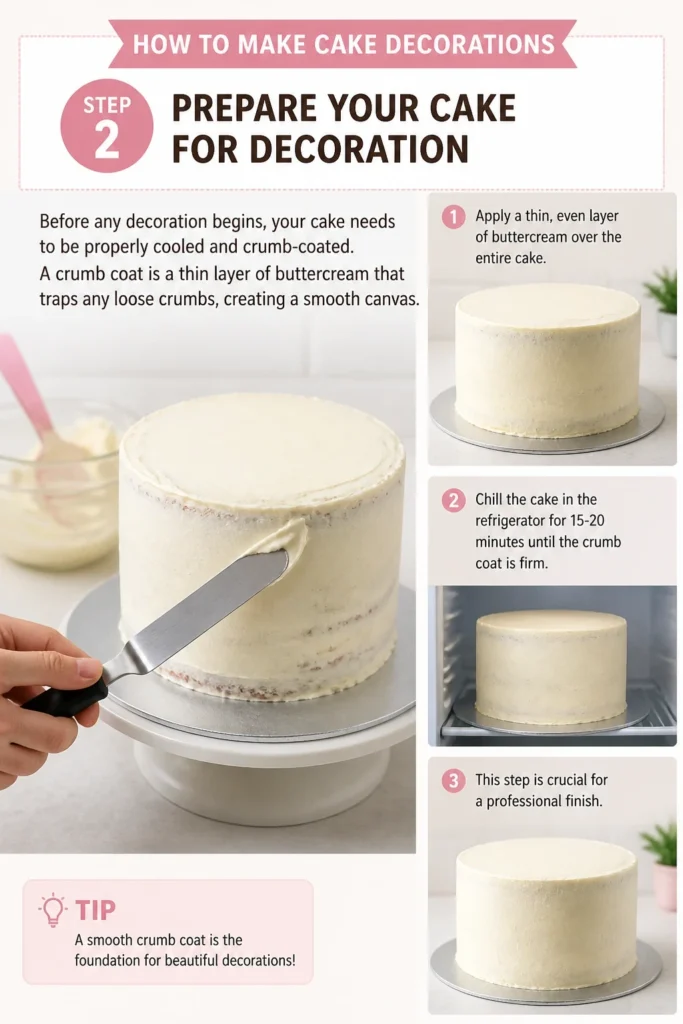
Before any decoration begins, your cake needs to be properly cooled and crumb-coated. A crumb coat is a thin layer of buttercream that traps any loose crumbs, creating a smooth canvas.
Apply a thin, even layer of buttercream over the entire cake. Chill the cake in the refrigerator for 15-20 minutes until the crumb coat is firm. This step is crucial for a professional finish.
Step 3: Master Basic Buttercream Piping
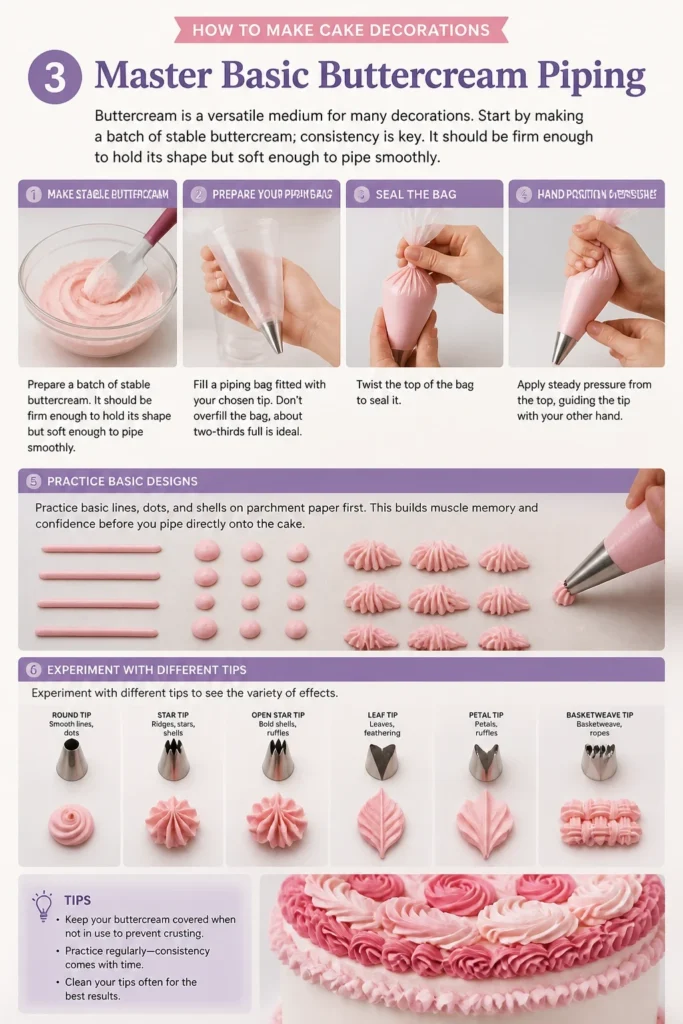
Buttercream is a versatile medium for many decorations. Start by making a batch of stable buttercream; consistency is key. It should be firm enough to hold its shape but soft enough to pipe smoothly.
Fill a piping bag fitted with your chosen tip. Don’t overfill the bag; about two-thirds full is ideal. Twist the top of the bag to seal it, then apply steady pressure from the top, guiding the tip with your other hand.
Practice basic lines, dots, and shells on parchment paper first. This builds muscle memory and confidence before you pipe directly onto the cake. Experiment with different tips to see the variety of effects.
Step 4: Color and Prepare Your Fondant
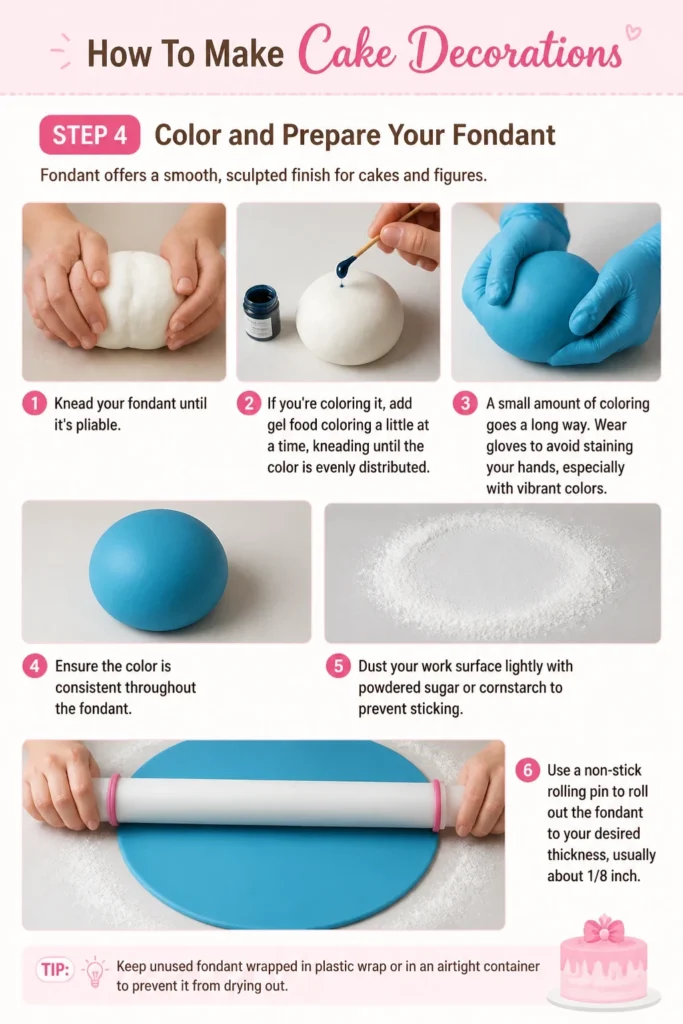
Fondant offers a smooth, sculpted finish for cakes and figures. Knead your fondant until it’s pliable. If you’re coloring it, add gel food coloring a little at a time, kneading until the color is evenly distributed.
A small amount of coloring goes a long way. Wear gloves to avoid staining your hands, especially with vibrant colors. Ensure the color is consistent throughout the fondant.
Dust your work surface lightly with powdered sugar or cornstarch to prevent sticking. Use a non-stick rolling pin to roll out the fondant to your desired thickness, usually about 1/8 inch.
Step 5: Cut and Shape Fondant Decorations
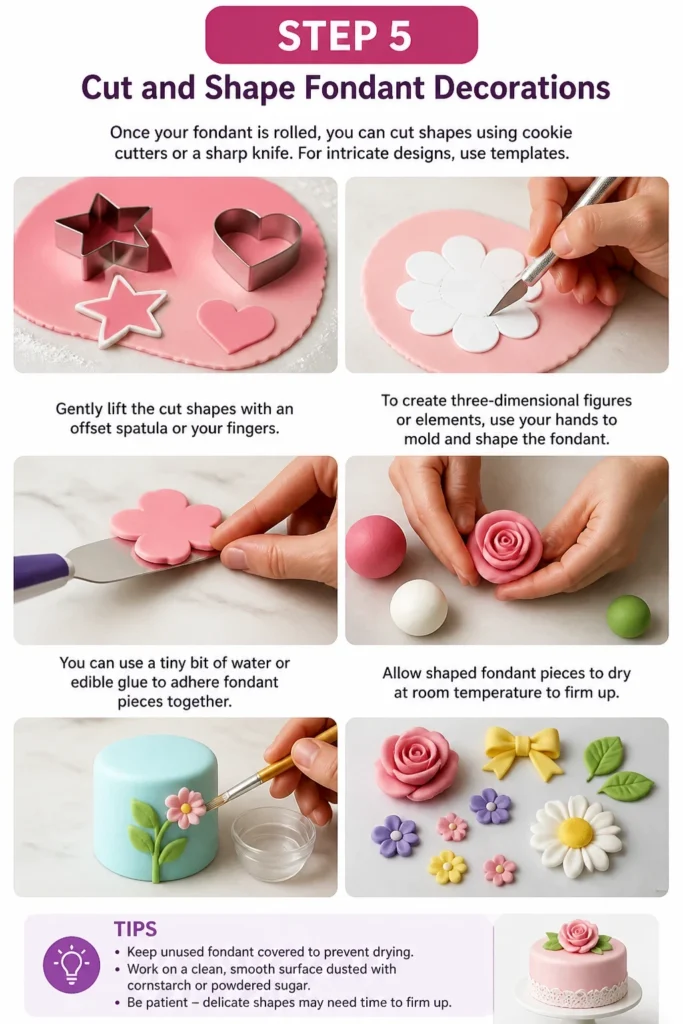
Once your fondant is rolled, you can cut shapes using cookie cutters or a sharp knife. For intricate designs, use templates. Gently lift the cut shapes with an offset spatula or your fingers.
To create three-dimensional figures or elements, use your hands to mold and shape the fondant. You can use a tiny bit of water or edible glue to adhere fondant pieces together. Allow shaped fondant pieces to dry at room temperature to firm up.
Step 6: Add Edible Dusts and Paints for Detail
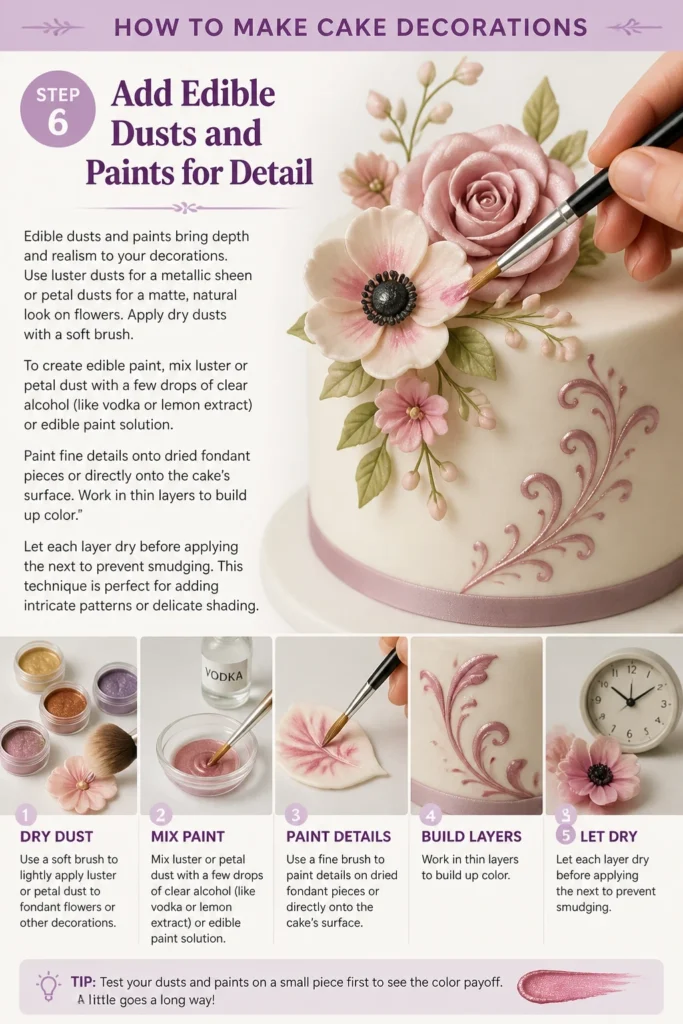
Edible dusts and paints bring depth and realism to your decorations. Use luster dusts for a metallic sheen or petal dusts for a matte, natural look on flowers. Apply dry dusts with a soft brush.
To create edible paint, mix luster or petal dust with a few drops of clear alcohol (like vodka or lemon extract) or edible paint solution. Paint fine details onto dried fondant pieces or directly onto the cake’s surface.
Work in thin layers to build up color. Let each layer dry before applying the next to prevent smudging. This technique is perfect for adding intricate patterns or delicate shading.
Step 7: Incorporate Fresh Elements and Sprinkles
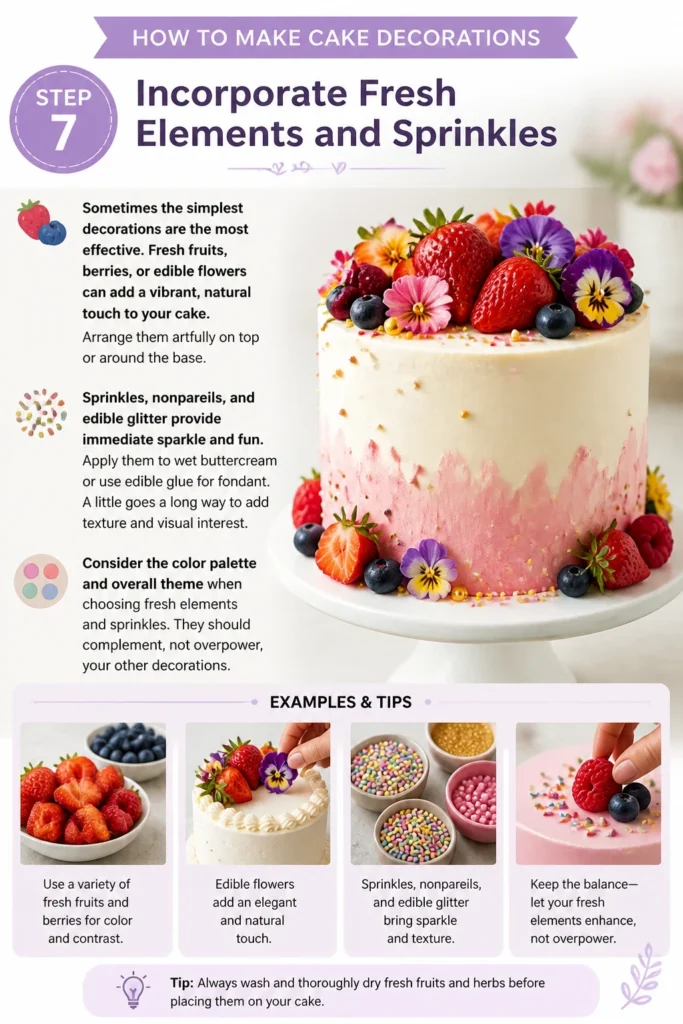
Sometimes the simplest decorations are the most effective. Fresh fruits, berries, or edible flowers can add a vibrant, natural touch to your cake. Arrange them artfully on top or around the base.
Sprinkles, nonpareils, and edible glitter provide immediate sparkle and fun. Apply them to wet buttercream or use edible glue for fondant. A little goes a long way to add texture and visual interest.
Consider the color palette and overall theme when choosing fresh elements and sprinkles. They should complement, not overpower, your other decorations.
Step 8: Assemble and Arrange Your Decorations
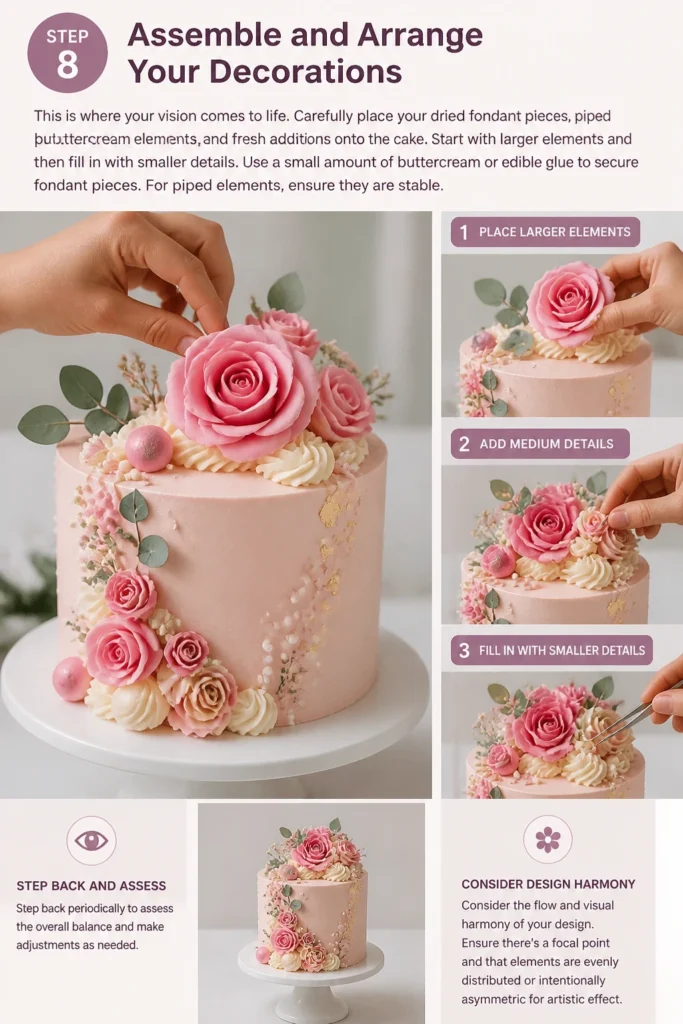
This is where your vision comes to life. Carefully place your dried fondant pieces, piped buttercream elements, and fresh additions onto the cake. Start with larger elements and then fill in with smaller details.
Use a small amount of buttercream or edible glue to secure fondant pieces. For piped elements, ensure they are stable. Step back periodically to assess the overall balance and make adjustments as needed.
Consider the flow and visual harmony of your design. Ensure there’s a focal point and that elements are evenly distributed or intentionally asymmetric for artistic effect.
Common Mistakes to Avoid
Overworking Fondant or Gumpaste
Kneading fondant or gumpaste too much can make it tough, crumbly, and prone to cracking. The heat from your hands can also cause it to become sticky and difficult to work with.
Instead, knead it just until it’s pliable and smooth. If it starts to get sticky, dust your hands and work surface with a tiny bit of powdered sugar or cornstarch. Work quickly and efficiently to maintain its elasticity.
Incorrect Buttercream Consistency
Buttercream that is too thin will melt and lose its shape, while buttercream that is too thick will be difficult to pipe smoothly. This often leads to messy lines and frustrated decorators.
Adjust your buttercream consistency carefully. If it’s too thick, add a tiny amount of milk or cream. If it’s too thin, add more powdered sugar. Aim for a consistency that holds its shape but flows smoothly from the piping bag.
Rushing the Process
Decorating a cake takes patience. Rushing steps like chilling crumb coats, allowing fondant to dry, or practicing piping can lead to an untidy and unprofessional result.
Take your time with each stage. Allow proper drying and chilling times. Break down complex designs into smaller, manageable tasks. Enjoy the creative process rather than focusing solely on the end product.
Not Planning the Design
Starting to decorate without a clear plan can lead to indecision, wasted materials, and a disjointed final look. You might end up with elements that don’t fit together or an unbalanced design.
Always sketch your design beforehand. Visualize how all the elements will fit on the cake. This roadmap helps you stay focused, choose appropriate colors and techniques, and achieve a cohesive, beautiful result.
Troubleshooting
Fondant Cracks While Rolling or Shaping
Cracking often happens when fondant is too dry or has been exposed to air for too long. It loses its elasticity and becomes brittle.
Knead a small amount of vegetable shortening or shortening-based edible oil into the fondant. This helps to re-moisturize it and restore its pliability. Work it in slowly until the cracks disappear.
Buttercream Melts or Collapses While Piping
This issue usually stems from the buttercream being too warm, either from your hands or the room temperature. The fat in the buttercream softens, causing it to lose its structure.
Chill your piping bag in the refrigerator for 5-10 minutes. If your hands are warm, try holding the bag with a cloth or wear thin gloves. Work in a cooler room if possible, or work in smaller batches.
Piping Bag Bursts or Tears
A bursting piping bag is often due to overfilling, using too much pressure, or a poor-quality bag. It can be frustrating and messy.
Avoid overfilling your piping bags; fill them only two-thirds full. Use sturdy, good-quality disposable or reusable piping bags. Apply even, steady pressure, guiding the buttercream out rather than forcing it.
Key Takeaways
- Planning is Paramount: Always sketch your design and gather all supplies before you begin decorating.
- Consistency is Crucial: Pay close attention to the consistency of both buttercream and fondant for best results.
- Practice Makes Perfect: Spend time practicing piping techniques on parchment paper to build confidence and skill.
- Patience is a Virtue: Allow adequate time for chilling, drying, and precise placement of your decorations.
- Embrace Creativity: Don’t be afraid to experiment with colors, textures, and different decorative elements.
- Enjoy the Process: Cake decorating is a rewarding art; savor each step of bringing your vision to life.
Frequently Asked Questions
Can I make cake decorations ahead of time?
Absolutely, many decorations can be made in advance. Fondant and gumpaste figures, flowers, and cut-outs can be made days or even weeks ahead. Store them in an airtight container at room temperature, away from direct sunlight or humidity. Buttercream decorations can also be piped and frozen.
How do I store a decorated cake?
The best way to store a decorated cake depends on the type of decoration. Cakes with buttercream or fresh fruit should be refrigerated in an airtight container. Fondant-covered cakes are generally best stored at cool room temperature to prevent condensation, unless they have perishable fillings.
What’s the difference between fondant and gumpaste?
Fondant is primarily used for covering cakes and making softer decorations. It has a pliable, dough-like texture and is edible. Gumpaste, on the other hand, dries much harder and is more elastic, making it ideal for delicate, intricate decorations like realistic flowers or thin structural elements. While edible, it’s not typically eaten due to its hard texture.
Are all food colorings the same?
No, food colorings come in various forms, each with specific uses. Gel food colorings are highly concentrated and best for coloring buttercream, fondant, and batter without altering consistency. Liquid food colorings are less concentrated and can thin out mixtures. Powdered food colorings are good for dusting or mixing with alcohol for painting.
Our Top Recommended Finds
- Professional Piping Tip Set: A good set with a variety of tips (round, star, leaf, petal) will allow you to create countless designs and textures. Look for stainless steel tips for durability.
- Fondant Smoother: This simple tool is essential for achieving a perfectly smooth, professional finish on fondant-covered cakes. It helps remove air bubbles and creases.
- Gel Food Colorings: Invest in a set of concentrated gel food colorings. They provide vibrant colors without adding excess liquid, which is crucial for maintaining the right consistency in buttercream and fondant.
Unleash Your Inner Cake Artist
Now you have the foundational knowledge and practical steps to begin your journey into cake decorating. The world of edible art is vast and exciting, full of endless possibilities to express your creativity. Don’t be afraid to experiment with new techniques, colors, and designs.
Start with a simple project, practice the steps outlined here, and watch your skills grow with each cake you decorate. Share your creations with loved ones, and most importantly, enjoy the process of turning flour and sugar into edible masterpieces. Your next beautifully decorated cake is just a few steps away!