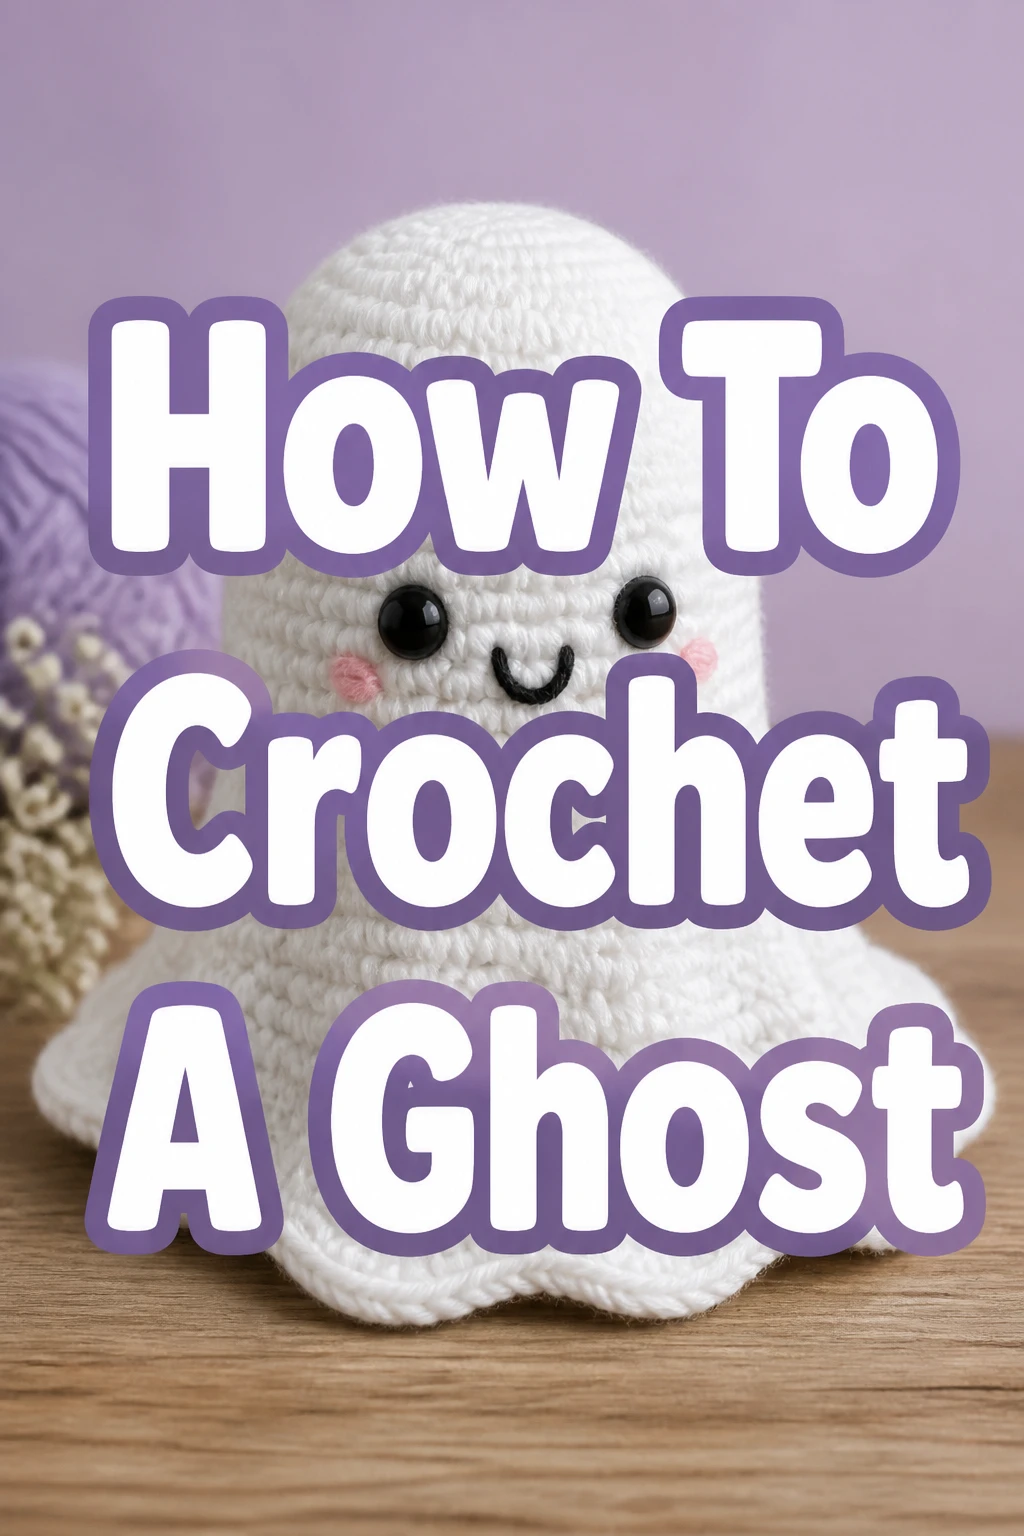
How To Crochet A Ghost
There’s something truly charming about a handmade ghost, especially when it’s your own creation.
I remember the joy of making my very first one; it brought such a unique, personal touch to my Halloween decor.
This guide will show you exactly how to crochet a delightful little ghost, even if you are just starting out.
Quick Overview
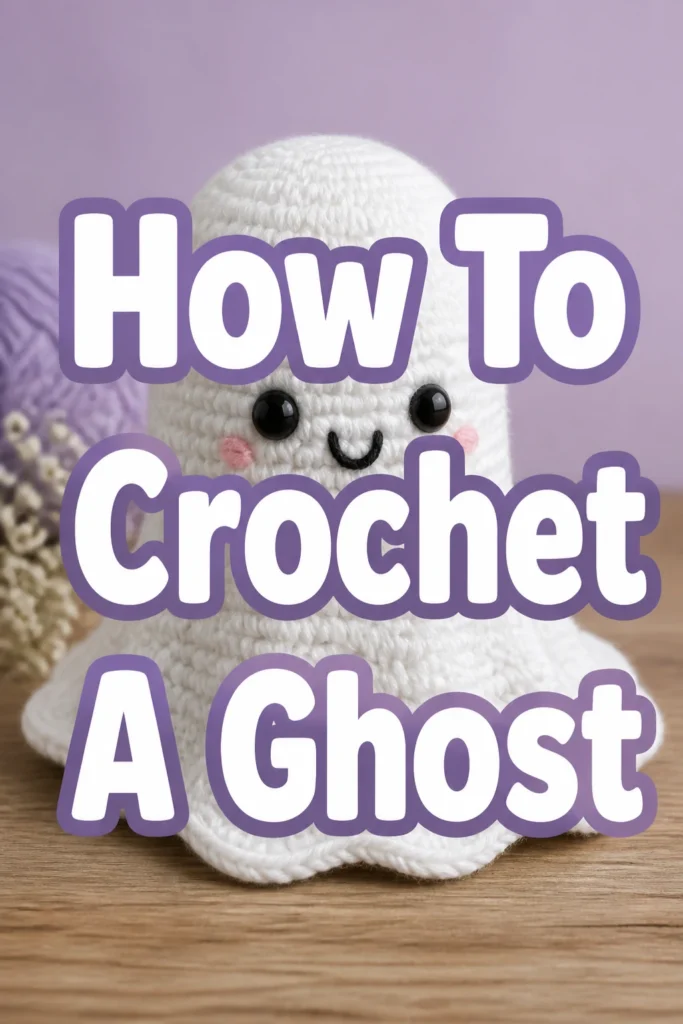
You’re about to create an adorable, spooky friend perfect for seasonal decorating or as a thoughtful, handmade gift.
This project uses fundamental crochet techniques, making it accessible and fun.
- Time needed: 1-2 hours
- Difficulty: Beginner
- What you’ll need: White yarn, crochet hook, stuffing, safety eyes, yarn needle, scissors
Step-by-Step Instructions
Step 1: Gather Your Haunting Supplies
Before beginning, ensure you have all your materials ready and within reach.
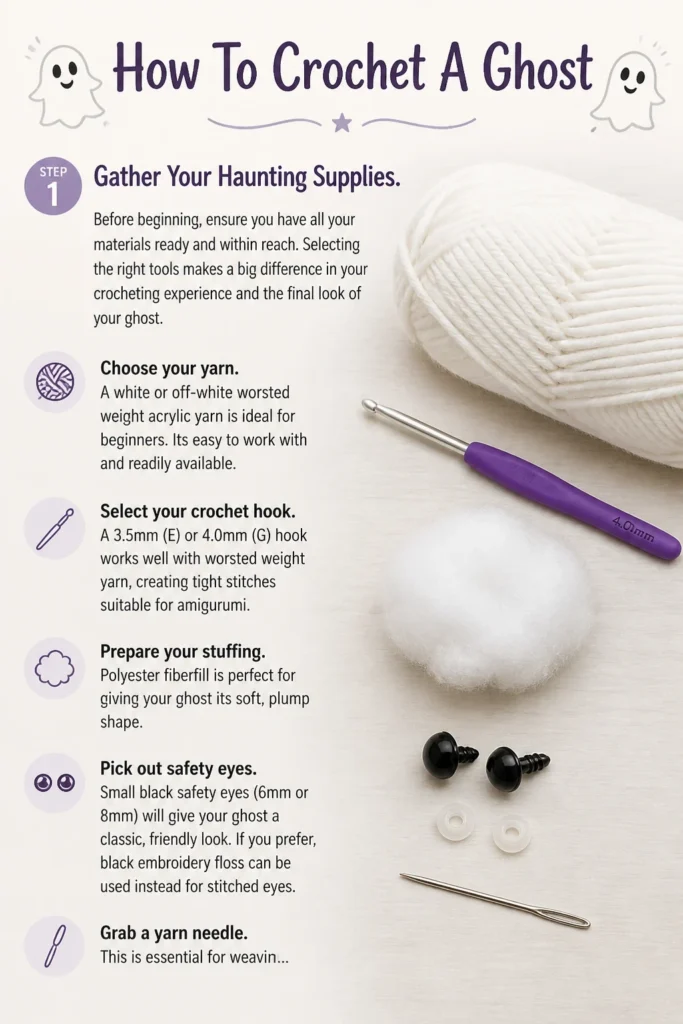
Selecting the right tools makes a big difference in your crocheting experience and the final look of your ghost.
- Choose your yarn. A white or off-white worsted weight acrylic yarn is ideal for beginners. It’s easy to work with and readily available.
- Select your crochet hook. A 3.5mm (E) or 4.0mm (G) hook works well with worsted weight yarn, creating tight stitches suitable for amigurumi.
- Prepare your stuffing. Polyester fiberfill is perfect for giving your ghost its soft, plump shape.
- Pick out safety eyes. Small black safety eyes (6mm or 8mm) will give your ghost a classic, friendly look. If you prefer, black embroidery floss can be used instead for stitched eyes.
- Grab a yarn needle. This is essential for weaving in ends and sewing any parts together.
- Keep your scissors handy for cutting yarn.
Pro Tip: Always check your yarn label for the recommended hook size. This is a good starting point, but you might adjust slightly for personal tension preference.
Step 2: Start with the Magic Ring
The magic ring, also known as a magic circle or adjustable ring, creates a tight, closed center for your crochet piece.
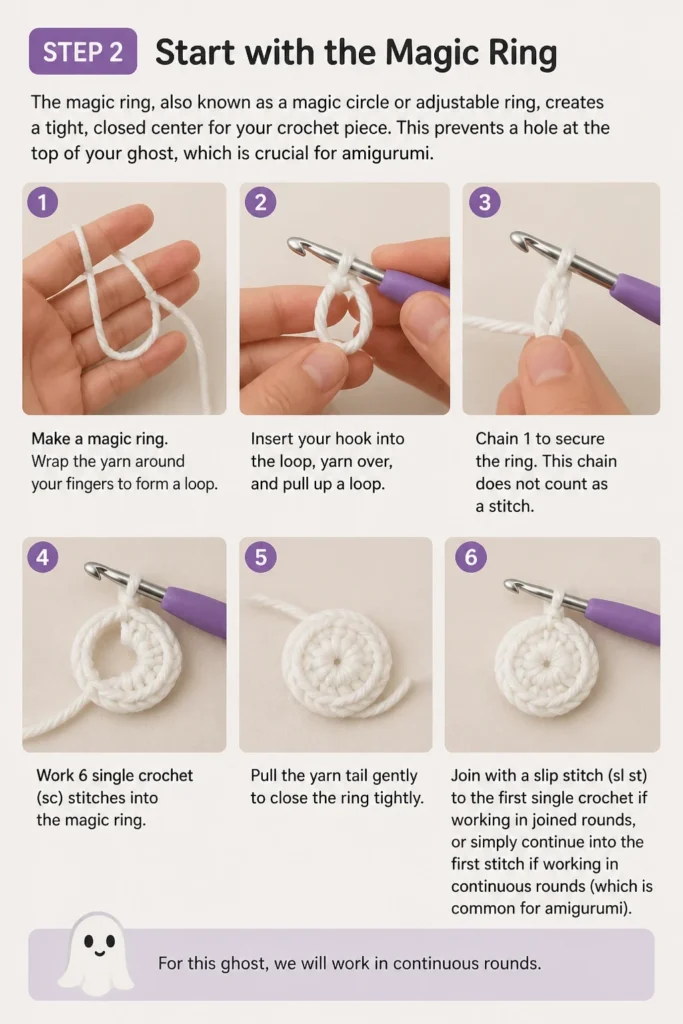
This prevents a hole at the top of your ghost, which is crucial for amigurumi.
- Make a magic ring. Wrap the yarn around your fingers to form a loop.
- Insert your hook into the loop, yarn over, and pull up a loop.
- Chain 1 to secure the ring. This chain does not count as a stitch.
- Work 6 single crochet (sc) stitches into the magic ring.
- Pull the yarn tail gently to close the ring tightly.
- Join with a slip stitch (sl st) to the first single crochet if working in joined rounds, or simply continue into the first stitch if working in continuous rounds (which is common for amigurumi). For this ghost, we will work in continuous rounds.
Step 3: Build the Body Base
Now you will begin to increase your stitches, forming the wider base of your ghost’s body.
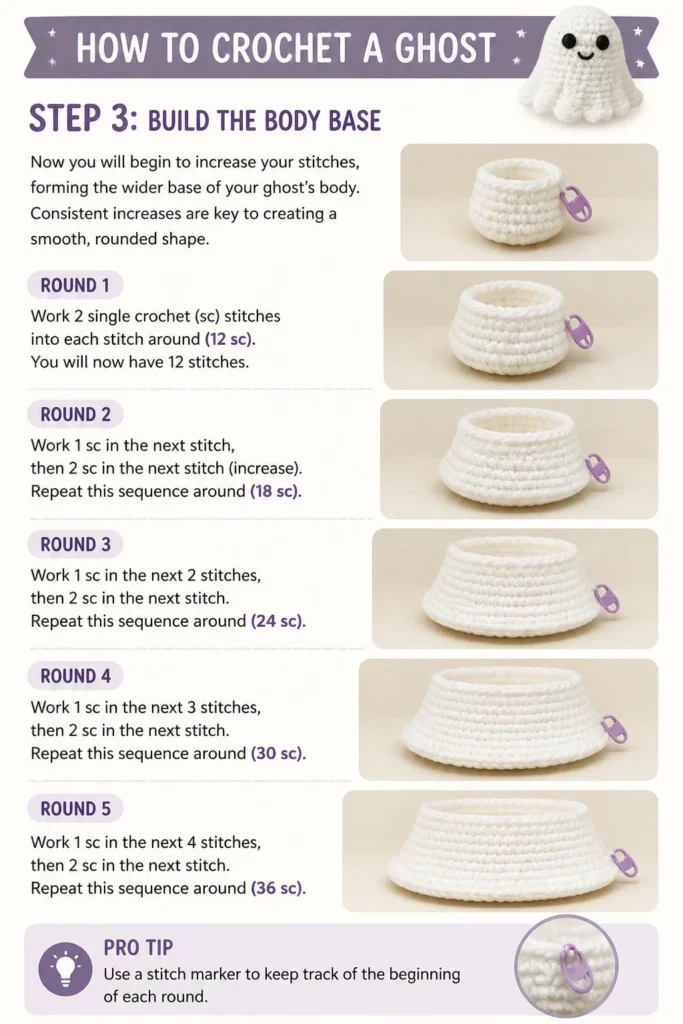
Consistent increases are key to creating a smooth, rounded shape.
- Round 1: Work 2 single crochet (sc) stitches into each stitch around (12 sc). You will now have 12 stitches.
- Round 2: Work 1 sc in the next stitch, then 2 sc in the next stitch (increase). Repeat this sequence around (18 sc).
- Round 3: Work 1 sc in the next 2 stitches, then 2 sc in the next stitch. Repeat this sequence around (24 sc).
- Round 4: Work 1 sc in the next 3 stitches, then 2 sc in the next stitch. Repeat this sequence around (30 sc).
- Round 5: Work 1 sc in the next 4 stitches, then 2 sc in the next stitch. Repeat this sequence around (36 sc).
Pro Tip: Use a stitch marker to keep track of the beginning of each round. This is incredibly helpful when working in continuous rounds and prevents losing your place.
Step 4: Shape the Ghost’s Form
After establishing the base, you will now work several rounds without increasing, which creates the main body height of your ghost.
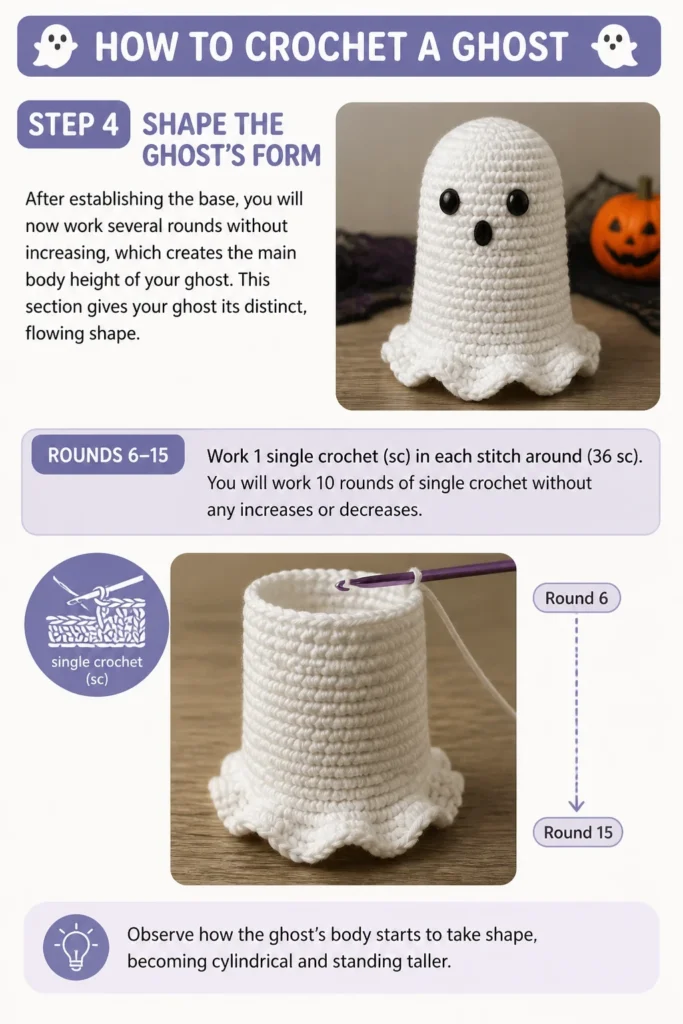
This section gives your ghost its distinct, flowing shape.
- Rounds 6-15: Work 1 single crochet (sc) in each stitch around (36 sc). You will work 10 rounds of single crochet without any increases or decreases.
- Observe how the ghost’s body starts to take shape, becoming cylindrical and standing taller.
Step 5: Define the Head and Start Stuffing
It’s time to begin shaping the top of your ghost, which will form its head.
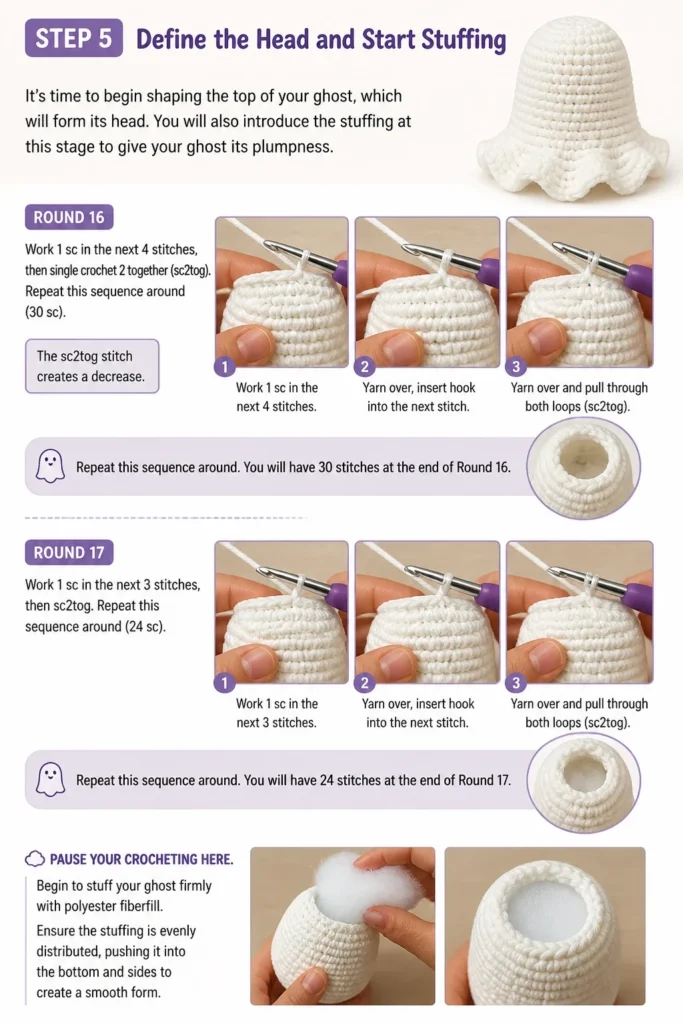
You will also introduce the stuffing at this stage to give your ghost its plumpness.
- Round 16: Work 1 sc in the next 4 stitches, then single crochet 2 together (sc2tog). Repeat this sequence around (30 sc). The sc2tog stitch creates a decrease.
- Round 17: Work 1 sc in the next 3 stitches, then sc2tog. Repeat this sequence around (24 sc).
- Pause your crocheting here. Begin to stuff your ghost firmly with polyester fiberfill.
- Ensure the stuffing is evenly distributed, pushing it into the bottom and sides to create a smooth form.
Step 6: Add the Spooky Details
Now is the perfect time to add the ghost’s facial features before the opening gets too small.
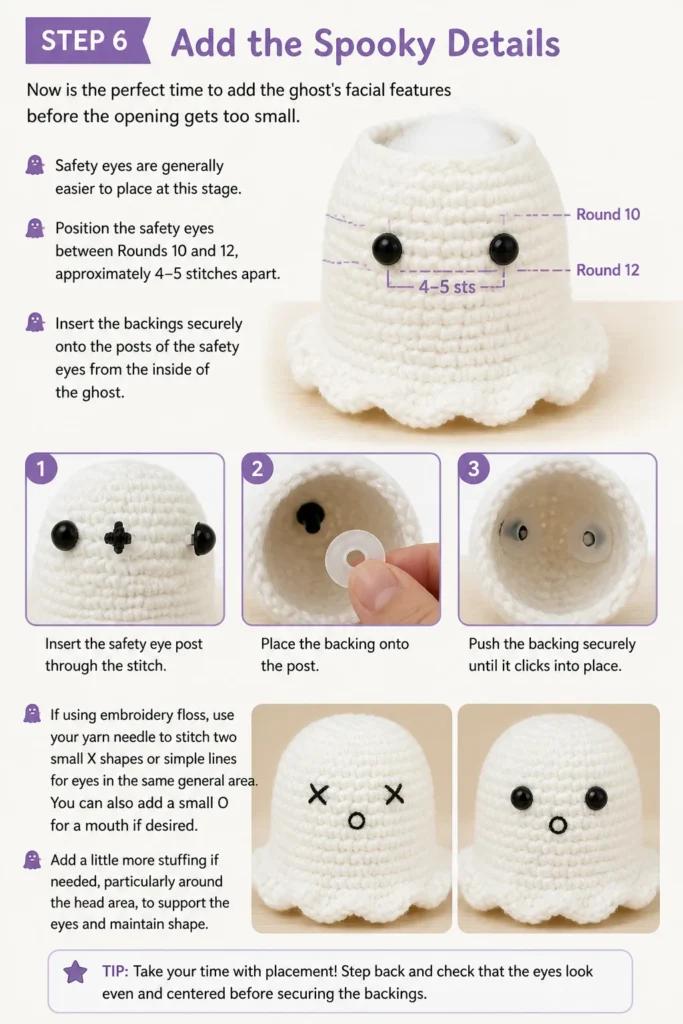
Safety eyes are generally easier to place at this stage.
- Position the safety eyes between Rounds 10 and 12, approximately 4-5 stitches apart.
- Insert the backings securely onto the posts of the safety eyes from the inside of the ghost.
- If using embroidery floss, use your yarn needle to stitch two small “X” shapes or simple lines for eyes in the same general area. You can also add a small “O” for a mouth if desired.
- Add a little more stuffing if needed, particularly around the head area, to support the eyes and maintain shape.
Step 7: Close the Top
Continue decreasing stitches to close the top of your ghost, forming a neat, rounded head.
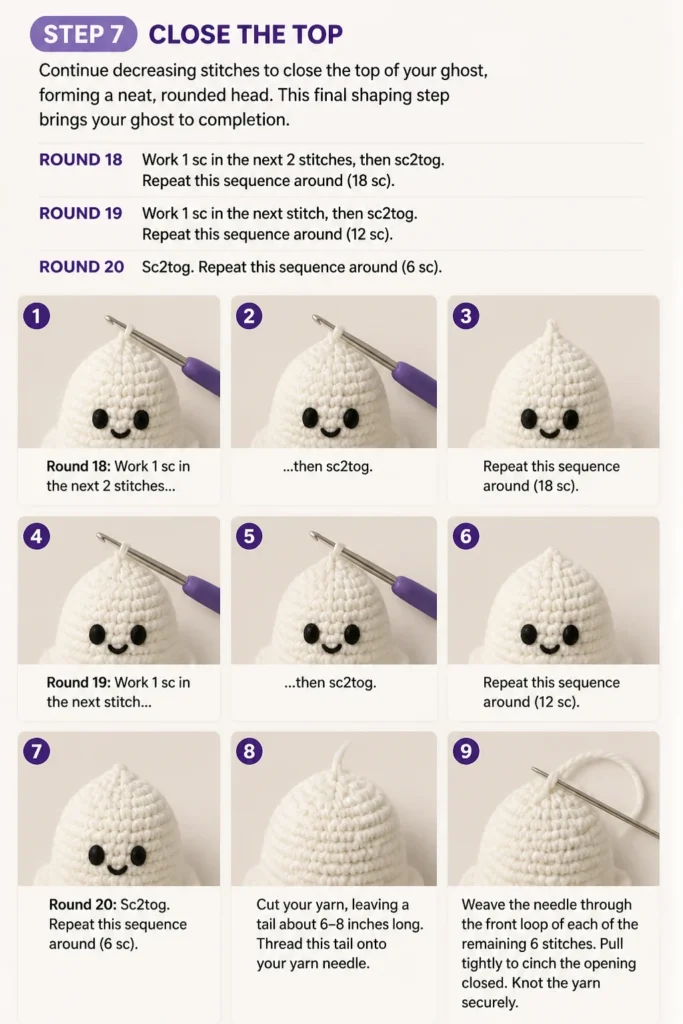
This final shaping step brings your ghost to completion.
- Round 18: Work 1 sc in the next 2 stitches, then sc2tog. Repeat this sequence around (18 sc).
- Round 19: Work 1 sc in the next stitch, then sc2tog. Repeat this sequence around (12 sc).
- Round 20: Sc2tog. Repeat this sequence around (6 sc).
- Cut your yarn, leaving a tail about 6-8 inches long.
- Thread this tail onto your yarn needle.
- Weave the needle through the front loop of each of the remaining 6 stitches.
- Pull tightly to cinch the opening closed. Knot the yarn securely.
Step 8: Create the Flowing Skirt
To give your ghost a more classic, ethereal look, you can add a simple chain loop skirt around its base.
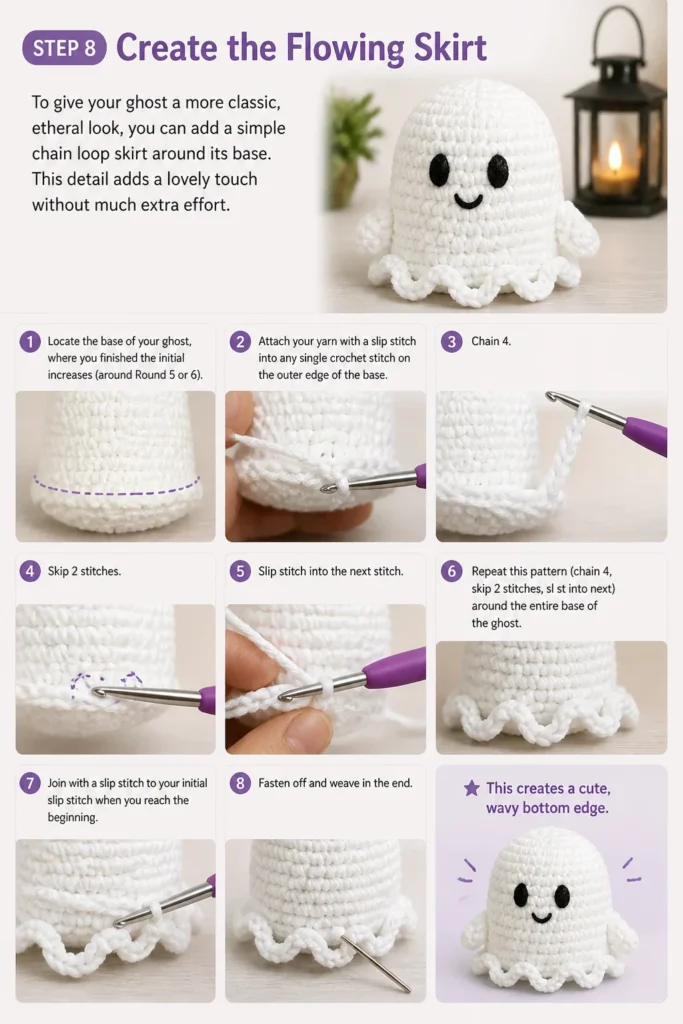
This detail adds a lovely touch without much extra effort.
- Locate the base of your ghost, where you finished the initial increases (around Round 5 or 6).
- Attach your yarn with a slip stitch into any single crochet stitch on the outer edge of the base.
- Chain 4, then skip 2 stitches and slip stitch into the next stitch.
- Repeat this pattern (chain 4, skip 2 stitches, sl st into next) around the entire base of the ghost.
- Join with a slip stitch to your initial slip stitch when you reach the beginning.
- Fasten off and weave in the end. This creates a cute, wavy bottom edge.
Step 9: Finish and Weave In
The final touches ensure your ghost looks neat and professional.
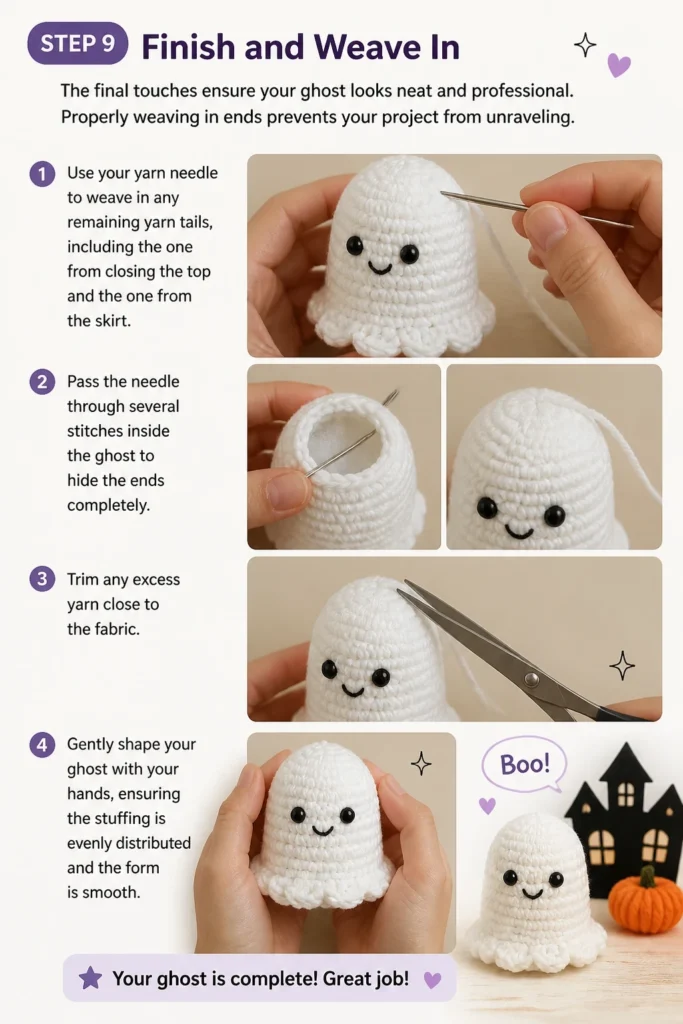
Properly weaving in ends prevents your project from unraveling.
- Use your yarn needle to weave in any remaining yarn tails, including the one from closing the top and the one from the skirt.
- Pass the needle through several stitches inside the ghost to hide the ends completely.
- Trim any excess yarn close to the fabric.
- Gently shape your ghost with your hands, ensuring the stuffing is evenly distributed and the form is smooth.
Common Mistakes to Avoid
Too Tight or Too Loose Stitches
Consistent tension is vital in amigurumi. If your stitches are too tight, your hands will ache, and the fabric will be stiff and difficult to work through.
If your stitches are too loose, the stuffing might show through the gaps, and the ghost will lose its firm shape.
Practice maintaining an even tension by relaxing your grip and adjusting your hook size if necessary.
Forgetting to Count Stitches
Missing a stitch count can lead to a lopsided or uneven ghost.
Always count your stitches at the end of each round, especially during increase and decrease rounds.
A stitch marker at the beginning of each round is your best friend for staying on track.
Stuffing Too Much or Too Little
The amount of stuffing directly impacts your ghost’s final appearance. Too little stuffing makes your ghost floppy and deflated, lacking definition.
Too much stuffing can distort the shape, stretch your stitches, and create an uneven, lumpy surface.
Aim for firm but gentle stuffing, ensuring all areas are filled evenly without over-stretching the fabric.
Incorrect Eye Placement
The placement of eyes gives your ghost its personality. Placing them too close, too far apart, or at different heights can make your ghost look awkward.
Always pin safety eyes in place first and stand back to assess the look before securing them.
Adjust until you are happy with the expression, then attach the backings firmly.
Troubleshooting
My Magic Ring Won’t Close
This is a common issue for beginners. Ensure you are pulling the correct yarn tail—there are two after working your stitches.
One is the working yarn, and the other is the tail that closes the ring. Gently tug on both to identify the correct one.
Also, make sure you’ve worked your initial single crochets into the ring, not around the chain you used to secure it.
My Ghost Looks Lopsided
A lopsided ghost often points to inconsistent stitch counts or uneven tension.
Double-check your stitch count after each round, especially during the increase and decrease sections.
If your tension varies, try practicing a few rows of single crochet to find a comfortable rhythm before restarting the ghost.
My Yarn Keeps Splitting
Yarn splitting can be frustrating and make your stitches look messy. This often happens with certain yarn types or if your hook has a very pointed tip.
Try using a hook with a slightly blunter tip, or experiment with a different brand of yarn that has a tighter ply.
Also, ensure you are inserting your hook completely under both loops of the stitch, not just piercing the yarn itself.
Key Takeaways
- The magic ring is a fundamental stitch for amigurumi, creating a seamless start.
- Consistent stitch counting and tension are crucial for achieving a well-shaped crochet ghost.
- Stuffing correctly gives your ghost its final form and prevents it from looking saggy or lumpy.
- Don’t be afraid to unravel and redo sections if they don’t look right; practice improves your skill.
- Adding facial features is best done before the opening becomes too small to access comfortably.
- Weaving in ends neatly provides a polished, professional finish to your handmade ghost.
Frequently Asked Questions
What kind of yarn is best for a ghost?
Worsted weight (medium/aran) acrylic yarn is highly recommended for crocheting ghosts. It is affordable, widely available, comes in many colors, and is easy for beginners to work with.
Its slight stretch also helps in creating a smooth, even fabric for amigurumi.
Can I make a bigger or smaller ghost?
Absolutely! To make a bigger ghost, use a thicker yarn (like bulky weight) and a larger crochet hook. For a smaller ghost, opt for a thinner yarn (like sport or fingering weight) and a smaller hook.
Remember that changing yarn and hook size will alter the final dimensions and stuffing requirements.
How do I make the ghost stand up?
For a ghost to stand upright, firm and even stuffing is essential, especially in the base. Ensure you pack the bottom of the ghost well to create a stable, flat foundation.
Some crocheters also insert a small, flat piece of cardboard or plastic into the base before the final stuffing for extra stability.
Can children help with this project?
Yes, older children or those with some fine motor skills can definitely participate. They might enjoy helping with the initial chain stitches, stuffing the ghost, or even picking out the safety eyes.
Always supervise younger children, especially when using sharp needles or small safety eyes.
Our Top Recommended Finds
- Ergonomic Crochet Hook Set: A set with comfortable handles can significantly reduce hand fatigue, especially during longer crafting sessions.
- Premium Acrylic Yarn Pack: Look for a pack with multiple shades of white or off-white. High-quality acrylic yarn is soft, durable, and easy to work with for beginners.
- Amigurumi Fiberfill Stuffing: Opt for a brand specifically designed for amigurumi or toy stuffing. It provides an even, resilient fill that holds its shape well.
Your Ghostly Creation Awaits!
You’ve just brought a charming, handmade ghost into existence, stitch by delightful stitch.
This project is more than just a craft; it’s a testament to your growing skills and creativity.
Now that you’ve mastered the ghost, why not try crocheting a little pumpkin, a friendly bat, or even a tiny spider?
Keep exploring the wonderful world of crochet, and let your imagination guide your next creation.