How To Make Floating Candles
There’s a special magic in seeing a candle’s soft glow dance on water. I remember making my first batch for a garden party, and the compliments flowed as freely as the water in the bowls. Crafting these beautiful, serene lights is simpler than you might imagine, and I’m excited to share my tried-and-true method with you. This guide will walk you through every step, ensuring your homemade floating candles are a radiant success.
Quick Overview
Making floating candles is a rewarding craft that adds a unique ambiance to any setting. You’ll melt wax, prepare wicks, and pour your creations into molds designed to float gracefully. This project will leave you with custom candles perfect for centerpieces, baths, or outdoor decor.
- Time needed: 1-2 hours (plus cooling time)
- Difficulty: Beginner
- What you’ll need: Wax, wicks, heat-safe pouring pot, double boiler, thermometer, molds, fragrance oil (optional), dye (optional).
Step-by-Step Instructions
Step 1: Gather Your Materials
Before you begin, ensure you have all your supplies ready and organized. Having everything within reach makes the process smooth and enjoyable. This preparation saves time and prevents frantic searching later.
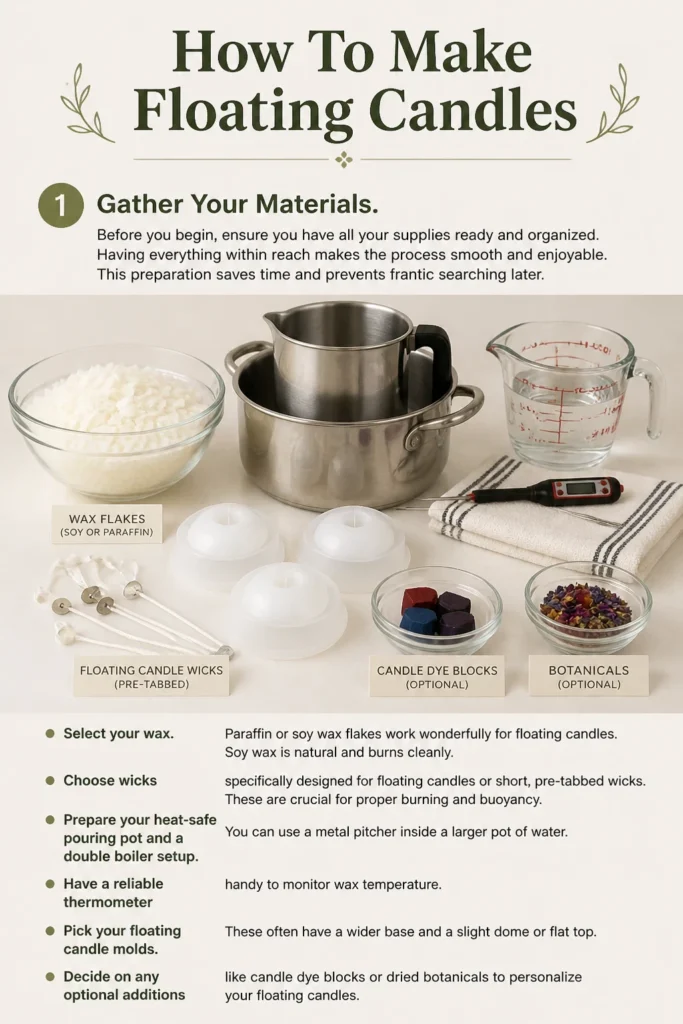
- Select your wax. Paraffin or soy wax flakes work wonderfully for floating candles. Soy wax is natural and burns cleanly.
- Choose wicks specifically designed for floating candles or short, pre-tabbed wicks. These are crucial for proper burning and buoyancy.
- Prepare your heat-safe pouring pot and a double boiler setup. You can use a metal pitcher inside a larger pot of water.
- Have a reliable thermometer handy to monitor wax temperature.
- Pick your floating candle molds. These often have a wider base and a slight dome or flat top.
- Decide on any optional additions like candle dye blocks or liquid fragrance oils.
Step 2: Set Up Your Workspace
A clean and protected workspace is essential for candle making. Wax can be messy, so take precautions to keep your area tidy. Lay down newspaper or old towels to catch any spills.
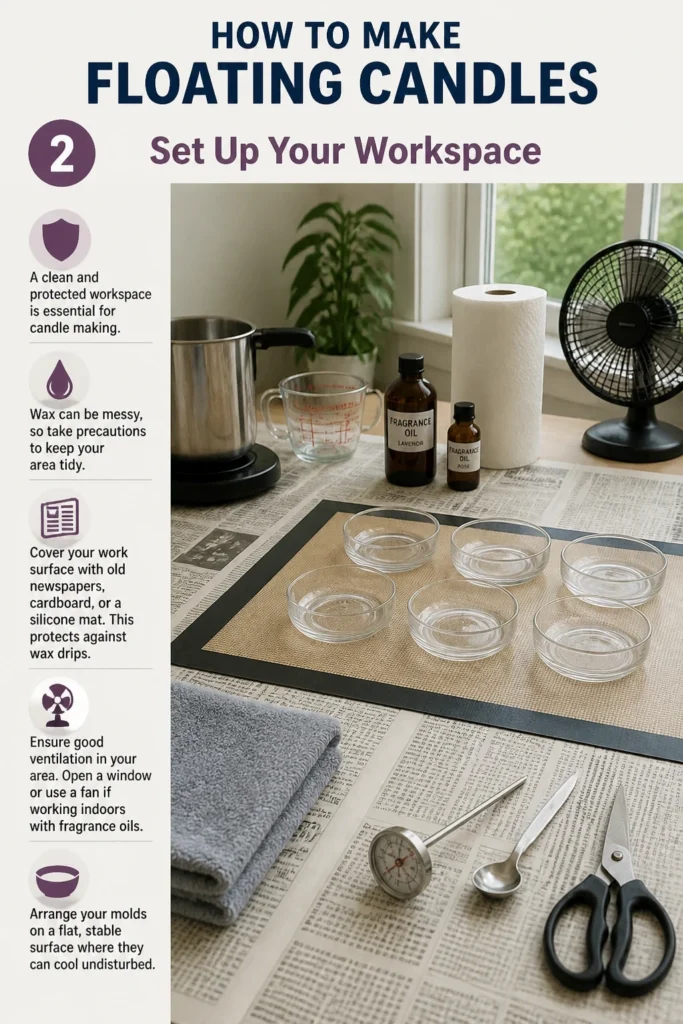
- Cover your work surface with old newspapers, cardboard, or a silicone mat. This protects against wax drips.
- Ensure good ventilation in your area. Open a window or use a fan if working indoors with fragrance oils.
- Arrange your molds on a flat, stable surface where they can cool undisturbed.
Step 3: Melt the Wax
Melting wax correctly is key to a smooth, even candle. Always use a double boiler method to prevent wax from overheating or catching fire. Patience is important here.
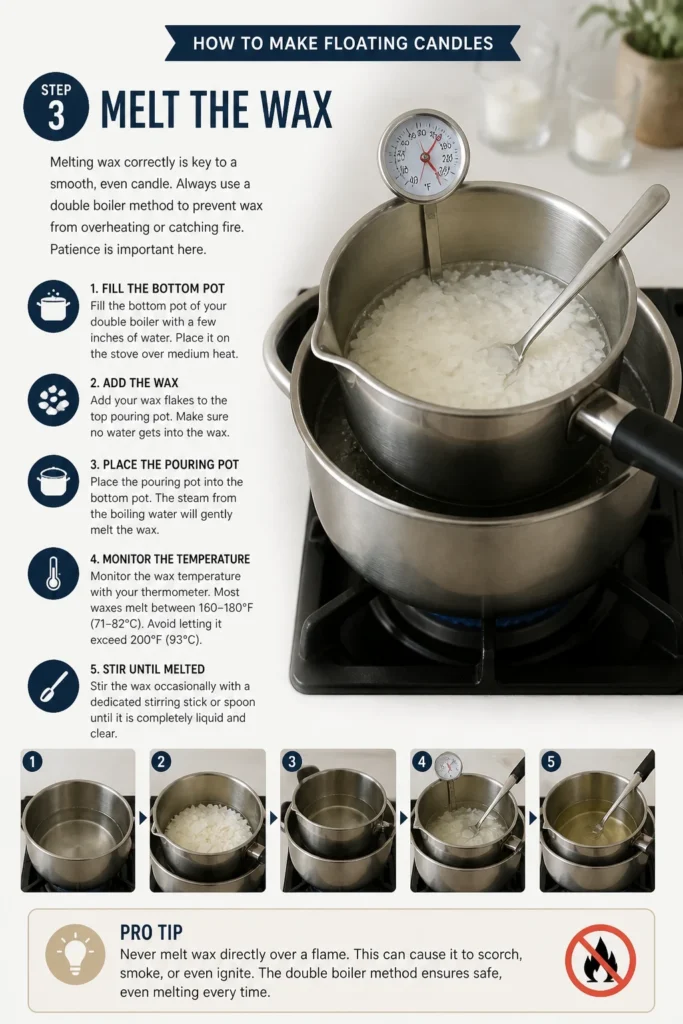
- Fill the bottom pot of your double boiler with a few inches of water. Place it on the stove over medium heat.
- Add your wax flakes to the top pouring pot. Make sure no water gets into the wax.
- Place the pouring pot into the bottom pot. The steam from the boiling water will gently melt the wax.
- Monitor the wax temperature with your thermometer. Most waxes melt between 160-180F (71-82C). Avoid letting it exceed 200F (93C).
- Stir the wax occasionally with a dedicated stirring stick or spoon until it is completely liquid and clear.
Pro Tip: Never melt wax directly over a flame. This can cause it to scorch, smoke, or even ignite. The double boiler method provides gentle, even heat.
Step 4: Add Dye and Fragrance (Optional)
This is where you infuse your candles with color and scent, if desired. Adding these at the right temperature ensures they blend properly. Personalize your floating candles to match any occasion or mood.
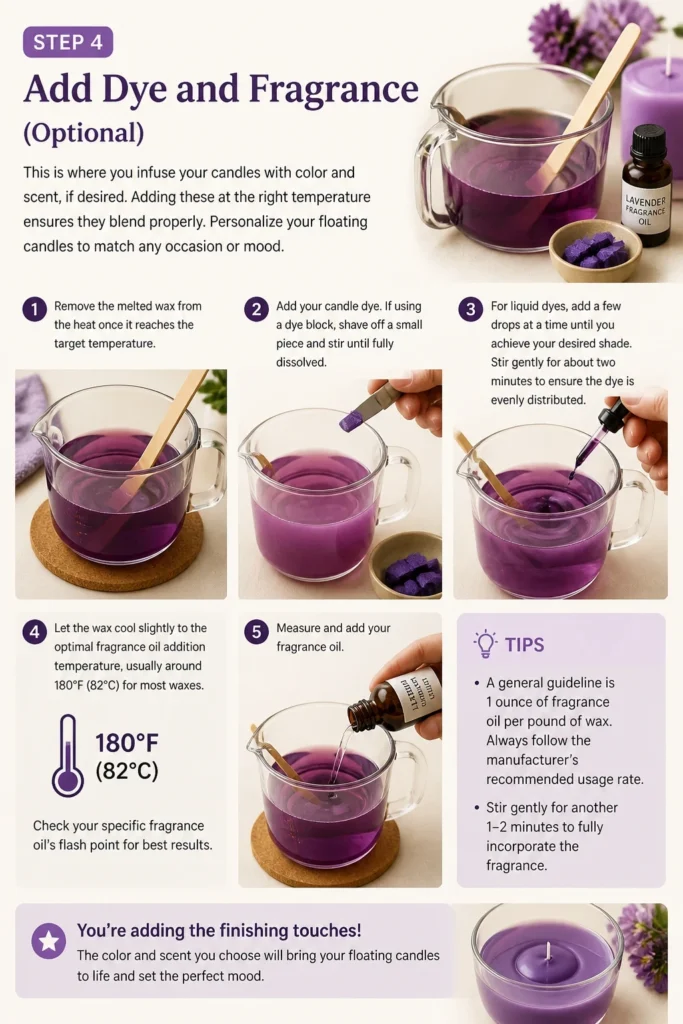
- Remove the melted wax from the heat once it reaches the target temperature.
- Add your candle dye. If using a dye block, shave off a small piece and stir until fully dissolved. For liquid dyes, add a few drops at a time until you achieve your desired shade.
- Stir gently for about two minutes to ensure the dye is evenly distributed.
- Let the wax cool slightly to the optimal fragrance oil addition temperature, usually around 180F (82C) for most waxes. Check your specific fragrance oil’s flash point for best results.
- Measure and add your fragrance oil. A general guideline is 1 ounce of fragrance oil per pound of wax.
- Stir the fragrance oil into the wax for another two minutes. This ensures the scent binds properly with the wax.
Step 5: Prepare Your Molds and Wicks
Proper wick placement is critical for a well-burning floating candle. Floating wicks are designed to be short, which helps with stability and buoyancy. Ensure they are centered and secure.
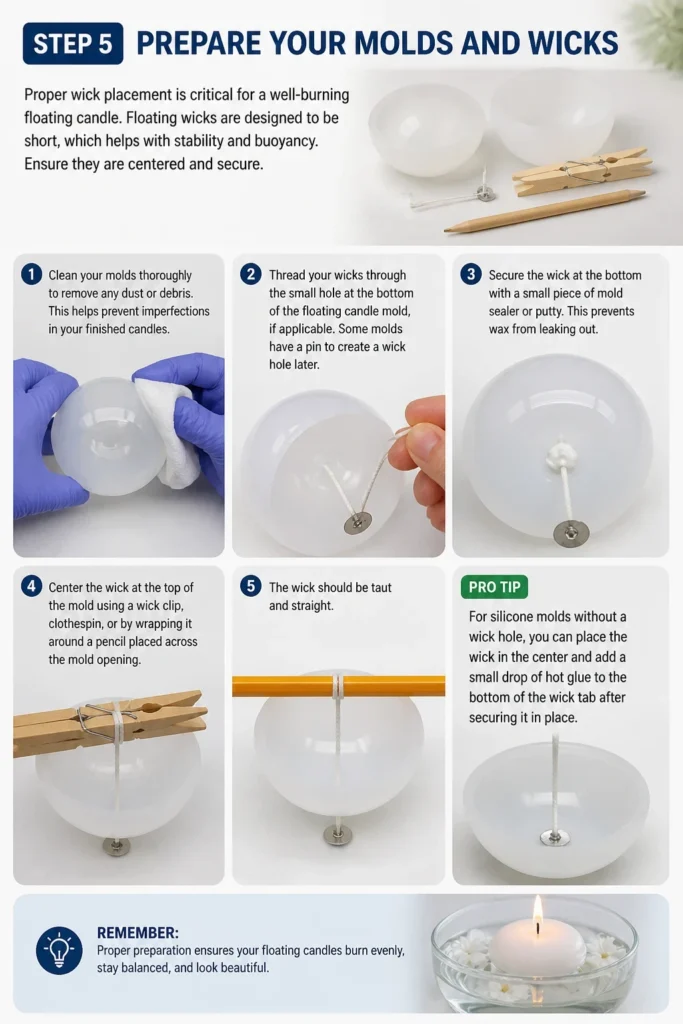
- Clean your molds thoroughly to remove any dust or debris. This helps prevent imperfections in your finished candles.
- Thread your wicks through the small hole at the bottom of the floating candle mold, if applicable. Some molds have a pin to create a wick hole later.
- Secure the wick at the bottom with a small piece of mold sealer or putty. This prevents wax from leaking out.
- Center the wick at the top of the mold using a wick clip, clothespin, or by wrapping it around a pencil placed across the mold opening. The wick should be taut and straight.
Pro Tip: For silicone molds without a wick hole, you can place a pre-tabbed wick directly into the bottom center of the mold before pouring. The tab will hold it in place.
Step 6: Pour the Wax
Pouring wax at the correct temperature prevents issues like sinkholes or cracking. A slow, steady pour yields the best results. Be careful not to disturb your wicks.
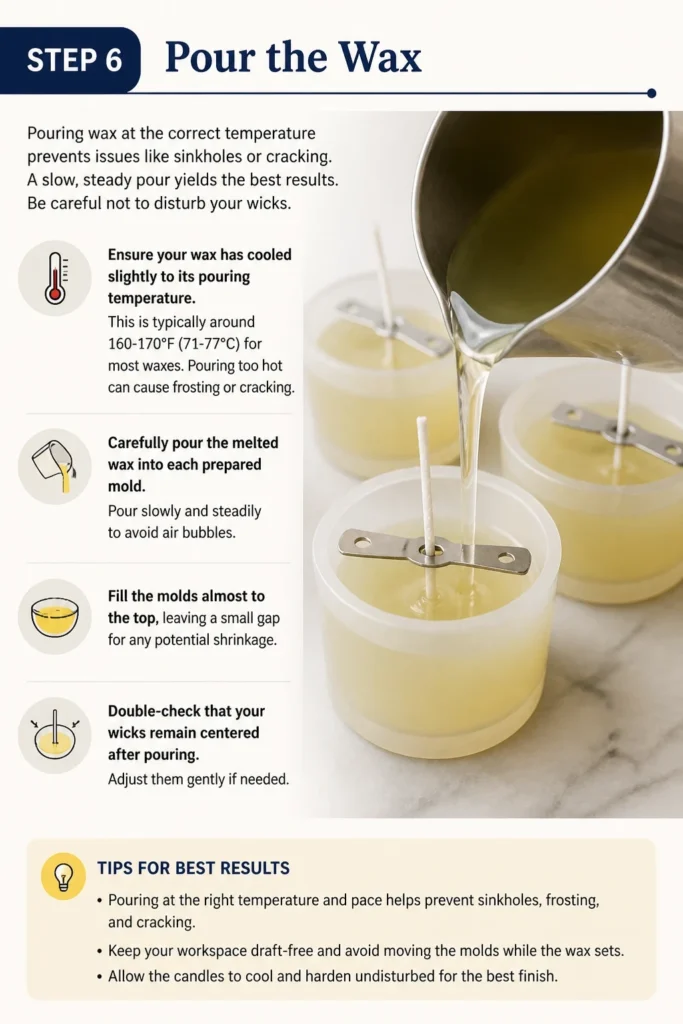
- Ensure your wax has cooled slightly to its pouring temperature. This is typically around 160-170F (71-77C) for most waxes. Pouring too hot can cause frosting or cracking.
- Carefully pour the melted wax into each prepared mold. Pour slowly and steadily to avoid air bubbles.
- Fill the molds almost to the top, leaving a small gap for any potential shrinkage.
- Double-check that your wicks remain centered after pouring. Adjust them gently if needed.
Step 7: Allow Candles to Cool and Cure
Cooling and curing are crucial steps that require patience. Rushing this process can lead to brittle candles or poor scent throw. Let your candles set completely.
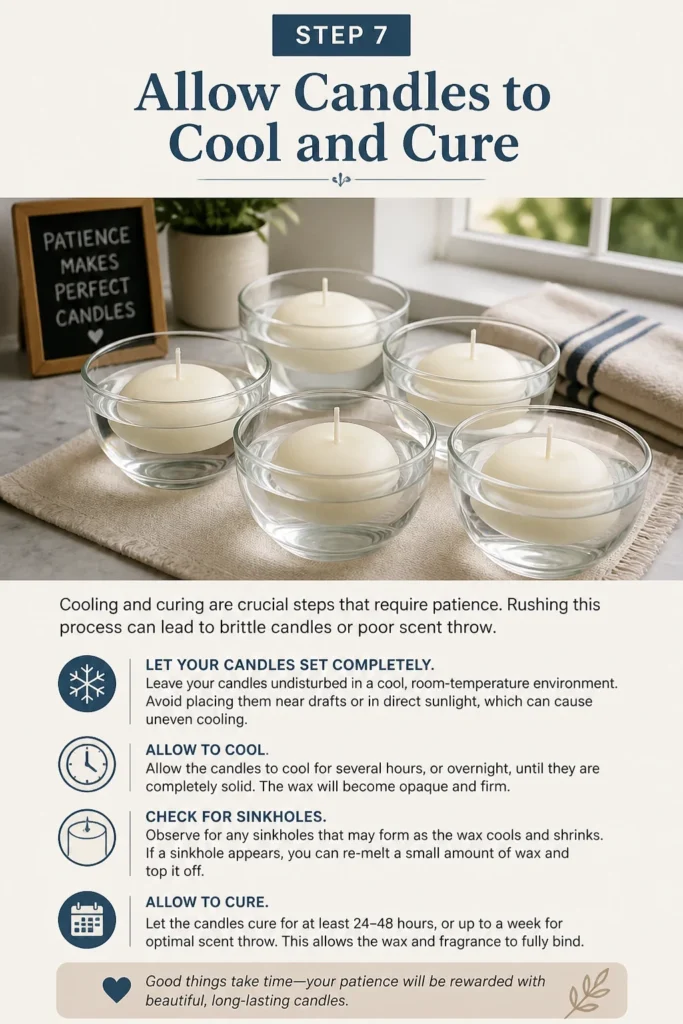
- Leave your candles undisturbed in a cool, room-temperature environment. Avoid placing them near drafts or in direct sunlight, which can cause uneven cooling.
- Allow the candles to cool for several hours, or overnight, until they are completely solid. The wax will become opaque and firm.
- Observe for any sinkholes that may form as the wax cools and shrinks. If a sinkhole appears, you can re-melt a small amount of wax and top it off.
- Let the candles cure for at least 24-48 hours, or up to a week for optimal scent throw. This allows the wax and fragrance to fully bind.
Step 8: Demold and Trim Wicks
Once your candles are fully cooled and cured, it’s time to release them from their molds. This reveals your beautiful creations. Proper wick trimming ensures a clean and safe burn.
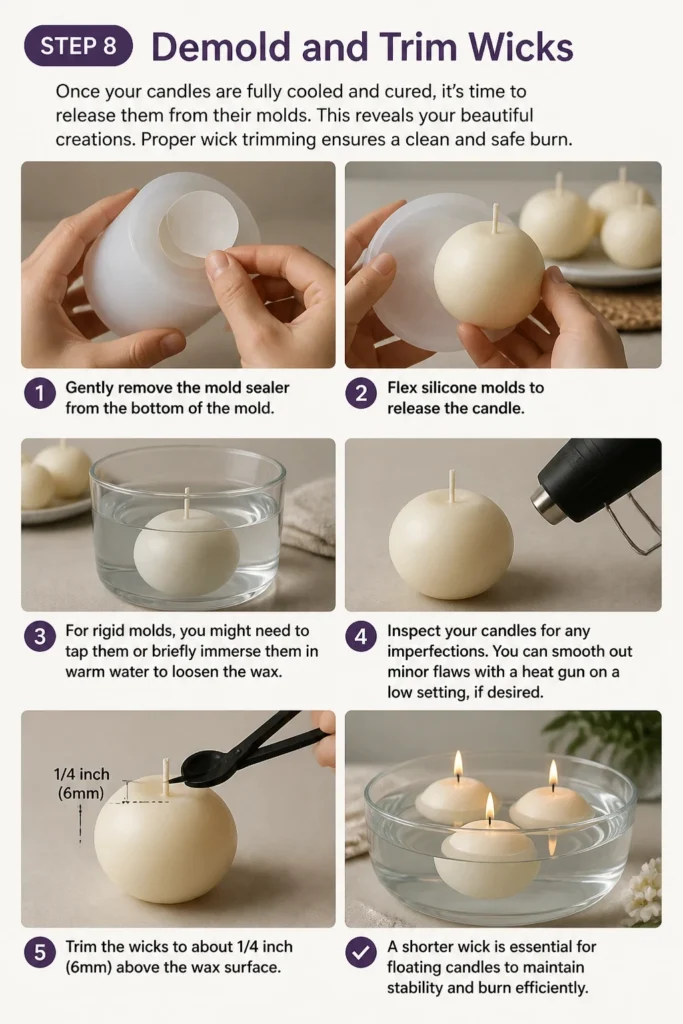
- Gently remove the mold sealer from the bottom of the mold.
- Flex silicone molds to release the candle. For rigid molds, you might need to tap them or briefly immerse them in warm water to loosen the wax.
- Inspect your candles for any imperfections. You can smooth out minor flaws with a heat gun on a low setting, if desired.
- Trim the wicks to about 1/4 inch (6mm) above the wax surface. A shorter wick is essential for floating candles to maintain stability and burn efficiently.
Common Mistakes to Avoid
Pouring Wax Too Hot
Pouring wax at an excessively high temperature can lead to several problems. It increases the likelihood of frosting, which appears as white patches on the candle surface, especially with soy wax. It can also cause the candle to crack as it cools unevenly, and the fragrance oil might burn off, resulting in a weak scent. Always allow your wax to cool to the recommended pouring temperature, typically between 160-170F (71-77C), before adding fragrance and pouring.
Incorrect Wick Size or Type
Using a wick that is too long, too thick, or not designed for floating candles will cause issues. A wick that is too long or thick will create a large flame, potentially making the candle unstable on water or burning too quickly. A standard wick might also absorb too much water if it gets wet, causing it to extinguish. Always use short, pre-tabbed wicks or wicks specifically made for floating candles to ensure proper buoyancy and a clean, safe burn.
Not Centering Wicks Properly
A wick that is off-center will cause the candle to burn unevenly. This leads to tunneling, where the wax melts down the middle leaving a thick rim of unburnt wax around the edges. It can also make the candle unstable and potentially tip over when floating. Always secure your wick straight and centered in the mold before pouring and check it again after pouring to make any necessary adjustments.
Rushing the Cooling Process
Trying to speed up cooling by placing candles in a refrigerator or freezer can cause the wax to cool too rapidly and unevenly. This often results in cracking, sinkholes, and poor adhesion to the mold. It can also affect the candle’s structural integrity. Allow your candles to cool slowly and naturally at room temperature for the best results, ensuring a smooth finish and strong structure.
Troubleshooting
Candle Sinks or Tips Over
If your floating candle doesn’t float properly or tips to one side, it’s usually a weight distribution issue. This could be due to an overly heavy mold design, too much dye or fragrance oil affecting wax density, or an uneven pour. Ensure your molds are specifically designed for floating and that your wax choice (like soy or paraffin) is inherently lighter. Try to use minimal additives to maintain buoyancy.
Wick Won’t Stay Lit
A wick that struggles to stay lit often indicates it’s either too short, too thin for the wax type, or has absorbed moisture. Make sure your trimmed wick is at least 1/4 inch long. If using a pre-tabbed wick, ensure the tab is fully embedded in the wax. If the wick gets wet, it will have trouble burning; ensure the candle is dry before lighting.
Candle Has Sinkholes or Cracks
Sinkholes and cracks typically occur when the wax cools too quickly or unevenly. This can also happen if the pouring temperature was too high. To fix sinkholes, gently re-melt a small amount of leftover wax and pour it into the depression, allowing it to cool slowly. To prevent future issues, ensure your pouring temperature is correct and let candles cool at a consistent room temperature, away from drafts.
Key Takeaways
- Always use a double boiler to safely melt wax.
- Choose wicks specifically designed for floating candles or trim standard wicks very short.
- Monitor wax temperature carefully for optimal dye and fragrance incorporation and pouring.
- Ensure wicks are perfectly centered for an even burn.
- Allow candles to cool and cure completely at room temperature for best results.
- Trim wicks to 1/4 inch before lighting for a stable flame.
Frequently Asked Questions
What kind of wax is best for floating candles?
Soy wax and paraffin wax are both excellent choices for floating candles. Soy wax is natural, burns cleanly, and is generally lighter, which aids in buoyancy. Paraffin wax is also widely used, provides a good scent throw, and holds its shape well. Experiment to see which you prefer.
How do I make sure my candle floats upright?
The key to a candle floating upright is its design and wick placement. Use molds with a wider base and a lower profile. Ensure your wick is perfectly centered and trimmed short, around 1/4 inch. The wax itself should be a lighter type, and avoid adding too many heavy embellishments that could shift its center of gravity.
Can I use essential oils instead of fragrance oils?
While you can technically use essential oils, they are not typically recommended for candle making. Essential oils are volatile and tend to burn off quickly, resulting in a very weak or non-existent scent throw when the candle burns. Fragrance oils are specifically formulated to bind with wax and withstand the heat of a burning candle, providing a much stronger and lasting aroma.
How long do homemade floating candles burn?
The burn time of a homemade floating candle depends on its size, the type of wax used, and wick size. Generally, a small floating candle (2-3 inches in diameter) will burn for 3-6 hours. Larger ones might burn longer. Always ensure the wick is trimmed to 1/4 inch for an efficient burn.
Our Top Recommended Finds
- Soy Wax Flakes: A versatile and eco-friendly choice, perfect for easy melting and clean burning.
- Floating Candle Molds: Essential for achieving that perfect buoyant shape, often made of durable silicone.
- Candle Pouring Pot with Thermometer: Simplifies the wax melting and temperature monitoring process, a must-have for beginners.
Light Up Your World with Handmade Glow
Creating your own floating candles is a wonderfully meditative and rewarding experience. Each candle you craft carries a piece of your personal touch, ready to bring warmth and beauty to your home or special events. Now that you have all the steps and tips, you’re perfectly equipped to start your own candle-making journey.
Don’t just dream of beautiful, shimmering lights; make them a reality today. Gather your materials, set aside some time, and let your creativity flow. You’ll soon be enjoying the gentle flicker of your very own handmade floating candles, adding a serene elegance to any moment.