How To Sew A Cape
Learning to sew a cape opens up a world of creative possibilities.
I remember the satisfaction of finishing my first one, realizing how simple the process could be with the right guidance.
This guide will walk you through each stitch, building your confidence as you create your own stunning garment.
Quick Overview
You’re about to embark on a rewarding journey, creating a versatile cape perfect for costumes, fashion, or cozy comfort. This project will teach you fundamental sewing techniques applicable to many future endeavors.
- Time needed: 6-10 hours (depending on fabric and embellishments)
- Difficulty: Beginner to Intermediate
- What you’ll need: Fabric, sewing machine, thread, scissors, pins, measuring tape, iron, cape pattern.
Step-by-Step Instructions
Step 1: Gather Your Materials and Prepare Your Workspace
Before you begin, ensure you have all necessary tools and supplies. A tidy workspace makes the sewing process much smoother and more enjoyable.
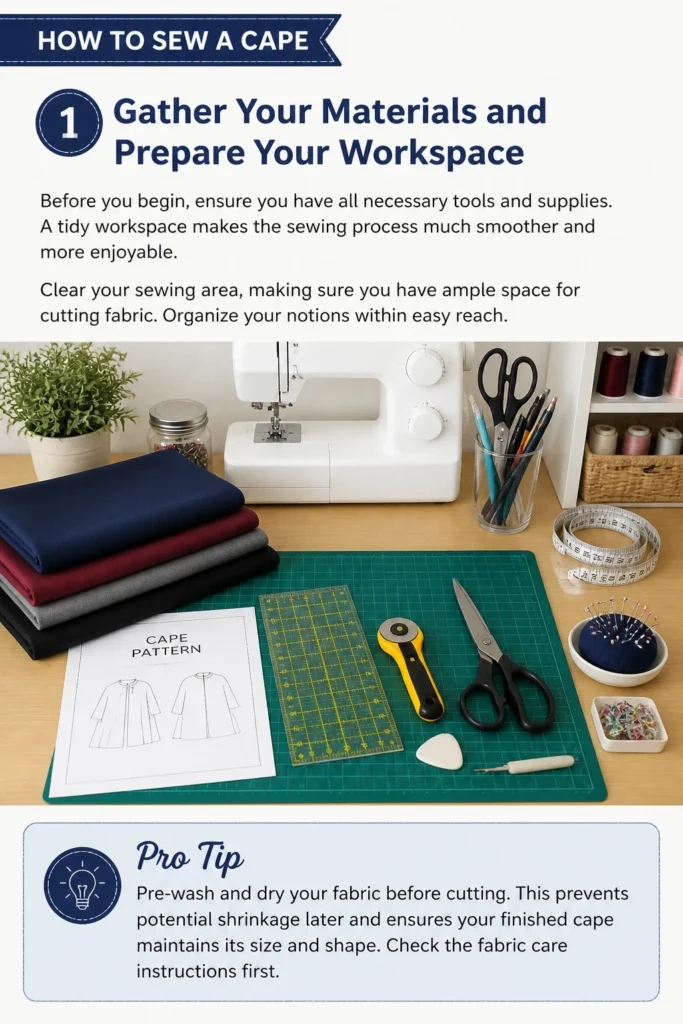
Clear your sewing area, making sure you have ample space for cutting fabric. Organize your notions within easy reach.
Pro Tip: Pre-wash and dry your fabric before cutting. This prevents potential shrinkage later and ensures your finished cape maintains its size and shape. Check the fabric care instructions first.
Step 2: Choose and Prepare Your Pattern
Selecting the right pattern is crucial for your cape project. Many free and paid patterns are available online, ranging from simple half-circle designs to more complex hooded capes.
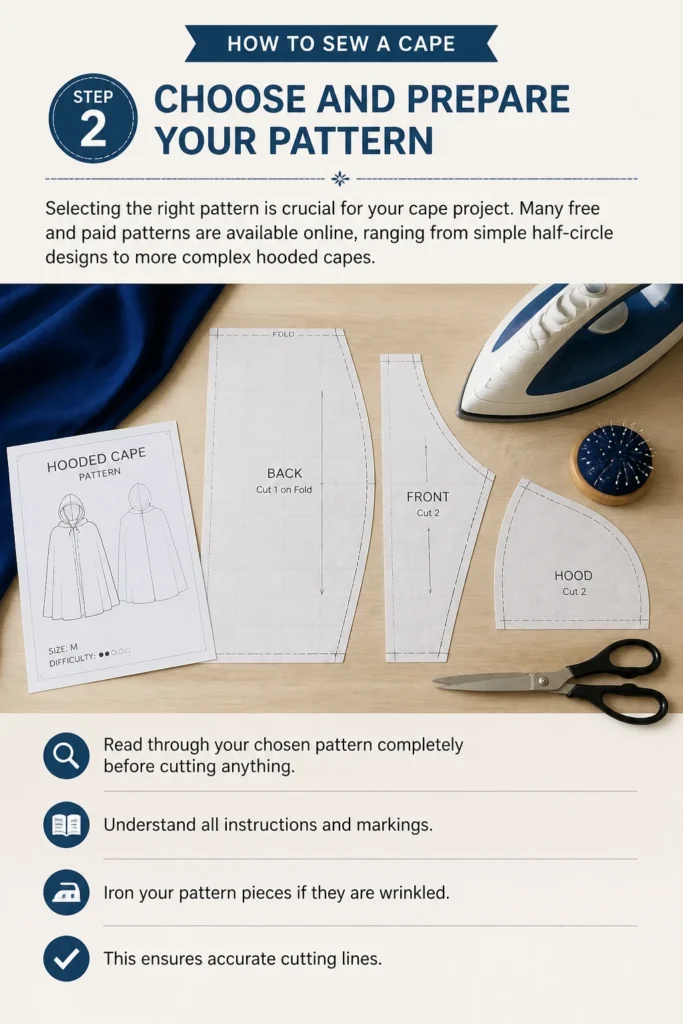
Read through your chosen pattern completely before cutting anything. Understand all instructions and markings.
Iron your pattern pieces if they are wrinkled. This ensures accurate cutting lines.
Step 3: Lay Out and Cut Your Fabric
Accuracy in cutting translates directly to a well-fitting cape. Take your time with this step to avoid frustration later.
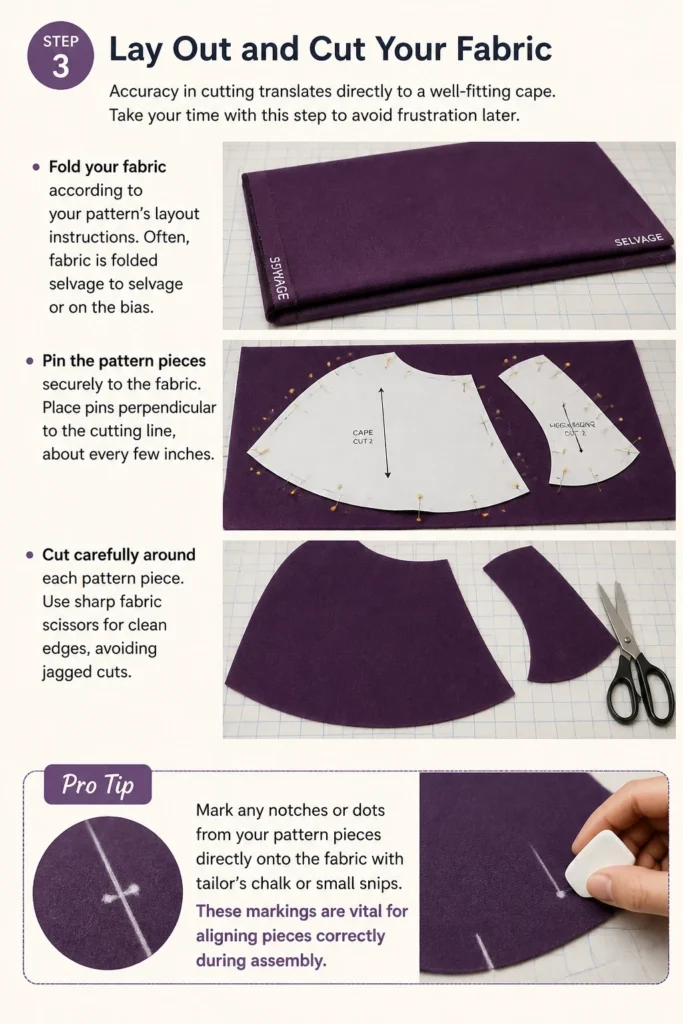
Fold your fabric according to your pattern’s layout instructions. Often, fabric is folded selvage to selvage or on the bias.
Pin the pattern pieces securely to the fabric. Place pins perpendicular to the cutting line, about every few inches.
Cut carefully around each pattern piece. Use sharp fabric scissors for clean edges, avoiding jagged cuts.
Pro Tip: Mark any notches or dots from your pattern pieces directly onto the fabric with tailor’s chalk or small snips. These markings are vital for aligning pieces correctly during assembly.
Step 4: Prepare Your Cape Pieces for Sewing
Before stitching, some preparation steps ensure a professional finish. This often involves finishing raw edges or adding interfacing.
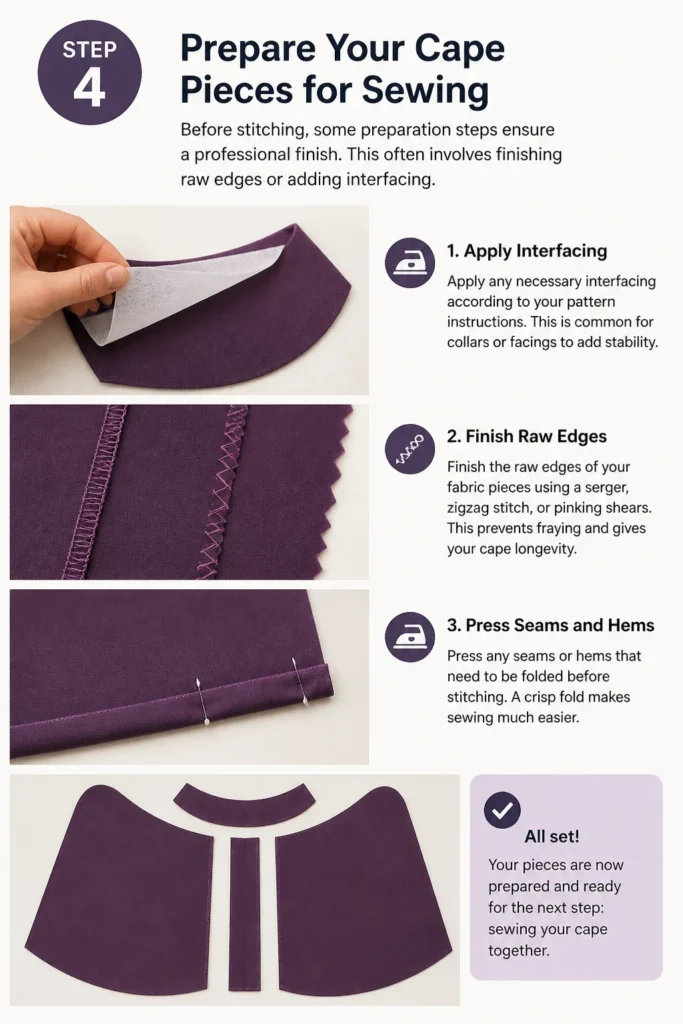
Apply any necessary interfacing according to your pattern instructions. This is common for collars or facings to add stability.
Finish the raw edges of your fabric pieces using a serger, zigzag stitch, or pinking shears. This prevents fraying and gives your cape longevity.
Press any seams or hems that need to be folded before stitching. A crisp fold makes sewing much easier.
Step 5: Assemble the Main Cape Body
This is where your cape starts to take shape. Most capes involve sewing a main body, which might be one large piece or several panels joined together.
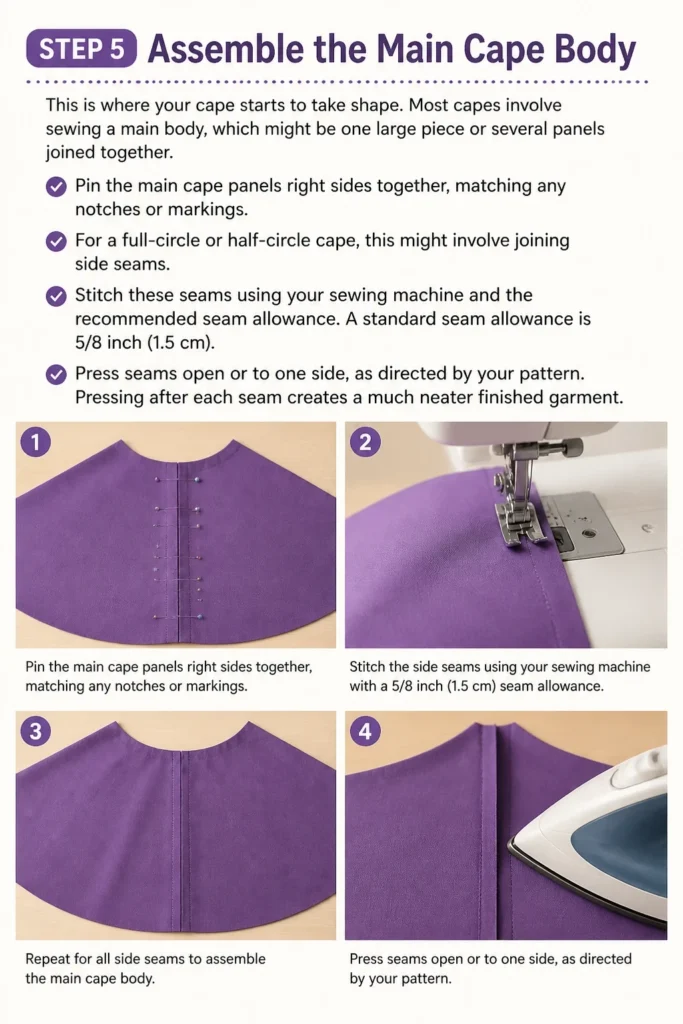
Pin the main cape panels right sides together, matching any notches or markings. For a full-circle or half-circle cape, this might involve joining side seams.
Stitch these seams using your sewing machine and the recommended seam allowance. A standard seam allowance is 5/8 inch (1.5 cm).
Press seams open or to one side, as directed by your pattern. Pressing after each seam creates a much neater finished garment.
Step 6: Attach the Neckline Facing or Collar
The neckline is a focal point and needs a clean finish. Many capes feature a facing or a collar to achieve this.
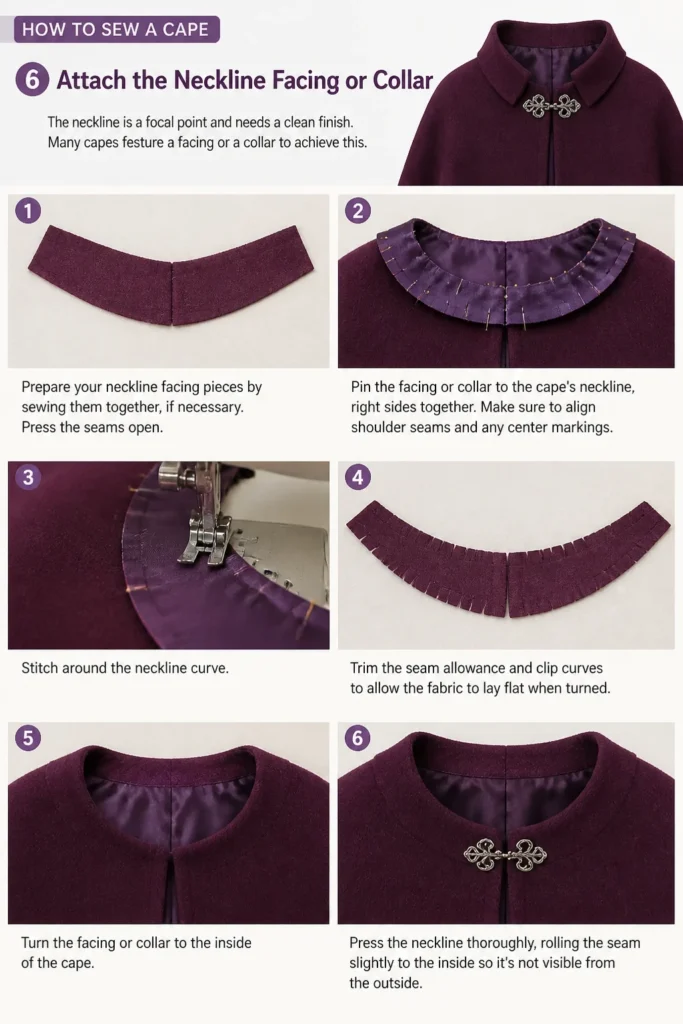
Prepare your neckline facing pieces by sewing them together, if necessary. Press the seams open.
Pin the facing or collar to the cape’s neckline, right sides together. Make sure to align shoulder seams and any center markings.
Stitch around the neckline curve. Trim the seam allowance and clip curves to allow the fabric to lay flat when turned.
Turn the facing or collar to the inside of the cape. Press the neckline thoroughly, rolling the seam slightly to the inside so it’s not visible from the outside.
Step 7: Hem the Cape
A neat hem gives your cape a polished and professional look. The type of fabric might influence your hemming method.
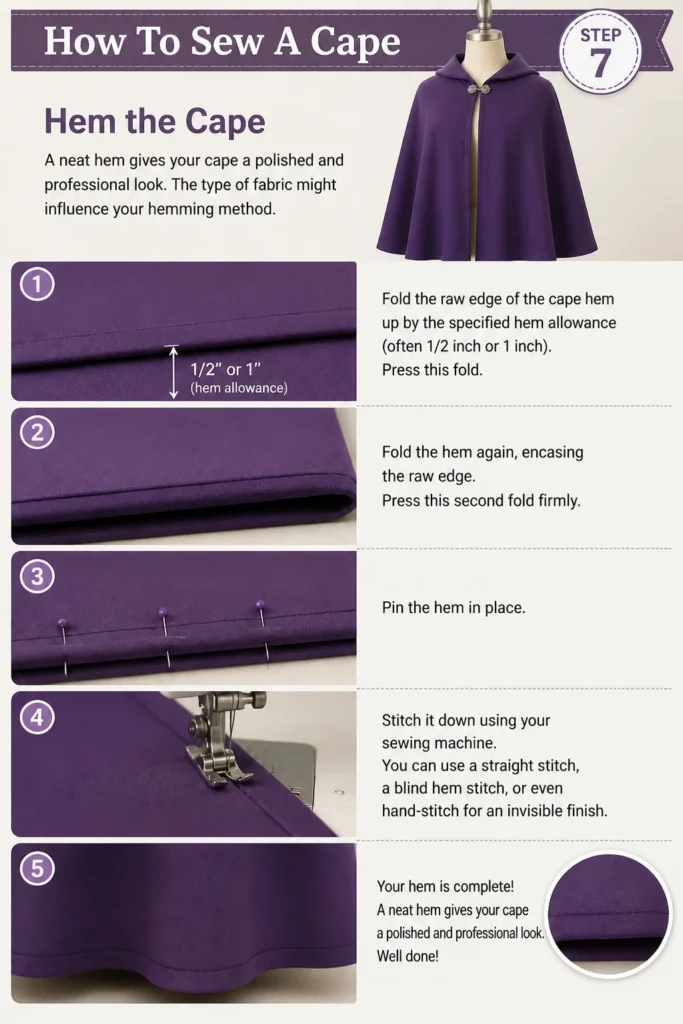
Fold the raw edge of the cape hem up by the specified hem allowance (often 1/2 inch or 1 inch). Press this fold.
Fold the hem again, encasing the raw edge. Press this second fold firmly.
Pin the hem in place, then stitch it down using your sewing machine. You can use a straight stitch, a blind hem stitch, or even hand-stitch for an invisible finish.
Step 8: Add Closures and Embellishments
The final touches bring your cape to life. This step is where you can truly personalize your creation.
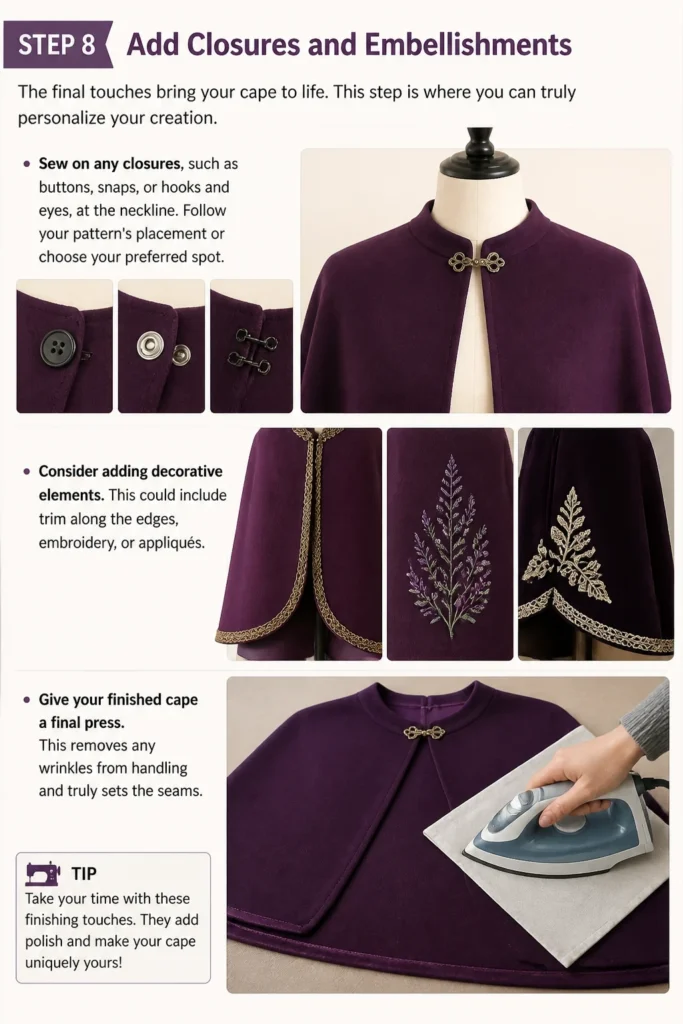
Sew on any closures, such as buttons, snaps, or hooks and eyes, at the neckline. Follow your pattern’s placement or choose your preferred spot.
Consider adding decorative elements. This could include trim along the edges, embroidery, or appliqués.
Give your finished cape a final press. This removes any wrinkles from handling and truly sets the seams.
Common Mistakes to Avoid
Rushing the Cutting Phase
Many beginners hurry through cutting their fabric, leading to uneven pieces. This can cause the cape to hang improperly or make seams difficult to match. Always take your time, use sharp scissors, and pin thoroughly for precise cuts.
Skipping Pressing Steps
Pressing seams open or to one side after stitching is not optional; it’s essential for a professional finish. Neglecting to press creates bulky, lumpy seams that detract from the cape’s overall appearance. Pressing also helps fabric lay flat and eases the next sewing step.
Ignoring Seam Allowance
Each pattern specifies a seam allowance, typically 5/8 inch or 1/2 inch. Deviating from this measurement can alter the garment’s size and fit, especially at the neckline. Use your sewing machine’s guides or a seam gauge to maintain consistent seam allowances.
Poor Fabric Choice for the Project
Not all fabrics are suitable for every cape design. A heavy wool might be perfect for a winter cape, but too stiff for a flowing, lightweight costume piece. Always check your pattern’s fabric recommendations and consider the drape and weight needed for your desired look.
Troubleshooting
Uneven Hem
An uneven hem often results from inaccurate measuring or stretching the fabric while sewing. To fix this, carefully measure the desired hem length from the floor while wearing the cape (or having someone wear it). Mark the new hemline, trim excess fabric, and then re-hem slowly and evenly, being careful not to stretch the fabric.
Neckline Gapes or Doesn’t Lie Flat
This issue usually stems from not clipping the curves of the seam allowance adequately, or from an incorrect seam allowance. To correct it, unpick the neckline stitching. Before re-stitching, trim the seam allowance and make small, precise clips into the curve, almost to the stitch line, but not through it. This releases tension and allows the fabric to lay smoothly.
Seams Pucker
Puckered seams can be caused by incorrect thread tension, using the wrong needle size for your fabric, or stretching the fabric as you sew. First, check your machine’s tension settings and adjust if needed. Ensure your needle is sharp and appropriate for your fabric type. If the fabric is stretchy, try using a walking foot or reducing pressure on the presser foot to prevent stretching.
Key Takeaways
- Preparation is paramount: Always pre-wash fabric and carefully cut pattern pieces.
- Pressing is your best friend: Press every seam as you go for a professional finish.
- Read your pattern thoroughly: Understand all instructions before starting to stitch.
- Accuracy with seam allowance: Consistent seam allowances ensure your cape fits as intended.
- Don’t rush the details: Hems and closures contribute significantly to the overall quality.
- Personalize your cape: Embellishments make your creation uniquely yours.
Frequently Asked Questions
What is the best fabric for a beginner to sew a cape?
For beginners, medium-weight fabrics like broadcloth, cotton twill, or even a stable fleece are excellent choices. They are easy to cut, don’t slip much, and are forgiving with stitches. Avoid very slippery or stretchy fabrics until you gain more experience.
How much fabric do I need for a cape?
The amount of fabric needed depends entirely on the cape’s length, width, and design. Always refer to your chosen pattern’s fabric requirements. Patterns usually provide yardage estimates for different fabric widths and cape sizes.
Can I sew a cape without a sewing machine?
Yes, you can hand-sew a cape, but it will take considerably more time and patience. Use strong hand-sewing stitches like the backstitch for seams and a slip stitch for hems. A sewing machine offers speed and durability that hand-sewing cannot easily match for a garment of this size.
How do I make a cape reversible?
To make a cape reversible, you’ll need to cut all main cape pieces twice, once for each side, from two different fabrics. You then sew each cape separately, wrong sides together, leaving an opening. Turn it right side out, press, and hand-stitch the opening closed. This creates a fully lined cape with no exposed seams.
Our Top Recommended Finds
- Sharp Fabric Shears: A good pair of shears makes cutting fabric precise and prevents hand fatigue. Look for brands known for quality blades.
- Magnetic Seam Guide: This small tool attaches to your sewing machine and helps maintain a consistent seam allowance, a crucial factor for neat seams.
- Tailor’s Chalk or Fabric Marking Pen: Essential for transferring pattern markings, darts, and hemlines onto your fabric without leaving permanent traces.
Your Next Sewing Adventure Awaits
You’ve navigated the steps and created a beautiful cape, building valuable sewing skills along the way.
This project is just the beginning of what you can achieve with a needle and thread.
Consider trying a simple tunic, a skirt, or even a more complex coat next. Your creativity knows no bounds, so pick up some new fabric and start your next project today!