How To Make Eye Mask
I remember the first time I tried to sleep in a bright hotel room after a long day of travel.
The thin curtains let in every bit of street light, and I realized I desperately needed a way to shut out the world.
I have since spent years refining my sewing techniques to create the perfect, light-blocking eye mask that stays comfortable all night long.
Quick Overview
This project allows you to create a professional-grade sleep accessory using simple materials you likely already have at home.
- Time needed: 45 to 60 minutes
- Difficulty: Beginner
- What you’ll need: Soft fabric, elastic, batting or fleece, scissors, and a sewing machine or needle and thread.
Step 1: Select Your Fabric
Choose a fabric that feels gentle against your face, as the skin around your eyes is incredibly sensitive.
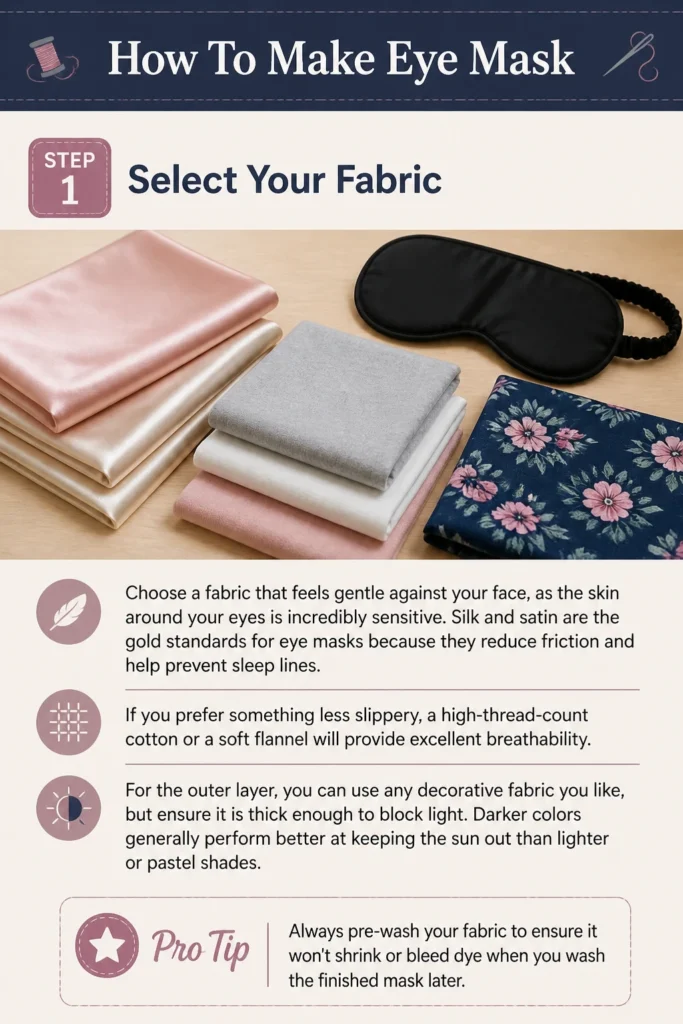
Silk and satin are the gold standards for eye masks because they reduce friction and help prevent sleep lines.
If you prefer something less slippery, a high-thread-count cotton or a soft flannel will provide excellent breathability.
For the outer layer, you can use any decorative fabric you like, but ensure it is thick enough to block light.
Darker colors generally perform better at keeping the sun out than lighter or pastel shades.
Pro Tip: Always pre-wash your fabric to ensure it won’t shrink or bleed dye when you wash the finished mask later.
Step 2: Create Your Pattern
Draft a template on a piece of cardstock or stiff paper to ensure your mask is symmetrical.
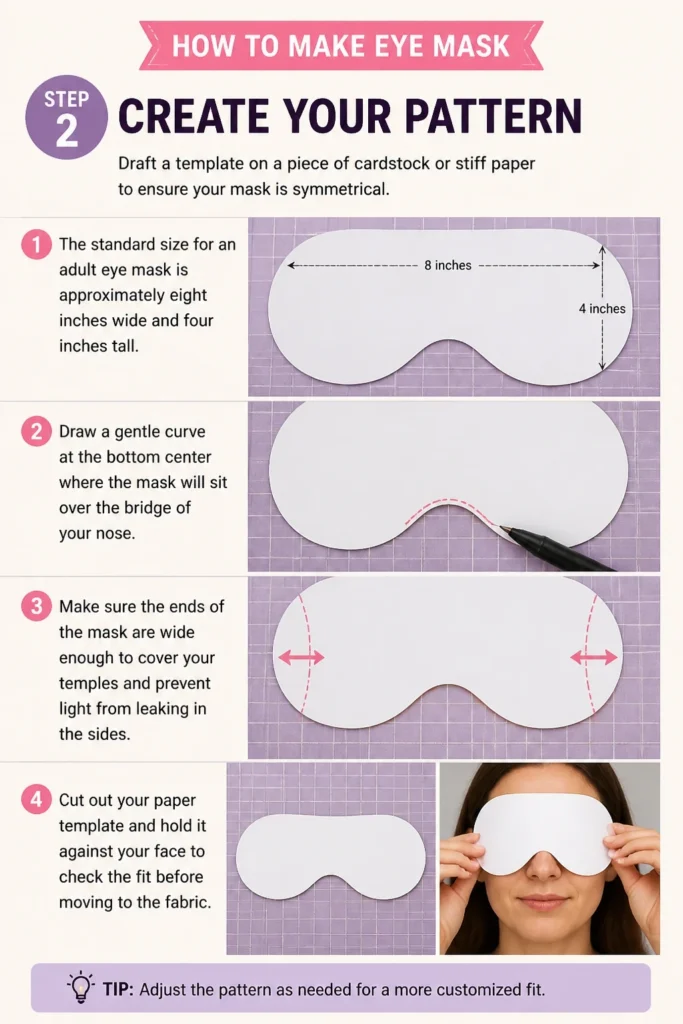
The standard size for an adult eye mask is approximately eight inches wide and four inches tall.
Draw a gentle curve at the bottom center where the mask will sit over the bridge of your nose.
Make sure the ends of the mask are wide enough to cover your temples and prevent light from leaking in the sides.
Cut out your paper template and hold it against your face to check the fit before moving to the fabric.
Step 3: Cut Your Fabric Pieces
Pin your paper template to the fabric to keep it from shifting while you work.
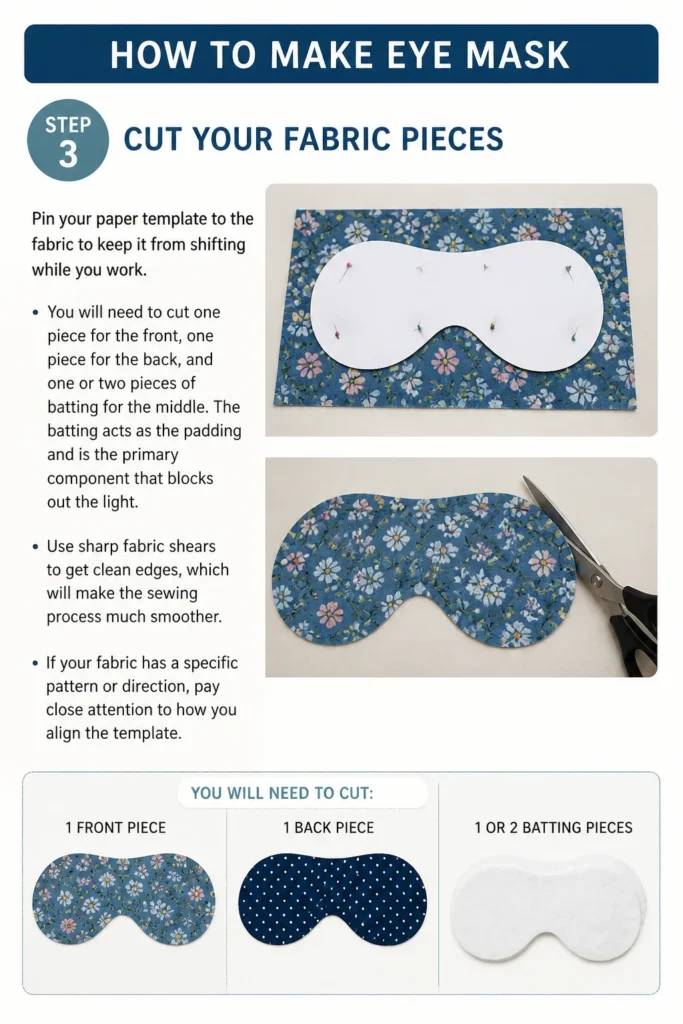
You will need to cut one piece for the front, one piece for the back, and one or two pieces of batting for the middle.
The batting acts as the padding and is the primary component that blocks out the light.
Use sharp fabric shears to get clean edges, which will make the sewing process much smoother.
If your fabric has a specific pattern or direction, pay close attention to how you align the template.
Step 4: Prepare the Padding
Trim about a quarter-inch off the edges of your batting pieces so they are slightly smaller than the fabric layers.
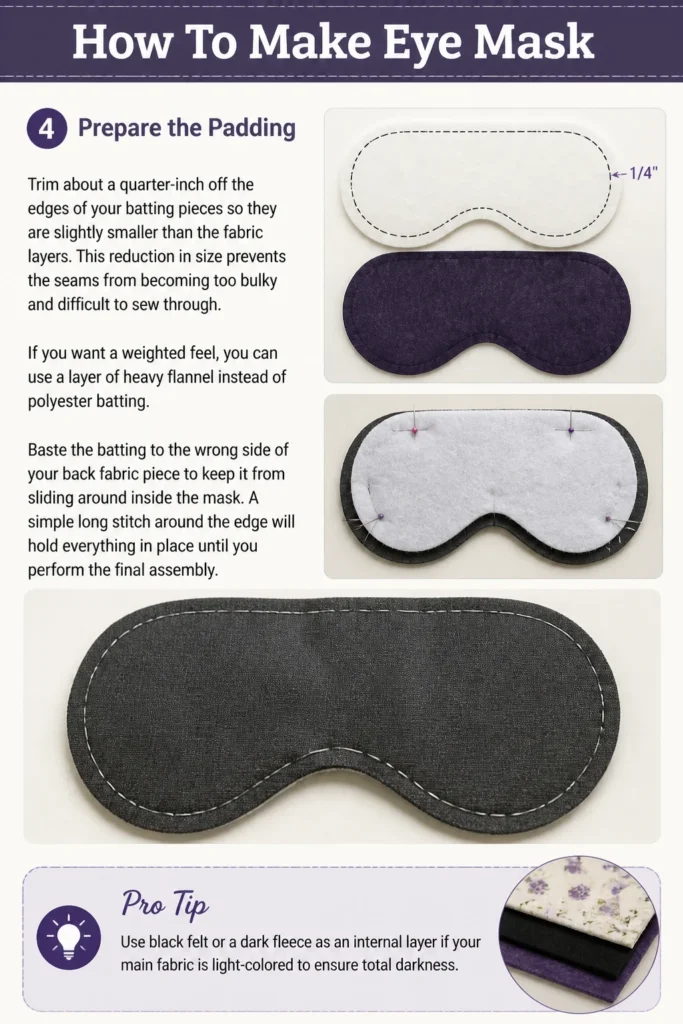
This reduction in size prevents the seams from becoming too bulky and difficult to sew through.
If you want a weighted feel, you can use a layer of heavy flannel instead of polyester batting.
Baste the batting to the wrong side of your back fabric piece to keep it from sliding around inside the mask.
A simple long stitch around the edge will hold everything in place until you perform the final assembly.
Pro Tip: Use black felt or a dark fleece as an internal layer if your main fabric is light-colored to ensure total darkness.
Step 5: Measure and Cut the Elastic
Measure the circumference of your head, starting from one temple, going around the back, and ending at the other temple.
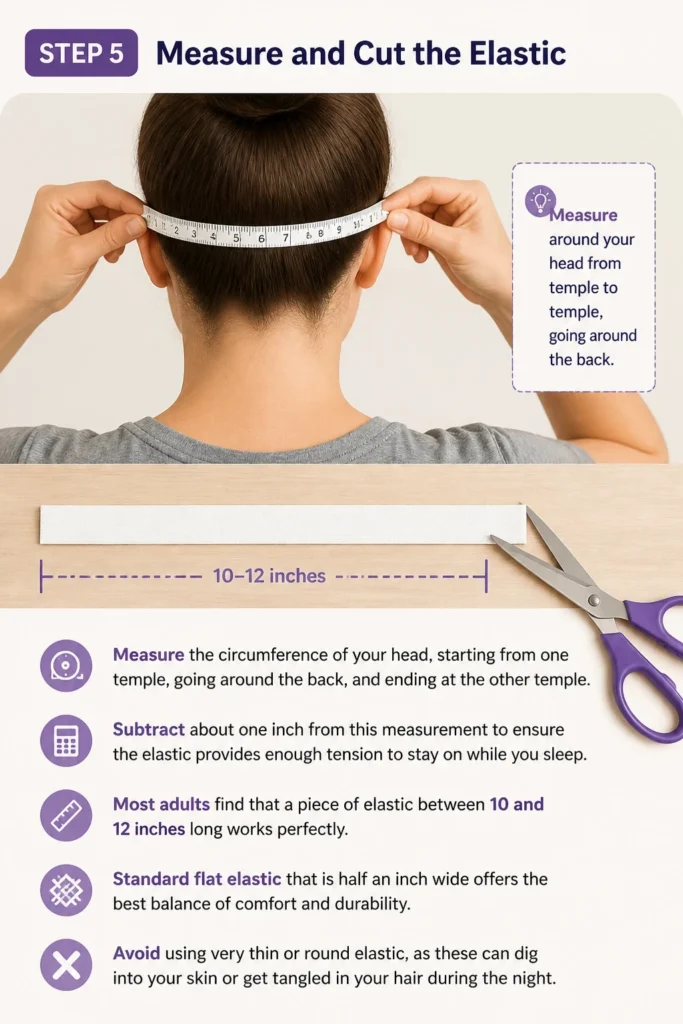
Subtract about one inch from this measurement to ensure the elastic provides enough tension to stay on while you sleep.
Most adults find that a piece of elastic between 10 and 12 inches long works perfectly.
Standard flat elastic that is half an inch wide offers the best balance of comfort and durability.
Avoid using very thin or round elastic, as these can dig into your skin or get tangled in your hair during the night.
Step 6: Layer the Components
Place your front fabric piece on the table with the “right” side (the pretty side) facing up toward you.
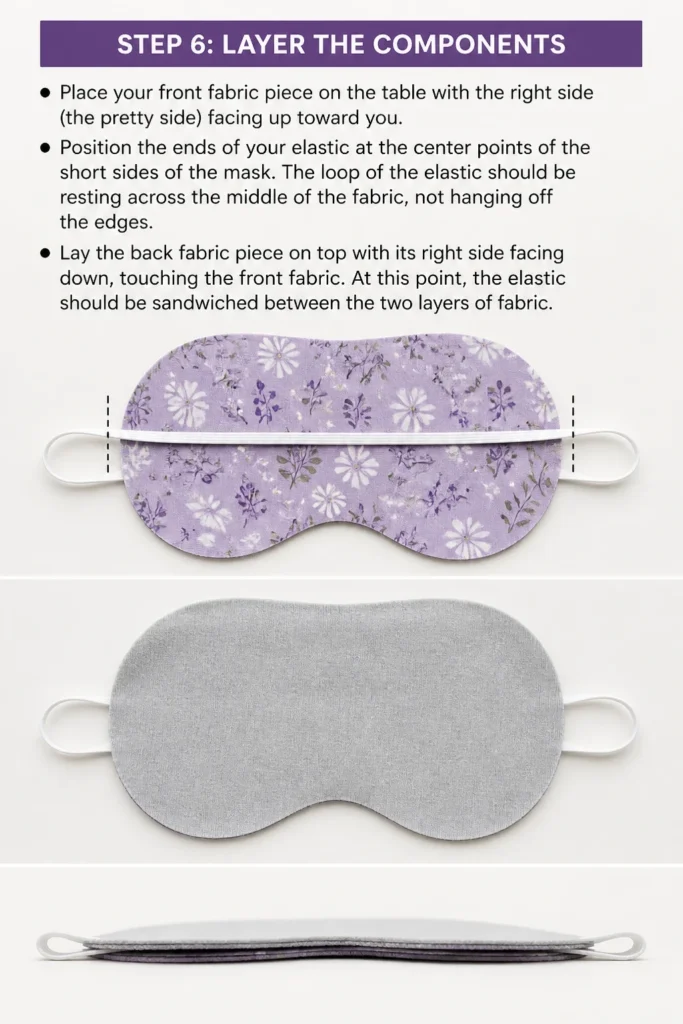
Position the ends of your elastic at the center points of the short sides of the mask.
The loop of the elastic should be resting across the middle of the fabric, not hanging off the edges.
Lay the back fabric piece on top with its “right” side facing down, touching the front fabric.
At this point, the elastic should be sandwiched between the two layers of fabric.
Step 7: Pin and Secure
Insert pins around the entire perimeter of the mask, making sure the elastic ends are firmly secured in their spots.
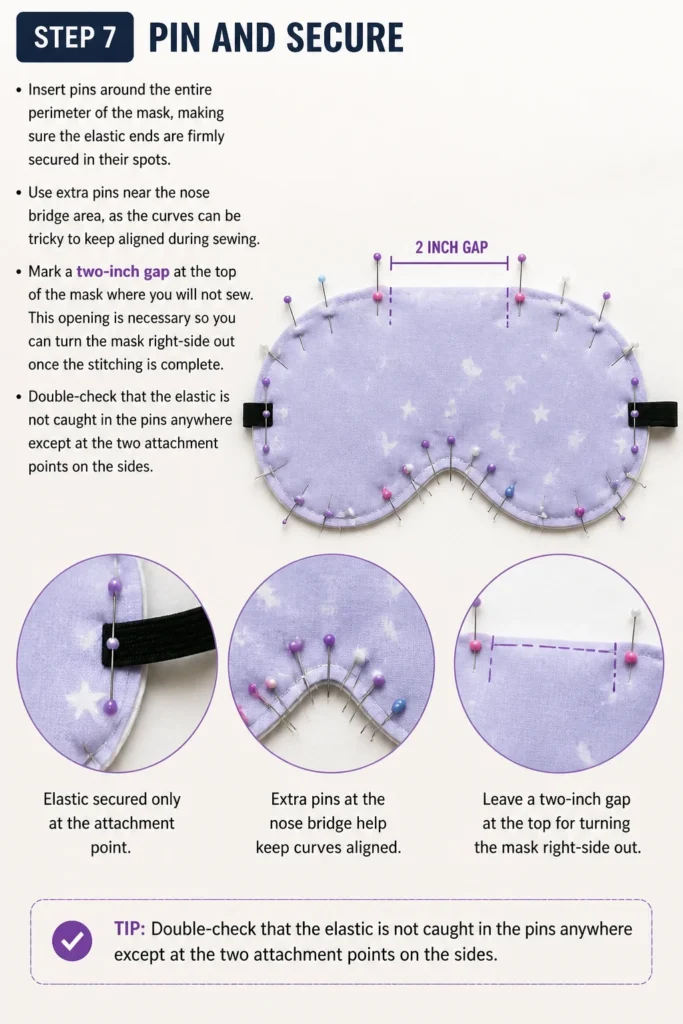
Use extra pins near the nose bridge area, as the curves can be tricky to keep aligned during sewing.
Mark a two-inch gap at the top of the mask where you will not sew.
This opening is necessary so you can turn the mask right-side out once the stitching is complete.
Double-check that the elastic is not caught in the pins anywhere except at the two attachment points on the sides.
Step 8: Sew the Perimeter
Stitch around the edge of the mask using a quarter-inch seam allowance, following the shape of your template.
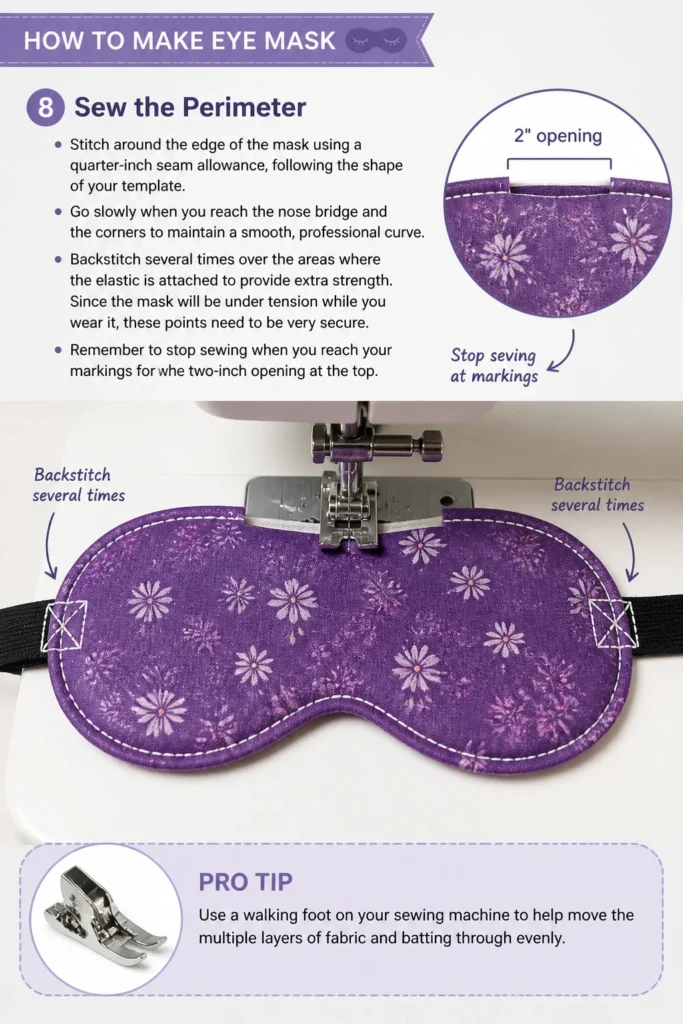
Go slowly when you reach the nose bridge and the corners to maintain a smooth, professional curve.
Backstitch several times over the areas where the elastic is attached to provide extra strength.
Since the mask will be under tension while you wear it, these points need to be very secure.
Remember to stop sewing when you reach your markings for the two-inch opening at the top.
Pro Tip: Use a walking foot on your sewing machine to help move the multiple layers of fabric and batting through evenly.
Step 9: Trim and Turn
Clip small V-shaped notches into the seam allowance around the curved sections of the mask.
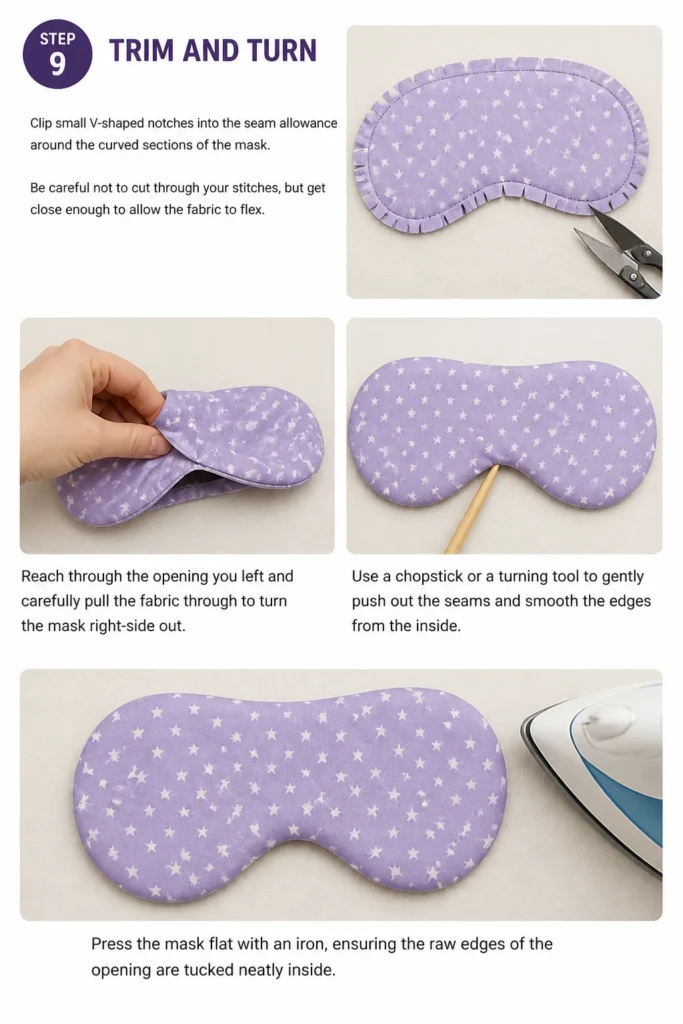
Be careful not to cut through your stitches, but get close enough to allow the fabric to flex.
Reach through the opening you left and carefully pull the fabric through to turn the mask right-side out.
Use a chopstick or a turning tool to gently push out the seams and smooth the edges from the inside.
Press the mask flat with an iron, ensuring the raw edges of the opening are tucked neatly inside.
Step 10: Close the Opening
Finish the mask by sewing the opening shut using a needle and thread for an invisible look.
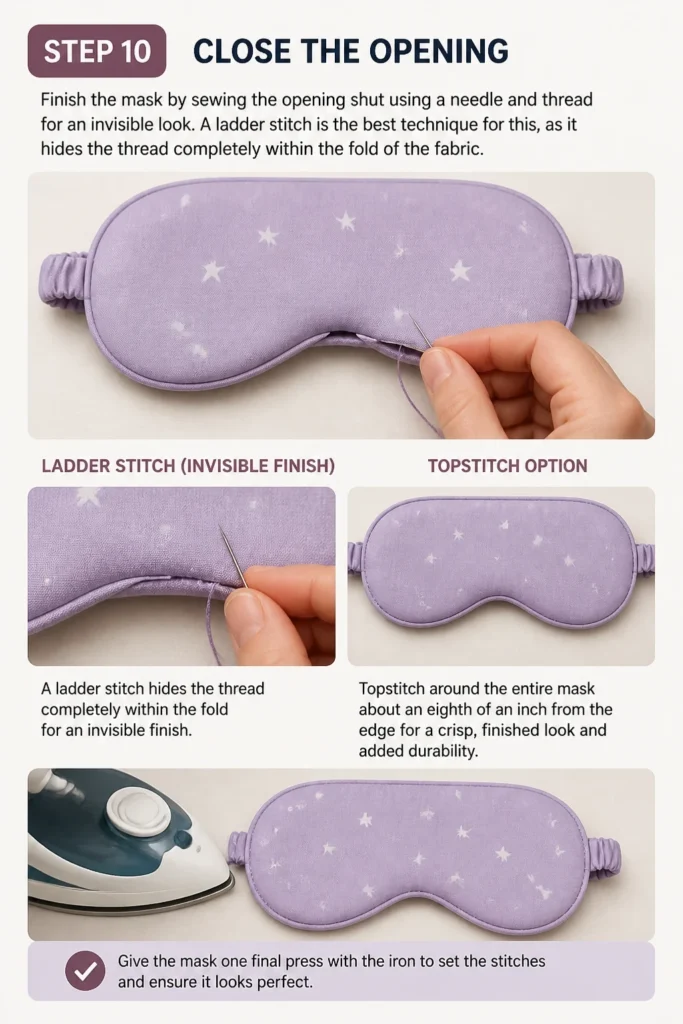
A ladder stitch is the best technique for this, as it hides the thread completely within the fold of the fabric.
Alternatively, you can topstitch around the entire mask about an eighth of an inch from the edge.
Topstitching gives the mask a crisp, finished appearance and helps the layers stay flat after washing.
Give the mask one final press with the iron to set the stitches and ensure it looks perfect.
Common Mistakes to Avoid
Using the Wrong Elastic Tension
If the elastic is too short, the mask will press against your eyelids and cause discomfort or blurry vision when you wake up. Conversely, elastic that is too loose will cause the mask to slide off your face the moment you roll over in bed. Always test the length against your head before sewing it into the final seam.
Ignoring the Fabric Grain
Cutting your fabric pieces on the bias or at odd angles can cause the mask to warp and stretch unevenly over time. Try to align your pattern with the straight grain of the fabric to ensure the mask maintains its shape after multiple uses. This is especially important when working with woven fabrics like cotton or linen.
Skipping the Ironing Process
Sewing through multiple layers of fabric and batting creates bulk that can look messy if not managed properly. Pressing your seams at every stage of the process helps the fabric lay flat and makes the final turning much easier. A well-pressed mask looks professional and feels much more comfortable against the bridge of your nose.
Troubleshooting
Light Leaking Near the Nose
If you notice light coming in through the bottom of the mask, the nose bridge curve may not be deep enough for your face shape. You can fix this by adding a small piece of flexible wire, like a pipe cleaner or a nose bridge strip, inside the seam. Sew a small channel for the wire so you can mold the mask to the exact shape of your nose.
Elastic Pulling Out of the Seam
This usually happens when the elastic wasn’t caught deeply enough in the seam or the stitching wasn’t reinforced. To fix this without taking the whole mask apart, tuck the elastic back into the side opening and use a tight zigzag stitch to secure it. Make sure you sew through all layers of fabric to provide a sturdy anchor point.
The Mask Feels Too Hot
If you wake up feeling sweaty, your batting or fabric choice may not be breathable enough for your climate. Synthetic polyester batting traps heat, so try replacing it with a layer of cotton flannel or a thin wool felt. Switching the side that touches your skin to 100% natural silk can also significantly improve temperature regulation.
Key Takeaways
- Natural fibers like silk and cotton provide the best comfort and skin protection.
- A paper template ensures symmetry and allows you to test the fit before cutting fabric.
- Sandwiching the elastic between fabric layers creates a clean, professional finish.
- Clipping the curves is a mandatory step for achieving smooth, rounded edges.
- A light-blocking inner layer is essential for the mask to function effectively in bright rooms.
- Topstitching or using a ladder stitch provides a durable and aesthetic final touch.
Frequently Asked Questions
How often should I wash my handmade eye mask?
You should wash your eye mask at least once a week if you wear it every night. Oils from your skin and hair, as well as sweat and nighttime skincare products, can build up on the fabric. Frequent washing prevents breakouts and keeps the fabric feeling fresh against your eyes.
Can I add scents like lavender to the mask?
Yes, you can place a small sachet of dried lavender or flax seeds inside the mask before you sew the final opening shut. If you use seeds or herbs, make sure the mask is not washable, or create a small removable pouch. Lavender can promote deeper relaxation and help you fall asleep faster.
What is the best way to wash a silk eye mask?
Silk is a delicate protein fiber and should be hand-washed in cool water with a gentle detergent. Avoid wringing the mask out, as this can damage the fibers and cause the batting to clump. Lay it flat on a clean towel and air dry it away from direct sunlight to maintain the integrity of the fabric.
Our Top Recommended Finds
- Rotary Cutter and Mat: These tools allow for much more precise cutting of curves than standard scissors.
- 100% Mulberry Silk Fabric: Investing in high-quality silk will make your mask feel like a luxury spa product.
- Soft Braided Elastic: This type of elastic is designed to be comfortable against the skin and won’t lose its stretch quickly.
Begin Your Journey To Better Sleep
Now that you have the skills to create a custom eye mask, you can experiment with different fabrics and weights to find your perfect fit.
Making your own sleep accessories is a rewarding way to improve your health and well-being through better rest.
Consider making a few extra masks to keep in your travel bag or to give as thoughtful, handmade gifts to friends.
Take a moment today to look through your fabric scraps and start your first mask project.