
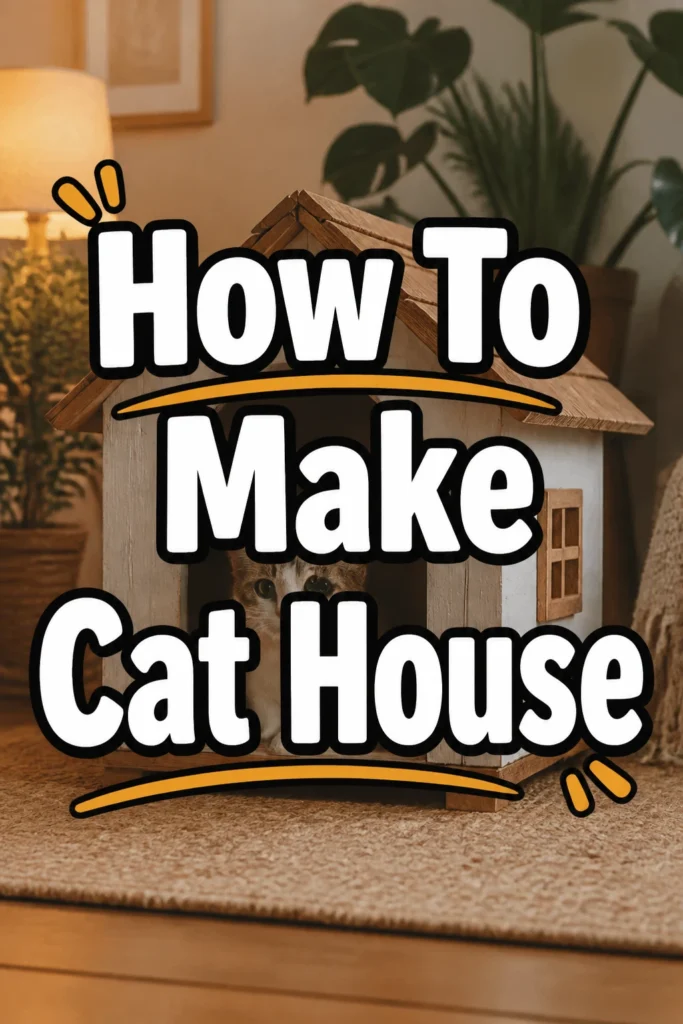
How To Make Cat House
Creating a cozy shelter for a feline friend is a rewarding project.
I’ve built a few cat houses over the years, learning what truly makes a difference for their comfort and safety.
This guide shares my practical experience to help you craft the perfect retreat for your cat.
Quick Overview
This guide will walk you through building a sturdy, comfortable cat house, perfect for both indoor and outdoor use. You’ll learn how to select materials, assemble the structure, and add finishing touches that your cat will adore.
- Time needed: 4-6 hours
- Difficulty: Beginner to Intermediate
- What you’ll need: Plywood, insulation, roofing material, basic tools, and pet-safe paint.
Step-by-Step Instructions
Step 1: Plan Your Cat House Design
Before cutting any materials, envision the ideal cat house for your specific needs. Consider your cat’s size and the climate it will be exposed to.
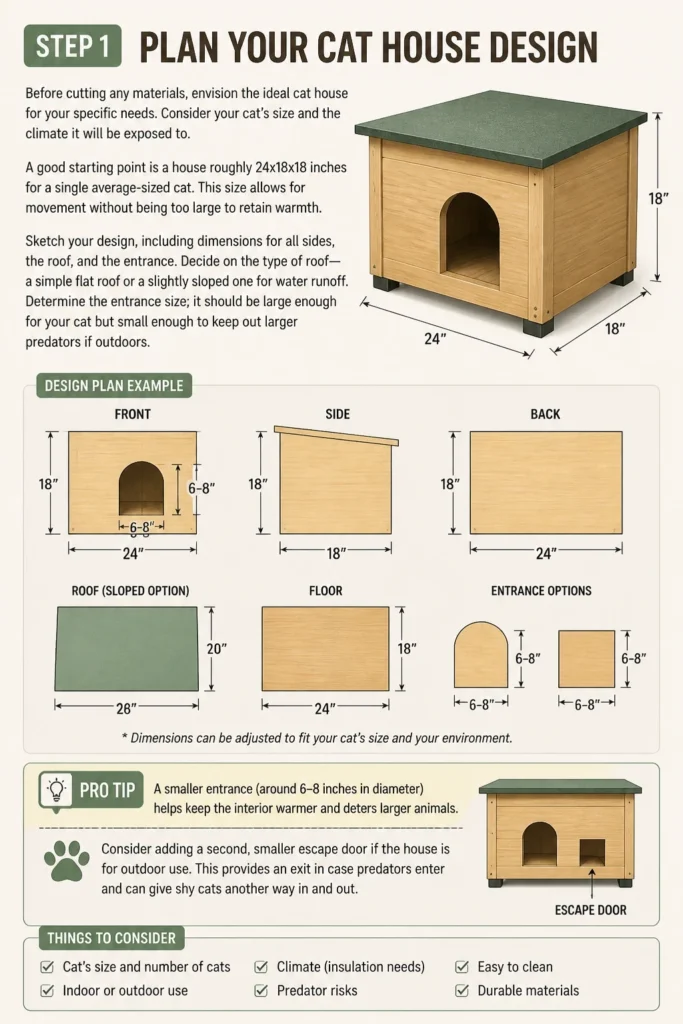
A good starting point is a house roughly 24x18x18 inches for a single average-sized cat. This size allows for movement without being too large to retain warmth.
- Sketch your design, including dimensions for all sides, the roof, and the entrance.
- Decide on the type of roof: a simple flat roof or a slightly sloped one for water runoff.
- Determine the entrance size; it should be large enough for your cat but small enough to keep out larger predators if outdoors.
Pro Tip: A smaller entrance (around 6-8 inches in diameter) helps keep the interior warmer and deters larger animals. Consider adding a second, smaller escape door if the house is for an outdoor cat in an area with potential predators.
Step 2: Gather Your Materials and Tools
Having everything ready before you start cutting makes the building process smooth and efficient. Quality materials ensure durability.
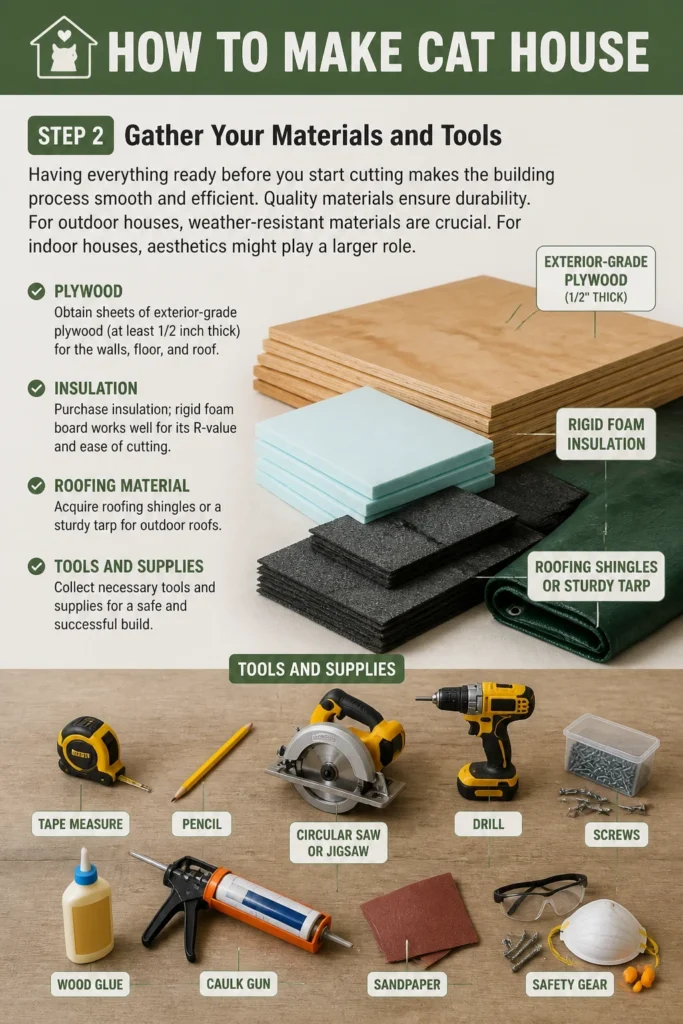
For outdoor houses, weather-resistant materials are crucial. For indoor houses, aesthetics might play a larger role.
- Obtain sheets of exterior-grade plywood (at least 1/2 inch thick) for the walls, floor, and roof.
- Purchase insulation; rigid foam board works well for its R-value and ease of cutting.
- Acquire roofing shingles or a sturdy tarp for outdoor roofs.
- Collect necessary tools: tape measure, pencil, circular saw or jigsaw, drill, screws, wood glue, caulk gun, sandpaper, and safety gear.
Step 3: Cut the Plywood Panels
Accurate cuts are essential for a stable and easy-to-assemble structure. Double-check all measurements before making your cuts.
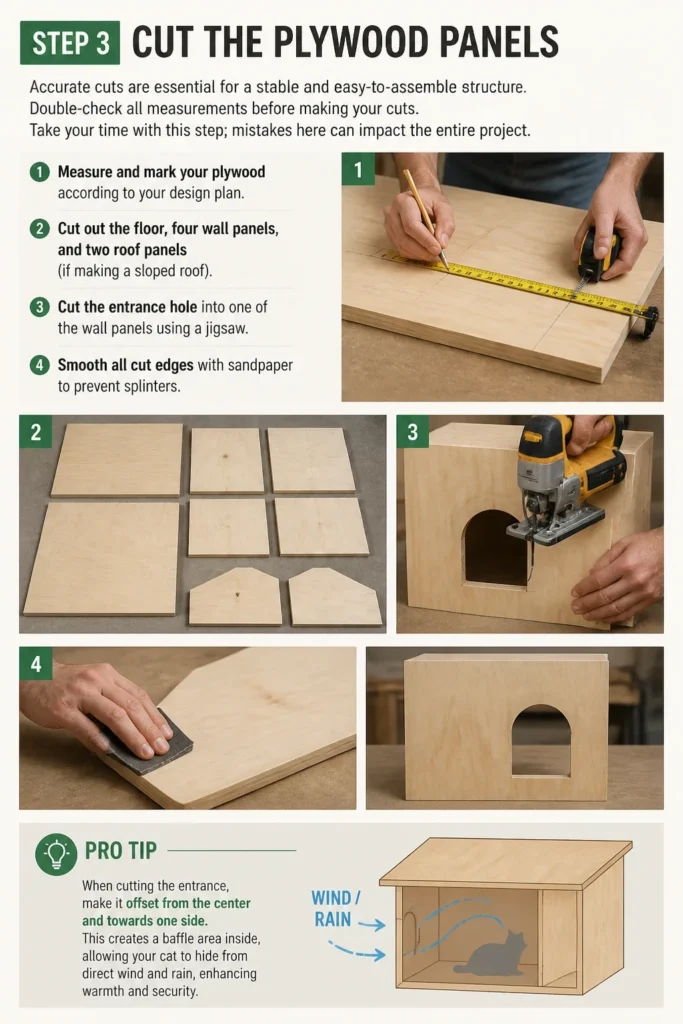
Take your time with this step; mistakes here can impact the entire project.
- Measure and mark your plywood according to your design plan.
- Cut out the floor, four wall panels, and two roof panels (if making a sloped roof).
- Cut the entrance hole into one of the wall panels using a jigsaw.
- Smooth all cut edges with sandpaper to prevent splinters.
Pro Tip: When cutting the entrance, make it offset from the center and towards one side. This creates a “baffle” area inside, allowing your cat to hide from direct wind and rain, enhancing warmth and security.
Step 4: Assemble the Base and Walls
This is where your cat house starts to take shape. A strong base is fundamental for the entire structure.
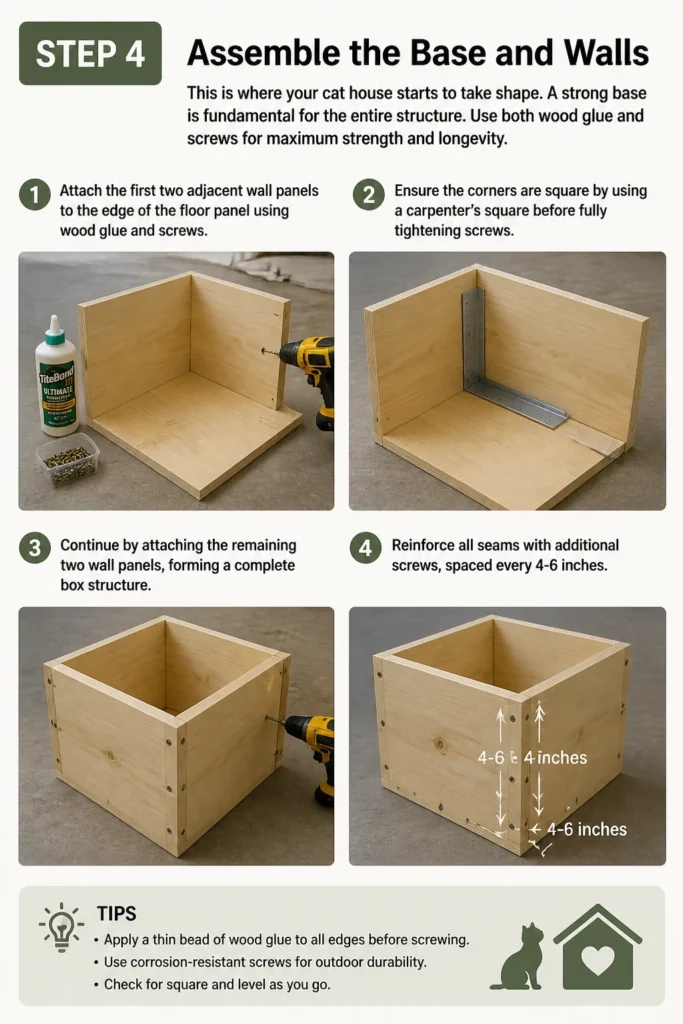
Use both wood glue and screws for maximum strength and longevity.
- Attach the first two adjacent wall panels to the edge of the floor panel using wood glue and screws.
- Ensure the corners are square by using a carpenter’s square before fully tightening screws.
- Continue by attaching the remaining two wall panels, forming a complete box structure.
- Reinforce all seams with additional screws, spaced every 4-6 inches.
Step 5: Add Insulation
Insulation is key to keeping your cat warm in winter and cool in summer. This step significantly improves comfort.
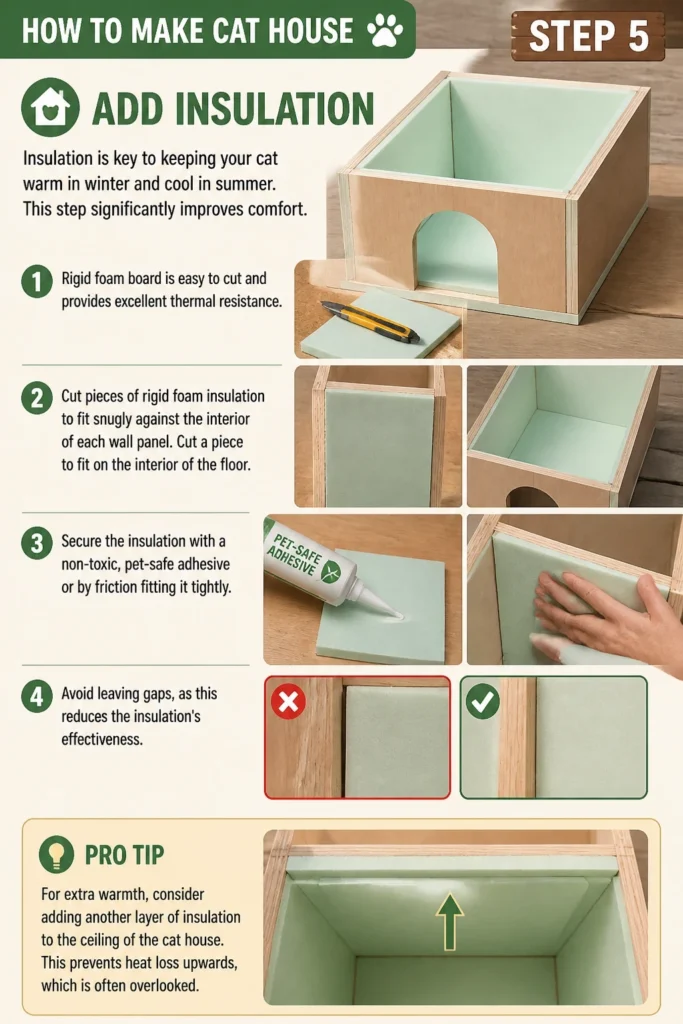
Rigid foam board is easy to cut and provides excellent thermal resistance.
- Cut pieces of rigid foam insulation to fit snugly against the interior of each wall panel.
- Cut a piece to fit on the interior of the floor.
- Secure the insulation with a non-toxic, pet-safe adhesive or by friction fitting it tightly.
- Avoid leaving gaps, as this reduces the insulation’s effectiveness.
Pro Tip: For extra warmth, consider adding another layer of insulation to the ceiling of the cat house. This prevents heat loss upwards, which is often overlooked.
Step 6: Install the Roof
The roof protects the interior from elements and completes the structure. A sloped roof offers better water drainage.
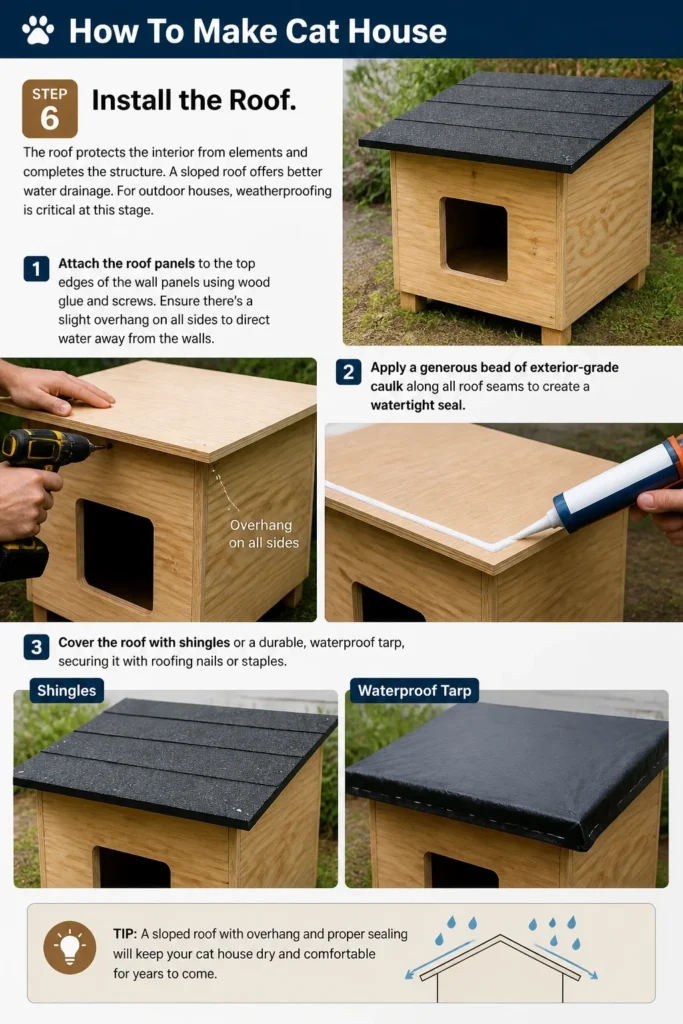
For outdoor houses, weatherproofing is critical at this stage.
- Attach the roof panels to the top edges of the wall panels using wood glue and screws.
- Ensure there’s a slight overhang on all sides to direct water away from the walls.
- Apply a generous bead of exterior-grade caulk along all roof seams to create a watertight seal.
- Cover the roof with shingles or a durable, waterproof tarp, securing it with roofing nails or staples.
Step 7: Finish and Personalize
Finishing touches make the cat house more appealing and durable. This is also where you can add flair.
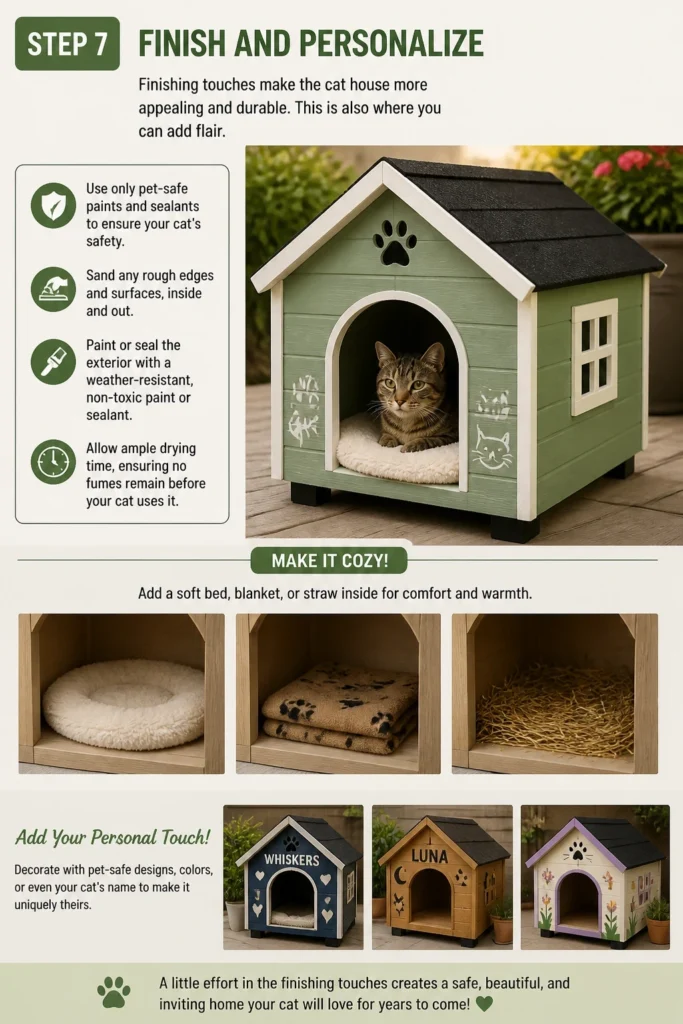
Use only pet-safe paints and sealants to ensure your cat’s safety.
- Sand any rough edges and surfaces, inside and out.
- Paint or seal the exterior with a weather-resistant, non-toxic paint or sealant.
- Allow ample drying time, ensuring no fumes remain before your cat uses it.
- Add a soft bed, blanket, or straw inside for comfort and warmth.
Common Mistakes to Avoid
Using Toxic Materials
Many paints, glues, and sealants contain chemicals harmful to pets. Cats often chew or lick surfaces, so anything used must be explicitly labeled as pet-safe or non-toxic. Always read product labels carefully and err on the side of caution to protect your cat’s health.
Making the Entrance Too Large
While you want your cat to enter comfortably, an overly large entrance compromises insulation and security. It allows too much heat to escape in winter and can let in larger animals or drafts. Aim for an opening just big enough for your cat, typically 6-8 inches in diameter.
Skipping Insulation
Without proper insulation, an outdoor cat house becomes a cold box in winter and a hot oven in summer. This defeats the purpose of providing shelter. Insulation, especially rigid foam board, is a relatively inexpensive addition that dramatically improves the house’s functionality and your cat’s comfort.
Ignoring Weatherproofing
An outdoor cat house needs to withstand rain, snow, and wind. Failing to caulk seams, use exterior-grade plywood, or properly shingle the roof will lead to water damage, mold, and a very uncomfortable, wet cat. Invest time in proper weatherproofing for longevity and safety.
Troubleshooting
Cat Won’t Use the House
Sometimes cats are wary of new things. Place a familiar blanket or toy inside to make it smell more inviting. You can also try sprinkling some catnip inside. Ensure the house is in a quiet, safe location where your cat feels secure and not exposed to constant disturbances.
House Feels Drafty
Drafts usually indicate unsealed gaps. Inspect all seams, especially around the floor, walls, and roof, for any openings. Use exterior-grade caulk to seal any visible cracks or gaps. A small flap over the entrance can also significantly reduce drafts and help retain heat.
Interior Gets Damp
Dampness often comes from inadequate weatherproofing or poor ventilation. Check the roof for leaks, reinforcing shingles or tarps if needed. Ensure all exterior seams are properly caulked. If condensation is the issue, a small, sheltered vent hole near the top of the house (away from direct rain) can improve airflow without causing drafts.
Key Takeaways
- Planning is Crucial: Sketch your design and measure carefully before cutting any materials.
- Prioritize Insulation: Rigid foam insulation makes a huge difference in regulating temperature inside the house.
- Weatherproof Thoroughly: For outdoor houses, use exterior-grade materials and seal all seams completely.
- Ensure Pet Safety: Use only non-toxic paints, glues, and sealants.
- Small Entrance is Better: A smaller door helps retain heat and deters larger animals.
- Add Comfort: A soft bed or straw inside will encourage your cat to use its new home.
Frequently Asked Questions
What is the best material for a cat house?
Exterior-grade plywood (at least 1/2 inch thick) is excellent for its durability and resistance to weather. For insulation, rigid foam board is highly recommended. For roofing, asphalt shingles or a heavy-duty waterproof tarp work well.
How big should the entrance hole be?
For an average adult cat, an entrance hole of 6 to 8 inches in diameter is ideal. This size allows easy entry for your cat while helping to keep out larger animals and retain warmth inside the house.
Do I need to insulate an indoor cat house?
While not as critical as for an outdoor house, insulation can still enhance comfort. It helps maintain a more consistent temperature, making the house feel cozier. If the indoor space tends to get chilly or warm, insulation is a good idea.
How do I keep the cat house from blowing away in strong winds?
For outdoor houses, add weight to the floor using bricks or paving stones inside, under the floor, or securely attach the house to a heavier base. You can also anchor it to the ground using stakes or by placing it against a sturdy structure like a fence.
Our Top Recommended Finds
- Exterior-Grade Plywood: Offers excellent durability and weather resistance for a long-lasting structure.
- Rigid Foam Insulation Boards: Easy to cut and provides superior thermal regulation for year-round comfort.
- Pet-Safe Exterior Paint: Ensures the house is protected from elements without exposing your cat to harmful chemicals.
Build Comfort, Build Shelter
Building a cat house is more than just a DIY project; it’s a gesture of care for your feline companion. You’re creating a safe, warm, and personal space where they can feel secure and loved.
By following these steps, you’ll construct a durable and welcoming retreat that will serve your cat for years to come. Don’t wait; gather your tools and start building a haven for your beloved pet today.